Welcome Spring with a Feast for the Eyes and the Appetite!
Hey friends, Beau here! Is there anything better than that first truly warm, sunshine-drenched day of spring? The birds are chirping, the flowers are peeking out, and suddenly, all I want to eat is food that looks as bright and cheerful as the world outside my window. That’s where the magic of a Spring Grazing Board comes in. Forget the rulebook—this isn’t just a cheese plate. It’s a sprawling, edible celebration of the season, designed for lazy afternoons, joyful gatherings, and yes, absolutely for snapping that perfect, envy-inducing photo for your feed.
I know what you might be thinking: “Beau, that looks complicated. I’m not a food stylist!” But trust me on this. Building a stunning grazing board is less about precision and more about joyful abundance. It’s about piling high the berries that taste like candy, showcasing cheeses in pretty pastel shades, and tucking in little surprises that make your guests smile. Whether you’re hosting Easter brunch, a baby shower, a garden party, or just treating yourself to a beautiful weekend snack, this board is your ticket to feeling like a culinary rockstar with minimal stress. So, grab your biggest board or platter, and let’s create something downright gorgeous together.
A Board Born from Berry Stains and Happy Chaos
My love for these sprawling feasts started years ago, back when my idea of hosting was inviting three friends over and nervously serving a slightly-lopsided lasagna. One particularly glorious spring Saturday, the plan was a simple picnic. But of course, I got carried away. I started pulling things from the fridge: some leftover herbed goat cheese from a dinner party, a half-pint of strawberries that were almost too perfect to eat, a bag of pistachios, and the last bits of a baguette. Instead of packing it neatly, I just threw it all on a big wooden cutting board and carried it outside.
The result was pure magic. We sat in the grass, sun on our faces, laughing and grazing for hours. There were no plates, just us passing the board around, dipping bread into honey, making outrageous cheese-and-berry combos. My friend’s toddler meticulously ate every single raspberry, staining her fingers pink with glee. It was messy, imperfect, and utterly perfect. That afternoon taught me that the best food isn’t about fussy recipes; it’s about creating a vibe. It’s about setting out a beautiful invitation to connect, to relax, and to savor the season, one delicious bite at a time. This Spring Grazing Board is my love letter to that day.
Gathering Your Spring Bounty: A Guide to Ingredients
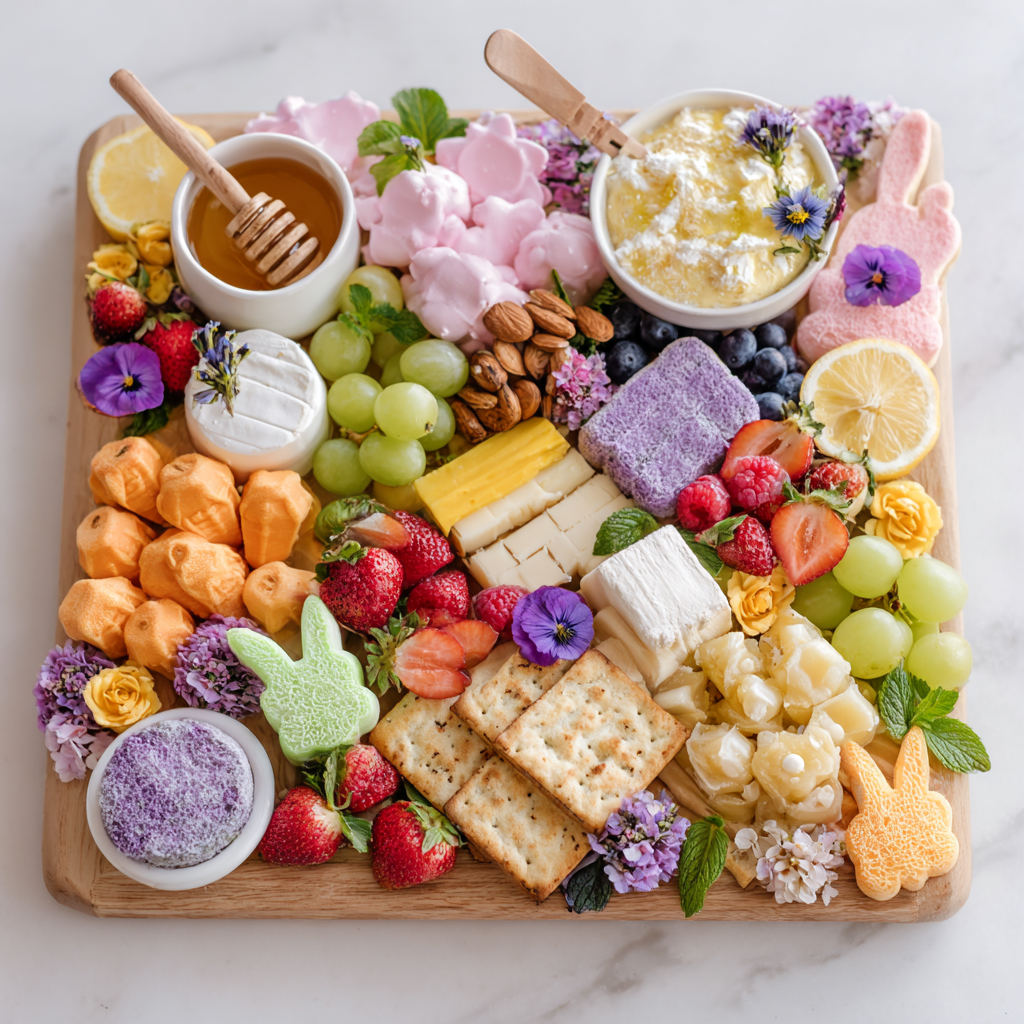
Here’s the beautiful part: this isn’t a strict recipe, it’s a blueprint. Use this list as inspiration and swap in what looks good at your market or what you already love. The goal is variety in color, texture, and flavor—something creamy, crunchy, sweet, salty, and fresh!
- Lavender-Infused Goat Cheese: This is our star! Its subtle floral notes just scream spring. Chef’s Insight: If you can’t find it, buy plain goat cheese and roll it in dried edible lavender or a mix of herbs de provence.
- Lemon Ricotta or Ricotta Dollop: Bright, creamy, and slightly tangy. Spoon it into a small bowl and drizzle with olive oil and lemon zest. Sub Tip: Mascarpone or whipped cream cheese with a squeeze of lemon works beautifully too.
- White Cheddar Cubes: A reliable, crowd-pleasing sharpness. Cutting it into cubes makes it easy to grab. Chef’s Hack: Use a crinkle cutter for fun, wavy edges that catch the light!
- Edible Flower-Topped Brie: The showstopper. A wheel of brie looks incredible adorned with pressed edible flowers (find them in the produce section or online). Insight: Don’t stress the flowers—a ring of halved grapes or a pool of jam on top is just as lovely.
- Fresh Berries & Fruit: Strawberries, raspberries, blueberries. Add green grapes, sliced kiwi, or mango for color contrast. Pro Tip: Keep berries whole for a lush, abundant look and slice larger fruits for easy eating.
- Carrot-Shaped Crackers & Baguette Toasts: The playful crunch! Many stores sell veggie-shaped crackers seasonally. No luck? Use a small cookie cutter on slices of cheddar or just grab your favorite butter crackers.
- Candied Pecans or Pistachios: Sweet, salty, crunchy. They fill gaps and add texture. Easy Swap: Toasted almonds or honey-roasted peanuts are fantastic.
- Honeycomb & Fruit Preserves: Liquid gold! Honeycomb is visually stunning. A small jar of local honey or some vibrant raspberry jam is equally delicious for drizzling and dipping.
- White Chocolate Bark & Pastel Candies: Sweet, whimsical finishes. Break bark into chunks. Those pastel candy-coated chocolates are a nostalgic, colorful touch.
- Edible Flowers & Fresh Herbs: The final confetti! Pansies, violets, or small mint and basil leaves add professional flair and fresh flavor. Key Note: Only use flowers labeled as “edible.”
Building Your Masterpiece: A Step-by-Step Guide
Okay, let’s build! Clear a big space on your counter. Have all your ingredients prepped (cheeses cut, fruits washed, etc.) and let’s dive in. Remember, there are no mistakes here—only delicious choices.
- Anchor Your Vessels. Start by placing any bowls or small dishes onto your board. This is your foundation. Tuck your bowl of lemon ricotta and your jar of honey or preserves in opposite corners or slightly off-center. These act as anchors that everything else will flow around.
- Place the Cheeses. Arrange your cheeses around the board. Put the brie wheel proudly in an open space. Scatter the white cheddar cubes in a little cluster. Place the lavender goat cheese log on its side, maybe next to a knife. Give each cheese its own little “home” with room around it.
- Add the Fruit for Color Pops. Now, bring in the vibrancy! Create small piles or gentle cascades of berries. Fan the strawberry slices or kiwi. Let the reds, blues, and greens create a rainbow effect between the cheeses. Don’t be shy—fruit is your best friend for filling space beautifully.
- Incorporate the Crunch. Time for crackers and bread! Fan out your baguette toasts in a line or curve. Nestle the carrot crackers in a fun group spilling out of a bowl or tucked next to the brie. This adds height and variety.
- Fill the Gaps with Goodies. Here’s where the board comes to life. Sprinkle those candied pecans in any empty spaces. They’re like the edible glue that ties areas together. Add clusters of pistachios for a different green hue.
- Add Sweet Touches & Garnish. Artfully place chunks of white chocolate bark. Scatter a few pastel candies. Now, the magic final touch: tuck in fresh mint sprigs and sprinkle edible flowers over everything. This is what takes it from “snack plate” to “work of art.”
- Step Back and Assess. Literally, take three steps back and look at your board. See any huge gaps? Fill them with a few extra berries or nuts. Is there a color missing? Maybe add a few slices of green apple for a fresh pop. Adjust until it feels lush and abundant.
How to Serve Your Spring Grazing Board Like a Pro
Presentation is half the fun! Place your finished board in the center of a table, preferably where the natural light is best (for those photos, of course!). I like to put out a stack of small plates, plenty of napkins (spring-themed ones if you’re feeling festive!), and a bunch of cheese knives, spreaders, and small spoons for the honey and jams. Encourage everyone to dig in with their hands—it’s part of the communal, relaxed vibe.
For drinks, I love pairing this with a crisp rosé, a light Prosecco, or a big pitcher of sparkling water with lemon and cucumber slices. The key is to create an environment where people feel free to linger, chat, and keep coming back for “just one more cracker and a swipe of that amazing cheese.”
Make It Your Own: Delicious Twists & Swaps
The beauty of a grazing board is its versatility. Here are a few ways to mix it up:
- The Herbivore’s Dream: Add more veggie power! Include blistered snap peas, roasted rainbow baby carrots with the tops on, radishes with salt for dipping, and a bowl of green olive tapenade.
- Coastal Spring Vibes: Swap in smoked salmon or trout, a bowl of lemon-dill cream cheese, capers, and some thinly sliced cucumber rounds for building pretty bites.
- Sweeten the Deal (Dessert Board): Turn it into a full dessert! Feature mini cupcakes, macarons, chocolate-dipped strawberries, shortbread cookies, and multiple bowls of dipping sauces like chocolate and caramel.
- Go Gluten-Free: Easily done! Use gluten-free crackers and breads. Ensure any candies or processed items are GF. Load up on extra nuts, fruits, and cheeses for plenty of options.
- Mediterranean Spring: Focus on olives, marinated artichoke hearts, hummus, dolmas, pepperoncini, and slices of salty feta cheese. Use pita chips and fresh pita bread for scooping.
Beau’s Kitchen Confidential: Notes from My Counter
Over the years, I’ve learned a few unspoken rules for grazing board success. First, let your cheeses sit out for about 30 minutes before serving. They taste a million times better at room temperature! Second, don’t fear empty space. In food styling, they call it “negative space,” and it lets each beautiful item shine. Crowding everything together is the only real mistake you can make.
This board has evolved from my haphazard picnic into my go-to hosting secret. I’ve built them on baking sheets lined with parchment for huge crowds, and on tiny slate boards for intimate date nights. The principle is always the same: abundance, color, and joy. The most common compliment I get? “It looks too pretty to eat!” But trust me, once someone bravely takes that first cracker, the board will be demolished in the best way possible.
Your Questions, Answered!
Q: How far in advance can I assemble this?
A: You can prep all your components 1 day ahead (wash/cut fruit, cube cheese, toast bread, etc.) and store them separately in airtight containers in the fridge. Assemble the full board no more than 1 hour before guests arrive so crackers stay crisp and fruit stays fresh.
Q: Help! My board looks sparse and not lush.
A: This is the #1 worry, and the fix is easy: add more of what you already have! Double up on berry clusters. Add another handful of nuts. Fill a small ramekin with extra candies or olives. Abundance is key. Also, drape green grapes in vines rather than piling them—they take up more visual space beautifully.
Q: What’s the best board to use?
A: A large wooden cutting board, a marble slab, or even a clean ceramic platter all work wonderfully. For a budget-friendly option, a large, unpainted wooden tray or a piece of clean, food-safe slate is perfect.
Q: How do I handle leftovers?
A: Carefully deconstruct! Store cheeses, fruits, and meats separately in the fridge. Crackers and nuts go in airtight containers at room temperature. Most items will be good for 1-2 more days.
A Note on Nourishment & Balance
While I’m all about indulgence, I love that a grazing board naturally offers a balance of nutrients. You’ve got calcium and protein from the cheeses, vitamins and antioxidants from the fresh fruits, healthy fats from the nuts, and complex carbs from the crackers and bread. It’s the perfect example of how eating a variety of foods can be both incredibly satisfying and wonderfully nourishing. Listen to your body—dive into the creamy brie, but also enjoy the crisp, juicy berries. It’s all about the mix, and that’s what makes this such a feel-good way to eat and share.
Print
Spring Grazing Board : A Picture-Perfect Platter Full of Seasonal Charm
Description
When the weather turns warm and everything starts to bloom, it’s the perfect excuse to serve food that’s just as colorful and joyful as the season. A Spring Grazing Board is less of a strict recipe and more of a creative guide — a mix of cheeses, fruits, crunchy bites, and sweet touches arranged beautifully on one big board. It’s easy, flexible, and perfect for brunches, picnics, and family get-togethers.
Instructions
1️⃣ Place Small Bowls First
Add bowls for ricotta, honey, jam, or olives. Spread them out — they act as visual anchors.
2️⃣ Add Cheeses
Set whole cheeses (like brie) first, then place sliced or cubed cheeses nearby. Leave a little space around each type.
3️⃣ Arrange Fruit
Create small piles of berries and clusters of grapes between cheeses. Fan sliced fruit for color and shape.
4️⃣ Add Crackers & Bread
Fan crackers in curved lines and tuck bread slices along edges to add height and structure.
5️⃣ Fill Gaps with Nuts & Extras
Sprinkle nuts, olives, and small snacks into empty spaces to make the board look full and abundant.
6️⃣ Finish with Sweets & Garnish
Add chocolate pieces and candies last. Tuck in herbs or edible flowers for a fresh spring look.
7️⃣ Step Back & Adjust
Fill any empty spots with extra berries or nuts. Variety and fullness make the board look professional.
Notes
-
Let cheeses sit at room temperature for 20–30 minutes before serving for best flavor.
-
Keep colors balanced — spread bright items across the board, not all in one spot.
-
Pre-cut anything firm so guests can grab easily.
-
Use odd numbers of items (3 cheeses, 5 fruit types) — it looks more natural.
-
If your board looks sparse, add more small items (nuts, berries, crackers). That fixes it fast.
Final Thoughts
So there you have it, friends—your blueprint for creating a Spring Grazing Board that’s as fun to make as it is to eat. Remember, my first board was born from leftovers and a desire to be outside. It wasn’t perfect, but it was made with joy. That’s the only ingredient that truly matters.
I can’t wait to see what you create in your own kitchen. Tag me @Feastical or use #FeasticalSpringBoard when you share your gorgeous creations. Let’s inspire each other! Now, go raid your fridge, hit the farmer’s market, and get building. Here’s to long, lazy spring afternoons filled with good food and even better company. Happy grazing!
Cheers,
Beau