Sourdough Discard Pretzel Bites: Golden, Soft & Irresistible
The Happy Accident That Became a Kitchen Hero
Hey friends, Beau here from Feastical! Let’s be real for a second. If you’re a sourdough enthusiast like me, you’ve probably found yourself in a weekly standoff with a jar of discard. You love the tangy flavor it promises, but you hate the idea of wasting it. It sits there in the fridge, a quiet, bubbly reminder of your baking ambitions. Do you make another loaf? Pancakes? Waffles? Again?
Well, I’m about to hand you the ultimate solution—a recipe so good, so universally beloved, you might start *hoping* for extra discard. I’m talking about Sourdough Discard Pretzel Bites. Imagine the soft, pillowy inside of a perfect pretzel, with that distinctive, shiny, golden-brown crust that gives way to a satisfying, chewy bite. Now, infuse it with the subtle, complex tang of your sourdough starter. That’s what we’re making today.
These little nuggets of joy are more than just a snack; they’re a kitchen experience. They’re perfect for game day, movie night, or just because it’s Tuesday and you deserve a warm, salty treat. They come together with surprisingly little fuss, and the act of boiling the dough before baking—the secret to that iconic pretzel texture—is downright magical to watch. So, let’s roll up our sleeves, rescue that discard from the fridge, and make something spectacular together.
My First Pretzel & Why These Bites Just Make Sense
My love affair with pretzels started not in a bakery, but at a baseball game. I was a kid, and the smell of warm, doughy pretzels and yellow mustard was more intoxicating than the popcorn or the hot dogs. It was pure, simple, carb-loaded joy. Fast forward to my early days of sourdough baking, and I was determined to capture that magic at home.
My first from-scratch pretzel attempt was… ambitious. Shaping those classic knots was a comedic exercise in dough-ropes-gone-wild. They looked less like elegant pretzels and more like abstract art. Delicious abstract art, but still. That’s when the “bite-sized” lightbulb went off. By cutting the dough into small pieces, I eliminated the shaping stress entirely. Suddenly, pretzel-making became accessible, fast, and incredibly fun. Adding my sourdough discard was the final masterstroke—it gave the dough incredible flavor and tenderness, and it solved my “what do I do with this?” dilemma in the most delicious way possible. These bites are the happy marriage of childhood nostalgia and my grown-up chef’s desire to use every last bit of goodness in the kitchen.
Gathering Your Cast of Characters
Here’s everything you’ll need to bring these pretzel bites to life. Don’t stress if you’re missing an item or two—I’ve got notes and swaps for you right here.
- 1 cup + 2 tbsp warm water: Think baby-bottle warm, not hot. Too hot and it’ll upset the yeast. If you don’t have a thermometer, it should feel pleasantly warm on your wrist.
- 1 tbsp brown sugar: This is the yeast’s favorite snack, helping it wake up and get bubbly. It also adds a whisper of molasses depth. White sugar works in a pinch!
- 1¼ tsp active dry yeast: The little engine that makes our dough rise. Make sure yours isn’t ancient for the best results.
- 200g (about ¾ cup) sourdough discard: This is our star! Use it straight from the fridge. Its acidity adds fantastic flavor and softness. Chef’s Insight: The hydration of your starter can vary. If your dough seems too wet, add a sprinkle more flour. Too dry? A teaspoon of extra water.
- 4 cups all-purpose flour: The trusty workhorse. For a slightly chewier bite, you can swap in one cup of bread flour.
- 2 tsp salt: Crucial for flavor. I use fine sea salt in the dough. Save the coarse stuff for topping.
- 4 tbsp melted butter: Adds richness and makes the crumb incredibly tender. For a dairy-free version, olive oil or a neutral oil like avocado works beautifully.
- 2 quarts water + ½ cup baking soda (for boiling): This is the **magic step**! The alkaline bath is what gives pretzels their distinctive, deep-brown, flavor-packed crust. Don’t skip it!
- 1 egg yolk + 1 tbsp water (for egg wash): The final touch for that professional, glossy sheen. A little milk or cream can be used instead of the egg wash if needed.
Let’s Get Our Hands Doughy: The Step-by-Step
Ready to create some magic? Follow these steps, and don’t forget to read my little chef hacks along the way—they make all the difference!
Step 1: Wake Up the Yeast. In a large mixing bowl, combine the warm water, brown sugar, and yeast. Give it a quick stir and walk away for 5-10 minutes. You want to see a foamy, creamy layer on top—this is your sign that the yeast is alive and ready to party! Chef Hack: If your kitchen is cold, let this mixture sit in the oven with just the light on for a cozy, draft-free spot.
Step 2: Bring the Dough Together. To the yeasty water, add your sourdough discard, flour, and salt. Mix with a wooden spoon or dough hook until it’s a shaggy mess. Now, stream in the melted butter. Keep mixing until a rough dough forms.
Step 3: Knead to Perfection. Turn the dough out onto a lightly floured surface. Knead for about 5 minutes. You’re not aiming for windowpane perfection like with bread; you just want a smooth, soft ball of dough that’s not sticky. If it sticks to your hands, add a tiny bit more flour. Chef Hack: Set a timer! It’s easy to over-knead, and 5 minutes of steady, rhythmic kneading is usually just right.
Step 4: The First Rise. Place your lovely dough ball into a lightly greased bowl, turn it once to coat, and cover it with a damp kitchen towel or plastic wrap. Let it rise in a warm spot for about 1 hour, or until roughly doubled in size. Don’t fret over the clock—go by the dough, not the timer.
Step 5: Shape the Bites. Punch down the dough (the most satisfying step!) and turn it out. Divide it into 8 equal pieces. Roll each piece into a rope about ¾-inch thick. No need to be precise! Using a bench scraper or a sharp knife, cut each rope into 10-ish bite-sized pieces. Chef Hack: Don’t roll the ropes too thin, or you’ll end up with tiny, dense bites. Plump ropes make plump, soft bites.
Step 6: The Infamous Baking Soda Bath. Preheat your oven to a hot 450°F (230°C). Line two baking sheets with parchment paper. In a large, wide pot (a Dutch oven is perfect), bring the 2 quarts of water and ½ cup of baking soda to a rolling boil. It will foam up—that’s normal! Working in batches, gently drop about 10-15 dough pieces into the boiling water. They’ll sink, then float to the top in about 30 seconds. That’s your cue! Use a slotted spoon to transfer them to your prepared baking sheets.
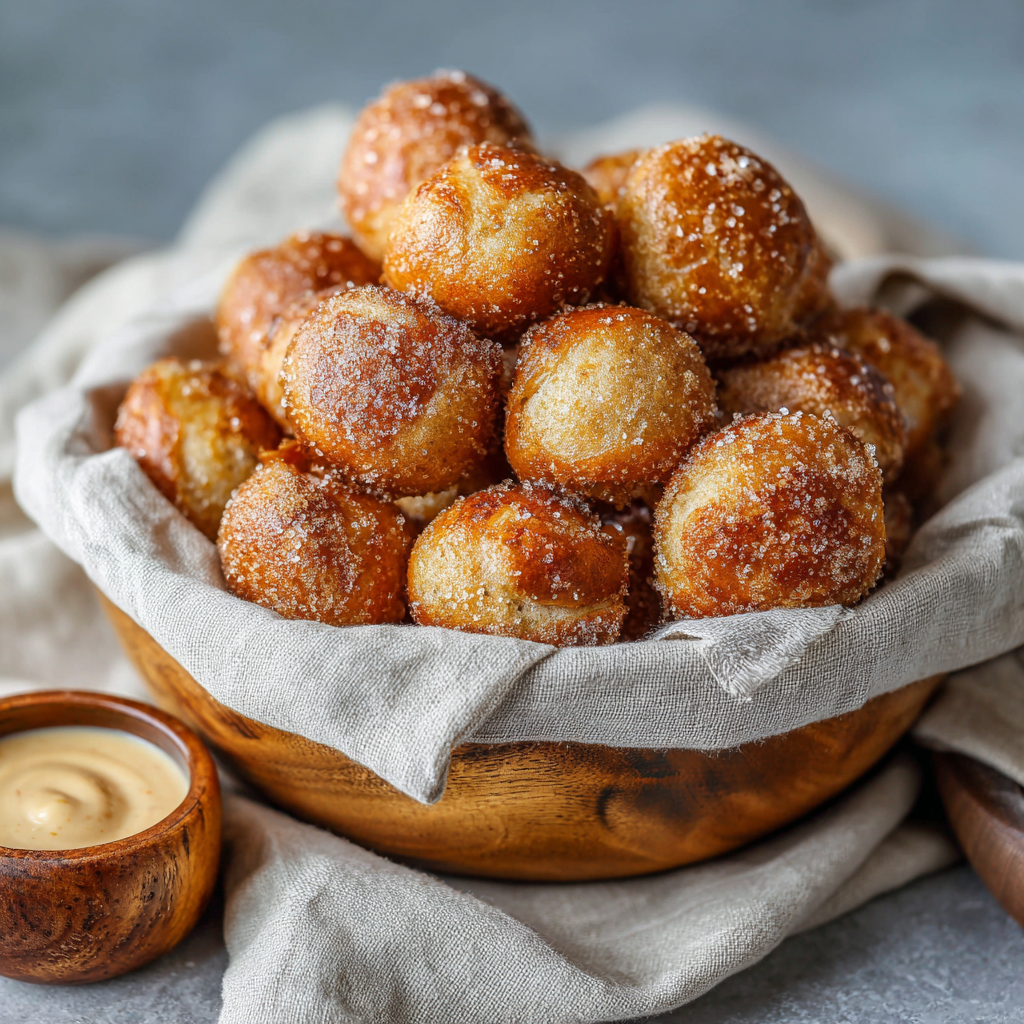
Step 7: Top and Bake. Whisk the egg yolk with a tablespoon of water and brush it generously over every bite. This is your glue for toppings! Sprinkle immediately with coarse salt (or cinnamon sugar if you’re going sweet). Bake for 12-15 minutes, rotating the pans halfway, until they are a deep, glorious golden brown.
How to Serve These Little Clouds of Joy
Pull them from the oven and try to resist eating one immediately (I never can). The ideal way to serve these is warm, piled high in a big bowl or on a wooden board. For the classic experience, serve with a side of spicy brown mustard or a simple cheese sauce for dipping (a warm beer cheese sauce is next-level). If you went the cinnamon sugar route, a bowl of vanilla cream cheese frosting or even just a dusting of powdered sugar is divine.
They’re the ultimate shareable food for a crowd, but honestly, making a batch just for yourself with a good book and a cup of coffee is a perfect form of self-care. They’re best the day they’re made, but if you have leftovers, see my Chef’s Notes for the best way to bring them back to life!
Make It Your Own: 5 Tasty Twists
The basic recipe is a blank canvas! Here are some of my favorite ways to play with it:
- Everything Bagel Bliss: Before baking, top with an everything bagel seasoning mix. The onion, garlic, sesame, and poppy seeds are a savory match made in heaven.
- Cheddar Jalapeño Popper: Knead 1 cup of shredded sharp cheddar and ¼ cup of finely diced pickled jalapeños into the dough after the first rise. Top with a little extra cheese before baking.
- Sweet Cinnamon Sugar Swirl: After rolling out the dough ropes, brush them with melted butter and sprinkle heavily with a cinnamon-sugar mix. Fold the rope over itself, roll slightly to seal, then cut into bites. After baking, roll the warm bites in more cinnamon sugar.
- Garlic Parmesan Herb: Brush the baked bites with garlic butter (melted butter + minced garlic) and immediately toss in a bowl with grated Parmesan and dried Italian herbs.
- Whole Grain Twist: Substitute 1.5 cups of the all-purpose flour with whole wheat or rye flour for a heartier, nuttier flavor. You may need a touch more water.
Beau’s Kitchen Notes & Stories
This recipe has been a work in progress for years. The first time I made them, I was so excited I forgot the salt in the dough. They were… sad. Lesson learned! I also learned that the baking soda bath isn’t as scary as it seems. Yes, it foams, but just use a big pot and you’re golden (literally).
Over time, I’ve started adding the butter *after* the initial mix, which seems to create a more tender crumb. And if I’m planning ahead, I sometimes let the shaped bites do a slow, cold rise in the fridge overnight. I boil and bake them straight from the fridge the next day—the flavor is even more complex! To reheat leftovers, a quick 5-minute stint in a 350°F oven or a 30-second zap in the microwave brings them right back. A quick brush of water before reheating in the oven helps revive the crust.
Your Questions, Answered
Q: My dough didn’t rise much. What happened?
A: The most common culprits are old yeast or liquid that was too hot, which can kill the yeast. Always test your yeast in step one to ensure it’s active. Also, a cold kitchen can slow the rise—find a warmer spot!
Q: Can I skip the baking soda boil?
A: Technically, yes, but you’ll lose the classic pretzel flavor, color, and chewy crust. They’ll be more like soft dinner rolls. The bath is what makes a pretzel a pretzel!
Q: My pretzel bites are dense, not soft and airy.
A: This usually means the dough was over-kneaded or, more likely, the first rise wasn’t long enough. Let the dough truly double in size. Also, make sure you’re not using discard that is *extremely* old and acidic, as this can weaken the gluten over time.
Q: Can I freeze these?
A> Absolutely! Freeze the baked and cooled bites on a tray, then transfer to a bag. Reheat from frozen in a 375°F oven for 10-12 minutes. You can also freeze the shaped, unboiled/unbaked dough pieces on a tray, then bag them. Boil and bake straight from frozen, adding a few extra minutes to the bake time.
Quick Nutrition & Prep Info
Prep Time: 20 minutes | Cook Time: 15 minutes | Rise Time: 1 hour | Total Time: ~1 hour 35 minutes | Servings: 8 (about 80 bites)
Estimated nutrition per serving (about 10 bites, plain with salt):
Calories: ~230 | Fat: 6g | Carbohydrates: 38g | Protein: 6g | Sodium: ~500mg (varies with topping)
Note: This is an estimate provided by an online nutrition calculator. Values can vary significantly based on specific ingredients used and topping choices.
Go Forth and Bake with Joy!
And there you have it, friends—your new secret weapon for sourdough discard and your next guaranteed party hit. What I love most about this recipe is how it turns something considered a “waste product” into the star of the show. It’s a little lesson in kitchen thrift and a huge lesson in deliciousness.
I hope you have as much fun making these as I do. Don’t forget to tag me @Feastical if you share your creations online—I love seeing your kitchen triumphs! Now, go grab that jar of discard, put on some good music, and get ready for your kitchen to smell like a professional bakery. Happy baking!
Print
Sourdough Discard Pretzel Bites: Golden, Soft & Irresistible
Description
These Sourdough Discard Pretzel Bites are the perfect way to turn extra sourdough discard into a warm, salty snack everyone loves. They’re soft and fluffy on the inside, chewy on the outside, and baked to a beautiful golden brown. With a quick dough, a simple baking-soda bath, and endless topping options, they’re ideal for game day, parties, or cozy nights at home.
Ingredients
Dough
-
1 cup + 2 tbsp warm water
-
1 tbsp brown sugar
-
1¼ tsp active dry yeast
-
200 g (about ¾ cup) sourdough discard (unfed)
-
4 cups all-purpose flour
-
2 tsp salt
-
4 tbsp butter, melted
Baking Soda Bath
-
2 quarts water
-
½ cup baking soda
Topping
-
1 egg yolk + 1 tbsp water (egg wash)
-
Coarse salt (or toppings of choice)
Instructions
-
Activate the Yeast
In a large bowl, mix warm water, brown sugar, and yeast. Let sit 5–10 minutes until foamy. -
Make the Dough
Add sourdough discard, flour, and salt. Mix until shaggy, then stir in melted butter. Knead on a floured surface for about 5 minutes until smooth and soft. -
First Rise
Place dough in a greased bowl, cover, and let rise in a warm spot for about 1 hour, or until doubled. -
Shape the Bites
Punch down dough. Divide into 8 pieces, roll each into a rope, and cut into bite-sized pieces. -
Boil
Preheat oven to 450°F (230°C). Bring water and baking soda to a boil. Boil dough pieces in batches for about 30 seconds, then transfer to lined baking sheets. -
Bake
Brush with egg wash, sprinkle with salt, and bake for 12–15 minutes until deep golden brown. -
Serve
Enjoy warm with mustard, cheese sauce, or your favorite dip.
Notes
-
Don’t skip the baking soda bath – it’s key for classic pretzel flavor and color.
-
Too sticky dough? Add flour a tablespoon at a time.
-
Sweet version: Skip salt and sprinkle with cinnamon sugar after baking.
-
Best fresh: Reheat leftovers briefly in the oven to restore texture.
Final Thoughts
These Sourdough Discard Pretzel Bites are more than a recipe—they’re a celebration of the happy accidents and simple joys that make home baking so special. They transform that jar of “almost-waste” into a centerpiece of comfort, connection, and pure, uncomplicated delight.
Remember, baking is a conversation between you and your ingredients. Don’t be afraid to listen, adjust, and make these bites your own. Whether you keep them classic or venture into a cheesy, spicy, or sweet variation, you’re not just making a snack. You’re creating a moment: the shared laughter over a bowl of warm bites, the quiet satisfaction of a Tuesday treat, or the pride of mastering a technique that once seemed mysterious.
So, here’s to less waste, more flavor, and the kind of baking that feels like a hug. Your sourdough starter isn’t just a project anymore—it’s a gateway to endless possibilities, starting with these golden, irresistible bites.
Now, go rescue that discard and create something wonderful. I can’t wait to hear how it goes.
Happy baking,
Beau