
Your New Favorite Cookie is Here: Red Velvet Kiss Cookies!
Hey, friends! Beau here, welcoming you back to my kitchen. Is there anything better than the smell of cookies wafting from the oven? It’s like a universal signal that says, “Hey, everything’s going to be just fine.” And today, we’re baking up a batch of pure, unadulterated joy: my Soft & Chewy Red Velvet Kiss Cookies.
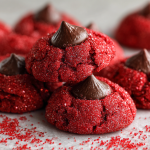
Picture this: a tender, cake-like red velvet cookie, rolled in sparkling red sugar for a little crunch, still warm from the oven. And right in the center, we’re tucking a creamy, melty Hershey’s Kiss that just takes the whole experience to another level. This isn’t just a cookie; it’s an event. It’s the cookie you bring to the party and watch disappear in minutes. It’s the treat you make for your kids and instantly become the coolest parent on the block. It’s a little bite of magic that’s perfect for Valentine’s Day, Christmas, or just a Tuesday that needs a splash of red.
Now, I know some of you might be thinking, “Beau, red velvet can be tricky!” But trust me on this one. We’re keeping it wonderfully simple. No fussy techniques, no hard-to-find ingredients. We’re using my favorite little chef hacks to ensure you get a soft, chewy, and absolutely stunning cookie every single time. So, tie on that apron, find your favorite mixing bowl, and let’s create some delicious memories together.
A Sweet Slice of Nostalgia
These cookies always take me right back to my grandma’s linoleum-floored kitchen. She wasn’t a fancy baker, but she was a powerhouse of love, and her signature move was hiding a little surprise inside her desserts. One blustery December, she decided her classic thumbprint cookies needed a “heart.” She didn’t have jam, but she did have a bag of chocolate kisses. She pressed one into a warm, red-tinted cookie, and a family legend was born.
We’d crowd around her table, still in our snow-damp coats, waiting for these ruby-red treasures to cool just enough to handle. That first bite—the slight resistance of the sugary shell giving way to the soft cookie and the warm, melting chocolate center—was pure childhood bliss. It taught me that the best recipes aren’t just about taste; they’re about the stories and the smiles they create. Every time I make these, I feel like I’m sharing a piece of her kitchen, and that’s a feeling I want to pass on to you.
Gathering Your Cookie Crew: The Ingredients
Let’s get our mise en place ready! (That’s just a fancy chef term for having all your ingredients prepped and measured. It makes everything flow so smoothly.) Here’s what you’ll need to gather. I’ve also included some of my favorite insights and swaps, because I believe in making recipes work for YOU.
- 7 tbsp Butter (softened): This is the heart of our cookie, providing that rich flavor and tender crumb. I use salted butter for a little flavor boost, but unsalted works perfectly too. Just make sure it’s softened to room temperature so it creams up beautifully with the sugar. If you’re in a pinch, you can gently soften it in the microwave for a few seconds, but be careful not to melt it!
- ½ cup Brown Sugar & 2 tbsp Granulated Sugar: This dynamic duo is key! The brown sugar gives us that moist, chewy texture and a hint of molasses warmth, while the little bit of granulated sugar helps with that slight crispness on the outside.
- 1 large Egg Yolk: We’re using just the yolk here for extra richness and a fudgier, more tender texture without making the cake too “eggy.” Save the white for a healthy omelet tomorrow morning!
- 1 tsp Vanilla Extract: The flavor enhancer! It rounds out the chocolate and buttery notes. Always use the real stuff if you can—it makes a world of difference.
- ¼ tsp Red Food Coloring Gel: I highly recommend gel over liquid food coloring. It’s more concentrated, so you get a vibrant red color without throwing off the liquid balance of your dough. Your hands will also thank you for being less stained!
- 1 cup All-Purpose Flour: The trusty foundation of our cookie. For a slightly softer cookie, you can fluff your flour with a spoon before measuring, then level it off with a knife to avoid packing too much in.
- 1 tbsp Cocoa Powder: This gives us that classic, subtle red velvet flavor. We’re not going for a deep chocolate hit here, just a lovely cocoa background. Natural, unsweetened cocoa powder is perfect.
- ½ tsp Baking Powder: Our leavening agent! This is what gives the cookies their gentle rise and soft, cake-like texture.
- ¼ tsp Salt: Never skip the salt! It’s the secret weapon that makes all the other flavors pop and balances the sweetness.
- ¼ cup Red Sanding Sugar: This is for that gorgeous, sparkling coating. It gives a wonderful little crunch with every bite. If you don’t have it, regular white sugar or even some festive sprinkles will work in a pinch.
- 18 Hershey’s Kisses, unwrapped: The star of the show! Unwrap them before you start so you’re ready to go when the cookies come out of the oven. It’s a great job for any little helpers in the kitchen.
Let’s Get Baking: The Step-by-Step Guide
Okay, team, this is where the magic happens. Follow these steps, and you’ll be a red velvet cookie hero in no time. I’m sprinkling in all my best tips along the way!
Step 1: Preheat and Prep. Fire up your oven to 350°F (175°C). Line a baking sheet with parchment paper. This is my non-negotiable hack for perfectly baked cookies—no sticking, easy cleanup, and even browning. Chef’s Tip: If you have a dark-colored baking sheet, consider reducing the oven temp by 25 degrees, as they tend to bake faster and can lead to darker bottoms.
Step 2: The Creaming Method. In a large bowl, cream together your softened butter, brown sugar, and granulated sugar. Now, “cream” doesn’t just mean “mix.” We want to beat it on medium-high speed for a good 2-3 minutes until it becomes pale, fluffy, and wonderfully smooth. This step is crucial because it incorporates air into the dough, which helps our cookies rise. Don’t rush it!
Step 3: The Wet Team Assembles. Beat in the vanilla extract, the single egg yolk, and that vibrant red food coloring gel. Mix it until the color is completely uniform. It should look like a bowl of delicious red velvet cake batter already. If the color isn’t as deep as you’d like, now is the time to add another tiny dab of gel.
Step 4: Whisk the Dry Goods. In a separate, medium-sized bowl, whisk together the flour, cocoa powder, baking powder, and salt. Whisking is important here—it ensures our leavening agents and cocoa are evenly distributed throughout the flour, so every cookie bakes up consistently.
Step 5: Bring It All Together. Gradually add the dry ingredients to the wet ingredients, mixing on low speed until *just* combined. I mean it—the moment you no longer see streaks of flour, STOP MIXING. Overmixing is the enemy of a tender cookie, as it develops the gluten in the flour and can make them tough.
Step 6: The Sugar Coating. Place your red sanding sugar in a small bowl. Using a cookie scoop or a tablespoon, portion the dough into 1-inch balls. Roll them between your palms to make them nice and round, then roll each one generously in the red sugar. This is where they get their gorgeous, jewel-like appearance!
Step 7: Bake to Perfection. Place the dough balls on your prepared baking sheet, spacing them about 2 inches apart. They don’t spread a ton, but they need their personal space! Bake for 8-10 minutes. They’re done when the edges are set and the tops are no longer glossy. They might look a little soft in the center—that’s exactly what we want! Chef’s Hack: For an extra-chewy cookie, slightly underbake them by a minute. They’ll finish setting up on the hot tray.
Step 8: The Grand Finale – The Kiss! As soon as you pull the baking sheet from the oven, it’s go-time. Working quickly but carefully, gently press a Hershey’s Kiss into the center of each warm cookie. You’ll see the cookie puff up around it beautifully. Don’t press too hard or you might crack the bottom.
Step 9: The Patience Test. Let the cookies cool on the baking sheet for a full 5 minutes. This allows them to set up so they don’t fall apart when you move them. Then, transfer them to a wire rack to cool completely. I know it’s hard, but try to let the chocolate set a bit before diving in!
How to Serve These Stunning Cookies
Presentation is part of the fun! I love piling these cookies high on a vintage cake stand or a simple wooden board. They look incredible all on their own. For a special touch, you can drizzle a little melted white chocolate over the top or add a few heart-shaped sprinkles around the base, especially for Valentine’s Day.
And what to serve with them? A tall glass of cold milk is the classic, unbeatable partner. For the adults, a rich cup of coffee or a latte complements the chocolate perfectly. These cookies also make the most adorable homemade gift. Tuck a few into a cellophane bag, tie it with a pretty ribbon, and you’ve got a present that’s straight from the heart.
Mix It Up! Fun Recipe Variations
Once you’ve mastered the classic, feel free to get creative! This dough is a fantastic canvas. Here are a few of my favorite twists:
- Peppermint Twist: Use a York Peppermint Pattie or an Andes Mint in the center instead of a Kiss. You can also add ¼ tsp of peppermint extract to the dough along with the vanilla for a real holiday vibe.
- White Chocolate Wonder: Swap the Hershey’s Kiss for a white chocolate kiss or a Hug. The contrast between the red cookie and the white chocolate is just gorgeous.
- Nutty Buddy: Press a roasted pecan or almond into the top alongside the Kiss for a little nutty crunch and flavor.
- Gluten-Free & Happy: You can easily use a 1:1 gluten-free all-purpose flour blend in place of the regular flour. I’ve had great results with brands like Bob’s Red Mill and King Arthur.
- Cream Cheese Surprise: Want to go next-level? Make a simple cream cheese filling by beating together 2 oz softened cream cheese, 2 tbsp powdered sugar, and a splash of vanilla. Flatten the dough ball, add a tiny dollop of this mixture, then seal the dough around it before rolling in sugar and baking. It’s a red velvet cheesecake in cookie form!
Beau’s Chef’s Notes
This recipe has been a fun one to evolve. I remember one time, in a pre-coffee haze, I accidentally used baking soda instead of baking powder. Let’s just say we ended up with very flat, very wide, and ironically, very tasty “red velvet cookie crisps.” We still ate them, of course! It was a great lesson in reading labels carefully.
Over the years, I’ve found that chilling the dough for 30 minutes before baking can help prevent a little bit of spreading if your kitchen is particularly warm, but it’s not strictly necessary for this recipe. The real key is nailing that creaming step and not overbaking. These cookies are wonderfully forgiving and always a crowd-pleaser.
Your Questions, Answered!
I’ve gotten a lot of questions about these cookies over the years, so here are the answers to the most common ones.
Q: My cookies spread too much. What happened?
A: This usually means your butter was too warm. It’s essential that it’s softened but not melted or greasy. If your kitchen is hot, pop the shaped dough balls in the fridge for 15-20 minutes before baking to firm up the butter.
Q: Can I make the dough ahead of time?
A: Absolutely! You can scoop and roll the dough balls, then freeze them on a tray before transferring to a freezer bag. When you’re ready to bake, just roll them in the red sugar (it sticks to the frozen dough perfectly) and add 1-2 minutes to the baking time. Fresh cookies on demand!
Q: My food coloring stained my hands. Help!
A> I feel your pain! Gel is better, but it can still stain. Wearing disposable food-safe gloves while rolling the dough is a game-changer. If you do get stained, a paste of baking soda and dish soap usually does the trick.
Q: The Kiss completely melted into the cookie. Why?
A> This means the cookies were likely a bit too hot when you pressed the Kiss in. Make sure you’re pressing them in *immediately* after removing from the oven, but if your cookies are very puffy and hot, it can happen. Letting them cool on the sheet for just 60 seconds first can help, but don’t wait too long or the cookie will set.
Red Velvet Kiss Cookies : Soft & Chewy with a Chocolate Center
Description
Hey friends! These Soft & Chewy Red Velvet Kiss Cookies are tender, cake-like red velvet cookies rolled in sparkling red sugar with a melty Hershey’s Kiss at the center. Perfect for Valentine’s Day, Christmas, or any day that needs a splash of red.
Ingredients
-
7 tbsp butter, softened (salted or unsalted)
-
½ cup brown sugar
-
2 tbsp granulated sugar
-
1 large egg yolk (save the white for another use)
-
1 tsp vanilla extract
-
¼ tsp red food coloring gel (use gel for vibrant color)
-
1 cup all-purpose flour
-
1 tbsp cocoa powder (unsweetened)
-
½ tsp baking powder
-
¼ tsp salt
-
¼ cup red sanding sugar (or regular sugar/festive sprinkles)
-
18 Hershey’s Kisses, unwrapped
Instructions
1. Preheat & Prep
-
Preheat oven to 350°F (175°C).
-
Line a baking sheet with parchment paper.
2. Cream Butter & Sugars
-
Beat the softened butter, brown sugar, and granulated sugar on medium-high speed for 2–3 minutes until pale and fluffy.
3. Add Wet Ingredients
-
Mix in vanilla extract, egg yolk, and red food coloring until fully combined and vibrant.
4. Whisk Dry Ingredients
-
In a separate bowl, whisk together flour, cocoa powder, baking powder, and salt.
5. Combine Wet & Dry
-
Gradually add dry ingredients to the wet on low speed, mixing just until combined. Stop once no streaks of flour remain.
6. Roll in Sugar
-
Scoop dough into 1-inch balls, roll between palms, then coat generously in red sanding sugar.
7. Bake
-
Place dough balls 2 inches apart on the baking sheet.
-
Bake 8–10 minutes, until edges are set and tops are no longer glossy. Slightly underbake for extra chewiness.
8. Add the Kiss
-
Immediately press a Hershey’s Kiss into the center of each warm cookie. Do not press too hard.
9. Cool
-
Cool on the baking sheet 5 minutes, then transfer to a wire rack to finish cooling.
Notes
-
Cookies spread too much? Butter too warm—chill dough 15–20 minutes.
-
Make ahead: Scoop and freeze dough balls; bake with an extra 1–2 minutes.
-
Food coloring stains: Wear gloves while rolling dough.
-
Kiss melts too fast: Press in after 60 seconds of cooling, not immediately if very hot.
Nutritional Information (Because Knowledge is Power!)
Alright, let’s talk facts. I’m a big believer in enjoying treats mindfully. Here’s a general breakdown per cookie (assuming you make 18). Remember, these are estimates and can vary based on the specific brands of ingredients you use.
Per Cookie: Calories: ~130 | Fat: 6g | Saturated Fat: 3.5g | Carbs: 18g | Fiber: 0g | Sugar: 11g | Protein: 1g
These are definitely a dessert cookie, and that’s okay! The joy they bring is part of the recipe. The fat comes primarily from the butter, which gives us that rich flavor and texture. The carbs and sugar are what make them a treat. To make them a bit lighter, you could use a light butter alternative, but the texture will change slightly. My philosophy? Enjoy one or two of the real-deal, homemade cookies slowly and with delight, rather than a whole sleeve of something less satisfying.
Final Sweet Thoughts
Well, there you have it! My go-to recipe for cookies that are guaranteed to bring a smile. They’re simple enough for a beginner but special enough for any celebration. The process of making them—the vibrant red dough, the sparkly sugar, the final press of that chocolate kiss—is just as joyful as eating them.
I hope you’ll give these Red Velvet Kiss Cookies a try. And when you do, I’d love to see your masterpiece! Tag me @Feastical on social media or share your photos in the comments on the blog. You’re not just baking cookies; you’re creating little moments of happiness. And that, my friends, is what Feastical is all about.