
Raspberry-Filled Almond Snowball Cookies – A Festive, Melt-in-Your-Mouth Treat
A Little Cookie That Feels Like a Holiday Hug
Hey friends, Beau here from Feastical! Can we talk about that one magical cookie for a second? You know the one. It’s the cookie that makes everyone’s eyes light up when they spot it on the dessert tray. The one that looks like a delicate, snow-dusted treasure and tastes like a little bite of pure, buttery joy. I’m talking, of course, about our star of the show today: the Raspberry-Filled Almond Snowball Cookie.
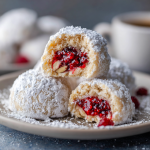
Now, I’m a firm believer that the best recipes are the ones that look like you fussed for hours but are secretly a joy to make. These cookies are exactly that. We’re taking a tender, melt-in-your-mouth almond dough, wrapping it around a vibrant pocket of tangy raspberry jam, and giving it a generous, snowy roll in powdered sugar. The result? A cookie with a gorgeous flavor contrast that’s elegant enough for your fanciest holiday party but simple enough to whip up on a cozy Tuesday afternoon.
If you’ve ever been intimidated by filled cookies, let me be the first to tell you: you’ve got this. We’re going to walk through this together, step-by-step, with all my favorite chef hacks to ensure your snowballs are perfect. So, preheat those ovens in your mind, grab your favorite mixing bowl, and let’s create some edible magic that’s sure to become a new family favorite.
The Snowball That Started It All
This recipe takes me right back to my grandma’s kitchen, which always smelled like butter and happiness in December. She had a classic snowball cookie recipe (you might know them as Russian Tea Cakes or Mexican Wedding Cookies) that was my absolute favorite. One particularly chaotic baking day, a jar of her homemade raspberry jam took a tumble off the counter and, in a brilliant (or desperate?) save, I smeared a little of the salvaged jam onto a piece of the raw dough before I rolled it.
What came out of the oven was a revelation. That single, jammy experiment transformed her beloved, classic cookie into something entirely new and exciting. The sweet, nutty cookie paired with the bright, tangy raspberry was a match made in heaven. Grandma arched an eyebrow, took one bite, and simply said, “Well, I guess we’re doing it this way from now on.” And we did. That happy little accident is the heart and soul of this recipe—a reminder that sometimes, the best creations come from a little mess and a lot of love.
Gathering Your Cookie-Making Crew (The Ingredients!)
Part of the beauty of this recipe is its simplicity. You likely have most of these ingredients in your pantry already. Here’s your shopping list and a little “chef’s insight” on each one to set you up for success.
- 1 cup (2 sticks) unsalted butter, softened: This is the foundation of our cookie’s tender, melt-in-your-mouth texture. Using unsalted butter lets us control the salt level perfectly. “Softened” is key here! It should be cool to the touch but leave a slight indent when you press it. Pro tip: if you forgot to take it out, cut the sticks into tablespoons and let them sit for 15-20 minutes.
- 1 cup powdered sugar (plus extra for coating): We use powdered sugar in the dough for a finer, more delicate crumb than granulated sugar would provide. And that snowy exterior? That’s the extra! Don’t be shy with it.
- 1 tsp vanilla extract: The warm, classic flavor that makes everything taste like home. Use the real stuff if you can—it makes a difference.
- ½ tsp almond extract: This is the secret weapon! It amplifies the nutty flavor of the almonds and gives the cookie that unforgettable, bakery-quality taste. A little goes a long way.
- 2¼ cups all-purpose flour: The structure of our cookie. For a lighter cookie, fluff your flour with a spoon before you scoop it into your measuring cup, and level it off. No packing!
- ½ cup finely ground almonds (or almond flour): This adds a wonderful nutty flavor and a slightly denser, more crumbly texture. You can buy almond flour or simply pulse sliced or slivered almonds in a food processor until they’re a fine meal.
- ¼ tsp salt: Don’t skip this! Salt is the flavor enhancer that makes the butter and almonds sing. It balances the sweetness perfectly.
- ½ cup seedless raspberry jam or preserves: I prefer seedless for a smooth, uninterrupted jammy experience, but seeded works just fine if that’s what you have! Preserves have slightly larger fruit pieces, which I love. Feel free to experiment with other flavors, too—more on that later!
Let’s Get Rolling: Your Foolproof Cookie Guide
Ready to make some magic? Follow these steps, and you’ll be a snowball pro in no time. I’ve sprinkled in my best tips to make the process smooth and fun.
- Cream the Butter & Sugar: In a large bowl, beat the softened butter and 1 cup of powdered sugar together on medium speed for 2-3 minutes. We’re not just mixing here; we’re “creaming.” This incorporates air into the dough, which helps give our cookies that lovely light texture. Stop when it’s pale, fluffy, and smooth. Now, add the vanilla and almond extracts and mix just until combined. Chef’s Hack: If your butter is still a bit cold, you can dice it and beat it alone for 30 seconds to soften it up before adding the sugar.
- Mix the Dry Ingredients: In a separate bowl, whisk together your all-purpose flour, ground almonds, and salt. This ensures the salt and baking powder are evenly distributed. Now, with your mixer on low speed, gradually add the dry ingredients to the wet butter mixture. Mix until just combined and no dry streaks remain. The dough will be soft—that’s exactly what we want! Chef’s Hack: Overmixing at this stage can develop the gluten in the flour and make the cookies tough. A gentle hand is your friend.
- Chill the Dough: This is a non-negotiable rest period! Wrap the dough in plastic wrap and chill it in the fridge for at least 30 minutes. This firms up the butter, making the dough much easier to handle and roll. It also prevents the cookies from spreading too much in the oven. Chef’s Hack: If you’re in a hurry, you can pop the bowl of dough into the freezer for 15 minutes instead.
- Preheat & Prep: While the dough chills, preheat your oven to 350°F (175°C). This ensures a consistent temperature for even baking. Line two baking sheets with parchment paper. Trust me, this makes cleanup a dream and prevents any sticking.
- Shape the Cookies (The Fun Part!): Unwrap your chilled dough. Scoop out about 1 tablespoon of dough. I use a small cookie scoop for uniformity, but a tablespoon measure works great. Flatten the dough slightly in the palm of your hand to make a small disc. Now, spoon about ¼ teaspoon of raspberry jam into the center. This is the sweet surprise! Gently fold the dough over the jam, pinching the edges to seal it completely. Then, roll it gently between your palms to form a smooth ball. Chef’s Hack: Make sure the jam is fully enclosed! Any leaks will bubble out and burn. If the dough gets too soft, just put it back in the fridge for 10 minutes.
- Bake to Perfection: Place your shaped cookies about 2 inches apart on the prepared baking sheets. They don’t spread a ton, but they need a little room to breathe. Bake for 12-15 minutes. You’re looking for the bottoms to be a very light golden brown, while the tops should still be pale. They might look a little underdone, but they’ll firm up as they cool! Let them cool on the baking sheet for 5 minutes before transferring them to a wire rack. This initial cooling period helps them set.
- Coat in Sugar & Create the Snowy Magic: Once the cookies are completely cool to the touch, it’s time for their snowy makeover! Place some extra powdered sugar in a shallow bowl. Gently roll each cookie in the sugar until it’s fully coated. For that extra-thick, professional-looking snowy finish, let them sit for 10 minutes after the first coat, then give them a second roll. It’s a game-changer!
How to Serve These Edible Snowballs
Presentation is part of the fun with these cookies! I love piling them high on a beautiful cake stand or a rustic wooden board. They look absolutely stunning next to darker cookies like chocolate crinkles or gingerbread, creating a beautiful contrast on your holiday dessert table.
And let’s talk about pairings. These cookies are a match made in heaven with a hot cup of coffee, cutting through the richness beautifully. They’re also divine with a mug of black tea or a spicy chai latte. For a truly decadent treat, serve them alongside a small glass of dessert wine or a flute of prosecco—the raspberry and almond flavors pop wonderfully with the bubbles.
Make It Your Own: Delicious Recipe Twists
Once you’ve mastered the classic, the fun really begins! This dough is a fantastic base for all sorts of flavor adventures. Here are a few of my favorite variations:
- Lemon Blueberry Bliss: Swap the almond extract for vanilla, and use blueberry jam or lemon curd in the center. Add a teaspoon of lemon zest to the dough for a bright, sunny twist.
- Chocolate Hazelnut Dream: Replace the ground almonds with ground hazelnuts and fill the center with a small square of high-quality dark chocolate or a dab of Nutella. Pure heaven.
- Apricot & Cardamom: Use apricot preserves and add ½ teaspoon of ground cardamom to the dry ingredients. This is a wonderfully warm and sophisticated flavor combination.
- Gluten-Free & Great: You can easily make these gluten-free by using a 1:1 gluten-free all-purpose flour blend. The texture is virtually identical!
- Dairy-Free Delight: Use a high-quality vegan butter stick. I’ve had great success with this swap, and the cookies still come out wonderfully tender and buttery.
Beau’s Brain Dump & Kitchen Stories
This recipe has evolved so much since that first jammy accident in my grandma’s kitchen. I’ve found that using a higher-quality, fruit-forward raspberry jam makes a world of difference in the final product. And that double-roll in powdered sugar? That was a tip I picked up from a baker friend who swore it was the secret to a bakery-style finish. She was right!
One of my favorite kitchen memories involving these cookies was the year I decided to make a triple batch for all my neighbors. Let’s just say my kitchen looked like a powdered sugar bomb went off, and I had little white footprints all through the house. But the joy on my neighbors’ faces was worth every second of the cleanup. Food is love, my friends, and these cookies are one of my favorite ways to spread it.
Your Questions, Answered!
Over the years, I’ve gotten a few repeat questions about these snowball cookies. Here are the answers to the most common ones!
Q: My jam leaked out everywhere! What did I do wrong?
A: Ah, the classic leak! This usually happens for one of two reasons: 1) The jam wasn’t fully enclosed. Make sure you pinch the dough seam really well. 2) You used too much jam. A little goes a long way! Stick to that ¼ teaspoon. If your jam is very runny, you can thicken it by mixing in a tiny pinch of cornstarch before using it.
Q: Why are my cookies flat and not holding their ball shape?
A: The most likely culprit is that your dough wasn’t chilled enough. The butter was too warm when it went into the oven, causing it to spread. Always make sure you give that dough its full 30-minute chill time. Also, double-check that your baking powder is fresh!
Q: Can I freeze these cookies?
A: Absolutely! They are fantastic freezer-friendly cookies. You can freeze the shaped, unbaked dough balls on a tray before transferring them to a freezer bag. Bake straight from frozen, adding 1-2 minutes to the baking time. You can also freeze the fully baked and cooled cookies—just note you may need to give them another light roll in powdered sugar after they thaw to freshen up their snowy look.
Q: The powdered sugar melts into the cookie. How do I get that perfect white finish?
A> This is why we wait for the cookies to cool completely before coating them! Rolling them while they’re even slightly warm will cause the sugar to melt and become sticky and translucent. Let them cool on the wire rack, and for that perfect, dry snow look, don’t skip the second roll after 10 minutes.
Raspberry-Filled Almond Snowball Cookies : A Festive, Melt-in-Your-Mouth Treat
Description
Hey friends, Beau here from Feastical! Let’s talk about a cookie that feels like a hug in edible form — buttery, nutty, and dusted in powdered sugar like freshly fallen snow. These Raspberry-Filled Almond Snowball Cookies are everything we love about holiday baking: simple to make, stunning to serve, and so delicious they disappear faster than you can say “save me one!”
Ingredients
-
1 cup (2 sticks) unsalted butter, softened
-
1 cup powdered sugar, plus extra for rolling
-
1 tsp vanilla extract
-
½ tsp almond extract
-
2¼ cups all-purpose flour
-
½ cup finely ground almonds (or almond flour)
-
¼ tsp salt
-
½ cup seedless raspberry jam or preserves
Instructions
1. Cream the Butter & Sugar
In a large bowl, beat the butter and 1 cup powdered sugar together until light and fluffy (about 2–3 minutes). Mix in the vanilla and almond extracts.
2. Add Dry Ingredients
Whisk together flour, ground almonds, and salt in a separate bowl. Gradually add to the butter mixture and mix until combined.
3. Chill the Dough
Wrap the dough in plastic wrap and refrigerate for 30 minutes (this helps prevent spreading).
4. Shape & Fill
Preheat oven to 350°F (175°C) and line baking sheets with parchment. Scoop out 1 tablespoon of dough, flatten slightly, and place about ¼ teaspoon of raspberry jam in the center. Seal and roll into a smooth ball.
5. Bake
Place balls 2 inches apart on the prepared sheet. Bake for 12–15 minutes, until bottoms are lightly golden. Cool on the sheet for 5 minutes, then transfer to a rack to cool completely.
6. Coat in Powdered Sugar
Roll the cooled cookies in powdered sugar to coat. For that perfect snowy look, let them rest for 10 minutes and roll again.
Notes
-
Chill that dough! It keeps your cookies round and tender.
-
Don’t overfill — just a touch of jam does the trick.
-
Double roll = bakery magic. Two coats of powdered sugar give that signature “snowball” look.
-
Switch it up! Try apricot, blueberry, or lemon curd for fun flavor twists.
Nutrition
- Calories: 135 kcal per Cookie
- Sugar: 7g
- Fat: 8g
- Carbohydrates: 15g
- Protein: 1g
Let’s Talk Nutrition (The Real Talk)
Alright, let’s be real. These are a holiday treat, a buttery, sugary delight meant to be savored and enjoyed. I’m all about balance, so here’s a quick nutritional snapshot per cookie (based on a batch of 32) so you can indulge mindfully.
Approximate Nutrition per Cookie: Calories: ~135 kcal | Fat: 8g | Carbs: 15g | Sugar: 7g | Protein: 1g
The fat comes primarily from the butter and almonds, which provide the rich flavor and texture we love. The carbs and sugar are from the flour, powdered sugar, and jam. Remember, these are estimates, and your exact numbers can vary based on the specific brands of ingredients you use and the exact size of your cookies. My philosophy? Enjoy one (or two!) with your favorite warm beverage, savor every single bite, and soak in the happiness they bring.
Your New Go-To Holiday Cookie
And there you have it, my friends! Your complete guide to creating the most incredible Raspberry-Filled Almond Snowball Cookies. This recipe is a testament to the fact that the most beloved dishes often come from a place of love, a little experimentation, and a willingness to embrace a happy accident.
I hope this recipe brings as much warmth and joy to your kitchen as it has to mine over the years. It’s more than just a cookie; it’s a little edible piece of holiday magic. So, go forth, bake up a storm, and don’t forget to share them with someone you love. And when you do, be sure to tag me @Feastical on social media—I can’t wait to see your beautiful, snowy creations!
Final Thoughts: A Cookie to Carry in Your Heart
So, there you have it—the story, the secrets, and the simple steps to creating a cookie that’s so much more than the sum of its parts. These Raspberry-Filled Almond Snowball Cookies are a perfect little package: a buttery, nutty exterior giving way to a vibrant, tangy heart. They are proof that you don’t need complicated techniques to create something truly extraordinary and memorable.
This recipe is a keeper, not just because it’s delicious, but because of the experience it creates. It’s a recipe that invites you to slow down, to get your hands a little dusty with powdered sugar, and to create something with your own two hands that will genuinely delight the people you share it with. From my grandma’s kitchen to that first jam-spattered “accident,” to the countless batches I’ve made since, this cookie is woven with memories. And now, it’s yours to make your own.
Whether you stick faithfully to the classic raspberry-almond combo or embark on a flavor adventure with lemon, chocolate, or cardamom, you’re not just baking—you’re creating a new tradition. You’re making edible hugs for a chilly day, snowy treasures for a holiday table, and little bites of pure, uncomplicated joy.
So, preheat that oven, roll up your sleeves, and bake a batch of happiness. I have a feeling this is one recipe that will find its way into your permanent collection, ready to be passed down with your own stories and kitchen secrets for years to come.
Happy Baking,
Beau