Welcome to My Pumpkin Patch!
Hey friends! Beau here from Feastical, back with another kitchen adventure that’ll make your taste buds dance and your heart feel all warm and fuzzy. 🧡 Can you smell it? That crisp autumn air, the scent of fallen leaves, and the promise of cozy gatherings? Fall isn’t just a season—it’s a *vibe*. And what better way to celebrate than with a treat that’s equal parts nostalgia and pure, unapologetic fun? Enter: Pumpkin Patch Rice Krispie Treats! These aren’t your average marshmallow squares. Nope, we’re turning a childhood classic into adorable, bite-sized pumpkins that’ll steal the show at Halloween parties, Thanksgiving feasts, or even just a Tuesday night family hang. Imagine golden-orange orbs, chewy and sweet, topped with cute green stems—ready to make everyone grin. Perfect for baking with kids, gifting to neighbors, or sneaking from the fridge at midnight (no judgment here!). So tie on that apron, crank up your favorite fall playlist, and let’s make some magic!
Why do I love these so much? Because they’re *stupidly* easy, wildly customizable, and they capture that joyful, playful spirit I live for at Feastical. No fancy skills needed—just butter, marshmallows, and a whole lot of enthusiasm. Whether you’re a dessert pro or still hunting for that elusive spatula (we’ve all been there!), this recipe’s your golden ticket. Let’s get sticky!
Why These Pumpkins Mean “Home” to Me
Picture this: It’s 1997. I’m 10 years old, wearing a lopsided witch hat, and standing in my grandma’s kitchen that smells like cinnamon and mischief. She’s got a bowl of melted marshmallows, and I’m armed with a wooden spoon, “helping” stir while sneaking bites. She’d always say, “Beau, honey, food’s love made edible.” That year, we ditched the usual Rice Krispie squares and shaped them into lumpy little pumpkins for my school’s harvest festival. They were hilariously uneven—some looked like squashed tomatoes!—but my classmates went wild for them. Fast-forward to today: Every time I make these, I’m back in that kitchen, flour dusting the air, grandma humming Patsy Cline, and that feeling of pure, sugar-fueled joy. It’s why I added this twist to Feastical. Because food isn’t just fuel; it’s memory, laughter, and a whole lot of heart. Now, let’s make new memories together!
Gather Your Pumpkin Crew!
Here’s your shopping list—simple, affordable, and easy to tweak. Pro tip: Measure everything before you start! Marshmallows wait for no one.
- 6 cups Rice Krispies cereal: The MVP! That light, crispy texture is non-negotiable. Chef’s hack: Sub with any puffed rice cereal, but avoid heavier ones (like Chex)—they’ll make your pumpkins dense.
- 3 tbsp butter: Unsalted, please! It controls saltiness and gives that rich, toasty base. Dietary swap? Vegan butter works perfectly.
- 1 (10 oz) bag mini marshmallows: Minis melt faster than large ones! Insider secret: Fresh marshmallows = best stretch. Stale ones make treats hard.
- Orange food coloring: Gel-based is KING. It’s vibrant without watering down the mix. Natural option: Use 1 tsp turmeric + 2 tbsp pumpkin purée (adds flavor but makes treats softer).
- Green licorice strings or sour straws: Cut into ½-inch “stems.” No licorice? Try green apple Twizzlers, melted green candy melts piped into stems, or even a sprig of fresh mint!
- Optional: mini chocolate chips or candy eyes: For silly jack-o’-lantern faces! Candy eyes stick best if pressed in right after shaping.
Let’s Build Some Pumpkins!
Ready? Channel your inner sculptor! I’ll walk you through every step with my favorite kitchen hacks.
Step 1: Melt the Magic Base
Grab a large pot (trust me, go bigger than you think—this stuff expands!) and melt the butter over low heat. Why low? Because burnt butter = sad pumpkins. Once it’s foamy, dump in the entire bag of marshmallows. Stir constantly with a silicone spatula (non-stick is your BFF here) until it’s a smooth, glossy lava flow—about 5 minutes. Chef’s lifesaver: Remove the pot from heat just before the last marshmallow melts. Residual heat will finish the job without scorching.
Step 2: Paint It Orange
Time for color! Add 8-10 drops of gel food coloring (start light—you can always add more!). Stir like crazy until it’s sunset-orange and streak-free. Fun twist: Stir in ½ tsp pumpkin pie spice here for a warm, autumnal kick!
Step 3: Cereal Takedown
Pour in the Rice Krispies all at once. Fold GENTLY with your spatula—don’t smash those crispy guys! Mix just until no dry spots remain. Critical tip: Let the mix cool for 3-4 minutes. Too hot? It’ll scorch your hands. Too cold? It won’t shape well. You want it warm and pliable, like playdough.
Step 4: Shape Your Pumpkin Army
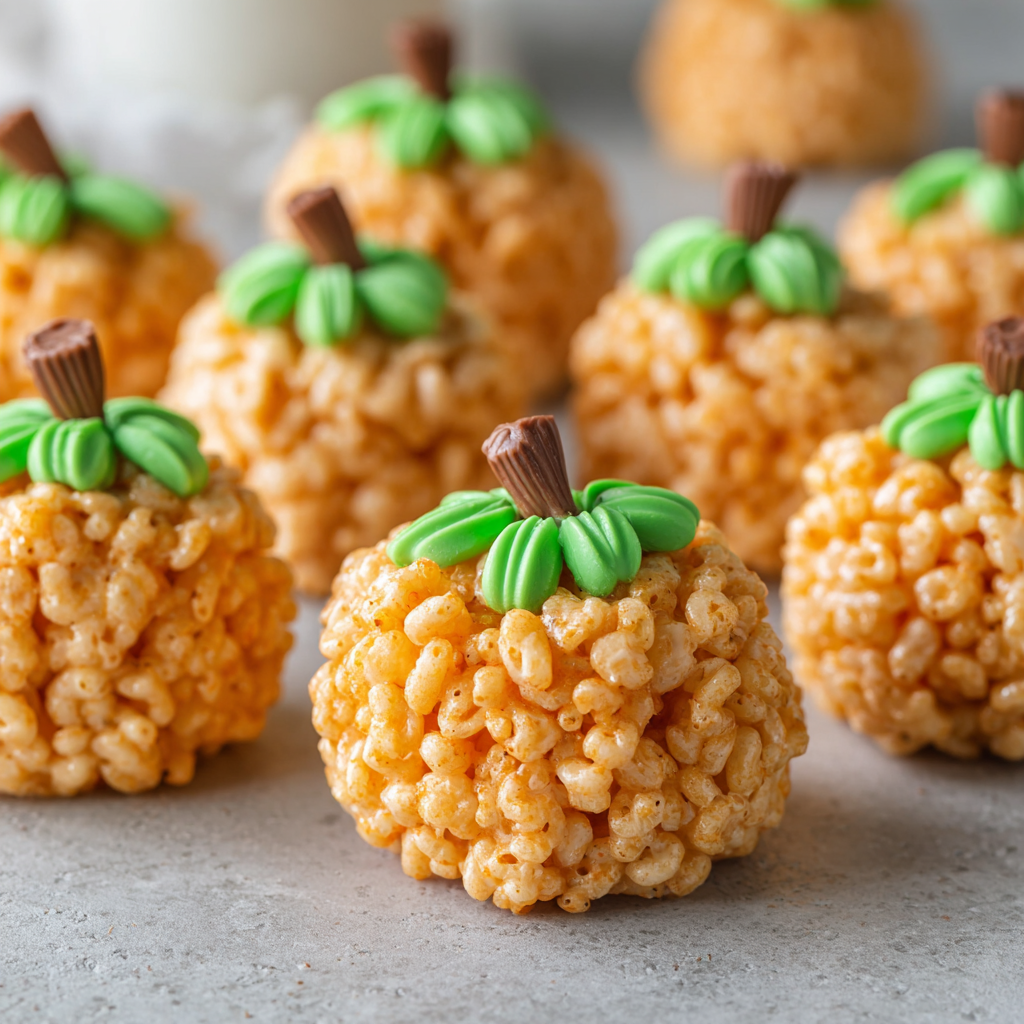
Coat your hands with butter or non-stick spray (reapply between every 2-3 pumpkins!). Scoop ¼-cup portions and roll into balls. Don’t stress perfection—real pumpkins have character! Indent the top slightly with your thumb. Press a licorice “stem” deep into the center so it stays put. Genius hack: Use a mini muffin tin to hold shaped pumpkins upright while they set!
Step 5: Decorate & Dominate
Get creative! Press on mini chocolate chips for eyes or mouths. Candy eyes add instant personality. Pro move: Use tweezers for precise placement. Let treats cool completely on parchment paper—about 15 minutes—so stems set.
Show Off Your Harvest!
Presentation is half the fun! Pile your pumpkins on a rustic wooden board lined with cinnamon sticks and fake leaves. For parties, nestle them in mini cupcake liners on a tiered stand. Kids love “planting” them in a tray of crushed Oreo “dirt” with gummy worms peeking out! Serve with mulled cider or a pumpkin spice latte. These babies stay fresh in an airtight container for 3 days… if they last that long!
Mix It Up, Buttercup!
Don’t stop at basic pumpkins! Try these twists:
- Fruity Pebbles Pumpkins: Swap Rice Krispies for Fruity Pebbles—rainbow insides, orange outsides!
- Chocolate-Dipped Dandies: Melt dark chocolate, dip pumpkin bottoms, and sprinkle with sea salt.
- Gluten-Free Gourds: Use GF crispy rice cereal and vegan marshmallows.
- Pumpkin Pie Bars: Press mix into a pan, top with whipped cream “frosting,” and cut into squares.
- Spicy Cinnamon Blaze: Add 1 tsp cayenne to the marshmallow mix for a sweet-heat surprise!
Beau’s Behind-the-Scenes Scoop
Okay, real talk: My first test batch looked like mutant sweet potatoes. I used liquid food coloring, and the pumpkins turned soggy. Gel coloring? Game-changer! And that thumb-indent trick? Learned it after my stems kept toppling like felled trees. Also—confession time—I once subbed Rice Krispies with popcorn during a pantry emergency. Do NOT recommend unless you want edible packing peanuts! Over the years, I’ve added pumpkin spice, tried drizzles, and even made a giant “pumpkin” cake with these as toppers. The beauty? They’re a blank canvas. Messy hands, laughter, and maybe a licorice stem stuck to your elbow? That’s the real recipe right there.
Your Questions, Answered!
Q: Why are my treats hard as rocks?
A: Overcooked marshmallows! Melt them low and slow, and remove from heat when almost melted. Also, old marshmallows dry out—use a fresh bag!
Q: Help! My pumpkins won’t hold shape.
A: Let the mix cool longer before rolling. Too warm = flat pumpkins. Too cold? Microwave the bowl for 10 seconds to soften.
Q: Can I make these ahead?
A: Absolutely! Store in an airtight container at room temp for 3 days. Freezing makes them chewier—thaw overnight before serving.
Q: Best way to get deep orange color?
A: Gel food coloring is essential! Liquid dilutes the mix. Start with 8 drops, add more until it screams “pumpkin.”
Pumpkin Patch Rice Krispie Treats
- Total Time: 35 minutes
Description
Celebrate fall with these adorable pumpkin-shaped Rice Krispie treats! Sweet, chewy, and fun to make, they’re perfect for Halloween parties, Thanksgiving, or cozy family nights. With just a few simple ingredients, you can turn a childhood classic into festive bite-sized pumpkins topped with cute green stems. No fancy skills required—just butter, marshmallows, and a lot of joy!
Ingredients
-
6 cups Rice Krispies cereal (or any puffed rice cereal)
-
3 tbsp unsalted butter (or vegan butter)
-
1 (10 oz) bag mini marshmallows
-
Orange gel food coloring (or 1 tsp turmeric + 2 tbsp pumpkin purée for natural option)
-
Green licorice strings, sour straws, or mint sprigs for stems
-
Optional: mini chocolate chips or candy eyes for decorating
-
Optional: ½ tsp pumpkin pie spice for extra autumn flavor
Instructions
Step 1: Melt the Magic Base
-
In a large pot, melt butter over low heat.
-
Add marshmallows and stir constantly until smooth and glossy (~5 minutes).
-
Pro Tip: Remove from heat just before the last marshmallow melts; residual heat finishes it without burning.
-
Step 2: Color & Flavor
-
Add 8–10 drops of orange gel food coloring; stir until streak-free.
-
Optional: Mix in ½ tsp pumpkin pie spice for extra autumn warmth.
Step 3: Add Cereal
-
Pour in Rice Krispies cereal and fold gently until evenly coated.
-
Let the mixture cool for 3–4 minutes—warm and pliable, not hot or stiff.
Step 4: Shape Pumpkins
-
Grease hands with butter or non-stick spray.
-
Scoop ¼-cup portions and roll into balls.
-
Indent the top slightly with your thumb and press in a green stem.
-
Tip: Mini muffin tins hold shaped pumpkins upright while setting.
-
Step 5: Decorate
-
Add candy eyes or mini chocolate chips for faces.
-
Let treats cool completely on parchment paper (~15 minutes).
Notes
-
Prevent hard treats: Avoid overcooking marshmallows. Use fresh marshmallows for best results.
-
Pumpkin shape issues: Let mix cool slightly before shaping. Too warm = flat; too cold = hard to mold.
-
Make ahead: Store airtight at room temp for up to 3 days. Freeze for chewier texture.
-
Deep orange color: Gel coloring works best; start light and add more as needed.
Fun Variations:
-
Fruity Pebbles Pumpkins: Swap Rice Krispies for Fruity Pebbles.
-
Chocolate-Dipped: Dip bottoms in melted chocolate; sprinkle with sea salt.
-
Gluten-Free: Use GF puffed rice cereal and vegan marshmallows.
-
Pumpkin Pie Bars: Press into a pan, frost with whipped cream, and cut into squares.
-
Spicy Cinnamon Blaze: Add 1 tsp cayenne to marshmallow mix for sweet heat.
- Prep Time: 15 minutes
- Cook Time: : 5 minutes
Nutrition
- Calories: 120 Ca per pumpkin
- Sugar: 11g
- Fat: 2g
- Carbohydrates: 24g
Quick Nutrition Snapshot
Makes ~18 pumpkins | Prep: 20 min | Cool: 15 min
Per pumpkin: Calories: ~120 | Carbs: 24g | Fat: 2g | Sugar: 11g | Protein: 1g
Not health food, folks—but joy food! Balance is key. 😉
Final Thoughts: More Than Just a Treat
These Pumpkin Patch Rice Krispie Treats aren’t just delicious—they’re memory makers. Whether you’re reliving childhood moments (like Beau’s lopsided witch hat days!) or starting new traditions, this recipe is all about joy, creativity, and togetherness.
So grab your ingredients, crank up the fall tunes, and let’s make something magical. Because the best recipes? They’re the ones that leave your hands sticky and your heart full.
Happy pumpkin crafting! 🎃✨
Storage Tip: Keep in an airtight container for up to 3 days (if they last that long!). Freezing? Wrap individually—they’ll stay chewy for weeks.