
When a Dessert Feels Like a Standing Ovation
Hey friends, Beau here. Let’s talk about dessert magic for a second. You know the kind—the one that makes everyone at the table stop mid-conversation, their eyes going wide before they even take a bite. The dessert that feels less like a recipe and more like a delicious secret you’re letting everyone in on. That, right there, is the pure, unadulterated joy of a perfect lava cake.
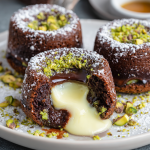
But today, we’re not just making any old chocolate lava cake. We’re leveling up. We’re adding a nutty, sophisticated, quietly brilliant twist that turns this classic from “wow” to “HOW did you make this?!” I’m talking about my Pistachio Chocolate Lava Cakes. Imagine this: a rich, dark chocolate shell that gives way to a river of molten white chocolate, all wrapped up in the subtle, elegant flavor of ground pistachios. It’s bakery-level impressive, but I promise you, the process is all about keeping it simple and soulful.
If the thought of a “molten center” has you nervous, don’t be. We’re walking through this together, step-by-step. This recipe is your ticket to becoming the undisputed dessert hero of your next dinner party, date night, or even your next “treat yourself” Tuesday. So grab your favorite mixing bowl, and let’s create some feel-good, fork-clinking magic.
The Cake That Started It All
My love affair with lava cakes started in the most unlikely place: a slightly chaotic, family-style Italian restaurant where I worked my first kitchen job. I was the “dessert guy,” which mostly meant plating tiramisu. But one slow Tuesday, the head chef—a man with forearms like tree trunks and a surprisingly soft spot for pastry—showed me his method for molten chocolate cakes. He didn’t use a recipe. He just *felt* it. The timing was everything, he said. “You wait for the cake to tell you it’s ready. It gets a little puffy around the edges and just *looks* set, but you can still sense the wobble in its soul.”
I must have made two dozen test batches that week, driving my roommates crazy with constant “taste tests.” The failures were either sad, solid chocolate muffins or, worse, chocolate soup. But that first successful one? The moment I turned it out onto a plate, dusted it with sugar, and cut into that oozing center… it was a revelation. It felt like I’d unlocked a chef’s superpower. This pistachio version is my homage to that feeling—that moment of kitchen triumph. It takes that simple, powerful technique and dresses it up with my favorite nut, creating a dessert that’s both nostalgic and brand new.
Gathering Your Flavor Arsenal
Here’s everything you’ll need to make four stunning individual cakes. The beauty is in the details, so I’ve added my two cents on each ingredient to set you up for success.
- ½ cup unsalted butter: The rich foundation. Unsalted lets you control the salt level. Make sure it’s at room temperature for smooth melting.
- 4 oz dark chocolate, chopped: Use a bar you love eating, chopped fine for even melting. I adore a 70% cocoa for a deep, not-too-sweet base. No chocolate chips here—they have stabilizers that can mess with our lava flow.
- 2 large eggs + 2 large egg yolks: The extra yolks are our secret for that decadent, custardy texture. Pro tip: crack your eggs into a separate bowl first to avoid any shell surprises in your batter.
- ⅓ cup granulated sugar: This might seem like less than other recipes, but the dark chocolate and white chocolate center provide plenty of sweetness. Trust me, it’s perfectly balanced.
- ¼ cup finely ground pistachios: This is our star! Grind shelled, unsalted pistachios in a food processor until they resemble fine sand. Not powder, not chunks—somewhere in between. This adds incredible flavor, a hint of color, and a lovely texture.
- ¼ cup all-purpose flour: Just enough to give the cake structure without making it bready. For a gluten-free swap, a 1:1 GF blend works like a charm.
- ¼ tsp salt: The flavor enhancer. It makes the chocolate taste more chocolatey and the pistachios pop.
- 4 tsp white chocolate spread or ganache: The “lava” in our volcano! A quality white chocolate spread (like Nutella’s cousin) is easiest. For a purist approach, a simple ball of solid white chocolate works too.
- Powdered sugar & chopped pistachios, for topping: The finishing flair. The snowy sugar and vibrant green nuts make it look straight out of a patisserie window.
Let’s Build Some Magic: Step-by-Step
Alright, team. Preheat that oven to a hot 425°F (220°C). This high heat is crucial—it sets the outside quickly while the inside stays gloriously gooey. Grease four 6-ounce ramekins REALLY well with butter or non-stick spray. Think of it as insurance for a clean release later.
- Melt the Chocolate & Butter: Combine the chopped dark chocolate and butter in a heatproof bowl. You can do this over a pot of simmering water (a double boiler) or in the microwave in 20-second bursts, stirring between each. We want it smooth and glossy. Once melted, take it off the heat and let it cool for a few minutes. We don’t want to scramble our eggs in the next step!
- Whip the Eggs & Sugar: In a separate bowl, whisk together the whole eggs, egg yolks, and granulated sugar. Now, go to town. Use a hand mixer or whisk vigorously by hand for a good 2-3 minutes until the mixture is pale, thick, and falls off the whisk in a slow ribbon. This step adds air, giving our cakes a slight lift.
- The Grand Unification: Gently pour the slightly cooled chocolate mixture into the egg mixture. Fold it in with a spatula—no aggressive stirring. We’re preserving that air. Once it’s mostly combined, sift in the flour and salt, and add the ground pistachios. Fold just until no dry streaks remain. The batter will be thick and luxurious.
- Assemble with Care: Spoon a heaping tablespoon of batter into each prepared ramekin, just enough to cover the bottom. Now, the heart of the operation: place 1 teaspoon of your white chocolate spread right in the center of each. Completely cover the chocolate “heart” with the remaining batter, dividing it evenly. Smooth the tops. (Chef’s Hack: Run your thumb around the inside rim of the filled ramekin. This helps the cake release cleanly and encourages a beautiful dome as it bakes.)
- Bake with Your Eyes (& Nose): Place the ramekins on a baking sheet (for easy handling) and bake for 10-12 minutes. Start checking at 10. You’re looking for: puffed tops, edges that look set and are pulling slightly away from the sides, but centers that still look soft and have a slight jiggle. If they look completely set, they’ve gone past the lava stage. Remember, they keep cooking a bit out of the oven!
- The Grand Reveal: Pull them out and let them rest on the stove for exactly 1 minute. This lets them settle. Then, wearing an oven mitt, place a small serving plate upside-down over a ramekin. In one confident, swift motion, flip it over. Gently lift the ramekin. There should be a satisfying “plop” as your masterpiece releases. Repeat with the others. A quick dusting of powdered sugar and a sprinkle of chopped pistachios, and you’ve done it.
How to Serve These Stunners
Presentation is half the fun with these cakes! Serve them immediately, while the centers are at peak lava-flow. Place each cake on a simple white plate to let the colors shine. That dusting of powdered sugar is non-negotiable—it’s like a fresh snowfall. The final sprinkle of bright green chopped pistachios adds texture and tells your guests exactly what delicious twist awaits.
For the full experience, add a small scoop of vanilla bean ice cream or a dollop of lightly sweetened whipped cream on the side. The contrast of hot and cold, rich and creamy, is absolute heaven. A few fresh raspberries add a lovely tart note that cuts through the richness beautifully. And don’t forget the coffee or a glass of dessert wine!
Make It Your Own: Fun Twists & Swaps
Once you’ve mastered the base, the world is your molten dessert oyster. Here are a few of my favorite riffs:
- Salted Caramel Surprise: Swap the white chocolate center for a small chunk of soft caramel or ½ tsp of thick salted caramel sauce. The salty-sweet combo with the pistachio is unreal.
- Orange Zest Dream: Add the zest of one orange to the egg-sugar mixture. The bright citrus cuts through the richness and pairs wonderfully with both chocolate and pistachio.
- Double Chocolate Hazelnut: Replace the ground pistachios with ground hazelnuts (filberts) and use a dark chocolate hazelnut spread for the center. It’s like a gourmet lava cake version of your favorite candy.
- Dairy-Free Delight: Use a high-quality vegan dark chocolate bar, vegan butter, and a dairy-free white chocolate spread. The structure from the eggs still works beautifully here.
- Espresso Kick: Dissolve 1 teaspoon of instant espresso powder into the melted chocolate-butter mixture. It won’t make it taste like coffee, but it will deepen the chocolate flavor dramatically.
A Few Notes from My Kitchen to Yours
This recipe has been my go-to “wow” dessert for years, and it’s evolved with every batch. I used to be terrified of under-baking, inevitably overdoing it. My friend finally told me, “Beau, you have to trust the jiggle!” She was right. That soft center at the 11-minute mark is your friend.
Another fun story: I once made these for a potluck and, in my rush, forgot to grease one ramekin. Let’s just say we had one “deconstructed” lava cake that we ate with spoons straight from the dish. It was still delicious, but it taught me the importance of that butter-and-a-prayer greasing method. The batter can be made up to a day ahead, kept covered in the ramekins in the fridge. Just add 1-2 minutes to the bake time if you’re starting from cold. Most of all, have fun with it. Cooking is about the joy, not perfection.
Your Questions, Answered
Q: My center didn’t flow! What happened?
A: The most common culprit is over-baking. Ovens vary, so yours might run hot. Start checking at 9 minutes. The edges should be set, but the center should look soft and jiggle when you gently shake the ramekin. Also, ensure your “lava” (white chocolate spread) is in a solid, cold state when you add it, not melted.
Q: Can I make these without ramekins?
A: Ramekins are ideal for the heat distribution and shape. In a pinch, a well-greased muffin tin works, but the baking time will be less—start checking at 8 minutes. The release and presentation are trickier, though.
Q: The cake stuck to the ramekin! How do I save it?
A> First, don’t panic. It’s still delicious! Run a thin knife around the edge again. If it’s being stubborn, you can always serve it in the ramekin with a spoon—call it a “deconstructed” or “rustic” presentation. Next time, be extra generous with the butter or spray.
Q: Can I use pistachio flour?
A> Absolutely! If you have store-bought pistachio flour, use a ¼ cup as a direct substitute for the ground pistachios. It will give a slightly finer texture and vibrant color.
Pistachio Chocolate Lava Cakes : Gooey Center, Bakery-Style Dessert at Home
Description
There’s something magical about breaking into a warm lava cake and watching the center flow. It feels fancy, dramatic, and restaurant-level — but it’s actually one of the most reliable impressive desserts you can make at home. This version adds finely ground pistachios and a creamy white-chocolate center for a nutty, elegant twist. If you can whisk and fold, you can make this. Let’s do it step by step.
Ingredients
-
½ cup (115 g) unsalted butter
-
4 oz (115 g) dark chocolate, finely chopped
-
2 large eggs
-
2 large egg yolks
-
⅓ cup (65 g) granulated sugar
-
¼ cup finely ground pistachios (unsalted)
-
¼ cup (30 g) all-purpose flour
-
¼ tsp salt
-
4 tsp white chocolate spread or small white chocolate pieces
-
Butter + cocoa powder (for greasing ramekins)
For topping (optional):
-
Powdered sugar
-
Chopped pistachios
-
Vanilla ice cream or whipped cream
Instructions
1️⃣ Prep
-
Heat oven to 425°F / 220°C.
-
Generously butter 4 small ramekins and dust with cocoa powder (or flour). Tap out excess.
2️⃣ Melt Chocolate & Butter
-
Melt butter and dark chocolate together in a bowl over gentle heat or in short microwave bursts.
-
Stir until smooth. Cool 3–4 minutes.
3️⃣ Whisk Eggs & Sugar
-
In another bowl, whisk eggs, yolks, and sugar for about 2–3 minutes until pale and slightly thick.
4️⃣ Combine
-
Gently fold melted chocolate into egg mixture.
-
Add flour, salt, and ground pistachios.
-
Fold just until combined — don’t overmix.
5️⃣ Fill & Add Center
-
Spoon batter halfway into each ramekin.
-
Place 1 tsp white chocolate spread (or a chocolate piece) in the center.
-
Cover with remaining batter.
6️⃣ Bake
-
Place ramekins on a tray.
-
Bake 10–12 minutes.
You want: set edges + soft, slightly jiggly centers.
7️⃣ Unmold
-
Rest 1 minute.
-
Run a knife around edges, flip onto plates, lift ramekin.
8️⃣ Finish
-
Dust with powdered sugar and sprinkle pistachios.
-
Serve immediately.
Notes
-
Use real chocolate bars, not chips — they melt smoother.
-
Slight jiggle in the center = lava success.
-
Overbaked = chocolate cake, not lava cake. Check early.
-
Room-temperature eggs whip better and give lighter texture.
-
You can refrigerate filled ramekins up to 24 hours — add 1–2 minutes to bake time.
Nutritional Information (Per Cake, Approximate)
Let’s be real—this is a celebratory dessert, and it’s meant to be enjoyed as such. Each individual pistachio chocolate lava cake packs rich, satisfying flavor. Based on the specific ingredients used, one cake comes in at roughly: 420 calories, 28g fat, 36g carbohydrates, and 8g protein. The majority of the fat comes from the butter, chocolate, and pistachios—ingredients that contribute to the luxurious mouthfeel and flavor we love. Remember, this is an estimate; for precise counts, use your preferred nutrition calculator with your exact brands. My philosophy? Enjoy every single bite mindfully and joyfully.
The Last Bite
And there you have it, friends—my heart-on-a-plate, the Pistachio Chocolate Lava Cake. This recipe is more than just a list of steps; it’s an invitation to play in the kitchen, to trust your instincts (and the jiggle), and to create a moment of pure, shared delight. That first crack of the spoon into the tender cake, watching that white chocolate lava mingle with the dark crumb and pistachio confetti… it’s a feeling I wish I could bottle.
I hope you make these, share them, and feel that little thrill of kitchen triumph I felt all those years ago. Remember, the best food always has a side of joy. If you make them, tag me over at @Feastical—I love seeing your creations! Now, go preheat that oven. Your standing ovation awaits.
With a full heart and a sweet tooth,
Beau