Pink Velvet Homemade Waffles – Festive, Fluffy & Full of Love
Wake Up to a Little Slice of Happy
Hey there, friend! Let’s talk about the best part of waking up. No, it’s not just the coffee (though I’ll never deny a good brew). It’s the smell of something warm, buttery, and downright magical wafting from the kitchen. It’s the sound of a waffle iron sizzling, promising a crispy-on-the-outside, cloud-soft-on-the-inside masterpiece. And today, we’re not just making any waffle. We’re making a celebration on a plate.
These Pink Velvet Waffles are my go-to for turning an ordinary morning into something special. They’re not just food; they’re a mood. That gorgeous blush color is an instant smile, a little kitchen confetti that says, “Hey, today is going to be a good day.” Whether it’s Valentine’s Day, a birthday brunch, Mother’s Day, or just a Tuesday where you want to show someone you care, these waffles deliver. They taste like a classic, tender buttermilk waffle with a hint of vanilla sweetness, and when you top them with a drizzle of chocolate, a mountain of fresh berries, and a fluffy cloud of whipped cream… well, you’ve just created pure, unadulterated joy. So, grab your favorite mixing bowl and let’s make some morning magic together!
The Waffle Iron That Started It All
This recipe takes me right back to my first apartment, with a kitchen so small you could practically touch all four walls at once. My most prized possession was a secondhand, slightly lopsided waffle iron I found at a garage sale. It had seen better days, but it had heart. I’d host “Waffle Wednesdays” for my friends—a chaotic, syrup-covered affair where we’d all cram into that tiny space.
One year, for a friend’s “Gal-entine’s” brunch, I decided plain waffles just wouldn’t do. I wanted to make something that felt as fun and vibrant as our friendship. I stared into my bowl of pale batter and had a wild idea. A few drops of pink food coloring later, and the Pink Velvet Waffle was born. The moment I lifted that iron to reveal the first perfectly pink, perfectly crisp waffle, the whole kitchen erupted in cheers. It wasn’t just about the color; it was about the feeling. It was a simple act that turned a regular Wednesday into a cherished memory. That’s the power of feel-good food, my friends.
Gathering Your Rainbow (Mostly Pink!)
Here’s everything you’ll need to whip up a batch of these beauties. Don’t stress if you’re missing an item or two—I’ve got your back with some easy swaps and chef-y insights.
- 4 cups all-purpose flour: This is the sturdy backbone of our waffle. It gives them that perfect structure that can hold up to all our delicious toppings. For a lighter texture, you can swap in 1 cup of cake flour for one of the all-purpose cups.
- 8 teaspoons baking powder: Our leavening hero! This is what gives these waffles their signature fluffy, airy lift. Make sure yours is fresh for the best rise.
- 4 tablespoons sugar: Just the right amount to add a subtle sweetness that plays so nicely with the vanilla. I use regular granulated, but cane sugar works great, too.
- 1 teaspoon salt: Never, ever skip the salt! It’s the flavor enhancer that makes all the other ingredients pop and balances the sweetness perfectly.
- 1 cup butter, melted: This is where the rich, luxurious flavor and that irresistible crispy edge come from. I use unsalted so I can control the salt level. For a dairy-free version, refined coconut oil is a fantastic substitute.
- 3½ cups buttermilk: The secret weapon for incredibly tender and tangy waffles. No buttermilk? No problem! Make a quick “sour milk” by adding 1 tablespoon of white vinegar or lemon juice to a cup of regular milk and let it sit for 5 minutes. Do this for the full amount needed.
- 4 teaspoons vanilla extract: The soul of the dish! Use the real stuff if you can—it makes a world of difference. That warm, aromatic flavor is pure comfort.
- 4 eggs: Our binding agent and another source of richness and fluffiness. They help create a beautiful, golden-brown crust.
- 12–16 drops pink food coloring: The fun part! I use liquid gel food coloring for a vibrant color without thinning the batter. Start with 12 drops and add more until you reach your dream shade of pink. For a natural tint, a teaspoon of beet powder works wonders!
For the Toppings (The Grand Finale!):
- Chocolate syrup or hot fudge
- Fresh strawberries or raspberries
- A big dollop of whipped cream
Let’s Get Cooking: Your Path to Waffle Greatness
Ready to transform these simple ingredients into brunch superstars? Follow these steps, and you’ll be a waffle whiz in no time. I’ve sprinkled in my favorite chef hacks to make the process smooth and successful.
- Preheat Your Waffle Iron. This is step one for a reason! A properly heated iron is the key to getting that crisp, non-stick exterior. If your iron has temperature settings, aim for a medium-high. Chef’s Hack: While it’s heating, give the plates a very light brush with neutral oil or a spritz of cooking spray, even if it’s non-stick. This guarantees a perfect release every single time.
- Whisk the Dry Team. In a large bowl, add your flour, baking powder, sugar, and salt. Grab your whisk and give it a really good, aerating whisk. We’re not just mixing; we’re making sure that baking powder is evenly distributed so every bite of your waffle is uniformly fluffy.
- Unite the Wet Team. In a separate, medium-sized bowl, crack in your eggs and give them a quick beat. Now, stream in your melted (but slightly cooled) butter while whisking. This tempers the eggs so they don’t scramble. Then, pour in the buttermilk, vanilla, and those all-important drops of pink food coloring. Whisk it until it’s a beautifully uniform shade of pink.
- The Big Merge. Now, pour your gorgeous pink wet ingredients into the bowl with the dry ingredients. This is the most critical moment: DO NOT OVERMIX! Use a spatula and gently fold the batter together. It’s totally okay—in fact, it’s perfect—if there are a few streaks of flour and the batter looks a little lumpy. Overmixing develops gluten and leads to tough, chewy waffles. We want tender, light, and airy. Chef’s Hack: If you’re adding mini chocolate chips or that almond extract twist, now is the time to fold them in gently.
- Cook to Perfection. Using a ladle or a measuring cup, pour the recommended amount of batter onto the center of your preheated waffle iron. Close the lid and let the magic happen! Resist the urge to peek for at least the first 3 minutes. Most waffles will take about 4-5 minutes to become golden and crisp. You’ll know they’re done when the steam slowing down significantly.
- Serve Immediately… or Keep ‘Em Crispy! The absolute best way to eat a waffle is straight from the iron. But if you’re cooking for a crowd, don’t let them get soggy in a stack! Chef’s Hack: Place cooked waffles in a single layer on a wire rack set inside a baking sheet. You can keep them warm in a 200°F (95°C) oven. This allows air to circulate and keeps them perfectly crisp.
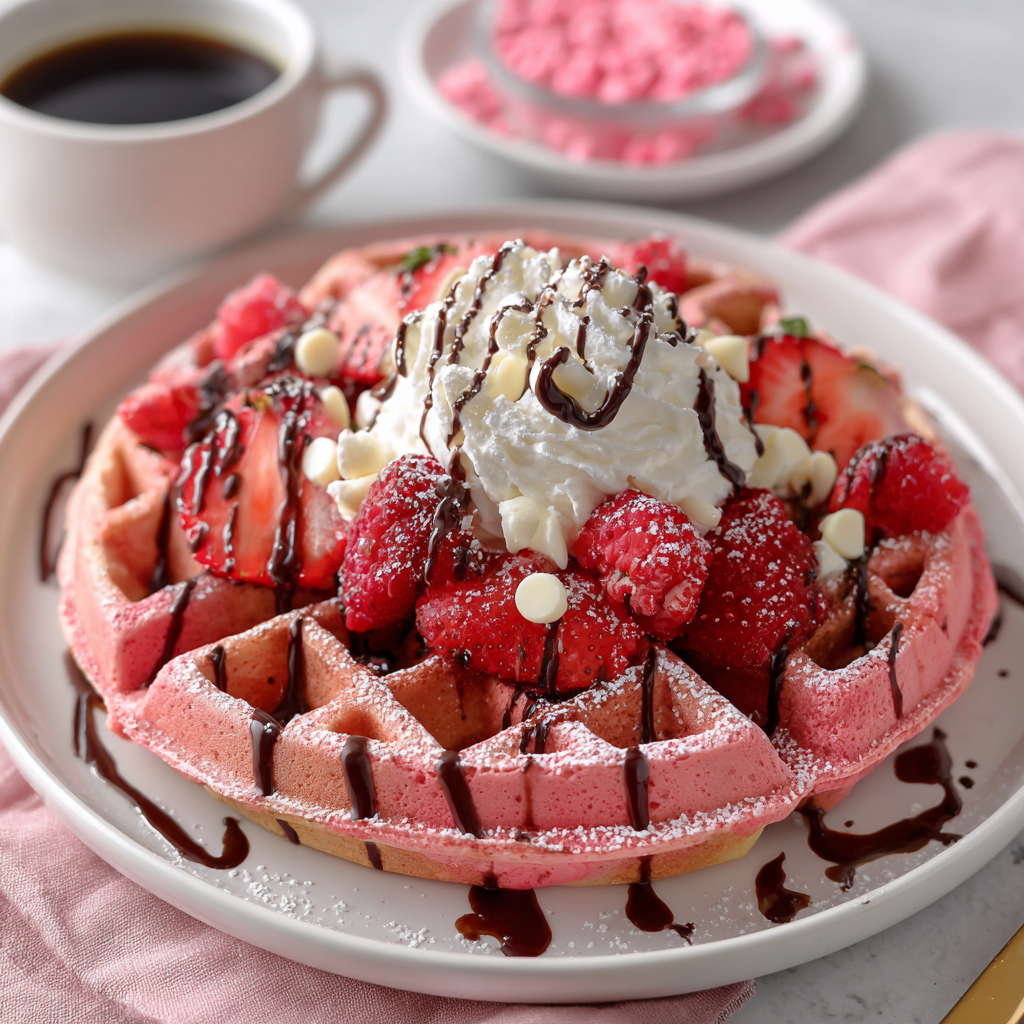
Plating Your Pink Masterpiece
Now for the best part—the grand presentation! How you serve these can turn a great breakfast into an unforgettable one.
I love placing one warm waffle on a vibrant plate—a bright white or even a light blue plate makes that pink color really sing. Drizzle the waffle generously with chocolate syrup, letting it cascade into all the little squares. Next, artfully scatter a handful of fresh, sliced strawberries and a few whole raspberries for a pop of red. The final, non-negotiable touch? A generous, billowy dollop of freshly whipped cream right in the center. For that extra “wow” factor, I’ll grate a little white chocolate over the top or add a sprig of fresh mint. Serve with a hot cup of coffee or a tall glass of cold milk, and watch the smiles appear.
Make It Your Own! Fun Flavor Twists
This recipe is a fantastic canvas for your creativity. Here are a few of my favorite ways to mix it up:
- Chocolate Chip Confetti: Fold in 1/2 cup of mini white chocolate chips and 1/2 cup of rainbow sprinkles into the batter for a true birthday party vibe.
- “Red Velvet” Vibe: Reduce the pink food coloring to 4-5 drops and add 1-2 tablespoons of unsweetened cocoa powder to the dry ingredients. You’ll get a lovely marbled pink-and-brown effect that tastes like a red velvet cake.
- Gluten-Free & Fantastic: Swap the all-purpose flour for your favorite 1:1 gluten-free flour blend. The result is just as tender and delicious!
- Berry Blast Compote: Instead of chocolate syrup, simmer a cup of mixed berries with a tablespoon of sugar and a squeeze of lemon juice until syrupy. Spoon this warm compote over your waffles for a fruity explosion.
- The Cream Cheese Drizzle: Whisk together 4 oz of softened cream cheese, 1/4 cup of milk, 1/2 cup of powdered sugar, and a splash of vanilla until smooth. Thin it out with a little more milk if needed and drizzle this tangy, creamy goodness over everything.
Beau’s Kitchen Corner
This recipe has come a long way from that first pink batch in my lopsided waffle iron! I’ve learned that the batter actually benefits from resting for about 5-10 minutes after mixing. It gives the flour time to fully hydrate and the baking powder a chance to start working, which leads to an even fluffier waffle. Don’t be afraid of the batter being thick; that’s what we want! A thin batter makes thin, sad waffles. We’re going for thick, fluffy, and fabulous. And a little kitchen story for you: I once accidentally used a whole bottle of pink coloring (it had a faulty lid!). Let’s just say we had neon pink waffles that stained everything, including my friend’s dog who managed to snag one. We still laugh about “The Day of the Pink Beast.” Learn from my mess—add your color gradually!
Your Waffle Questions, Answered!
Q: My waffles are coming out soft and soggy, not crisp. What am I doing wrong?
A: The most common culprit is a waffle iron that isn’t hot enough. Make sure it’s fully preheated before you add the batter. Also, avoid stacking them directly on a plate when they come out—that steam makes them soft. Use a wire rack to keep them crisp!
Q: Can I make the batter the night before?
A: I don’t recommend it for the fluffiest results. The baking powder will lose its oomph overnight, leading to denser waffles. For a make-ahead solution, mix your dry ingredients and wet ingredients in separate bowls the night before. In the morning, just combine them and cook!
Q: How do I clean a sticky waffle iron?
A> Prevention is key! That light coating of oil before the first waffle helps a ton. For cleanup, always let the iron cool completely, then brush off any crumbs. Wipe the plates with a damp cloth. Never use abrasive scrubbers!
Q: Can I freeze these waffles for later?
A> Absolutely! Let them cool completely on a wire rack. Then, place them in a single layer on a baking sheet to “flash freeze” for an hour. Once frozen solid, transfer them to a freezer bag. They’ll keep for up to 3 months. Reheat straight from the freezer in a toaster or a 350°F oven until warm and crisp.
Nourishing Your Brunch Cravings
Let’s be real—these are a treat, and they’re meant to be enjoyed as such! This approximate nutritional info is for one waffle (without toppings), based on the recipe making about 6 large, Belgian-style waffles. Remember, your specific ingredients and waffle iron size will cause variations.
Per Waffle (approx.): Calories: ~430 | Protein: 9g | Fat: 24g | Carbohydrates: 45g | Sugar: 10g | Fiber: 1g
To lighten things up a bit, you can use a light buttermilk, reduce the butter slightly (though it will affect richness and crispness), or use a sugar alternative. But my personal philosophy? When you’re indulging in something as special as Pink Velvet Waffles, go for the real deal, savor every single bite, and enjoy the moment with the people you love.
Final Thoughts
And there you have it! My complete guide to creating the most delightful, fluffy, and feel-good Pink Velvet Waffles. This recipe is more than just a list of ingredients and steps; it’s an invitation to slow down, to play with your food, and to create a little bit of edible happiness. There’s no wrong way to enjoy them, and no mistake in the kitchen that can’t be fixed (trust me, I’ve made most of them!).
So, the next time you want to make a morning memorable, whip up a batch of these. See that pink batter and just try not to smile. I dare you. Happy cooking, and don’t forget to tag @Feastical in your photos—I love seeing your kitchen creations!
With a full heart and an even fuller plate,
Beau