Pineapple Dream Dessert: Your New No-Bake Obsession
Hey friends, Beau here from Feastical! Tell me if this sounds familiar: the sun is shining, you’ve got people coming over, and you need a dessert that’s going to make everyone’s eyes light up without you spending the whole day in a hot kitchen. I hear you. That’s exactly why this Pineapple Dream Dessert has been my secret weapon for years.
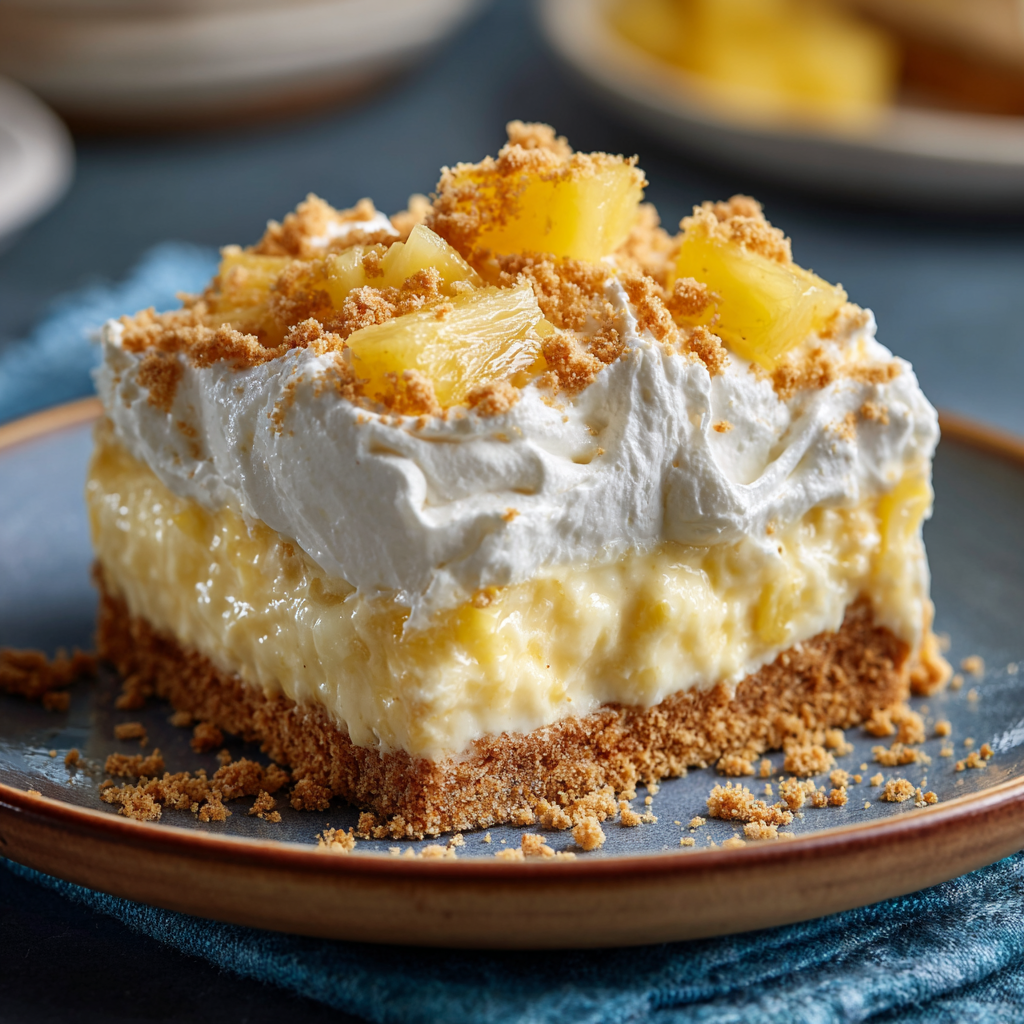
This isn’t just a recipe; it’s a little slice of tropical vacation right on your spoon. We’re talking a buttery, crunchy graham cracker crust that gives way to a cloud-like, pineapple-speckled filling that’s so light, you’ll be tempted to call it a salad (but trust me, it’s 100% dessert). It’s sweet, it’s tangy, it’s creamy, and it requires exactly zero oven time. Just some simple mixing, a little patience while it chills, and boom—you’ve got a showstopper.
Whether you’re a seasoned pro who wants a hassle-free crowd-pleaser or you’re just starting your kitchen adventures and need a guaranteed win, this Pineapple Dream Dessert is for you. It’s the recipe I get asked for the most at family reunions and the one that always disappears first at potlucks. So, grab your mixing bowl and let’s make some magic happen.
The Potluck That Started It All
I have to take you back to my first-ever neighborhood summer potluck. I was new, wanted to make a good impression, and maybe show off a little. I planned this elaborate, three-layer cake. Of course, the humidity had other plans. It was a delicious, but slightly lopsided, mess. My lovely neighbor, Mrs. Henderson, took pity on me and slid a slice of this creamy, cool pineapple dessert onto my plate with a wink. “Try this, dear. No baking required.”
One bite and I was hooked. It was the perfect antidote to the sweltering day. I begged her for the recipe, a well-loved index card splattered with vanilla extract and butter stains. That card is now tucked in my recipe box, a reminder that sometimes the simplest, most humble dishes are the ones that truly bring people together. I’ve tweaked it a bit over the years (a touch more vanilla, always draining that pineapple well), but the soul of Mrs. Henderson’s kindness is in every bite. It’s a dessert that feels like community.
Gathering Your Sunshine Ingredients
Here’s the beautiful part: you probably have most of this in your kitchen right now. Let’s break it down. I’ll give you my chef notes and easy swaps so you can make this your own.
For the Crust:
- 2 cups graham cracker crumbs: The sweet, earthy foundation. You can buy them pre-crushed, but pulsing whole crackers in a food processor or sealing them in a bag and going to town with a rolling pin is oddly therapeutic. Chef’s Insight: For a deeper flavor, try using honey or cinnamon grahams!
- ½ cup (1 stick) unsalted butter, melted: This is the glue. It creates that iconic, crisp base that holds its shape against the creamy filling. Salted butter works in a pinch, but I prefer unsalted to control the overall saltiness.
- 2 tablespoons granulated sugar: A little extra sweetness to caramelize slightly with the butter. You can skip it if you like, but it gives the crust that little something extra.
For the Dreamy Filling:
- 8 oz cream cheese, softened: This is non-negotiable – SOFTEN IT. Leave it on the counter for a good hour. Room temp cream cheese blends into a silky-smooth filling, while cold cream cheese leaves you with frustrating lumps.
- ½ cup (1 stick) unsalted butter, softened: Same rule applies! Soft butter whips up beautifully with the cream cheese for an impossibly rich texture.
- 1 cup powdered sugar: Also called confectioner’s sugar. It dissolves instantly and sweetens without graininess. Sift it if it’s lumpy!
- 1 teaspoon pure vanilla extract: The flavor enhancer. It rounds out all the other ingredients. Use the good stuff if you have it.
- 8 oz crushed pineapple, WELL-DRAINED: The star of the show! This is the most important step. Press it in a fine-mesh strainer, even squeeze it in a clean kitchen towel. Extra liquid will make your filling runny. For more texture, you can use tidbits.
- 8 oz whipped topping (like Cool Whip), thawed: This gives our filling its dreamy, airy lift. Make sure it’s fully thawed in the fridge for easy folding. For a from-scratch touch, you can substitute with an equal amount of freshly whipped heavy cream sweetened with a tablespoon of powdered sugar.
Let’s Build the Dream: Step-by-Step
Ready? This is where the fun begins. Put on some music, clear a space, and let’s create.
Step 1: The Foundation (The Crust)
In a medium bowl, combine your graham cracker crumbs, melted butter, and sugar. Mix it with a fork until it resembles wet sand and holds together when you pinch it. Pro-Tip: I use the bottom of a flat glass or measuring cup to press the mixture firmly and evenly into the bottom of your 9×9 dish. Get it nice and compact—this prevents a crumbly crust later. Pop it in the fridge to set while you make the filling. This chills the butter, solidifying our base.
Step 2: The Creamy Heart (The Filling)
In a large mixing bowl, beat the softened cream cheese and softened butter together with an electric mixer on medium speed. Beat for a good 2-3 minutes until it’s completely smooth, creamy, and no lumps remain. Scrape down the sides of the bowl. This is the time to be patient—a smooth start means a smooth finish.
Add the powdered sugar and vanilla extract. Beat again on low at first (to avoid a sugar cloud!), then increase to medium until it’s fully incorporated and looks fluffy. Little Hack: Taste it now. This is your moment to adjust. Want it a touch sweeter? Add another tablespoon of powdered sugar. More vanilla? Go for it!
Step 3: Bringing in the Sunshine
Now, take your very well-drained crushed pineapple and add it to the cream cheese mixture. Use a spatula to fold it in gently at first. You want to distribute the pineapple without deflating the fluffiness you just created.
Step 4: The Final Fluff
Time for the whipped topping. Add your thawed whipped topping to the bowl. Here’s the key: fold, don’t stir. Use your spatula to cut down through the center, scoop along the bottom, and fold over the top. Rotate the bowl and repeat until no white streaks remain and the filling is one uniform, luscious, airy cloud. This gentle technique keeps the dessert light.
Step 5: Assembly & The Patience Game
Pull your chilled crust from the fridge. Spoon the pineapple dream filling on top and spread it into a beautiful, even layer. Smooth the top with your spatula. Now, cover it with plastic wrap and refrigerate for at least 4 hours, but overnight is truly best. I know, the wait is the hardest part! But this chilling time is what allows the flavors to marry and the dessert to set perfectly so you get clean slices. Trust the process.
How to Serve Your Tropical Masterpiece
When it’s finally time to serve, you have options! For clean squares, run a sharp knife under hot water, wipe it dry, and make your cuts. For a more rustic, family-style look, just dig in with a serving spoon.
I love plating it with a little extra flair. A dollop of extra whipped topping, a few fresh pineapple tidbits, or a sprinkle of toasted coconut or graham cracker crumbs adds texture and makes it look bakery-fancy. Serve it straight from the fridge—that cool, creamy texture is everything.
Make It Your Own: Dreamy Variations
The beauty of this dessert is its adaptability. Here are a few of my favorite twists:
- Piña Colada Dream: Fold in ½ cup of toasted sweetened coconut flakes with the pineapple. Use coconut extract instead of vanilla for a real tropical punch.
- Berry Bliss: Replace the crushed pineapple with 1 cup of well-drained, mashed strawberries or raspberries. You’ll get a gorgeous pink hue and a beautiful berry flavor.
- Lemon-Lime Zing: Swap the pineapple for 1 cup of well-drained lemon or lime pie filling (or curd). You’ll get a bright, citrusy, and utterly refreshing dessert.
- Chocolate-Dipped Twist: Use chocolate graham crackers for the crust. You could even add a handful of mini chocolate chips folded into the filling.
- Lighter Version: Use Neufchâtel cheese (⅓ less fat cream cheese), light butter, and light whipped topping. The texture will be slightly less rich but still delicious.
Beau’s Kitchen Notes & Stories
This recipe has seen it all in my kitchen. I’ve made it in a pie dish for a more elegant look, and I’ve doubled it for a crowd in a 9×13 pan (just increase the chill time). One time, in a pinch, I used digestive biscuits for the crust because that’s what I had—it was a delicious, slightly more “grown-up” variation!
The biggest lesson I’ve learned? DRAIN THAT PINEAPPLE. I can’t say it enough. I learned the hard way at a Fourth of July BBQ, ending up with a delicious but soupy dessert. Now, I’m militant about it. Also, letting the cream cheese and butter get truly soft is the secret to avoiding arm-ache from mixing and ensuring a flawless filling. This dessert is forgiving, but those two tips are game-changers.
Your Questions, Answered
My filling is runny. What happened?
99% of the time, it’s the pineapple. Even if you think it’s drained, drain it more. Press it in a strainer or squeeze it in a towel. The other culprit could be under-softened cream cheese/butter that didn’t incorporate fully, or not chilling it long enough. Give it a full overnight chill if you can.
Can I use fresh pineapple?
You can, but canned is actually better here. Fresh pineapple contains an enzyme (bromelain) that can break down dairy proteins, potentially making your filling watery or causing it to separate over time. Canned pineapple is heat-treated, deactivating that enzyme, making it the safer, more reliable choice for this no-bake dessert.
How long does it keep in the fridge?
Covered tightly, it keeps beautifully for 3-4 days. The crust may soften slightly by day 3 or 4, but it will still taste amazing.
Can I freeze Pineapple Dream Dessert?
I don’t recommend freezing the assembled dessert, as the texture of the whipped topping and cream cheese can become grainy and separate upon thawing. It’s best enjoyed fresh from the fridge.
Print
Pineapple Dream Dessert : A Light and Creamy No-Bake Delight
Description
Pineapple Dream Dessert
Your New No-Bake Obsession
Creamy, Cool, and Made for Sharing
Hey friends, Beau here from Feastical! When the sun is shining and people are coming over, I want a dessert that feels special without turning my kitchen into a sauna. That’s exactly why this Pineapple Dream Dessert has been my secret weapon for years.
Ingredients
For the Graham Cracker Crust
-
2 cups graham cracker crumbs
-
½ cup (1 stick) unsalted butter, melted
-
2 tbsp granulated sugar
For the Pineapple Dream Filling
-
8 oz cream cheese, fully softened
-
½ cup (1 stick) unsalted butter, softened
-
1 cup powdered sugar
-
1 tsp pure vanilla extract
-
8 oz crushed pineapple, VERY well drained
-
8 oz whipped topping (Cool Whip), thawed
(or equal amount freshly whipped cream, lightly sweetened)
Instructions
In a medium bowl, mix graham cracker crumbs, melted butter, and sugar until it resembles wet sand.
Press firmly into the bottom of a 9×9-inch dish, using the bottom of a glass to compact it evenly.
Refrigerate while you prepare the filling.
In a large bowl, beat softened cream cheese and butter together for 2–3 minutes until completely smooth and lump-free. Scrape down the bowl as needed.
Add powdered sugar and vanilla. Beat until fluffy and well combined.
Fold in the well-drained crushed pineapple using a spatula. (Drain it more than you think you need to!)
Gently fold in the whipped topping until the filling is light, airy, and uniform. Do not stir—folding keeps it cloud-like.
Spread filling evenly over the chilled crust. Smooth the top, cover, and refrigerate for at least 4 hours, preferably overnight, until fully set.
Notes
-
Drain the pineapple aggressively — excess juice = runny filling
-
Fully softened cream cheese and butter = silky texture
-
Overnight chilling gives the cleanest slices and best flavor
Nutritional Information*
*Please note: This is an estimated nutritional breakdown based on the specific ingredients listed and standard serving sizes. Values may vary depending on brands and any substitutions you make.
Per Serving (assuming 12 servings): Calories: ~290 | Total Fat: 18g | Saturated Fat: 11g | Carbohydrates: 30g | Sugar: 20g | Protein: 2g
This is a celebratory dessert, meant to be enjoyed in the context of a balanced diet. To lighten it up, see the “Lighter Version” variation above. Remember, sharing a homemade dessert like this is about joy and connection—that’s always good for the soul.
Final Thoughts from My Kitchen to Yours
And there you have it, friends—my beloved Pineapple Dream Dessert in all its no-bake glory. It’s more than just a recipe; it’s a ticket to easy entertaining, a guaranteed smile-inducer, and a reminder that the best food often comes from simple ingredients and a little bit of love.
I hope this becomes a staple in your home just like it is in mine. When you make it, I’d love to hear about it! Tag me on social @Feastical or drop a comment on the blog. Nothing makes me happier than seeing your kitchen creations.
Now, go enjoy that sunshine in a dish. You’ve earned it. Until next time, keep cooking (or not baking!) with joy.
— Beau