
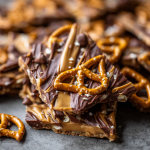
Peanut Butter Pretzel Bark Recipe – Easy 3-Ingredient Sweet & Salty Treat
When a Snack Craving Strikes: The Magic of Sweet & Salty
Hey there, friend! Beau here. Let’s be real for a second. Some days, you just need a treat. Not a fussy, five-layer cake that dirties every bowl in the kitchen, but a quick, no-nonsense, soul-satisfying bite that hits all the right notes. You know the feeling—that tug-of-war between wanting something sweet and something salty, where you find yourself standing in front of the pantry, a jar of peanut butter in one hand and a bag of pretzels in the other.
Well, I’m here to tell you to put both of those things in your basket, because we’re about to make magic. This Peanut Butter Pretzel Bark is my go-to hero for last-minute potlucks, movie nights, or those “I-deserve-this” moments. It’s the glorious love child of a candy bar and a snack mix, and it’s here to make your life infinitely more delicious.
We’re talking a mere three ingredients and zero oven time. Just a few minutes of active work transforms humble pantry staples into a stunning, crackly bark that’s creamy, crunchy, sweet, and salty all at once. It’s the kind of recipe that makes people think you’re a kitchen wizard, and I’m absolutely giving you permission to take all the credit. So, let’s ditch the complicated recipes and make something that tastes like a warm hug and a high-five combined.
The Midnight Snack That Started It All
This recipe always takes me back to my college days. Picture this: It’s 2 a.m., and my roommate, Leo, and I are “studying” (which, let’s be honest, meant watching old cooking shows and complaining we were hungry). Our pantry was a sad sight—mostly ramen and stale cereal. But we did have a half-eaten bag of pretzels, some chocolate chips left over from a failed baking experiment, and of course, the eternal jar of peanut butter.
In a moment of what we thought was pure, sleep-deprived genius, we melted everything together on a plate, stuck it in our tiny dorm fridge, and crossed our fingers. What emerged was a crude, chunky, glorious slab of deliciousness. We broke it into pieces right there on the linoleum floor and declared it a masterpiece. That messy, improvised treat became our secret weapon. It’s evolved since then (parchment paper is a game-changer, trust me), but the spirit remains the same: the best food often comes from a simple, happy accident.
Gather Your Trio of Heroes
See? I told you it was simple. But don’t let the short list fool you—each ingredient is pulling serious weight. Here’s the lowdown on what you’ll need and why it works.
- 2 cups mini pretzels, roughly broken – The salty, crunchy foundation of our bark. I like using mini pretzels because they’re the perfect bite-sized crunch. Don’t pulverize them into dust! We want a variety of chunks and pieces for that fantastic texture. Chef’s Insight: If you only have big pretzels, throw them in a zip-top bag and give them a few gentle whacks with a rolling pin. It’s a great way to relieve a little stress!
- 1 cup semi-sweet or milk chocolate chips, melted – This is our rich, sweet blanket. I’m a semi-sweet guy myself—I love the way its slight bitterness plays with the salty pretzels. But if you have a serious sweet tooth, milk chocolate is a dreamy, creamy alternative. Substitution Tip: Feel free to use high-quality chocolate bars chopped up, or even dark chocolate chips for a more sophisticated vibe.
- ½ cup creamy peanut butter, melted – The creamy, nutty star of the show. It gets swirled into the chocolate, creating those beautiful marbled veins of flavor. Chef’s Insight: Use a standard, no-stir creamy peanut butter for the best, smoothest melting. The natural kind can sometimes separate and get oily when melted.
Let’s Build Some Bark! (Step-by-Step)
Ready to see how this all comes together? It’s so easy, you’ll have it memorized after one try. I’ve packed each step with my favorite little hacks to ensure your bark is absolutely perfect.
- Line a baking sheet with parchment paper. This is our non-negotiable first step, friends. Parchment paper is your best friend for no-bake treats. It prevents sticking and makes cleanup a literal snap. Don’t try to use wax paper—it’s not the same and can melt into your beautiful bark! A quarter-sheet pan (9×13) is the perfect size for this recipe.
- Scatter broken pretzels evenly across the sheet. Take your roughly broken pretzels and create a single, even layer. You want them close enough that the chocolate can bridge the gaps, but not so piled up that you get clumpy spots. Think “rustic and scattered,” not “neat and tidy.” This is where the fun, free-form texture comes from.
- Drizzle melted chocolate over the pretzels and gently spread to cover. Now for the fun part! You can melt your chocolate in a double boiler, but my go-to method is the microwave. Pop the chocolate chips in a microwave-safe bowl and heat in 30-second bursts, stirring well after each, until smooth. Pour it over the pretzels and use an offset spatula or the back of a spoon to gently spread it into an even layer, making sure to get into all the nooks and crannies. Chef’s Hack: Leave a few pretzel bits poking out around the edges—it looks artisanal and gives a preview of the crunch inside!
- Spoon melted peanut butter over the chocolate and swirl using a toothpick or knife. Melt your peanut butter the same way (microwave in 15-second intervals, stirring until runny). Drop spoonfuls of the melted peanut butter all over the chocolate layer. Then, take a toothpick or the tip of a thin knife and drag it through the two layers, creating beautiful swirls and marbling. Don’t overdo it! A few figure-eight motions are all you need. Over-mixing will just muddle the flavors.
- Chill in the refrigerator for 30–45 minutes or until fully set. The hardest part: waiting. Slide the entire baking sheet into the fridge and let the magic happen. The bark is ready when it’s firm to the touch and doesn’t give when you press it. This is where it transforms from a gooey puddle into a snappable, shardable masterpiece.
- Break into pieces and store in an airtight container. Time for the grand finale! Take the bark out of the fridge. Lift the entire slab off the parchment paper and place it on a cutting board. Now, get hands-on! Use your fingers to crack it into rustic, irregular pieces. This isn’t about perfect squares; it’s about that satisfying “CRACK!” Store your bounty in an airtight container at room temperature or in the fridge.
How to Serve Your Sweet & Salty Masterpiece
Okay, you’ve made this gorgeous bark. Now what? The beauty is in its versatility. Pile it high on a wooden board or in a big rustic bowl for a casual get-together—it’s a guaranteed conversation starter. For gifting, I love stacking a few pieces in a clear cellophane bag tied with a bit of twine or a ribbon. It makes for a wonderfully personal and delicious homemade present.
My favorite way to enjoy it? With a big, cold glass of milk or a hot cup of coffee. The creaminess of the milk is the perfect partner for the rich chocolate and peanut butter, while the bitterness of coffee cuts through the sweetness beautifully. It’s also a superstar on a dessert charcuterie board, nestled next to some fresh fruit and a few chunks of cheese. Trust me, it belongs there.
Get Creative! 5 Tasty Twists on the Classic
Once you’ve mastered the basic blueprint, the world is your oyster! This recipe is a fantastic canvas for your creativity. Here are a few of my favorite ways to mix it up.
- The “Trail Mix” Bark: Before the chocolate sets, sprinkle a handful of raisins, dried cranberries, and maybe even a few sunflower seeds over the top for a fruit-and-nut energy boost.
- The “Elvis” Special: Channel the King himself! After swirling, sprinkle on some crispy cooked and crumbled bacon. Sweet, salty, smoky, and absolutely incredible.
- White Chocolate Dream: Swap the semi-sweet chocolate for white chocolate. The contrast with the salty pretzels and peanut butter is next-level. A drizzle of dark chocolate on top looks stunning, too.
- Nut-Free Friendly: Have an allergy? No problem! Use sunflower seed butter or Wowbutter instead of peanut butter. The flavor profile is wonderfully similar and just as delicious.
- Sea Salt & Caramel Swirl: Drizzle a few tablespoons of store-bought caramel sauce along with the peanut butter before you swirl. Then, finish the bark with a light sprinkle of flaky sea salt for a gourmet touch.
Beau’s Kitchen Notes & Funny Stories
This recipe has been with me for so long, it feels like an old friend. It’s evolved from that dorm-room floor creation into the reliable showstopper it is today. I once made a triple batch for a friend’s wedding shower, and I’ll never forget the sight of the groom sneaking an entire plate of it into the coat closet. When we found him, he just looked up, covered in chocolate crumbs, and said, “It’s just too good, man.” I took it as the highest compliment.
The biggest lesson I’ve learned? Don’t stress the swirl. Seriously. Whether you create a perfect marbled pattern or it all just kind of blends together, it’s going to taste phenomenal. Perfection is overrated; flavor is forever.
Your Questions, Answered!
Over the years, I’ve gotten a few repeat questions about this bark. Here are the answers to the most common head-scratchers.
- Q: My chocolate seized up and got grainy when I melted it. What happened?
A: Ah, the dreaded seize! This usually happens when a tiny bit of water or steam gets into the chocolate. Even a drop can cause it to tighten up. Make sure your bowl and utensils are completely dry. If it happens, it’s tricky to fix, but you can try stirring in a teaspoon of neutral oil (like vegetable or coconut) to smooth it out. - Q: Can I use chunky peanut butter?
A: You absolutely can! It will give you an even bigger peanut crunch. Just know that it might be a tiny bit harder to swirl smoothly. If you’re a texture person, go for it! - Q: How long does this bark last?
A: Stored in an airtight container at a cool room temperature (or in the fridge if your kitchen is warm), it will stay fresh and crunchy for up to two weeks. If it lasts that long! - Q: My bark is soft and doesn’t snap. Why?
A: It probably just needs more time to set. Pop it back in the fridge for another 30 minutes. Also, make sure you’re not in a super humid environment, as that can prevent the chocolate from setting up properly.
Peanut Butter Pretzel Bark : Sweet, Salty, and Ready in Minutes
Description
Hey friends! Some days, you just need a simple treat that hits all the right notes—sweet, salty, crunchy, and creamy. This Peanut Butter Pretzel Bark is my go-to snack for last-minute potlucks, movie nights, or those “I-deserve-this” moments. With just three ingredients and zero oven time, it’s a showstopper that’s surprisingly easy to make.
Ingredients
-
2 cups mini pretzels, roughly broken
-
1 cup semi-sweet or milk chocolate chips, melted
-
½ cup creamy peanut butter, melted
Instructions
-
Prep your pan
Line a baking sheet (9×13 inch works well) with parchment paper. This prevents sticking and makes cleanup a breeze. -
Layer the pretzels
Scatter the broken pretzels evenly across the sheet in a single layer. Some overlap is fine, but aim for a mostly flat base. -
Add chocolate
Melt chocolate chips in a microwave-safe bowl in 30-second bursts, stirring each time until smooth. Pour over the pretzels and gently spread to cover, leaving a few pretzel bits peeking out for a rustic look. -
Swirl in peanut butter
Melt the peanut butter in 15-second intervals until runny. Drop spoonfuls over the chocolate layer, then swirl lightly with a toothpick or knife to create marbled veins. -
Chill
Place the sheet in the fridge for 30–45 minutes or until firm to the touch. -
Break into pieces
Lift the bark from the parchment and break into rustic shards. Store in an airtight container at room temperature or in the fridge.
Notes
-
Chocolate seized? Ensure bowls and utensils are completely dry. Stir in a teaspoon of neutral oil if needed.
-
Chunky peanut butter? Works fine but may be slightly harder to swirl smoothly.
-
Soft bark? Chill a bit longer; humidity can affect setting.
-
Creative twists:
-
Sprinkle dried fruit, seeds, or crumbled bacon before chocolate sets.
-
Swap chocolate for white chocolate or dark chocolate for variety.
-
Add caramel drizzle and a pinch of flaky sea salt for a gourmet touch.
-
A Quick Bite on Nutrition
Now, let’s be clear: this is a treat, and we should enjoy it as such! But it’s always good to know what you’re eating. The beauty of this bark is that you control the ingredients. Using dark chocolate can add antioxidants, and peanut butter provides a bit of protein and healthy fats to help keep you satisfied. The pretzels give you that satisfying carb-y crunch. It’s all about balance. Enjoy a piece or two mindfully as part of a happy, well-rounded life. Remember, food is fuel, but it’s also joy.
Estimated per piece (based on 12 pieces):
Calories: 180 | Fat: 11g | Carbs: 17g | Sugar: 9g | Protein: 4g
Final Thoughts
And there you have it! Your complete guide to creating the easiest, most crowd-pleasing treat in your repertoire. This Peanut Butter Pretzel Bark is more than just a recipe; it’s a reminder that the best things in life don’t have to be complicated. It’s about embracing simple ingredients, having a little fun in the kitchen, and creating something that genuinely makes people smile.
So, the next time that sweet-and-salty craving hits, you know exactly what to do. You’ve got this. Now, go break some bark—and don’t forget to save a piece for the cook!
Happy munching,
Beau
Prep Time: 5 minutes | Chill Time: 30–45 minutes | Total Time: 35–50 minutes | Makes: About 10–12 shards