
Peanut Butter Lunch Lady Cookie Bars – Soft Frosted Peanut Butter Bars
Welcome Back to the Best Part of the School Day
Hey friends, Beau here from Feastical! Let me ask you a question. Close your eyes for a second. Can you smell it? That unmistakable aroma of roasting peanuts and sweet vanilla wafting through the fluorescent-lit hallways? Can you hear the clatter of plastic trays and the buzz of a hundred kids counting down the minutes until lunch? And then, you see it. Sitting there, glorious and unassuming under the sneeze guard, was the holy grail of cafeteria desserts: the Peanut Butter Lunch Lady Bar.
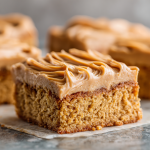
It wasn’t fancy. It wasn’t artisanal. But my goodness, was it perfect. A thick, impossibly soft and chewy peanut butter cookie base, topped with a cloud of rich, melt-in-your-mouth peanut butter frosting. It was the kind of treat that made you forget about that pop quiz you just bombed. For years, I chased that flavor, that specific texture, trying to recreate the magic in my own kitchen. And after more batches than I care to admit (all in the name of research, of course!), I’ve finally nailed it.
Today, I’m sharing my ultimate recipe for these Peanut Butter Lunch Lady Cookie Bars. This is more than just a recipe; it’s a time machine. It’s a warm hug from the past, designed to bring a little simple, soulful joy to your kitchen right now. They’re incredibly easy to make, require no fancy equipment, and are guaranteed to disappear faster than you can say “second helping.” So, preheat that oven, grab your favorite mixing bowl, and let’s bake up a big pan of pure, unadulterated nostalgia.
The Cafeteria Line & A Sweet Core Memory
I’ll never forget my third-grade lunch lady, Dorothy. She had a towering beehive hairdo that defied gravity and a smile that could calm even the most frantic kindergartener. She called everyone “sweet pea” and always had a kind word. But her real superpower was her peanut butter bars. They were legendary. Rumor had it she’d been making them from the same stained, handwritten recipe card since the school opened in the 60s.
One fateful Tuesday, I was the designated “line leader” for my class. My heart was pounding as I approached the dessert section, my tray shaking slightly. Dorothy saw my wide eyes locked on the last remaining bar. She leaned in, her voice a warm whisper. “For you, sweet pea,” she said, sliding that precious bar onto my tray with a wink. “I saved the biggest one.” In that moment, I wasn’t just a kid getting a dessert; I felt seen. It was a small act of kindness, baked into a 3×3 inch square, that taught me how food can truly connect us. That’s the feeling I try to bake into every single batch.
Gathering Your Sweet, Simple Ingredients
The beauty of this recipe is in its simplicity. These are pantry staples that come together to create something truly magical. Here’s your shopping list, complete with a few of my chef-y insights to help you nail it.
For the Cookie Bars:
- 2 cups all-purpose flour: This is the structural backbone of our bars. I don’t recommend substituting with whole wheat here, as we want that classic, tender crumb. For a gluten-free swap, a 1:1 gluten-free flour blend works wonderfully!
- 2 cups granulated sugar: Yes, two full cups! This is a nostalgic treat, after all. The sugar not only adds sweetness but also contributes to that beautifully crisp, golden top and chewy center.
- 1½ cups peanut butter: This is the star of the show! I find creamy, conventional peanut butter (like Jif or Skippy) works best for that authentic “lunch lady” texture and flavor. The added oils and sugars help keep the bars super soft. Natural peanut butter can sometimes make the bars a bit drier and oilier.
- 3 sticks (1½ cups) butter, softened: Use unsalted butter and let it come to true room temperature. This is the secret to a light, creamy batter that isn’t greasy. If you only have salted, just reduce the added salt in the recipe by half.
- 2 large eggs: They bind everything together and add richness. Make sure they’re at room temperature to blend seamlessly into the batter.
- 1 tsp vanilla extract: The supporting actor that makes the peanut butter flavor sing. Don’t skip it!
- 1 tsp baking soda: Our leavening agent, giving the bars a little lift and a perfect, cake-like texture.
- 1 tsp salt: Crucial for balancing all that sweetness and enhancing the peanut butter flavor. Trust me on this one.
For That Dreamy Peanut Butter Frosting:
- 4 cups powdered sugar: Also known as confectioner’s sugar. It creates that smooth, melt-in-your-mouth frosting we all love. No substitutes here!
- ½ cup milk: Whole milk will give you the creamiest, richest frosting, but 2% or even a plain, unsweetened non-dairy milk like almond or oat milk will work just fine.
- ½ cup peanut butter: This is taken from the 1½ cups listed for the bars. We’ll use 1 cup in the batter and reserve this ½ cup specifically for the frosting.
Let’s Bake: Step-by-Step to Nostalgia
Ready to create some magic? This process is as easy as, well, pie. Or in this case, bars! Follow these steps, and you’ll be a lunch lady legend in no time.
- Preheat and Prep: Fire up your oven to 350°F (175°C). Now, grab your trusty 9×13-inch baking pan. Grease it thoroughly with butter or non-stick spray. I’m a big fan of the butter-and-flour method for absolute non-stick security, but a good spray will do the trick. Chef’s Hack: For super easy removal and clean slicing, line your pan with parchment paper, leaving a little overhang on two sides. You’ll be able to lift the entire slab of bars out in one go!
- Cream the Good Stuff: In a large mixing bowl, combine the softened butter, granulated sugar, and 1 cup of the peanut butter. Using an electric mixer (or some serious elbow grease with a wooden spoon), beat this together on medium speed for a good 2-3 minutes. You want it to be light, fluffy, and pale in color. This step is key for incorporating air, which gives our bars that perfect texture. Don’t rush it!
- Incorporate the Wet Ingredients: Crack in the two eggs and add the teaspoon of vanilla extract. Mix on medium speed until everything is fully combined and the mixture looks smooth and satiny. Scrape down the sides of the bowl with a spatula to make sure no rogue butter is hiding out.
- Bring in the Dry Team: In a separate bowl, whisk together your flour, baking soda, and salt. This ensures the leavening and salt are evenly distributed throughout the flour. Now, with your mixer on low speed, gradually add the dry ingredients to the wet mixture. Mix just until the flour disappears. Chef’s Hack: Overmixing at this stage is the enemy of a tender bar! A few streaks of flour are fine; they’ll incorporate as you spread the batter.
- Pan and Bake: Transfer the thick, glorious batter to your prepared pan. Use a spatula or your fingers (lightly dampened with water to prevent sticking) to spread it into a smooth, even layer. Pop it into the preheated oven and bake for 22-25 minutes. You’ll know it’s done when the top is a beautiful golden brown and the edges are just starting to pull away from the sides of the pan. The center might still look a tiny bit soft—that’s perfect! It will set up as it cools. Chef’s Hack: For the ultimate fudgy texture, err on the side of under-baking. A toothpick inserted in the center should come out with a few moist crumbs attached, not completely clean.
- The All-Important Cool Down: This is the hardest part: patience. Remove the pan from the oven and place it on a wire rack. You must let the bars cool completely before you even think about frosting them. I’m talking totally, 100% cool to the touch. If you frost them warm, the frosting will melt into a goopy, sugary puddle. Let’s avoid that tragedy!
- Whip Up the Frosting: While the bars are cooling, let’s make that iconic frosting. In a medium saucepan over low heat, combine the milk and the remaining ½ cup of peanut butter. Warm it gently, whisking constantly, until the peanut butter has melted and the mixture is smooth and unified. Remove the pan from the heat. Now, gradually whisk in the powdered sugar, one cup at a time, until you have a thick, glossy, pourable frosting. If it seems too thick, add a teaspoon of milk at a time. Too thin? Add a bit more powdered sugar.
- Frost and Finale: Once the bars are completely cool, pour the frosting over the top. Tilt the pan to help it spread into a beautiful, even layer. Now, you have two choices: you can dig in immediately for a softer, more gooey experience, or you can let the frosting set for about an hour for cleaner slices. I won’t judge either way.
How to Serve Up These Sweet Squares
Presentation is part of the fun! For the true cafeteria experience, slice them into generous rectangles and serve them right from the pan. But if you’re feeling a little fancy, here are a few ideas:
The Classic: A simple square on a napkin or a small plate is all you need. This is pure, unpretentious comfort food.
The Dinner Party Darling: Place a small square on a dessert plate alongside a shot glass of cold milk or a dollop of freshly whipped cream. It elevates the nostalgia just enough.
The Ultimate Indulgence: Warm a square gently in the microwave for 10-15 seconds and top it with a scoop of high-quality vanilla bean ice cream. The contrast of warm bar, cool ice cream, and that soft frosting is a life-changing experience.
And the perfect pairing? A tall, ice-cold glass of milk is non-negotiable. It’s the official beverage of these bars.
Get Creative! Fun Flavor Twists
Once you’ve mastered the classic, feel free to play with your food! Here are a few of my favorite ways to mix it up:
- Chocolate Peanut Butter Paradise: Stir 1 cup of semi-sweet chocolate chips into the batter before baking. Or, for a decadent top, make a simple chocolate glaze instead of the peanut butter frosting by melting together 1 cup chocolate chips with ½ cup of heavy cream.
- The “Elvis” Special: For the King himself! After spreading the batter, sprinkle 1 cup of chopped, cooked bacon and 1 sliced banana over the top before baking. The sweet and salty combo is insane.
- Peanut Butter & Jelly Bars: Before baking, drop teaspoonfuls of your favorite jam or jelly (grape is classic!) randomly over the batter. Use a knife to gently swirl it in for a marbled effect.
- Crunchy Time: Add a delightful texture by folding in ½ cup of chopped, salted peanuts into the batter along with the dry ingredients.
- Oatmeal Peanut Butter Bars: Replace ½ cup of the all-purpose flour with ½ cup of old-fashioned oats for a heartier, chewier bar with a lovely nubbly texture.
Beau’s Kitchen Confidential
This recipe has been a living, evolving thing in my kitchen. The first time I made it, I was so eager I dumped all the peanut butter into the batter and had to make a sad, peanut-butter-less powdered sugar glaze. It was… fine. But it wasn’t Dorothy’s bar. That’s when I learned the importance of reserving that ½ cup for the frosting! I’ve also learned that the brand of peanut butter really does matter for that specific nostalgic taste. My family now has a “bar alert” system—if they see me pulling out the 9×13 pan and the giant jar of Jif, they know it’s going to be a good day.
Your Questions, Answered!
Over the years, I’ve gotten a lot of great questions about this recipe. Here are the most common ones to ensure your baking success.
Q: My bars came out really dry and crumbly. What happened?
A: The most common culprit is over-baking. Ovens can vary wildly, so start checking at the 20-minute mark. Also, be sure you’re measuring your flour correctly. Spoon it into your measuring cup and level it off with a knife instead of scooping directly from the bag, which can pack in too much flour.
Q: Can I make these ahead of time?
A: Absolutely! These bars are actually even better the next day. Once cooled and frosted, just cover the pan tightly with plastic wrap or foil. They’ll stay soft and delicious at room temperature for up to 3 days. You can also freeze them for up to 3 months!
Q: Why did my frosting turn out grainy?
A: This usually happens if the powdered sugar isn’t fully dissolved. Make sure your milk and peanut butter mixture is warm enough (but not boiling) before you whisk in the sugar. Whisking vigorously for a full minute or two can also help achieve that super-smooth, glossy texture.
Q: Can I use natural peanut butter?
A> You can, but be prepared for a different texture. Natural peanut butter tends to be oilier and can separate, which might make the bars a bit greasier and less cohesive. If it’s all you have, give it a good stir and maybe reduce the butter by a tablespoon or two.
Peanut Butter Lunch Lady Cookie Bars : Soft, Sweet, and Totally Nostalgic
- Total Time: 40 mins
Description
Thick, soft, and slathered in creamy peanut butter frosting—these Peanut Butter Lunch Lady Cookie Bars are pure nostalgia in a pan. Inspired by the old-school cafeteria favorite, this recipe brings back that warm, sweet scent of peanut butter and vanilla that used to drift through the lunch line. Made with simple ingredients, these bars are perfectly chewy, rich, and melt-in-your-mouth delicious. One bite, and you’ll be transported straight back to the good old days—minus the plastic tray!
Ingredients
For the Bars
-
2 cups all-purpose flour
-
2 cups granulated sugar
-
1½ cups creamy peanut butter (divided)
-
1½ cups unsalted butter, softened (3 sticks)
-
2 large eggs, room temperature
-
1 tsp vanilla extract
-
1 tsp baking soda
-
1 tsp salt
For the Frosting
-
½ cup peanut butter (reserved from above)
-
4 cups powdered sugar
-
½ cup milk (whole or evaporated for extra creaminess)
-
Pinch of salt
Instructions
-
Preheat & Prep
Heat oven to 350°F (175°C). Grease a 9×13-inch baking pan and line with parchment for easy lifting. -
Make the Batter
Beat together butter, sugar, and 1 cup of peanut butter until light and fluffy (2–3 minutes). Mix in eggs and vanilla until smooth. -
Add Dry Ingredients
In a separate bowl, whisk flour, baking soda, and salt. Gradually mix into the wet ingredients until just combined—don’t overmix! -
Bake
Spread batter evenly in the pan and bake for 22–25 minutes, until golden and set at the edges but soft in the center. Cool completely before frosting. -
Frosting Time
Warm milk and remaining ½ cup peanut butter over low heat until smooth. Remove from heat and whisk in powdered sugar and a pinch of salt until glossy and spreadable. Pour over cooled bars and spread evenly. -
Set & Slice
Let frosting set for about an hour for clean squares—or dig in while it’s still gooey and irresistible!
Notes
-
Use creamy Jif or Skippy for the most authentic “school cafeteria” flavor.
-
Slightly underbake for soft, chewy bars.
-
Top with flaky sea salt or mini chocolate chips for a modern twist.
- Prep Time: 15 mins
- Cook Time: 25 mins
Nutrition
- Calories: 290 Cal per bar
Let’s Talk Nutrition (The Fun Kind!)
Look, we’re all friends here. This is a dessert bar, through and through. It’s meant to be enjoyed as a special treat that brings joy and a flood of happy memories. Each generous bar comes in at around 290 calories. It’s a rich, satisfying indulgence, so a little goes a long way! They pack about 17g of fat (from all that delicious butter and peanut butter), 30g of carbs for that energy boost, and 4g of protein thanks to our star ingredient. My philosophy has always been that food should nourish the soul first, and these bars are packed with soul. So savor every bite without an ounce of guilt!
One Last Bite of Wisdom
And there you have it, my friends—the secret to bringing that lunchroom magic right into your own kitchen. This recipe is a testament to the fact that the most beloved foods are often the simplest ones, made with love and shared with joy. I hope baking these Peanut Butter Lunch Lady Cookie Bars fills your home with the same warmth and wonderful smells that it fills mine.
I’d love to hear about your baking adventures! Did you add a twist? Did it bring back a core memory for you? Tag me on social @Feastical or shoot me an email. Sharing our kitchen stories is my favorite part of this whole journey.
Now, go forth and bake something Feastical!
Final Thoughts: More Than Just a Bar
Baking, at its very best, is a time machine. It’s a way to preserve and relive the moments that shaped us—the simple, powerful joys of childhood. This recipe for Peanut Butter Lunch Lady Cookie Bars is more than just a list of ingredients and steps; it’s a direct line back to the squeak of sneakers on linoleum, the sound of a best friend’s laugh, and the profound kindness of a lunch lady named Dorothy.
These bars are a celebration of the unpretentious, soul-satisfying treats that form the fabric of our sweetest memories. They prove that you don’t need exotic ingredients or complicated techniques to create something truly magical. All you need is a well-loved recipe, a handful of pantry staples, and the intention to bake with heart.
So, as you slice into that pan and see the soft, chewy base beneath its cloud of frosting, I hope you feel a wave of that same simple happiness. I hope it reminds you that joy can be found in a 9×13-inch pan, that connection can be baked into a dessert, and that sometimes, the most powerful flavor of all is nostalgia.
Now, grab that glass of milk, take a bite, and welcome back to the best part of the day.
With a full heart and an even fuller pan,
Beau