
Your Childhood Sandwich Just Got a Major Dessert Glow-Up
Hey there, Feastical family! Beau here, coming at you from a kitchen that currently smells like toasted peanuts and sweet, bubbling jam. If that doesn’t sound like a slice of heaven to you, just hang tight—I’m about to change your mind.
We all have those flavor memories that instantly transport us, right? For me, it’s the unbeatable combo of creamy peanut butter and sweet, fruity jelly, smooshed between two slices of soft white bread. It was the taste of after-school snacks, of lunchboxes traded on the playground, of simple, no-fuss comfort. But what if I told you we could take that iconic duo and turn it into something even more magical? Something you can hold in one hand with a cup of coffee in the other, no plate required?
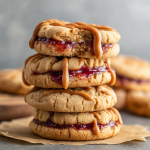
Welcome to the world of Peanut Butter & Jelly Cookies. This isn’t just a recipe; it’s a full-blown nostalgia trip, baked to perfection. We’re talking buttery-soft peanut butter cookies, warm from the oven, each one cradling a hidden pocket of your favorite jam. And because we believe in going the extra mile for that “wow” factor, we’re finishing them with a graceful drizzle of melted peanut butter that sends these cookies straight into the hall of fame.
Whether you’re a seasoned baker or someone who considers store-bought dough a major win, this recipe is for you. It’s simple, soulful, and guaranteed to make your kitchen the happiest place in the house. So, tie on your apron, dig out that jar of peanut butter from the back of the pantry, and let’s bake up some memories together.
The Little League Lunch That Started It All
I’ll never forget my first-grade lunchbox. It was this beat-up, blue plastic thing with a matching thermos that always smelled faintly of tomato soup. But every Tuesday, without fail, my mom would pack me the king of all sandwiches: peanut butter and grape jelly on whole wheat, cut into two perfect triangles. It was my secret pre-game fuel before Little League, and I was convinced it made me run faster and hit harder.
One particular Tuesday, we had a bake sale to raise money for new team jerseys. My mom, being the absolute rockstar she is, decided to “cookie-fy” my favorite sandwich. She showed up with a tupperware container full of these warm, jammy thumbprint cookies. The team went wild for them. They sold out in minutes, and for one glorious afternoon, I wasn’t just the kid with a decent throwing arm—I was the kid with the cool mom who made the best cookies ever. That’s the power of food, friends. It’s not just about taste; it’s about the stories and the feelings we bake right into every batch.
Gathering Your Cookie Dream Team
This is where the magic begins! I’ve built this recipe to be forgiving and flexible, because life’s too short to stress over cookies. Let’s break down what you’ll need and why each ingredient is a key player.
- 1 cup unsalted butter, softened: This is the foundation of our cookie’s rich, tender texture. Using unsalted lets you control the salt level. Chef’s Tip: “Softened” means your butter should give slightly when you press it, but you shouldn’t be able to poke your finger straight through it. If you forget to take it out of the fridge, cut it into chunks and let it sit for 15-20 minutes.
- 1 cup granulated sugar + 1 cup brown sugar, packed: The dynamic duo of sweetness! Granulated sugar gives our cookies that slight crispness on the edges, while the brown sugar (pack it firmly into your measuring cup!) brings moisture, chewiness, and that deep, caramel-like flavor we all love.
- 2 large eggs: Our binding agents. They bring everything together and add structure. Make sure they’re at room temperature to blend seamlessly with the butter and sugars.
- 1 teaspoon vanilla extract: The flavor enhancer. It might seem simple, but a good quality vanilla adds a warm, aromatic depth that makes the peanut butter and jelly sing in harmony.
- 2½ cups all-purpose flour: The backbone of our cookie. It provides the structure so our cookies don’t spread into one giant, delicious puddle. For a gluten-free swap, a 1:1 gluten-free flour blend works wonderfully here.
- 1 teaspoon baking powder + 1 teaspoon baking soda: Our leavening dream team. They work together to give the cookies the perfect amount of lift and that signature soft, cake-like crumb.
- ½ teaspoon salt: Don’t skip this! Salt is the secret weapon that balances the sweetness and makes all the other flavors pop. If you only have salted butter, just reduce this to a pinch.
- 1 cup creamy peanut butter: The star of the show! I prefer creamy for a smooth texture, but if you’re a crunchy peanut butter fan, go for it—it’ll add a lovely little texture. Natural peanut butter can sometimes make the dough a bit oily, so a standard brand like Jif or Skippy works best for consistency.
- 1 cup jelly or jam of choice: This is where you get to be the artist! Grape is the classic, but I’m a sucker for raspberry or strawberry. Jam tends to be thicker and less runny than jelly, which is perfect for keeping its shape in the cookie’s center.
Let’s Get Baking: The Step-by-Step Cookie Journey
Ready to create some magic? Follow these steps, and you’ll be a PB&J cookie pro in no time. I’ve sprinkled in my favorite chef hacks to make the process even smoother.
- Preheat Oven & Prep Your Pans: First things first, get that oven preheating to a cozy 350°F (175°C). This ensures it’s perfectly hot and ready when your cookies are. Line your baking sheets with parchment paper. Chef’s Hack: This isn’t just for easy cleanup; it prevents the bottoms from browning too quickly. No parchment? A light coating of non-stick spray works too.
- Cream Butter & Sugars: In a large bowl, beat the softened butter, granulated sugar, and brown sugar together. We’re not just mixing here; we’re “creaming.” Beat it on medium-high speed for a good 2-3 minutes until the mixture turns pale, fluffy, and almost looks like a light cookie dough itself. This step is crucial for incorporating air, which gives our cookies that perfect, soft texture.
- Add the Wet Team: Crack in the eggs, add the vanilla extract, and scoop in that glorious peanut butter. Mix on medium speed until everything is beautifully combined and smooth. Scrape down the sides of the bowl with a spatula to make sure no rogue pockets of butter are hiding.
- Welcome the Dry Ingredients: In a separate bowl, whisk together your flour, baking powder, baking soda, and salt. This little pre-mix ensures the leavening agents are evenly distributed, so every cookie rises uniformly. Now, gradually add these dry ingredients to the wet mixture, mixing on low speed just until the flour disappears. Chef’s Tip: Overmixing at this stage can lead to tough cookies! A few streaks of flour are okay; they’ll get incorporated when we shape the dough.
- Shape & Create the “Sandwich”: Here’s the fun part! Roll the dough into 1-inch balls. I use a small cookie scoop for uniformity, but a tablespoon works great. Place them about 2 inches apart on your prepared baking sheets. Now, using your thumb, the back of a small measuring spoon, or even the handle of a wooden spoon, press a firm indentation into the center of each dough ball. Chef’s Hack: If the dough starts sticking to your thumb, lightly dip it in a small bowl of water or flour.
- The Jammy Heart: Grab your jelly or jam. If it’s super thick, you can give it a quick stir to loosen it up. Spoon about ½ a teaspoon into each little well you created. Don’t overfill them! The jam expands as it heats up, and we want a cute little pool, not a volcanic eruption.
- Bake to Golden Perfection: Slide those trays into your preheated oven and bake for 10-12 minutes. You’re looking for the edges to be lightly golden and set. The centers might still look a tiny bit soft—that’s perfect! They’ll continue to firm up as they cool. For even baking, rotate your trays halfway through.
- The All-Important Cool Down: Once they’re out of the oven, let the cookies rest on the baking sheet for 5 minutes. This allows them to set up enough to handle. Then, carefully transfer them to a wire rack to cool completely. This step is non-negotiable if you’re planning that peanut butter drizzle—it will just slide right off a warm cookie!
- The Grand Finale: Peanut Butter Drizzle: For that extra flair, put a few tablespoons of creamy peanut butter in a microwave-safe bowl and heat it in 15-second bursts, stirring each time, until it’s melted and drizzle-able. You can use a fork, a spoon, or for more control, put it in a small zip-top bag, snip off a tiny corner, and pipe it over the cooled cookies. It’s the ribbon on the present!
How to Serve These Jammy Jewels
Okay, the cookies are cooled, the drizzle is set… now what? The beauty of these cookies is that they’re fantastic all on their own. But if you want to elevate the experience, here are a few of my favorite ways to serve them up.
For the ultimate nostalgia trip, serve them warm with a tall, ice-cold glass of milk. It’s a classic for a reason. If you’re feeling fancy, crumble one over a scoop of vanilla bean ice cream—the warm cookie, cool ice cream, and jammy center is a textural masterpiece.
These are also the undisputed champions of bake sales and lunchboxes. Tuck one into a lunchbox for a sweet surprise, or stack them high on a rustic wooden board for your next potluck. I promise, they’ll be the first thing to disappear. And for my fellow coffee lovers, a slightly warm PB&J cookie alongside your afternoon cup of joe is a little moment of pure bliss.
Mix It Up! Creative Twists on the Classic
Once you’ve mastered the base recipe, the playground is yours! Here are a few delicious ways to put your own spin on these cookies.
- The Chocolate Lover’s Dream: Fold 1 cup of chocolate chips into the dough right after the dry ingredients. Chocolate and peanut butter? A match made in heaven.
- Savory & Salty Swirl: Use a naturally salted, crunchy peanut butter and top each cookie with a light sprinkle of flaky sea salt right when they come out of the oven. The sweet-and-salty combo is next-level.
- Fruit Explosion: Swap the jelly for a high-quality fruit preserves with chunks of real fruit. Apricot, blackberry, or even orange marmalade offer a more sophisticated, tangy twist.
- Sunflower Seed Butter Swap: Have a nut allergy? No problem! Use sunflower seed butter in place of the peanut butter and pair it with your favorite seed-free jam. The flavor is remarkably similar and just as delicious.
- Peanut Butter Cup Thumbprint: Instead of jelly, press a mini peanut butter cup into the thumbprint right after the cookies come out of the oven. The heat will soften it into a gooey, chocolatey center.
Beau’s Kitchen Chronicles: A Note on Cookie Evolution
This recipe has been a living, breathing thing in my kitchen for years. The first time I made them, I was so worried about the jam spilling that I barely put any in! They were more like “Peanut Butter Cookies with a Hint of Jelly.” Over time, I learned to embrace the mess. A little jam bubbling over the side just adds to the homemade charm, you know?
I’ve also learned that chilling the dough for 30 minutes if your kitchen is really warm can help the cookies hold their shape even better. But honestly? Some days I don’t have the patience, and they turn out just fine. Cooking is about joy, not perfection. So have fun with it!
Your PB&J Cookie Questions, Answered!
I’ve gotten a lot of questions about this recipe over the years, so I’ve compiled the most common ones here to help you troubleshoot like a pro.
Q: My jelly always spills out and makes a mess! What am I doing wrong?
A: This is the #1 question! A few things can help: 1) Make sure your thumbprint is deep enough and has a defined “well.” 2) Don’t overfill it—stick to that ½ teaspoon. 3) Chilling the shaped, jam-filled dough balls for 15 minutes before baking can help them set up faster in the oven, reducing spillage.
Q: My cookies turned out dry and crumbly. Why?
A> This usually means the dough was over-mixed after the flour was added, or they were baked a minute or two too long. Remember, mix just until the flour disappears, and take them out when the edges are golden, even if the centers look soft. They continue to cook on the hot tray!
Q: Can I use natural peanut butter?
A> You can, but be cautious. Natural peanut butters often have more oil and can separate, which might make your dough greasy and cause the cookies to spread more. If it’s all you have, give the jar a really good stir to reincorporate the oils, and consider reducing the butter by a tablespoon or two.
Q: How do I store these cookies, and can I freeze the dough?
A> Once completely cool, store them in an airtight container at room temperature for up to 5 days. You can absolutely freeze the dough! Roll the dough balls (without the jam), place them on a parchment-lined tray to freeze solid, then transfer to a freezer bag. When you’re ready to bake, let them thaw just enough to make the thumbprint, add the jam, and bake. You may need to add 1-2 minutes to the baking time.
Peanut Butter & Jelly Cookies : Classic Sandwich, Cookie-Style!
Description
Say hello to childhood nostalgia, all grown up. These Peanut Butter & Jelly Cookies take the classic lunchbox duo and give it a dreamy dessert makeover. Imagine soft, buttery peanut butter cookies baked to golden perfection, each one cradling a sweet, jammy center that melts in your mouth. And just when you think it can’t get better—each cookie gets a silky drizzle of warm peanut butter on top. Simple, sentimental, and irresistibly delicious, these cookies turn snack time into story time. Grab your apron and let’s bake a batch of pure joy.
Ingredients
Cookie Dough:
-
1 cup unsalted butter, softened
-
1 cup granulated sugar
-
1 cup brown sugar, packed
-
2 large eggs (room temp)
-
1 tsp vanilla extract
-
1 cup creamy peanut butter
-
2½ cups all-purpose flour
-
1 tsp baking powder
-
1 tsp baking soda
-
½ tsp salt
Filling & Finish:
-
1 cup jelly or jam (grape, strawberry, or raspberry)
-
3 tbsp creamy peanut butter (for drizzle)
Instructions
-
Preheat Oven: Set oven to 350°F (175°C) and line baking sheets with parchment paper.
-
Cream Butter & Sugars: Beat butter, granulated sugar, and brown sugar until light and fluffy (2–3 min). Add eggs, vanilla, and peanut butter; mix until smooth.
-
Mix Dry Ingredients: In another bowl, whisk flour, baking powder, baking soda, and salt. Gradually add to wet ingredients, mixing until just combined.
-
Shape Cookies: Roll dough into 1-inch balls and place 2 inches apart on baking sheets. Press a thumbprint into each center.
-
Fill with Jam: Spoon about ½ tsp jam into each well.
-
Bake: Bake 10–12 min until edges are lightly golden. Cool 5 min on tray, then transfer to wire rack.
-
Drizzle: Melt 3 tbsp peanut butter in the microwave until smooth. Drizzle over cooled cookies for that perfect finish.
Notes
-
Chill the dough 30 min if your kitchen is warm for perfect shape.
-
For a twist, swap peanut butter for sunflower butter or add chocolate chips.
-
A sprinkle of flaky sea salt right after baking takes these to gourmet level.
Nutrition
- Calories: 180 Cal Per Serving
- Fat: 9g
- Carbohydrates: 21g
Let’s Talk Nutrition (The Fun Part!)
Now, we all know a cookie is a treat, and that’s exactly what it should be—a delightful, soul-satisfying indulgence. But I also believe in being transparent about what we’re eating. The nutritional info below is an estimate per cookie (based on a batch of 36).
Each cookie comes in at around 180 calories, with about 9g of fat (from the butter and peanut butter—the good, satisfying fats!), 21g of carbs for energy, and 3g of protein from the peanut butter and eggs to help keep you full.
Remember, these are approximations, and the exact numbers will change if you use different brands of peanut butter or jam. The beauty of baking at home is that you control the ingredients. You can choose a natural peanut butter, a low-sugar jam, or even experiment with a sugar alternative if that’s your thing. But my professional chef opinion? Life’s too short not to enjoy a classic, delicious, jam-filled PB&J cookie every now and then.
One Last Bite of Wisdom
And there you have it, friends! My complete guide to turning your favorite childhood sandwich into a show-stopping cookie. This recipe is more than just a list of ingredients and steps; it’s an invitation to slow