
Orange Dreamsicle Fudge: Your New Favorite Bite of Sunshine
Hey there, friend! Beau here, welcoming you back to the Feastical kitchen. Is there a flavor that instantly teleports you back to being a kid? For me, it’s that unmistakable, sunny combination of creamy vanilla and bright, zesty orange—the one and only Orange Dreamsicle. It’s the taste of summer vacations, sticky fingers, and the simple joy of a melting popsicle on a hot afternoon.
But what if I told you we could capture that magical flavor in a rich, decadent, melt-in-your-mouth fudge? And what if I told you it’s one of the easiest, most foolproof recipes you’ll ever make? No candy thermometers, no frantic stirring, just a few simple ingredients coming together to create pure, unadulterated happiness.
This Orange Dreamsicle Fudge is my go-to treat for potlucks, holiday gift boxes, or just those days when you need a little edible sunshine. It’s ultra-creamy, bursting with nostalgic flavor, and guaranteed to put a smile on your face. So, let’s ditch the complicated stuff and dive into this simple, soul-satisfying recipe. I promise, by the end of this, you’ll be a fudge-making pro!
A Sticky-Fingered Trip Down Memory Lane
This recipe always takes me back to my grandma’s backyard. She had this giant oak tree that was perfect for climbing, and her rule was simple: if you made it to the top branch you could see from, you earned a Dreamsicle from the big chest freezer in the garage. My cousins and I would spend hours daring each other to go higher, fueled entirely by the promise of that frozen treat.
I can still feel the anticipation as she’d hand me the double-stick popsicle, the immediate chill against my palm. The first bite was always a race against the melting orange ice, followed by the slow, creamy reward of the vanilla center. It wasn’t just a popsicle; it was a trophy. This fudge is my way of bottling that feeling—the triumph, the sweetness, the pure joy of a summer afternoon—and sharing it with you, no tree-climbing required.
Gather Your Sunshine: The Ingredients
Here’s the beautiful part: you only need a handful of simple ingredients to create this magic. I’ll walk you through each one and share a few chef-y insights and substitutions to make it your own.
- 1 (12 oz) bag of High-Quality White Chocolate Chips: This is the foundation of our fudge, so quality matters! I look for brands with real cocoa butter. They melt smoother and give us a much richer flavor than cheaper, waxy chips. Chef’s Tip: If you’re feeling fancy, you can chop up a good-quality white chocolate bar instead.
- 1 can (16 oz) of Vanilla Frosting (not whipped!): This is our secret weapon for foolproof, creamy fudge. The whipped variety has too much air and won’t set properly, so make sure you grab the classic, dense vanilla frosting. It provides the perfect sweetness and structure.
- 3-4 tablespoons of Orange Crush Ice Cream Topping (or any orange syrup): This is where the magic happens! The syrup gives us that authentic, vibrant orange flavor and a beautiful marbled effect. Substitution Tip: No orange syrup? No problem! You can use 2-3 tablespoons of thawed orange juice concentrate mixed with a drop of orange food coloring for a similar effect.
- Optional: 1 teaspoon of Orange Zest: This is my little pro-move for an extra burst of fresh, citrusy aroma. It really makes the orange flavor pop and feel more natural.
- Optional: 1-2 drops of Orange Extract: If you want an even more intense orange flavor, a tiny drop of extract added with the chips will do the trick. A little goes a long way!
Let’s Make Some Magic: The Foolproof Steps
Ready? This comes together so fast, you’ll want to have your pan prepared before you even turn on the stove. Let’s do this!
Step 1: Prep Your Pan. First things first, grab an 8×8-inch baking pan. Line it with parchment paper, leaving a little overhang on two opposite sides. This creates “handles” that will make it a breeze to lift the entire slab of fudge out later for clean cutting. If you don’t have parchment, you can lightly grease the pan with butter or cooking spray. Trust me, this prep step saves a world of frustration later!
Step 2: Melt the Frosting. Now, place your saucepan over LOW heat. I mean it—low and slow is the key here! We’re not trying to boil anything, just gently warm it. Dump the entire can of frosting into the pan and stir it constantly with a spatula or wooden spoon. You’ll see it loosen up and become smooth and glossy in just a few minutes. This is your foundation, so keep it moving to avoid any hot spots or burning.
Step 3: Welcome the Chocolate. Once the frosting is melted and smooth, pour in the entire bag of white chocolate chips. Continue stirring over low heat. You’ll watch as the chips slowly melt into the frosting, creating a thick, luxurious, velvety mixture. Keep stirring until every last chip has melted and the two are completely combined into one homogenous, heavenly substance. This should take about 5-7 minutes. Chef’s Hack: If a few stubborn chips won’t melt, just take the pan off the heat and keep stirring. The residual heat will finish the job without risking scorching.
Step 4: The Big Pour. Immediately pour your beautiful, creamy fudge mixture into your prepared pan. Use your spatula to spread it into an even layer, getting it into all the corners. Work relatively quickly here, as the fudge will start to set as it cools.
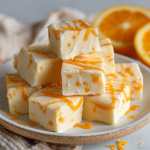
Step 5: Swirl in the Sunshine. Here’s the fun part! Take your Orange Crush syrup and drizzle it generously all over the top of the fudge. Don’t be shy! Now, take a toothpick, a knife tip, or the tines of a fork and gently drag it through the orange drizzle and into the white fudge beneath. Make swirls, figure-eights, zig-zags—get creative! You’re not mixing it in completely; you’re creating a beautiful marbled effect. This is where your fudge gets its personality.
Step 6: The Patience Part. Carefully transfer the pan to the refrigerator. Now, we wait. Let it chill for at least 2-3 hours, or until it’s completely firm to the touch. I know it’s tempting, but don’t rush this! A properly set fudge is key for getting those clean, beautiful squares.
Step 7: Slice and Savor. Once it’s rock-solid, use your parchment paper handles to lift the entire fudge slab out of the pan and onto a cutting board. Using a large, sharp knife, wipe the blade with a hot, damp cloth between cuts for the cleanest slices. Cut into 36 small squares (6 rows by 6 rows) for the perfect bite-sized treat.
How to Serve Up This Slice of Sunshine
This fudge is a star all on its own, but a little presentation goes a long way! For a simple, elegant look, arrange the squares on a white or light-colored platter. The bright orange swirls will really pop against a neutral background.
If you’re feeling extra, you can garnish the platter with a few thin slices of candied orange or a light dusting of additional orange zest. It adds a touch of sophistication and a hint of what’s inside. These little squares are also perfect for gift-giving. Tuck them into a cute cellophane bag tied with a ribbon, or layer them in a festive tin between sheets of parchment paper. A homemade gift that tastes this good? That’s a Feastical favorite for sure.
Get Creative! Flavor Variations to Try
The best part about this base recipe is its versatility. Once you master the classic, the flavor world is your oyster! Here are a few of my favorite twists:
- Lemon Bar Fudge: Swap the vanilla frosting for lemon frosting and use lemon syrup or a few tablespoons of lemon curd for the swirl. It’s tart, sweet, and incredibly refreshing!
- Root Beer Float Fudge: Use vanilla frosting, white chocolate chips, and swirl in root beer syrup instead of orange. It tastes just like the classic ice cream float!
- Peppermint Bark Fudge: Perfect for the holidays! Use the classic vanilla/white chip base, but swirl in 2-3 tablespoons of crushed candy canes or peppermint sprinkles instead of syrup. Add a drop of peppermint extract to the melted mixture for an extra kick.
- Chocolate Raspberry Fudge: A match made in heaven! Use chocolate frosting and semi-sweet chocolate chips for the base. Then, swirl in seedless raspberry jam that you’ve warmed slightly to make it pourable.
- Dairy-Free/Vegan Option: You can easily adapt this! Use a certified vegan vanilla frosting and dairy-free white chocolate chips. Most orange syrups are naturally vegan, but just double-check the label.
Beau’s Chef Notes & Kitchen Stories
This recipe has become a Feastical staple, but it had a hilarious (and slightly messy) beginning. The first time I tested it, I got a phone call right after I poured the fudge into the pan. Distracted, I left the orange syrup bottle uncapped on the counter above the pan. You can probably guess what happened next. I bumped the counter, the bottle fell, and I ended up with not marbled fudge, but a pan of violently orange, soupy fudge! It was a great lesson in both patience and proper bottle-closing etiquette. The batch was still delicious, but now I always place my syrup bottle safely away from the edge!
Over time, I’ve learned that the quality of your white chocolate is the single biggest factor in the final taste. It’s worth the extra dollar or two for the good stuff. Also, don’t skip the zest if you have an orange on hand—it really is the secret ingredient that elevates it from great to “oh wow, what is in this?!”
Your Fudge Questions, Answered!
Q: My fudge is too soft and won’t set. What happened?
A: The most common culprit is not using enough chilling time. Make sure it chills for a full 2-3 hours, undisturbed. If it’s still soft, it’s possible the heat was too high when melting, which can cause the fats to separate. Also, double-check that you used regular frosting, not the whipped variety!
Q: Can I freeze this fudge?
A: Absolutely! This fudge freezes beautifully. Once it’s set and cut, layer the squares between parchment paper in an airtight container. It will keep in the freezer for up to 3 months. Thaw in the fridge for a few hours before serving.
Q: Why did my fudge get a grainy texture?
A: Graininess usually means the white chocolate was exposed to too much heat or a drop of moisture got into the mix. Always melt over low heat and make sure your utensils and pan are completely dry.
Q: My orange syrup sank to the bottom. How do I get a good swirl?
A: This can happen if the fudge base is too warm and liquidy when you add the syrup. Let the base cool in the pan for just 2-3 minutes before adding the drizzle. This gives it a chance to thicken slightly, so the syrup will stay suspended on top for a perfect swirl.
Orange Dreamsicle Fudge
Description
Capture the nostalgic taste of an orange creamsicle in a rich, creamy fudge! This simple recipe blends white chocolate and vanilla frosting with bright orange syrup for a melt-in-your-mouth treat that’s perfect for holidays, gifts, or a sunny snack.
Ingredients
-
12 oz white chocolate chips (high-quality)
-
16 oz can vanilla frosting (not whipped)
-
3–4 tbsp orange syrup or Orange Crush ice cream topping
-
Optional: 1 tsp orange zest
-
Optional: 1–2 drops orange extract
Instructions
-
Prep Pan: Line an 8×8-inch pan with parchment paper, leaving overhang for easy removal.
-
Melt Frosting: In a saucepan over low heat, stir the vanilla frosting until smooth and glossy.
-
Add Chocolate: Pour in white chocolate chips, stirring until fully melted and combined. Remove from heat if needed to avoid scorching.
-
Pour & Spread: Transfer fudge mixture to the prepared pan and spread evenly.
-
Swirl in Orange: Drizzle orange syrup over the top and swirl gently with a toothpick or knife for a marbled effect.
-
Chill: Refrigerate for 2–3 hours until completely firm.
-
Cut & Serve: Lift fudge from the pan using parchment overhang, and cut into 36 squares.
Notes
-
Extra Zest: Add fresh orange zest for a brighter, natural flavor.
-
Flavor Twists: Try lemon syrup for Lemon Bar Fudge or root beer syrup for a Root Beer Float version.
-
Vegan Option: Use vegan white chocolate chips and dairy-free frosting.
-
Clean Cuts: Wipe knife with a warm, damp cloth between slices.
Nutrition
- Calories: 110 Ca per square
- Sugar: 14g
- Fat: 6g
- Saturated Fat: 3g
- Protein: 0.5g
Nutritional Information*
Let’s be real, this is a treat, and treats are meant to be enjoyed! But I believe in transparency, so here’s a general breakdown per small square (based on 36 servings). Remember, these are estimates and can vary based on the specific brands you use.
Per Serving (approx.): Calories: 110 | Fat: 6g | Saturated Fat: 3g | Carbohydrates: 16g | Sugar: 14g | Protein: 0.5g
*This information is an estimate provided by an online calculator. For the most accurate nutritional information, please calculate using the specific brands and ingredients you use.
Final Sweet Thoughts
Well, there you have it! My secret for bringing a little bit of summer sunshine into your kitchen, no matter what the season. This Orange Dreamsicle Fudge is more than just a recipe; it’s a conversation starter, a memory-maker, and a guaranteed mood-lifter.
I hope you have as much fun making it as I do. Remember, cooking is about joy, not perfection. If your swirls are a little wobbly or your squares aren’t perfectly even, it doesn’t matter one bit. What matters is the love you put into it and the smiles it creates.