
No-Bake Gingerbread Oat Bars: Your New Favorite Cozy Snack
Hey friends, Beau here! Can we talk about that magical, elusive feeling for a second? You know the one. It’s that moment you bite into something and it just gets you. It’s cozy, it’s comforting, and it tastes like a warm hug on a crisp afternoon. For me, that feeling has always been wrapped up in the warm, spiced, deeply soulful flavors of gingerbread. The only problem? Sometimes, turning on the oven feels like a monumental task. Between preheating, baking, and cleaning up, the cozy vibe can get lost in the shuffle.
Well, I’m here to tell you that we can have our gingerbread and eat it too, with zero baking required. These No-Bake Gingerbread Oat Bars are my latest kitchen obsession, and I have a feeling they’re about to become yours. Imagine all the nostalgic charm of a gingerbread cookie, but in a chewy, crunchy, perfectly sweet bar that comes together in one bowl and sets up in your fridge. They’re packed with wholesome oats, a double hit of cozy spice, and pockets of melty chocolate that send the whole experience over the top. This is feel-good food at its finest—simple, soulful, and seriously satisfying. So, let’s ditch the hot kitchen and get straight to the good part.
A Spoonful of Molasses & a Dash of Memory
This recipe takes me right back to my grandma’s kitchen, but not in the way you might think. She was the queen of gingerbread men, but her kitchen during the holiday baking marathon was a strict “no-kids-underfoot” zone. My gateway to those flavors was actually a jar of molasses she kept in the pantry. I’d sneak a spoonful when no one was looking—that deep, bittersweet, almost smoky flavor was like nothing else. It felt so grown-up and complex. These bars capture that exact same spirit. They’re not overly sweet; they’re sophisticated in their simplicity, with the rich molasses taking center stage, supported by cinnamon and vanilla. It’s that same thrilling, cozy flavor I discovered as a kid, now all grown up and packed into a no-fuss bar perfect for our busy, beautiful lives. Every bite is a little delicious time machine.
Gathering Your Bar-Making Superstars
One of the best things about this recipe is its flexibility. I’m a big believer in using what you’ve got, so don’t stress if you need to make a swap or two. Here’s the lowdown on what goes into these beauties and why:
- 1 ½ cups (360 g) Cashew Butter: This is our superstar binder! Cashew butter has a mild, buttery sweetness that lets the other flavors shine. Chef’s Insight: No cashew butter? No problem! Almond butter, peanut butter, or even sunflower seed butter will work beautifully. Just know that a stronger-flavored nut butter will add its own distinct voice to the choir.
- ½ cup (6 oz) Honey: Our natural sweetener that also helps everything stick together. It adds a lovely floral note that pairs perfectly with the spices.
- ¼ cup (80 g) Molasses: This is the heart and soul of the gingerbread flavor! That deep, robust, almost bitter sweetness is non-negotiable for that classic taste. Pro Tip: I use a light, unsulphured molasses for the best flavor. Blackstrap can be too intense and bitter for this recipe.
- ½ teaspoon Salt: Never, ever skip the salt! It’s the flavor enhancer that makes all the other ingredients pop and prevents the bars from tasting flat.
- 2 teaspoons Ground Cinnamon: The warm, familiar spice that makes everything feel like home.
- 2 teaspoons Vanilla Extract: The flavor bridge that ties all our sweet and spicy elements together in perfect harmony.
- 6 cups (480 g) Old-Fashioned Rolled Oats: The sturdy, chewy foundation of our bars. They give us substance, fiber, and that wonderful wholesome texture.
- 2 cups (30 g) Puffed Kamut: My secret weapon for a delightful, airy crunch! Substitution Tip: Can’t find puffed kamut? Puffed rice or even puffed millet are fantastic and easy-to-find alternatives.
- 2 cups Chocolate Chips: Because chocolate makes everything better! I’m partial to dark chocolate for a bittersweet contrast, but semi-sweet or milk chocolate are all welcome here.
- Sea Salt for topping (optional): A light sprinkle of flaky sea salt right before chilling creates an incredible sweet-and-salty situation that will have everyone asking for your secret.
Let’s Make Some Magic: The No-Bake Process
Ready to see how this all comes together? It’s so simple, you might just have it memorized after one try. Let’s get mixing!
- Create the Gooey Glue. Grab a large saucepan—and I mean large, we’re making a double batch for a reason!—and place it over medium-low heat. Add your cashew butter, honey, molasses, salt, cinnamon, and vanilla extract. Now, the key here is gentle heat. We’re just warming everything through until it’s melted, smooth, and beautifully fragrant. You’ll want to stir it constantly with a spatula. This should only take 3-4 minutes. Chef’s Hack: If your nut butter is super thick, you can gently warm it in the microwave for 20-30 seconds first to make it easier to stir into the mixture.
- Combine the Dry Crew. Once your wet mixture is silky smooth, take the saucepan off the heat. This is a crucial step! If you add the oats to a hot pan, the chocolate chips you add later will instantly melt. Now, dump in all your rolled oats and puffed kamut. Use that spatula to fold and stir until every single oat and puff is gleaming and thoroughly coated in that spiced, sweet glue. It’s a serious arm workout, but so worth it!
- Let It Cool (Be Patient!). Here’s a little tip that makes a big difference: let the oat mixture sit and cool down for about 10-15 minutes. Stir it once or twice to help it along. Why? This prevents the chocolate chips from completely melting when we fold them in. We want lovely little pockets of chocolate, not a uniformly chocolate-colored bar.
- The Grand Chocolate Fold-In. Once the mixture is warm but not hot to the touch, it’s time! Pour in almost all of your chocolate chips (save a small handful for topping) and gently fold them in until they’re evenly distributed.
- Press It, Don’t Just Dump It. Line a 9×13-inch baking pan with parchment paper, leaving some overhang on the sides. This is your golden ticket to easy bar removal later! Transfer the mixture into the pan. Now, for the texture secret: press it down firmly and evenly. I like to use the bottom of a flat measuring cup or a glass, sometimes with a small piece of parchment on top to prevent sticking. Really compacting the mixture is what gives you bars that hold their shape and don’t crumble when you bite into them.
- The Final Flourish & The Big Chill. Sprinkle those reserved chocolate chips over the top and add a flurry of flaky sea salt if you’re feeling fancy. Now, the hardest part: patience. Slide the pan into the refrigerator and let it chill for at least 1-2 hours, or until the bars are completely firm. This allows the fats in the nut butter to re-solidify, setting our creation into perfect, sliceable bars.
- Slice and Savor! Once set, use the parchment paper to lift the entire slab of bars out of the pan. Place it on a cutting board and slice it into your desired size. I usually go for 24 generous rectangles.
How to Serve Up These Cozy Bars
Honestly, one of my favorite ways to enjoy these bars is straight from the fridge, standing in front of the open fridge door. No judgment here! But if you want to get a little fancy, here are a few of my go-to serving ideas:
- The Classic: Just the bar, all on its own, with a hot cup of coffee or a cold glass of milk. Perfection.
- The A La Mode Affair: For a decadent dessert, warm a bar slightly in the microwave for 10-15 seconds and top it with a scoop of vanilla bean ice cream. The contrast of warm, chewy bar and cold, creamy ice cream is next-level.
- The Gift of Good Taste: These bars make incredible edible gifts! Stack them in a cute cellophane bag tied with a ribbon, or arrange them in a festive tin. It’s a homemade gift from the heart that everyone actually wants.
- The Meal Prep Hero: Store them in an airtight container in the fridge and grab one for a quick breakfast on-the-go or an afternoon pick-me-up. They’re packed with lasting energy!
Make It Your Own: Delicious Twists & Swaps
This recipe is like a blank canvas for your culinary creativity. Feel free to play around and make it your own! Here are a few of my favorite variations:
- Spice Lover’s Dream: Add 1 teaspoon of ground ginger and a pinch of nutmeg or allspice along with the cinnamon for a more complex, classic gingerbread spice profile.
- Citrus Zing: Fold in 1 tablespoon of fresh orange zest with the chocolate chips. The bright, sunny citrus cuts through the richness beautifully.
- Crunchy Nut Delight: Add ½ cup of chopped walnuts or pecans for an extra layer of texture and a toasty, nutty flavor.
- Mocha Magic: Stir 1 teaspoon of instant espresso powder into the wet mixture. It won’t taste like coffee, but it will deepen the chocolate flavor and add a wonderful warmth.
- Fruity Fun: Swap out half of the chocolate chips for dried cranberries or chopped apricots for a chewy, tart contrast.
Beau’s Kitchen Chronicles
This recipe has truly evolved in my kitchen. The first time I made it, I was so impatient that I sliced into it after only 30 minutes of chilling. Let’s just say I ended up with more of a “gingerbread oat crumble” than bars—still delicious, but not exactly what I was going for! I’ve learned that the firm press and the full chill time are non-negotiable for the perfect texture. I’ve also made these with every nut butter under the sun, and while cashew is my favorite, a chunky peanut butter version with chopped peanuts mixed in is a close second. Don’t be afraid to experiment; some of the best recipes are born from a happy kitchen accident!
Your Questions, Answered!
I’ve gotten a few questions about this recipe over time, so I thought I’d answer the most common ones right here.
- My mixture is too dry and crumbly. What happened? This usually means your nut butter was particularly thick or you measured your oats a little heavy. No worries! Just add another tablespoon or two of honey or maple syrup and mix it in. It should come together nicely.
- Can I make these vegan? Absolutely! Simply swap the honey for maple syrup and use dairy-free chocolate chips. It works like a charm.
- How long do these bars last? Stored in an airtight container in the fridge, they’ll stay fresh and firm for up to 2 weeks. You can also freeze them for up to 3 months! Just layer them between parchment paper in a freezer-safe container.
- My bars are too soft, even after chilling. This can happen if the mixture wasn’t pressed firmly enough into the pan. Next time, really put some muscle into it! Also, ensure you’re using the correct amount of nut butter and sweetener—they are the binding agents.
A Note on Nourishment
While I’m not a nutritionist, I love creating food that makes you feel good from the inside out. These bars are a fantastic source of sustained energy, thanks to the complex carbs and fiber from the oats. The healthy fats and protein from the nut butter help keep you full and satisfied. Using natural sweeteners like honey and molasses means we’re avoiding refined sugars, and molasses even brings a small boost of iron and calcium to the party. Remember, this is a treat, but it’s one made with real, wholesome ingredients that love you back.
Print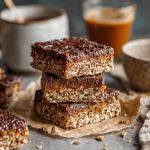
No-Bake Gingerbread Oat Bars : Cozy, Crunchy & Naturally Sweet
Description
These cozy, chewy, no-bake bars capture all the warm, spiced magic of gingerbread without ever turning on the oven. Packed with oats, a hint of molasses, and melty chocolate chips, they’re a quick, wholesome snack perfect for breakfast, dessert, or a midday pick-me-up.
Ingredients
-
1½ cups (360 g) cashew butter (or almond/peanut/sunflower butter)
-
½ cup (6 oz) honey (or maple syrup for vegan)
-
¼ cup (80 g) light molasses
-
½ tsp salt
-
2 tsp ground cinnamon
-
2 tsp vanilla extract
-
6 cups (480 g) old-fashioned rolled oats
-
2 cups puffed kamut (or puffed rice/millet)
-
2 cups chocolate chips (dairy-free if vegan)
-
Flaky sea salt, optional, for topping
Instructions
-
Make the wet mixture: In a large saucepan over medium-low heat, combine cashew butter, honey, molasses, salt, cinnamon, and vanilla. Stir until smooth and fragrant (3–4 minutes).
-
Add the oats and puffed grains: Remove from heat. Fold in rolled oats and puffed kamut until fully coated. Let cool 10–15 minutes.
-
Add chocolate: Fold in almost all chocolate chips, reserving a few for topping.
-
Press into pan: Line a 9×13-inch pan with parchment paper. Transfer mixture and press firmly into an even layer. Sprinkle reserved chocolate chips and optional flaky sea salt on top.
-
Chill: Refrigerate 1–2 hours until firm.
-
Slice and serve: Lift from pan using parchment overhang. Slice into bars (24 rectangles recommended).
Notes
-
Spice it up: Add 1 tsp ground ginger and a pinch of nutmeg/allspice.
-
Citrus zing: Fold in 1 tbsp orange zest with chocolate chips.
-
Extra crunch: Add ½ cup chopped nuts.
-
Mocha magic: Stir in 1 tsp instant espresso powder.
-
Fruity twist: Swap half of the chocolate chips for dried cranberries or apricots.
-
Vegan: Use maple syrup and dairy-free chocolate chips.
Nutrition
- Calories: 180 Cal Per Serving
- Sugar: 12 g
- Fat: 9 g
- Carbohydrates: 22 g
- Protein: 5 g
Your New Go-To Cozy Treat
And there you have it, friends! My ultimate no-bake, feel-good, gingerbread-spiced oat bars. This recipe is a celebration of simplicity, flavor, and that wonderful feeling of creating something delicious with your own two hands. It’s proof that you don’t need fancy equipment or a whole day to make a treat that feels special. I hope these bars find a spot in your recipe box, become a lunchbox staple, or become your new favorite thing to share with neighbors and friends. Food is about connection, and I’m so glad we got to connect over this recipe today. Now, go forth and make something Feastical!
With a full heart and a happy stomach,
Final Thoughts
These No-Bake Gingerbread Oat Bars are more than just a snack; they’re a little passport to coziness, anytime you need it. Simple to make, endlessly adaptable, and deeply satisfying, they’re proof that the most comforting treats often come from the simplest processes. I hope this recipe becomes a cherished, easy-going staple in your kitchen, bringing a moment of warm, spiced joy to your beautifully busy days. Now, go make something Feastical!