
Your New Favorite Dessert: No-Bake Apple Pie Cheesecake
Hey friends, Beau here from Feastical! Let’s talk about something magical. You know that feeling when you’re craving something decadent, something that tastes like you fussed over it for hours, but the mere thought of turning on your oven makes you want to take a nap on the cool kitchen tiles? Yeah, I’ve been there more times than I can count. That’s exactly why I’m so crazy about this recipe. This No-Bake Apple Pie Cheesecake is the hero we all need—a show-stopping dessert that comes together with zero baking required.
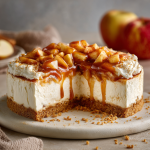
Imagine this: a thick, buttery graham cracker crust that crumbles just right. A cloud-like, impossibly creamy cinnamon-spiced cheesecake filling that’s light yet indulgent. And on top, a glorious, warm-spiced apple pie topping that’s basically autumn in a spoon. Each layer is a star, and together? They create a symphony of texture and flavor that will have everyone at your table asking for seconds (and the recipe!). It’s the perfect centerpiece for your holiday table, a brilliant potluck contribution, or just a Wednesday night treat because you deserve it. So, let’s ditch the oven, grab a mixing bowl, and create some no-bake magic together.
A Slice of Nostalgia: Why This Recipe Hits Home
This dessert is more than just a combination of ingredients for me; it’s a delicious mashup of my two favorite childhood memories. My grandma’s house always smelled like baked apples and cinnamon in the fall. She’d make these incredible deep-dish apple pies, and I’d sit at her counter, sneaking pinches of the leftover crust. Meanwhile, my mom was the queen of no-bake cheesecakes. Her simple, creamy version was a staple at every family BBQ and birthday party. It was cool, refreshing, and always hit the spot.
One particularly hectic holiday season, I was trying to figure out what to bring to a friendsgiving potluck. I desperately wanted to capture the cozy, comforting essence of my grandma’s apple pie but didn’t have the time or energy to make pastry from scratch. I glanced at my mom’s old no-bake cheesecake recipe scribbled on a notecard, and a lightbulb went off. What if I combined them? The result was this glorious creation. It’s my little culinary homage to both of these incredible women—all the heartwarming flavor of a classic apple pie, with the effortless ease of a no-bake cheesecake. It’s a story in every bite, and I’m so excited to share it with you.
Gathering Your No-Bake Toolkit: The Ingredients
Here’s everything you’ll need to bring this masterpiece to life. The beauty of this recipe is in its simplicity, but a few chef’s notes on the ingredients can make all the difference!
For the Graham Cracker Crust:
- 4 cups graham cracker crumbs: You can buy pre-crushed crumbs or pulse whole sheets in a food processor. For a deeper flavor, try using ginger snaps or biscoff cookies! (Gluten-free grahams work perfectly here too).
- 1 cup (2 sticks) unsalted butter, melted: Unsalted lets you control the salt level. If you only have salted, just skip the pinch of salt you might normally add. This butter is the glue that holds our crunchy crust together.
- 4 tbsp granulated sugar: This sweetens the crust and helps it caramelize slightly for that perfect hold.
- 2 tsp ground cinnamon: We’re building that warm, spiced flavor from the ground up! Don’t be shy with it.
For the Cinnamon Cheesecake Filling:
- 4 (8 oz) packages cream cheese, softened: This is non-negotiable – FULL FAT cream cheese, and it MUST be softened to room temperature. This is the secret to a silky-smooth filling with no lumps. I can’t stress this enough!
- 6 cups Cool Whip, thawed: Lite or regular both work great. Thaw it in the fridge overnight for best results. This is what gives our filling that incredible, airy lightness.
- 2 ⅔ cups granulated sugar: It seems like a lot, but it balances the tang of the cream cheese. You can adjust slightly to your taste.
- 1 tsp ground cinnamon: Infusing the filling with spice makes every layer cohesive and delicious.
- Optional twist: 1 tsp vanilla extract or 1 tbsp real maple syrup: I almost always add the vanilla for a flavor backbone. The maple syrup is a fantastic fall-inspired twist that pairs beautifully with the apples.
For the Warm Apple Pie Topping:
- ½ cup (1 stick) unsalted butter: Because everything is better with butter. This forms the rich base for sautéing our apples.
- 8 Gala apples, peeled, cored, and chopped: Gala apples are my go-to because they hold their shape well and have a lovely sweetness. Feel free to use a mix of Granny Smith (for tartness) and Honeycrisp (for sweetness)!
- 1 cup water: This helps create the sauce.
- 4 tsp cornstarch: Our thickening agent! Always mix it with a bit of cold water first to create a “slurry” before adding it to the hot apples to avoid lumps.
- 1 cup light brown sugar, packed: Brown sugar brings molasses notes and a deeper caramel flavor that white sugar just can’t match.
- 4 tsp ground cinnamon: Hello, classic apple pie flavor!
- 1 tsp vanilla extract: Added at the very end to preserve its beautiful aroma.
- Optional twist: A pinch of nutmeg or a splash of bourbon: Nutmeg is apple’s best friend. A tablespoon of bourbon adds a wonderful grown-up depth of flavor.
Building Your Masterpiece: Step-by-Step Instructions
Alright, team! Let’s get mixing. Follow these steps, and you’ll be a no-bake champion in no time.
Step 1: The Foundation (The Crust)
In a medium bowl, combine your graham cracker crumbs, sugar, and cinnamon. Pour the melted butter over the top and mix it with a fork until it resembles wet sand and holds together when you pinch it. Transfer this mixture to your 9×13 pan (or two pie dishes) and press it down firmly and evenly. I like to use the bottom of a measuring cup to really pack it in—this prevents a crumbly crust later. Pop it in the fridge to set for at least 20 minutes while you make the filling. Chef’s Hack: For a next-level crust, toast your graham cracker crumbs in a dry skillet for 2-3 minutes before mixing with the butter. It amplifies the flavor exponentially!
Step 2: The Cloud (The Cheesecake Filling)
In a large bowl, use an electric hand mixer (or stand mixer with the paddle attachment) to beat your softened cream cheese on medium speed until it’s completely smooth and lump-free. This should take about 2-3 minutes. Scrape down the sides of the bowl. Add the granulated sugar and cinnamon (and vanilla or maple syrup if using) and beat again until everything is fully incorporated and creamy. Now, here’s the key: gently fold in the thawed Cool Whip. Use a spatula and a light hand, folding from the bottom of the bowl up until no white streaks remain. You want to keep all that airiness! Chef’s Hack: If your cream cheese was still a bit cold and you see tiny lumps, don’t panic! Press the filling through a fine-mesh sieve. It’s a extra step but guarantees a perfectly silky texture.
Step 3: The Star (The Apple Pie Topping)
Melt the butter in a large skillet over medium heat. Add your chopped apples, brown sugar, and cinnamon. Stir to coat everything beautifully and cook for about 5 minutes, until the apples just start to soften. In a small separate bowl, whisk the cornstarch into the 1 cup of COLD water until it’s completely dissolved. Pour this slurry into the skillet with the apples and stir continuously. Bring the mixture to a gentle simmer. It will start to thicken noticeably within a few minutes. Cook for another 5-7 minutes, until the apples are tender but not mushy and the sauce is glossy and thick. Remove from heat and stir in the vanilla (and nutmeg or bourbon). Let this cool completely to room temperature before adding it to the cheesecake. Chef’s Hack: Spreading the apple topping on a baking sheet will help it cool down much faster so you’re not waiting around!
Step 4: The Grand Finale (Assembly & Chill)
Pull your chilled crust from the fridge. Spread the cinnamon cheesecake filling evenly over the top. Now, carefully spoon the completely cooled apple pie topping over the cheesecake layer. Grab some plastic wrap and cover the pan tightly. This is the hardest part: walk away. Let the cheesecake chill in the refrigerator for at least 4 hours, but honestly, overnight is best. This patience allows the flavors to marry and the filling to set up perfectly for clean slices.
How to Serve This Show-Stopper
When it’s finally time to serve, you’ve got options! For a 9×13 pan, you can simply cut it into squares. If you used a springform pan, run a thin knife under hot water, dry it, and then carefully slide it around the edge of the pan for a clean release.
I love serving this slightly chilled. The contrast between the cool, creamy filling and the spiced apple topping is everything. For a truly decadent experience, drizzle each slice with warm homemade caramel sauce and add a scoop of high-quality vanilla ice cream. The warm-cold combo is absolute perfection. A little dollop of whipped cream and a light dusting of cinnamon on top makes it look like it came from a fancy bakery. Serve it on a pretty plate, and get ready for the compliments to roll in!
Make It Your Own: Delicious Recipe Variations
The fun doesn’t stop here! This recipe is a fantastic base for all sorts of creativity.
- Gluten-Free & Vegan Friendly: Use gluten-free graham crackers for the crust. For a fully vegan version, use vegan butter, plant-based cream cheese, coconut whipped topping, and a vegan caramel sauce. It works like a dream!
- Different Fruit Twist: Not an apple person? Swap the apple topping for a homemade cherry pie filling, salted caramel, or a simple mixed berry compote. The possibilities are endless.
- Nuttier Crust: Replace 1 cup of the graham cracker crumbs with finely ground toasted pecans or walnuts for a richer, nuttier crust flavor.
- Boozy Upgrade: Add that splash of bourbon to the apple topping as mentioned, or add a tablespoon of bourbon or spiced rum directly to the cheesecake filling for a grown-up kick.
- Individual Servings: Layer the components in small mason jars or dessert cups for adorable, pre-portioned treats perfect for parties.
Beau’s Chef Notes & Kitchen Stories
This recipe has evolved so much since that first friendsgiving experiment. The first time I made it, I was in such a rush that I didn’t let the apple topping cool. I poured it right on top of the cheesecake layer, and let’s just say… it turned my beautiful white filling into a pink, runny mess. A delicious mess, but a mess nonetheless! I learned the importance of patience the hard way.
I’ve also found that using a high-quality vanilla extract really makes a difference in the filling. It’s one of those ingredients where you can truly taste the quality. Don’t be afraid to really pack that brown sugar for the topping, either—it’s the key to a deep, rich sauce. This dessert has become my most-requested recipe, and I love hearing how you all make it your own!
Your Questions, Answered: FAQs & Troubleshooting
Q: My cream cheese was lumpy! How do I avoid that?
A: The number one rule is SOFTENING. Take the blocks of cream cheese out of the fridge at least 2-3 hours before you start. If you’re short on time, you can microwave them on 50% power for 15-second bursts, but be very careful not to melt them. If you end up with lumps, try pressing the mixed filling through a sieve—it’s a lifesaver!
Q: Why does my crust seem crumbly and not holding together?
A: You probably need a bit more butter. The mixture should hold its shape when you squeeze it in your hand. If it’s too dry, add another tablespoon of melted butter and mix it in. Also, make sure you are pressing it into the pan firmly enough.
Q: Can I make this ahead of time?
A: Absolutely! This is the perfect make-ahead dessert. It needs that long chill time anyway. You can assemble it completely up to 2 days in advance. Just keep it covered tightly in the fridge.
Q: Can I use real whipped cream instead of Cool Whip?
A: You can, but the texture will be different. Cool Whip is stabilized, so it helps the filling set firmly. If you use freshly whipped cream, your cheesecake will be lighter and softer. I’d recommend adding a tablespoon of instant pudding powder (vanilla or cheesecake flavor) to your whipped cream to help stabilize it.
No-Bake Apple Pie Cheesecake
Description
Dreamy, creamy, and bursting with cozy autumn flavor—this No-Bake Apple Pie Cheesecake is the dessert you’ll crave all year long. With a buttery graham cracker crust, a cinnamon-kissed cheesecake filling, and a glossy apple pie topping, it’s a showstopper that requires zero oven time. Perfect for holiday tables, potlucks, or just when you want a little indulgence without the fuss.
Ingredients
Crust
-
4 cups graham cracker crumbs (or gingersnaps for extra spice)
-
1 cup unsalted butter, melted
-
4 tbsp granulated sugar
-
2 tsp ground cinnamon
Cheesecake Filling
-
4 (8 oz) packages full-fat cream cheese, softened
-
6 cups Cool Whip, thawed
-
2 ⅔ cups granulated sugar
-
1 tsp ground cinnamon
-
1 tsp vanilla extract or 1 tbsp maple syrup (optional)
Apple Pie Topping
-
½ cup unsalted butter
-
8 Gala apples, peeled, cored, chopped
-
1 cup water + 4 tsp cornstarch (slurry)
-
1 cup light brown sugar, packed
-
4 tsp ground cinnamon
-
1 tsp vanilla extract
-
Optional: pinch of nutmeg or splash of bourbon
Instructions
-
Crust: Mix crumbs, sugar, and cinnamon. Stir in melted butter until sandy. Press firmly into a 9×13 pan or 2 pie dishes. Chill 20 minutes.
-
Filling: Beat softened cream cheese until smooth. Add sugar, cinnamon, and vanilla/maple. Fold in Cool Whip gently until airy and uniform. Spread over crust.
-
Topping: Sauté apples with butter, brown sugar, and cinnamon for 5 minutes. Stir in cornstarch slurry, simmer until glossy and thick (7–10 min). Remove from heat, stir in vanilla (and nutmeg/bourbon if using). Cool completely.
-
Assemble: Spoon cooled apple topping over cheesecake filling. Cover and chill at least 4 hours, ideally overnight. Slice, serve, and enjoy!
Notes
For bakery-style flair, serve with warm caramel drizzle, a scoop of vanilla ice cream, and a sprinkle of cinnamon.
Nutritional Information*
*Please note: This is an estimated nutritional breakdown for informational purposes. Values can vary based on specific ingredients used and portion size.
Per Serving (1/16th of recipe, without optional caramel or ice cream):
- Calories: ~450 kcal
- Total Carbohydrates: 52g
- Dietary Fiber: 2g
- Sugars: 38g
- Total Fat: 25g
- Saturated Fat: 15g
- Protein: 4g
This is certainly a treat-yo-self kind of dessert. The richness comes from the cream cheese, butter, and sugars. To lighten it up slightly, you can use reduced-fat cream cheese, lite Cool Whip, and reduce the sugar in the filling by 1/4 cup. Remember, it’s all about balance!
Final Thoughts from My Kitchen to Yours
Well, friends, there you have it. My ultimate no-bake dessert love letter to fall, to family, and to taking it easy in the kitchen without sacrificing an ounce of flavor. This No-Bake Apple Pie Cheesecake is proof that the most impressive dishes often come from the simplest, most heartfelt ideas.
I hope this recipe finds its way into your recipe box and becomes a new tradition for your own family and friends. It’s a reminder that cooking is about connection—to our past, to each