Mocha Protein Mousse – High-Protein, Dairy-Free & Coffee-Lover Approved
Who Says Healthy Can’t Be Heavenly?
Hey friends, Beau here! Let’s talk about one of life’s great dilemmas. You’re staring down a serious dessert craving, the kind that whispers sweet nothings about rich chocolate and creamy textures. But maybe you’re also trying to be a little kinder to your body, fuel it with good stuff, and not end up in a sugar coma on the couch. For the longest time, I felt like I had to choose: either the decadent dessert or the healthy choice. It was a tug-of-war between my taste buds and my goals.
Well, I’m here to tell you that the era of choosing is OVER. I’ve been tinkering in the Feastical test kitchen (aka my wonderfully cluttered countertop), and I’ve landed on a recipe that feels like pure magic. This isn’t a “good-for-you” compromise. This is a straight-up, spoon-licking, “I-can’t-believe-it’s-actually-packed-with-protein” triumph. We’re making a Mocha Protein Mousse that’s so creamy, so bold, and so satisfying, it’s going to change your dessert game forever.
Imagine the silkiest chocolate mousse you’ve ever had, then give it a welcome jolt of rich coffee flavor and a powerful protein punch. It’s dairy-free, surprisingly simple, and comes together in about five minutes of active work. This is the dessert you can whip up for a fancy-ish dinner party or enjoy as a post-workout treat without a single shred of guilt. So, grab your blender and your favorite mug—we’re about to make a feel-good food moment happen.
A Coffee-Fueled Flashback
This recipe takes me right back to my grandma’s kitchen. She was a formidable woman who believed a shot of strong coffee could solve most of life’s problems. Every afternoon, without fail, she’d brew a pot, and the entire house would fill with that warm, invigorating aroma. She’d let me have a tiny cup, mostly milk and sugar, but I felt so grown-up. That ritual was our special time—a moment of calm and connection.
When I started creating this mousse, I wanted to capture that feeling. The comfort of chocolate and the soul-stirring wake-up call of coffee, all in one bite. But I also wanted it to be the kind of energy boost I needed for my busy days, not the crash that follows a sugary treat. Blending that rich espresso with silken tofu and chocolate protein powder felt like a revelation. It’s my modern, health-conscious homage to those afternoons with Gran—a dessert that comforts you while it fuels you forward. Every spoonful is a little taste of nostalgia, with a powerful protein kick.
Gathering Your Mocha Magic
This is where the fun begins! The beauty of this mousse lies in its simple, powerhouse ingredients. Each one plays a crucial role in creating that perfect texture and flavor. Here’s what you’ll need to serve four lucky people (or, you know, one very determined you).
- 1 block (12 oz) Silken Tofu, drained: Don’t let this scare you! Silken tofu is our secret weapon for that incredibly creamy, dairy-free texture. It’s neutral in flavor, so it lets the chocolate and coffee shine. Chef’s Insight: Make sure it’s silken or soft tofu, not firm. The firm stuff won’t blend up as smoothly.
- 1/4 cup Chocolate Protein Powder: This is our protein powerhouse and a key flavor builder. I love a good plant-based blend, but whey protein works great too if that’s your jam. Substitution Tip: If your protein powder is very sweet, you can reduce the maple syrup a touch.
- 2 tbsp Unsweetened Cocoa Powder: This brings the deep, rich chocolate flavor that forms the soul of our mousse. Use the highest quality you have for the best taste.
- 2 tbsp Maple Syrup or Monk Fruit Syrup: Our natural sweetener! Maple syrup adds a lovely warmth, while monk fruit keeps it sugar-free. Substitution Tip: Agave nectar or honey (if you’re not strictly vegan) work beautifully too.
- 2–3 tbsp Brewed Espresso (or strong coffee): This is the “mocha” in our mousse! It amplifies the chocolate flavor and adds that sophisticated coffee kick. Chef’s Insight: Using cooled espresso or coffee is key. Hot liquid will warm the tofu and make the mousse less appealing. No espresso maker? Instant espresso powder dissolved in a little hot water is a fantastic pantry staple for this.
- 1 tsp Vanilla Extract: The supporting actor that makes all the other flavors pop. A splash of vanilla rounds out the sharp edges and adds a layer of warmth.
- Pinch of Salt: Never, ever skip the salt! It’s not about making things taste salty; it’s about making the chocolate taste more chocolatey. It balances the sweetness perfectly.
For the Topping:
- 1/4 cup Cacao Nib Granola or Crushed Cacao Nibs: We’re adding crunch! Cacao nibs are like nature’s chocolate chips—bitter, crunchy, and packed with antioxidants. The granola version adds a little extra texture and sweetness.
- Flaky Sea Salt (optional): A tiny sprinkle on top just before serving is a game-changer. It creates these incredible sweet-and-salty bursts that will make you swoon.
Let’s Make Some Mousse Magic!
Ready for the easiest dessert of your life? If you can press a button on a blender, you are already a mousse-making master. Let’s walk through it.
- The Prep: First things first, drain your block of silken tofu. You don’t need to press it like you would with firm tofu; just let the water run off. Give it a little pat dry with a paper towel if it seems extra wet. This simple step ensures our mousse isn’t watery. Chef’s Hack: If you have time, pop your blender pitcher and the tofu in the fridge for 30 minutes before you start. Starting with cold ingredients helps the mousse set faster and gives it a lovely chilled texture right out of the gate.
- The Blend: Crumble the tofu into your blender. Add the chocolate protein powder, cocoa powder, your chosen syrup, the cooled espresso, vanilla extract, and that all-important pinch of salt. Now, put the lid on tight and let ‘er rip! Blend on high for a good 60-90 seconds. You’re looking for a completely smooth, creamy, and homogenous mixture. Stop the blender, scrape down the sides with a spatula if needed, and blend for another 15 seconds just to be sure. Chef’s Commentary: Don’t be shy here. Blending it really well is the secret to that dreamy, silky-smooth texture. Under-blending can leave you with a slightly grainy feel.
- The Taste Test: This is the most important step! Grab a spoon and taste your creation. This is your kitchen, your rules. Want it sweeter? Add another half tablespoon of syrup. Want a bigger coffee kick? Drizzle in another half tablespoon of espresso. This is where you make it perfect for you. Blend again for 10 seconds to incorporate any adjustments.
- The Chill: Once you’re happy with the flavor, spoon the mousse into four serving glasses or ramekins. I’m a sucker for little mason jars or elegant cocktail glasses—it makes it feel extra special. Cover them with plastic wrap or a lid and gently place them in the refrigerator. Let them chill and set for at least 1 hour. Chef’s Hack: If you’re in a real hurry, you can pop them in the freezer for 20-25 minutes. Just don’t forget about them, or you’ll have mocha protein ice cream (which, honestly, isn’t a bad plan B).
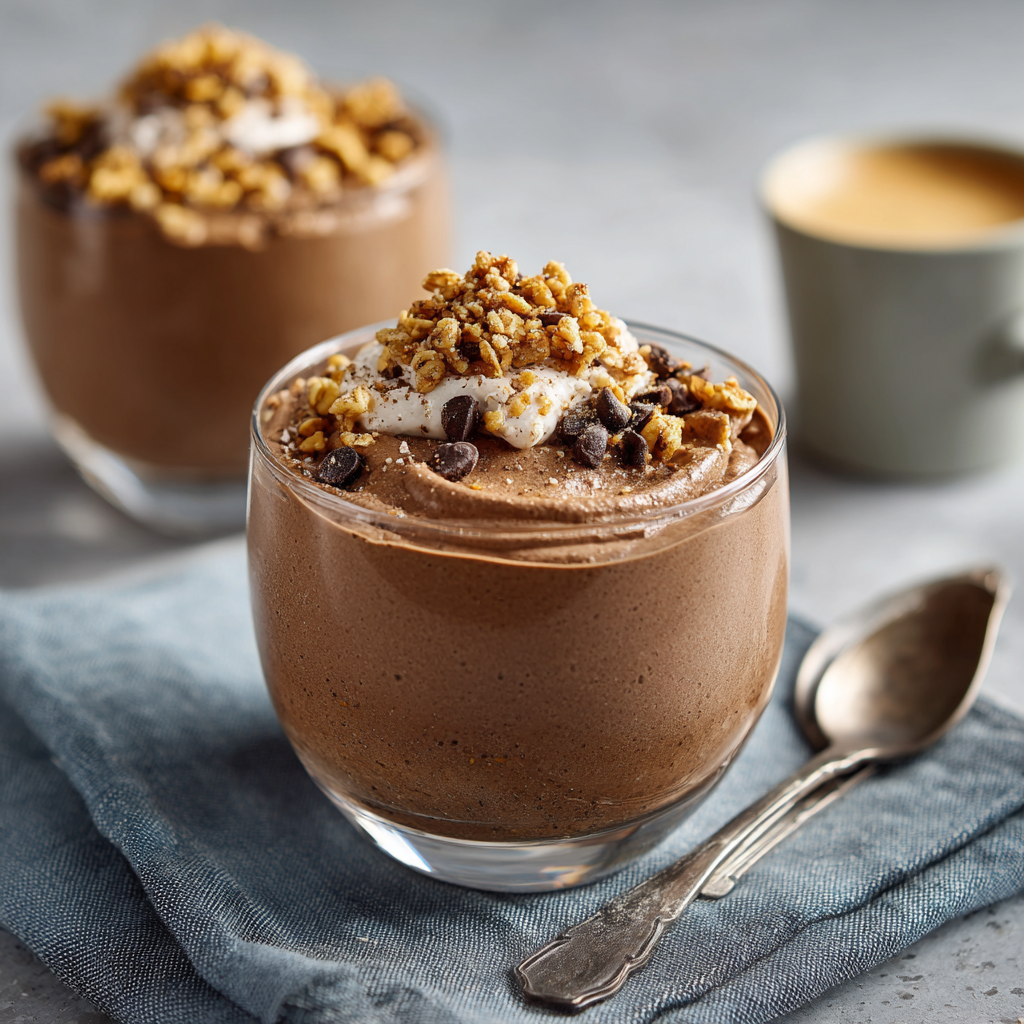
- The Grand Finale: When you’re ready to serve, take the mousses out of the fridge. Give them a generous sprinkle of the cacao nib granola for that essential crunch, and finish with a delicate pinch of flaky sea salt. This final touch elevates it from a simple pudding to a gourmet dessert.
How to Serve This Stunner
Presentation is part of the fun! This mousse is incredibly versatile. For a casual weeknight treat, eating it straight from the jar with a big spoon is totally acceptable (and encouraged). But if you’re feeling fancy, here are a few of my favorite ways to serve it up:
- The Classic Elegance: Serve it in clear glasses or vintage coupes. Let those beautiful layers of dark mousse and light toppings shine. It looks incredibly professional with almost zero effort.
- The Deconstructed Affogato: Love the coffee theme? Serve the mousse in a bowl and pour a shot of warm espresso over the top right before serving. It’s a melty, mocha-y dream.
- The Party Parfait: Layer the mousse with fresh berries (raspberries are a match made in heaven), a little coconut whipped cream, and some granola in a tall glass. It’s a showstopping dessert that’s also a complete, balanced treat.
- With a Side of… Breakfast? Honestly, this mousse is so packed with protein and so low in sugar, it makes a fantastic breakfast. Pair it with a piece of whole-grain toast or some fresh fruit to start your day on a deliciously indulgent note.
Make It Your Own: 5 Delicious Twists
Once you’ve mastered the basic recipe, the kitchen playground opens up! This mousse is a fantastic base for all kinds of flavor adventures. Here are a few of my favorite variations:
- Mint Chocolate Chip: Add 1/4 teaspoon of peppermint extract (not mint extract, it’s too strong!) along with the vanilla. After blending, fold in 2 tablespoons of mini dairy-free chocolate chips for that classic nostalgic flavor.
- Orange Mocha: Add the zest of one small orange to the blender. The bright, citrusy notes cut through the richness of the chocolate and coffee in the most incredible way. It’s sophisticated and refreshing.
- Peanut Butter Cup: Who can resist? Add a heaping tablespoon of natural peanut butter (or any nut or seed butter) to the blender. Top with crushed, salted peanuts for the ultimate sweet-and-salty satisfaction.
- Keto/Very Low-Carb: Swap the maple syrup for your favorite sugar-free syrup (monk fruit is perfect) and use a keto-friendly chocolate protein powder. Double-check that your cocoa powder is unsweetened, and you’ve got a decadent dessert that fits your macros.
- Simple Chocolate: Not a coffee fan? No problem! Simply replace the espresso with 2-3 tablespoons of unsweetened almond milk or water. You’ll get a pure, creamy, and intensely chocolatey mousse that’s still packed with protein.
Beau’s Kitchen Chronicles
This recipe has come a long way from its first iteration. I’ll let you in on a little secret: the first time I tried a version of this, I used firm tofu by accident. Let’s just say the texture was… interesting. More like a thick, chocolate hummus than a light mousse! It was a classic case of “read the label, Beau.” That little failure taught me the importance of silken tofu’s unique, custardy texture.
Over time, I’ve also learned that the quality of your protein powder makes a HUGE difference. Some can have a chalky or artificial aftertaste. My advice? Use a brand you already know and love to drink on its own. If it tastes good in a shaker bottle, it’s going to taste incredible in this mousse. This recipe is a testament to the fact that the best dishes often come from a little experimentation and a willingness to laugh at your own kitchen mishaps.
Your Mocha Mousse Questions, Answered!
I’ve made this recipe a zillion times and I’ve heard all your questions. Here are the answers to the most common ones.
- Q: My mousse is a bit runny. What did I do wrong?
A: This usually happens for one of two reasons. First, the tofu might have had a bit more water content. Next time, give it an extra gentle press with a paper towel. Second, it might just need more chilling time! Pop it back in the fridge for another 30-60 minutes; that should firm it right up. The protein powder will continue to absorb moisture as it chills. - Q: Can I taste the tofu?
A: I get this one a lot! I promise, if you use silken tofu and blend it really well, you will not taste it. The powerful flavors of chocolate, coffee, and vanilla completely take over. The tofu is just there to work its textural magic, creating that lush, creamy base that feels indulgent. - Q: How long will this keep in the fridge?
A: It stores beautifully! Keep it covered in the refrigerator for up to 3-4 days. I recommend adding the crunchy toppings right before you serve it to keep them from getting soggy. - Q: I don’t have a high-powered blender. Will a food processor work?
A: Absolutely! A food processor will work just fine. It might take a little longer to get it perfectly smooth, so just let it run for a couple of minutes, scraping down the sides once or twice. The goal is total silkiness.

Mocha Protein Mousse : High-Protein, Dairy-Free & Coffee-Lover Approved
Description
Mocha Protein Mousse (Dairy-Free, High-Protein)
Prep Time: 5–10 minutes
Chill Time: 1 hour (or 20–25 min in freezer for quick set)
Total Time: 1 hour
Servings: 4
Ingredients
Mousse Base:
-
1 block (12 oz) silken tofu, drained
-
1/4 cup chocolate protein powder
-
2 tbsp unsweetened cocoa powder
-
2 tbsp maple syrup or monk fruit syrup
-
2–3 tbsp brewed espresso or strong coffee, cooled
-
1 tsp vanilla extract
-
Pinch of salt
Topping:
-
1/4 cup cacao nib granola or crushed cacao nibs
-
Flaky sea salt (optional)
Instructions
1. Prep the Tofu
-
Drain silken tofu and pat lightly with paper towels to remove excess moisture.
-
Optional: Chill tofu and blender pitcher for 30 minutes to improve texture.
2. Blend the Mousse
-
Crumble tofu into a blender or food processor.
-
Add protein powder, cocoa powder, syrup, cooled espresso, vanilla, and pinch of salt.
-
Blend on high for 60–90 seconds until smooth and creamy. Scrape down sides and blend an extra 15 seconds if needed.
-
Taste and adjust sweetness or coffee strength, blending briefly again.
3. Chill
-
Spoon mousse into four serving glasses or ramekins.
-
Cover and refrigerate for at least 1 hour (or freeze 20–25 min for faster set).
4. Serve
-
Sprinkle with cacao nib granola or crushed cacao nibs and a pinch of flaky sea salt before serving.
-
Enjoy straight from the jar, or layer with berries or coconut whipped cream for a fancy parfait.
Notes
-
Runny mousse? Drain tofu well, or chill longer.
-
Taste tofu? Silken tofu is neutral if blended well; chocolate & coffee dominate.
-
Storage: Keeps 3–4 days in fridge; add crunchy toppings before serving.
-
No high-powered blender? A food processor works; blend a bit longer.
The Good Stuff: A Peek at the Nutrition
Now, let’s talk about why this dessert makes you feel so good. This isn’t just empty calories; it’s functional fuel. Per serving (approximately one-quarter of the recipe), you’re looking at roughly:
- Calories: 160
- Protein: 14g – This is the star! It’s what keeps you full, satisfied, and helps repair your muscles.
- Carbohydrates: 10g
- Fat: 8g – Healthy fats from the tofu and cocoa help with nutrient absorption and keep you satiated.
- Sugar: 4g – Mostly natural sugars from the maple syrup, making it a low-sugar dessert option.
- Fiber: 3g – Thanks to the cocoa and tofu, it gives your digestive system a little love.
Compare that to a traditional chocolate mousse made with heavy cream and sugar, which can easily clock in at over 400 calories and 30g of sugar per serving, with very little protein. This version lets you indulge your cravings while genuinely nourishing your body. It’s a win-win.
Your New Go-To Guilt-Free Dessert
And there you have it! A dessert that truly delivers on every front: incredible flavor, luxurious texture, and a powerhouse of nutrition. This Mocha Protein Mousse is proof that you don’t have to give up the foods you love to feel your best. It’s about making smart, delicious swaps that add up to a happier, healthier you.
Final Thoughts: Your Dessert Dilemma, Solved.
So, there you have it. The great dessert dilemma—decadence versus health—is officially a thing of the past. This Mocha Protein Mousse isn’t just a recipe; it’s your new secret weapon. It’s the answer to that 3 p.m. slump, the perfect post-workout reward, and the effortless, impressive dessert that will have your friends begging for the recipe.
We started with a simple craving and a bit of kitchen nostalgia, and we ended up with a creation that feels like a hug and a high-five all at once. It’s proof that “healthy” doesn’t have to mean “bland,” and “indulgent” doesn’t have to mean “regretful.” With a base of silken tofu and protein powder, you’re choosing a dessert that fuels your body without sacrificing a single bit of joy.
I encourage you to make it your own. Try the variations, play with the toppings, and adjust the sweetness to your heart’s content. Let this recipe be a launchpad for your own culinary creativity.
Most of all, remember that taking care of yourself can and should be delicious. So go ahead, grab a spoon, and dig into a dessert that loves you back.
Stay sweet (but not too sweet!),
Beau