Forget the Fuss, Let’s Talk Flavor: Your New Favorite Party Dessert is Here!
Hey friends, Beau here! Let me paint you a picture. You’re hosting a get-together, or maybe you’re just craving something sweet that feels a little fancy, a little special. You think of cannoli—that iconic Italian pastry with its crisp, shattering shell and dreamy, creamy ricotta filling. But then you think about wrestling with hot oil, fiddling with metal tubes, and the inevitable mess of trying to pipe filling into a delicate shell without it cracking. Suddenly, that craving feels like a chore.
Sound familiar? I’ve been there more times than I’d like to admit. That’s exactly why I created these Mini Cannoli Cups. We’re taking every single bit of that classic, soul-warming cannoli flavor and packing it into the most adorable, fuss-free, party-perfect bite you’ve ever seen. No deep fryer, no special equipment, just pure, unadulterated bliss.
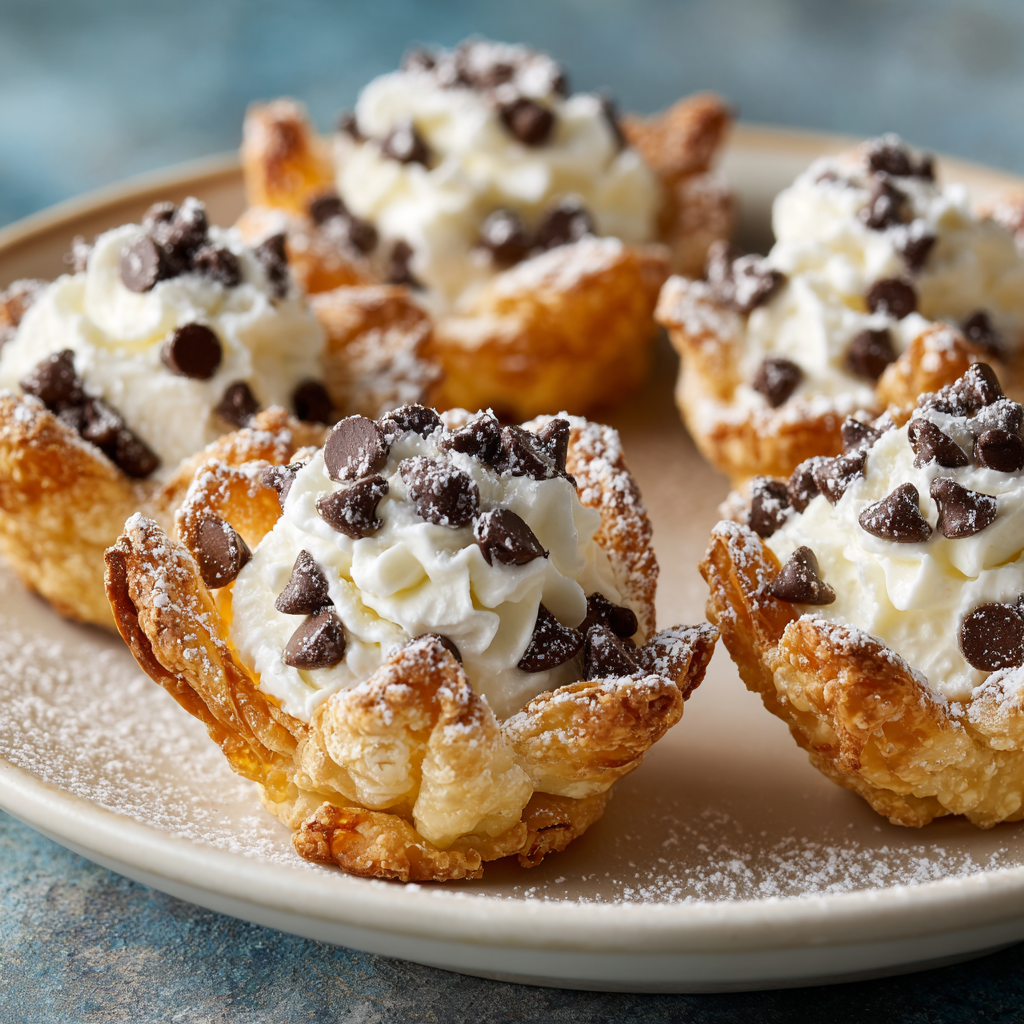
Imagine this: golden, flaky little cups, warm with a hint of cinnamon, cradling a cloud-like sweet ricotta filling studded with mini chocolate chips. They’re the ultimate crowd-pleaser—easy to make, even easier to eat (I dare you to stop at just one!). So, if you’re ready to bring a taste of the Italian bakery right into your kitchen with a fraction of the effort, grab your favorite mixing bowl and let’s get started. This is one recipe that’s about to become a staple in your feel-good food repertoire.
A Sicilian Sunrise and a Happy Kitchen Accident
This recipe actually has its roots in a happy little kitchen accident. Years ago, I was attempting my first-ever batch of traditional cannoli for a big family dinner. Let’s just say it did not go according to plan. The shells were… let’s call them “rustic.” Some were a little too dark, others didn’t quite seal right. I was staring at this platter of imperfect, albeit delicious, pastries, feeling a bit defeated.
Then, I remembered a trip my Nonna and I took to Sicily when I was a teenager. We wandered into a tiny, sun-drenched pasticceria where the baker, a jovial man with flour up to his elbows, wasn’t just making perfect cannoli. He was also taking the trimmed scraps of dough, pressing them into tiny molds, and baking them off into little free-form cups for the kids. He’d fill them with a dollop of sweetened ricotta and a single cherry. It was the best thing I’d eaten all trip—simple, joyful, and made with love (and zero waste!).
In that moment of my own kitchen disaster, that memory came flooding back. I took my “rustic” shells, crumbled them into a muffin tin, pressed them into cups, and rebaked them. The result? A revelation! These mini cups were born out of a desire to capture that same spirit of joy and simplicity. They’re a reminder that sometimes, the best recipes aren’t about perfection; they’re about flavor, fun, and sharing something delicious with the people you love.
Gathering Your Flavor Arsenal
One of the best things about this recipe is the short, sweet ingredient list. We’re using a couple of smart shortcuts (hello, refrigerated pie crust!) to get maximum flavor with minimal effort. Here’s everything you’ll need to make about 24 little bites of heaven.
For the Crispy, Golden Shells:
- 2 refrigerated pie crusts: Our superstar shortcut! I like the ones you find in the dairy aisle. They’re flaky, buttery, and save us a ton of time. Chef’s Insight: Let them sit at room temperature for about 15 minutes before unrolling—it prevents cracking.
- 1 tbsp granulated sugar: Just a sprinkle to add a subtle sweetness and help the shells caramelize to a beautiful golden brown.
- 1 tsp ground cinnamon: This is my little secret weapon. That warm, aromatic spice gives these cups that authentic “cannoli shop” fragrance and flavor.
For the Dreamy, Creamy Filling:
- 1 ½ cups whole milk ricotta cheese: This is non-negotiable for the best texture and flavor. Please, please use whole milk ricotta and make sure it’s well-drained. If your ricotta is watery, your filling will be too. I like to let it sit in a fine-mesh strainer over a bowl for 30 minutes beforehand. Substitution Tip: For an ultra-smooth filling, you can swap in an equal amount of mascarpone cheese.
- ½ cup powdered sugar: It dissolves instantly into the ricotta, giving us a silky-smooth filling without any grittiness.
- ½ tsp pure vanilla extract: The backbone of so many great desserts. It adds a warm, floral sweetness that pairs perfectly with the ricotta.
- ½ cup mini chocolate chips: Their small size is perfect for these little cups! Chef’s Insight: Toss them in a teaspoon of flour before folding them in—this helps prevent them from sinking to the bottom of the filling.
- Optional Flavor Boosts: The zest of one small orange (for a bright, citrusy kick) or a ¼ tsp of almond extract (for a deeper, nutty flavor) are fantastic additions!
For the Final Flourish (Toppings):
- Powdered sugar for dusting: A snowy, beautiful finish that makes everything look professionally made.
- Extra chocolate chips or crushed pistachios: A sprinkle of green pistachios not only looks gorgeous but adds a wonderful textural contrast.
Let’s Build Some Bites: A Step-by-Step Guide to Bliss
Ready to see some magic happen? This is where we transform these simple ingredients into something truly spectacular. Follow these steps, and you’ll be a mini cannoli cup pro in no time.
- Preheat and Prep. Fire up your oven to 375°F (190°C). This is the perfect temperature to get our pie crust cups beautifully golden and flaky. While it’s heating, grab your mini muffin tin. No need to grease it—the butter in the pie crust will take care of that! Chef’s Hack: If you have two muffin tins, you can bake all the cups at once. If not, no worries, we’ll work in batches.
- Create the Cups. Unroll your first pie crust onto a lightly floured surface. Now, we need circles! You can use a 2.5-inch round cookie cutter, or if you’re like me and can never find the right one, the rim of a standard cocktail glass works perfectly. Press down and cut out as many circles as you can. Gently press each circle into a well of your mini muffin tin. Don’t stress about making them perfect! Just use your fingers or a small glass to press them down and up the sides. A little rustic charm is a good thing. Chef’s Tip: Re-roll the scraps to get a few extra circles out of each crust.
- The Cinnamon-Sugar Kiss. In a small bowl, mix together that tablespoon of sugar and teaspoon of cinnamon. Now, take a pinch and sprinkle it right into the bottom of each unbaked pie crust cup. This isn’t just for flavor; the sugar will create a slightly caramelized, crisp layer that’s absolutely divine.
- Bake to Golden Perfection. Pop the tin into your preheated oven and bake for 10-12 minutes. You’re looking for a lovely light golden brown color. Keep an eye on them—ovens can vary! Once they’re done, carefully remove the tin and let the cups cool in the pan for about 5 minutes before transferring them to a wire rack to cool completely. This is crucial! If you add the filling to warm shells, it will melt and make the cups soggy. Patience, my friend!
- Whip Up the Dreamy Filling. While the shells are cooling, let’s make the star of the show. In a medium bowl, combine your well-drained ricotta, powdered sugar, and vanilla extract. Use a hand mixer or a sturdy whisk to beat it all together until it’s smooth and creamy. If you’re using orange zest or almond extract, now’s the time to mix it in. Finally, gently fold in those mini chocolate chips. Chef’s Hack: Want an even fluffier filling? Whip it with the mixer for a full 2-3 minutes until it lightens in color and texture.
- The Grand Finale: Fill ‘Em Up! Once your shells are completely cool, it’s time for the fun part. You can simply spoon the filling into the cups, but for a really pretty presentation, scoop the filling into a zip-top bag, snip off a corner, and pipe it in. Don’t be shy—pile it high!
- The Chill Factor. Place your filled cannoli cups on a tray or plate and pop them in the fridge for at least 30 minutes. This allows the filling to set up slightly, making them easier to eat and allowing all the flavors to meld together beautifully.
- Serve with Style. Right before serving, give them a generous dusting of powdered sugar (I use a fine-mesh sieve for this) and a sprinkle of extra chocolate chips or crushed pistachios. And just like that, you’ve created pure magic.
How to Serve These Show-Stopping Mini Cannoli Cups
Presentation is part of the fun! These little guys are so versatile. For a casual game day spread, just pile them high on a rustic wooden board or a simple platter. For something a bit more elegant, like a bridal shower or holiday party, arrange them on a beautiful tiered dessert stand. I love serving them with a fresh pot of strong espresso or a pot of herbal tea for the perfect afternoon pick-me-up.
They are the ultimate party dessert because they’re a self-contained, no-mess, one-bite wonder. Your guests can just grab and go! If you’re bringing them to a potluck, consider transporting the shells and filling separately and assembling them on-site for the ultimate crisp-to-creamy experience.
Get Creative! 5 Fun Twists on the Classic
Once you’ve mastered the basic recipe, the flavor world is your oyster! Here are a few of my favorite ways to mix things up:
- The “Lemon Bliss” Cup: Swap the vanilla for the zest and juice of one lemon for a bright, tangy, and refreshing twist. Fold in some fresh blueberries instead of chocolate chips for a real summery treat.
- The “Turtle” Cup: Fold chopped, toasted pecans and a handful of caramel bits into the filling. After piping, drizzle with a little store-bought caramel sauce and a sprinkle of sea salt. Trust me on this one.
- The “Chocolate Dipped” Cup: Melt some semi-sweet or dark chocolate and dip the rims of the cooled, unfilled shells in it. Let them set on parchment paper before filling. It adds a gorgeous look and an extra layer of chocolatey goodness.
- The “Cannoli Napolean” (Gluten-Free Friendly): For a super quick, gluten-free version, skip making the shells and use store-bought mini phyllo shells! Just fill and serve—no baking required. It’s the ultimate 10-minute dessert hack.
- The “Boozy Berry” Cup: Add a tablespoon of your favorite liqueur to the filling—Chambord (raspberry), Frangelico (hazelnut), or Kahlúa (coffee) are all amazing. Top with a corresponding fresh berry.
Beau’s Kitchen Chronicles: A Recipe That Grows With You
This recipe has been a living, evolving thing in my kitchen. I’ve made it for everything from my nephew’s baptism to a last-minute “I need dessert!” panic before book club. It’s never let me down. One of my favorite kitchen memories is of my little niece, covered in powdered sugar, “helping” me fill the cups and declaring herself the “Official Chocolate Chip Taster.”
The beauty of this recipe is its flexibility. I started with the basic cinnamon-sugar shell, but now I sometimes add a pinch of cocoa powder to the shell mixture for a chocolate version. I’ve learned that a tiny splash of fresh orange juice in the filling can make the chocolate flavor pop even more. Don’t be afraid to make it your own—that’s where the real magic happens.
Your Cannoli Cup Questions, Answered!
Over the years, I’ve gotten a lot of great questions about this recipe. Here are the answers to the most common ones to ensure your success!
Q: My ricotta filling is a bit runny. What did I do wrong?
A: The most common culprit is ricotta that wasn’t drained well enough. Even if it looks fine in the container, it often holds extra whey. Next time, let it drain in a fine-mesh strainer for 30-60 minutes before you start. If you’re in a pinch, you can gently fold in a tablespoon or two of whipped cream or a bit more powdered sugar to help thicken it up.
Q: Can I make these ahead of time?
A: Absolutely! You are a party-planning genius. You can bake the shells up to 2 days in advance and store them in an airtight container at room temperature. The filling can also be made 1-2 days ahead and kept in a sealed container in the fridge. I highly recommend waiting to assemble them until the day you plan to serve them to keep the shells perfectly crisp.
Q: My shells puffed up in the middle while baking. How do I prevent that?
A> This is a classic pie crust quirk! To prevent puffing, you can “dock” the dough. Just take a fork and prick the bottom of each unbaked pie crust cup a few times before you add the cinnamon sugar. This lets the steam escape during baking.
Q: I don’t have a mini muffin tin. Can I still make these?
A> You sure can! A regular-sized muffin tin will work, though you’ll get fewer, larger cups (about 12). Just adjust your baking time—they might need an extra 2-4 minutes. You can also simply cut the dough into squares and press them into the wells for a more free-form, “rustic” look. No tin at all? Roll the dough a bit thicker, cut into circles, and bake them flat on a parchment-lined sheet pan to create cannoli “cookies” that you can sandwich with the filling!

Mini Cannoli Cups : Bite-Sized Bliss with Creamy Ricotta Filling
Description
Mini Cannoli Cups – Fuss-Free Italian Indulgence
Think of classic cannoli—crispy shells, creamy ricotta filling, chocolate chips—but in a tiny, bite-sized cup that’s easy, fun, and mess-free. Perfect for parties, potlucks, or an elegant treat at home.
Ingredients
For the Crispy, Golden Shells:
-
2 refrigerated pie crusts, room temperature
-
1 tbsp granulated sugar
-
1 tsp ground cinnamon
For the Creamy Filling:
-
1½ cups whole milk ricotta cheese, well-drained
-
½ cup powdered sugar
-
½ tsp pure vanilla extract
-
½ cup mini chocolate chips (tossed in 1 tsp flour to prevent sinking)
-
Optional: zest of 1 small orange or ¼ tsp almond extract
For Topping:
-
Powdered sugar for dusting
-
Extra chocolate chips or crushed pistachios
Instructions
1. Preheat & Prep
-
Preheat oven to 375°F (190°C).
-
Use a mini muffin tin (no greasing needed).
2. Make the Cups
-
Roll out pie crust and cut 2.5-inch circles (cookie cutter or cocktail glass rim).
-
Press each circle gently into a muffin tin well. Re-roll scraps for extra cups.
3. Add Cinnamon-Sugar
-
Mix sugar and cinnamon. Sprinkle a pinch into each cup for flavor and caramelized crunch.
4. Bake
-
Bake 10–12 minutes until light golden brown.
-
Cool 5 minutes in the tin, then transfer to a wire rack to cool completely.
5. Prepare Filling
-
In a medium bowl, beat drained ricotta, powdered sugar, and vanilla until smooth.
-
Fold in chocolate chips (and optional flavorings).
-
For extra fluff, whip 2–3 minutes until lighter in color.
6. Fill the Cups
-
Pipe or spoon filling into cooled shells, piling it high.
7. Chill
-
Refrigerate at least 30 minutes to set the filling.
8. Serve
-
Dust with powdered sugar and sprinkle with extra chocolate chips or crushed pistachios.
Notes
-
Runny filling? Drain ricotta well. Fold in a tablespoon of whipped cream or extra powdered sugar if needed.
-
Make ahead: Bake shells 2 days in advance; make filling 1–2 days ahead. Assemble just before serving.
-
Shell puffing? Dock dough with a fork before adding sugar.
-
No mini muffin tin? Use a regular muffin tin, or press circles into a pan for rustic cups; adjust baking time.
Let’s Talk Nourishment (The Soul Kind, Too!)
While I’m all about feel-good food that feeds the soul first, I know many of you like to have the facts. Here’s a general nutritional breakdown for one mini cannoli cup. Remember, these are estimates and can vary based on the specific brands of ingredients you use.
Approximate Nutrition per Cup (based on 24 servings):
Calories: 110 | Total Fat: 6g | Saturated Fat: 3g | Cholesterol: 10mg | Sodium: 75mg | Total Carbohydrates: 10g | Dietary Fiber: 0g | Sugars: 4g | Protein: 3g
These little cups are a perfect example of a “little goes a long way” treat. They’re satisfying enough with just one or two, but
Final Thoughts: Your New Go-To Recipe Awaits
So, there you have it. We’ve traded the fuss for pure, unadulterated flavor. These Mini Cannoli Cups are more than just a dessert; they’re your ticket to becoming the hero of any gathering, without spending the whole party in the kitchen.
They prove that the heart of a great recipe isn’t perfection—it’s the joy of creating something delicious to share. It’s the memory of a Sicilian bakery, the laughter of a kitchen “accident,” and the promise of a perfect, creamy-crisp bite.
So go ahead, preheat that oven and whip up that filling. Your new favorite party dessert is waiting. Don’t be surprised when your friends start requesting them by name.
Happy baking!
Beau