The Viral No-Bake Miracle: Your New Favorite Dessert Awaits
Hey friends, Beau here! Have you ever scrolled through your phone, seen a recipe that seems too good to be true, and just had to stop everything to try it? That was me the first time I stumbled upon the Japanese Yogurt Cheesecake. A creamy, dreamy dessert with the soul of cheesecake, the simplicity of yogurt, and absolutely zero baking required? I was skeptical, I’ll admit it. My trusty oven felt a little betrayed. But let me tell you, after one bite of this magically set, protein-packed treat, I was a full-on convert.
This isn’t just a recipe; it’s a kitchen revolution in a jar. It went viral for the best reason possible: it genuinely works. With just two core ingredients—thick Greek yogurt and your favorite cookies—you create something that transforms in your fridge. The cookies soften into a tender, cake-like base, and the yogurt firms up into a silky, panna cotta-meets-cheesecake layer that’s downright luxurious. It’s the ultimate “set it and forget it” dessert, perfect for warm days, busy weeks, or anytime you crave something sweet without the fuss.
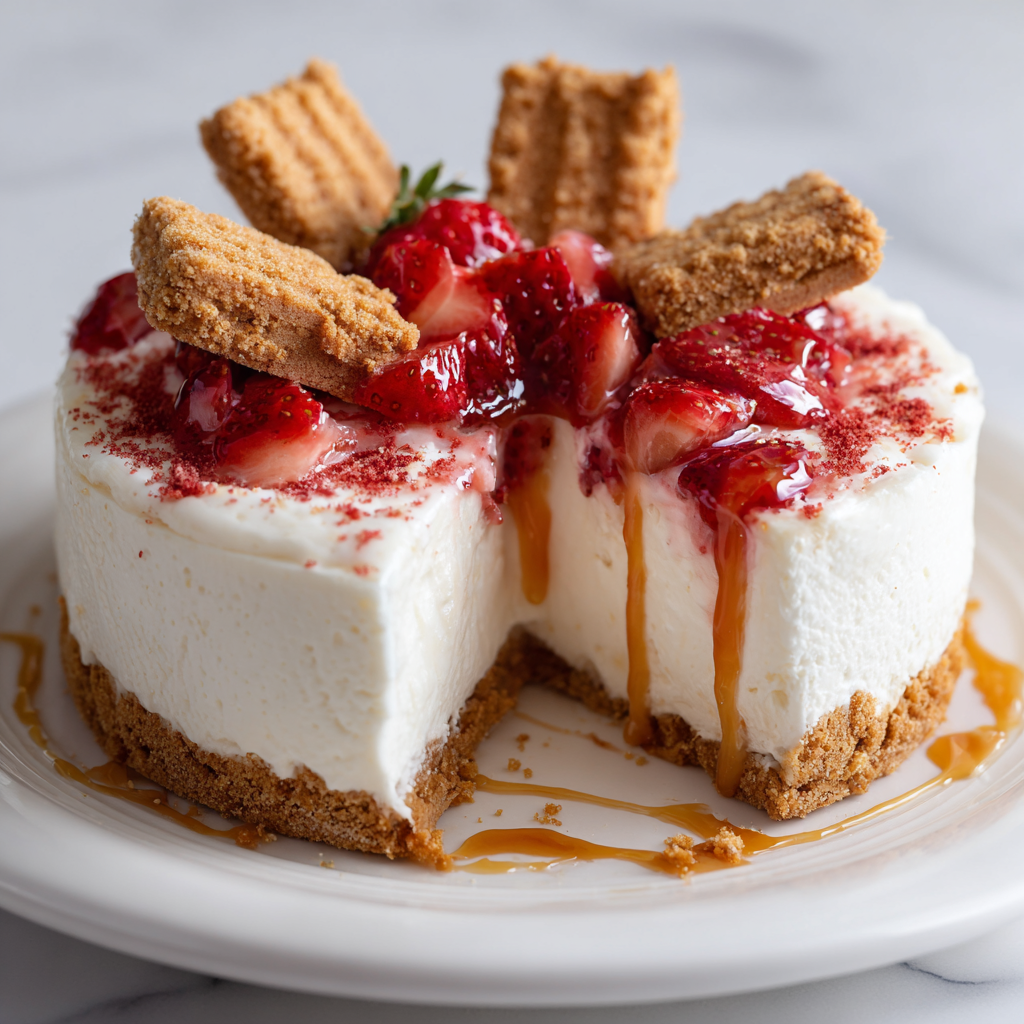
And because I can never leave well enough alone (what fun is that?), I’ve also perfected a Strawberry Cheesecake version that tastes like a cloud of berry bliss. It’s a few more ingredients, but still a no-bake wonder. So, whether you’re a kitchen newbie looking for a guaranteed win or a seasoned pro who appreciates sheer brilliance, grab a spoon. We’re about to make magic happen.
The Night the Fridge Made Dessert (And I Got the Credit)
This recipe takes me back to one of those classic “uh-oh” moments that turned into a triumph. I had friends coming over for a last-minute game night. I’d promised dessert, but between prepping snacks and cleaning up my chaotic counter (we’ve all been there), I completely forgot to actually make it. Panic mode! I opened the fridge and saw a giant tub of Greek yogurt and a sleeve of Biscoff cookies staring back at me. Then I remembered a vague video I’d seen about a “fridge cake.”
With nothing to lose, I literally slapped them together in a dish, shoved it in the back of the fridge, and crossed my fingers. Hours later, mid-laughter and terrible poker faces, I remembered it. I pulled out the dish with a mumbled, “It’s an experiment, no promises!” The first spoonful was met with pure silence—the good kind. Then came the, “Beau, what is this? It’s incredible!” I just smiled and said, “A little secret.” The real secret? The fridge did all the work, and I looked like a dessert wizard. It was the night I learned that sometimes, the simplest tricks are the most impressive.
Gathering Your Simple, Powerful Ingredients
Here’s where the beauty shines. You likely have most of this right now. The magic is in the quality and ratios, so let’s break it down.
For the Classic 2-Ingredient Wonder:
- 1½ cups plain Greek yogurt: This is your star. Go for full-fat or 2% for the creamiest, richest texture. The fat is flavor and structure here. Non-fat can work but might be a tad tangier and less luscious. For a dairy-free twist, a very thick coconut or almond milk yogurt can work, but check that it’s unsweetened and super-strained.
- 12-14 Biscoff cookies (Lotus brand): This is your magic wand. Their spicy, caramelized flavor bakes into the yogurt perfectly. They soften but don’t disintegrate. Chef’s Swap: No Biscoff? Graham crackers, Digestive biscuits, or even Anna’s ginger thins are fantastic. For a gluten-free version, use your favorite GF crunchy cookie.
For the Strawberry Cheesecake Twist:
- 1½ cups plain Greek yogurt: Same rules apply. The blank canvas for our berry masterpiece.
- 2 tablespoons honey (or maple syrup): A touch of sweetness and binder. It balances the yogurt’s tang and complements the strawberries beautifully. Agave works too!
- ½ teaspoon vanilla extract: The flavor enhancer. It rounds everything out and gives that classic “cheesecake” aroma. Don’t skip it!
- ½ cup fresh strawberries, finely chopped: Fresh, fruity bursts! Tiny pieces ensure every bite has berry goodness. If strawberries aren’t in season, frozen (thawed and well-drained) work in a pinch.
- 3-4 full graham cracker sheets, broken: The classic crust flavor. Break them into rustic pieces for texture. For the Strawberry version, they’re a perfect flavor match.
- 2 tablespoons freeze-dried strawberries, crushed: Your flavor bomb topping. This isn’t just pretty; it intensifies the strawberry flavor tenfold. Find them in the snack or dried fruit aisle.
Let’s Build Some Magic: Step-by-Step
Get ready for the easiest “cooking” you’ll ever do. I’m talking minutes of active time for a payoff that tastes like you labored for hours.
For the Classic Biscoff Version:
- Layer the Yogurt: Grab your container—I love a clear glass jar or small loaf pan to see the layers. Spoon in the Greek yogurt and use the back of your spoon to smooth it into an even, flat layer. Pro Tip: Give the container a gentle tap on the counter to settle the yogurt and remove any air bubbles. A smooth base makes for prettier slices later.
- Insert the Cookies: Here’s the fun part. Take your Biscoff cookies and press them upright into the yogurt, like little soldiers standing at attention. Space them about ½ inch apart. Push them down until only the top ¼ inch or so is peeking out. Chef’s Hack: Don’t be shy! Really embed them. They need good contact with the yogurt to soften properly. It might look weird now, but trust the process.
- The Patient Chill: Cover the container tightly with a lid or plastic wrap. This is crucial—it prevents any fridge flavors from creeping in. Now, walk away. Let it chill for at least 6 hours, but overnight is golden. This is non-negotiable. The yogurt needs time to firm up, and the cookies need time to absorb moisture and transform into that soft, cakey layer. Your fridge is now your oven.
- Serve & Celebrate: After the long wait, pull it out. You can eat it straight from the jar (no judgment!) or for a stunning presentation, run a thin knife around the edge and flip it onto a plate. The layers will hold! Drizzle with honey, add fresh berries, or go wild with a caramel sauce.
For the Strawberry Cheesecake Version:
- Mix the Filling: In a medium bowl, combine the Greek yogurt, honey, and vanilla extract. Stir until it’s smooth and homogenous. Now, gently fold in your finely chopped fresh strawberries. Pro Tip: Folding, not stirring aggressively, keeps those beautiful berry pieces intact for little bursts of flavor.
- Assemble: Spoon this gorgeous pink-tinged mixture into your container and smooth the top. It already smells like a strawberry dream, doesn’t it?
- Add the Graham Cracker “Crust”: Just like with the Biscoff version, take your broken graham cracker pieces and press them upright into the strawberry-yogurt mixture. Leave about ¼ inch exposed.
- Chill Out: Again, cover and give it the full 6+ hours in the fridge. This rest time allows the graham crackers to soften and the flavors to marry into pure cheesecake harmony.
- The Grand Finale: Just before serving, take your crushed freeze-dried strawberries and dust them generously over the top. This adds a pop of color, an incredible concentrated strawberry flavor, and a delightful bit of texture. Slice and serve with a big smile.
How to Serve Your Masterpiece
This dessert is incredibly versatile. For a casual treat, eat it straight from the jar with a big spoon—it’s your personal cheesecake pot! For a dinner party wow-factor, turn the whole thing out onto a small cake stand or plate. Slice it with a clean, warm knife (dip it in hot water and dry it between slices) for pristine pieces.
Take your toppings to the next level. For the Classic version, a drizzle of warmed Biscoff cookie butter is a religious experience. For the Strawberry version, a balsamic glaze reduction or a dollop of lightly sweetened whipped cream is divine. I also love serving it with a side of fresh mint or a sprinkle of lemon zest to brighten all the creamy richness. It’s breakfast, it’s a snack, it’s dessert—you make the rules.
Make It Your Own: Endless Twists & Swaps
The fun doesn’t stop here! This method is a blueprint for infinite creativity. Here are a few of my favorite riffs:
- Chocolate Hazelnut Dream: Use chocolate-hazelnut spread swirled into the yogurt and press in Ferrero Rocher-type cookies or chocolate wafers. Top with chopped toasted hazelnuts.
- Lemon Berry Bliss: Add the zest of one lemon and a tablespoon of lemon juice to the yogurt. Use shortbread cookies and layer with fresh raspberries or blueberries before chilling.
- Tropical Coconut: Use coconut-flavored Greek yogurt (or add a dash of coconut extract to plain), and press in toasted coconut cookies or macaroons. Top with fresh mango or pineapple.
- PB&J Remix: Swirl a few tablespoons of your favorite jam into the yogurt. Use peanut butter sandwich cookies (like Nutter Butters) for the insert. A childhood favorite, all grown up.
- High-Protein Power: Use vanilla protein powder Greek yogurt for an extra boost. It’s the ultimate healthy-ish dessert or post-workout treat.
A Few Notes From My Kitchen to Yours
This recipe has become a staple in my home, and it’s evolved in silly ways. I once tried to speed up the process by putting it in the freezer for an hour. Friends, don’t do it. The cookies froze rock-hard and the texture was all wrong. Patience is truly the secret ingredient!
I’ve also learned that the type of cookie is everything. A super-soft cookie will turn to mush, and a rock-hard biscuit might not soften enough. You want something with a good “snap” that can hold its structure for a bit before yielding. It’s a fun excuse to buy different cookies and “test” them… for science, of course. Over time, I’ve started making these in little 4-oz mason jars for perfect, portion-controlled grab-and-go desserts all week long. Meal prep has never tasted so good.
Your Questions, Answered!
Q: My cookies are still crunchy/hard after chilling. What happened?
A: This usually means they didn’t have enough contact with the yogurt, or they didn’t chill long enough. Make sure you’re pushing them deep into the yogurt, and always aim for the full 6-8 hours or overnight. Some very dry cookies might need a touch more time.
Q: Can I use regular yogurt instead of Greek?
A> I don’t recommend it. Regular yogurt is too thin and won’t firm up properly. The thick, strained nature of Greek yogurt is essential for the final set texture. If you’re in a bind, you can strain regular yogurt through cheesecloth for a few hours to thicken it up.
Q: How long does this last in the fridge?
A> It keeps beautifully! Covered tightly, it will stay fresh and delicious for 4-5 days. The cookies will continue to soften, becoming more cake-like over time.
Q: Can I make a giant one for a crowd?
A> Absolutely! Just use a larger dish (like an 8×8 pan) and scale up the ingredients evenly. You may need to add an extra hour or two of chilling time for it to set fully throughout.

Japanese Yogurt Cheesecake (2-Ingredient Classic + Strawberry Version) : No-Bake & Viral
Description
This no-bake yogurt cheesecake-style dessert is one of the easiest sweets you can make. With thick Greek yogurt and crunchy cookies, your fridge does all the work — transforming the layers into a creamy, sliceable, cheesecake-like treat. It’s quick to assemble, higher in protein than traditional cheesecake, and perfect when you want dessert without turning on the oven.
Instructions
Classic Version
-
Add yogurt
Spoon the Greek yogurt into a small loaf pan, dish, or jar. Smooth the top. -
Insert cookies
Stand cookies upright in the yogurt, spacing slightly apart. Press them down so most of each cookie is submerged. -
Cover and chill
Cover tightly and refrigerate at least 6 hours, preferably overnight. -
Serve
Scoop straight from the container or unmold and slice. Add toppings if desired.
Strawberry Version
-
Mix filling
Stir yogurt, honey, and vanilla until smooth. Fold in chopped strawberries. -
Assemble
Spread mixture into your container and smooth the top. -
Add crackers
Press graham cracker pieces upright into the mixture. -
Chill
Cover and refrigerate 6–8 hours or overnight. -
Finish
Sprinkle crushed freeze-dried strawberries on top before serving.
Notes
-
Use thick yogurt only — regular yogurt is too thin to set properly.
-
Full-fat or 2% tastes creamier and gives better texture.
-
Choose crunchy cookies with a firm snap — very soft cookies turn mushy.
-
Make ahead friendly — keeps well in the fridge up to 4–5 days.
-
For cleaner slices: dip your knife in hot water and wipe between cuts.
A Lighter Take on Indulgence
Let’s be real—this is a dessert, and it’s meant to be enjoyed. But part of its viral charm is that it feels like a smarter indulgence. Compared to a traditional baked cheesecake, this version is significantly lower in sugar, fat, and calories, while being higher in protein thanks to the Greek yogurt. A serving of the classic version comes in around 280 calories, with a great protein punch that can actually keep you satisfied. It’s a fantastic way to satisfy a sweet tooth without the heaviness. Remember, the specific nutritional info will vary based on the brands of yogurt and cookies you use, but you can feel good about digging into this creamy creation.
The Last Bite
So there you have it, friends—the viral sensation that lives up to the hype. This Japanese Yogurt Cheesecake is more than a recipe; it’s a reminder that incredible food doesn’t have to be complicated. It’s about smart, simple techniques and letting quality ingredients shine. It’s the dessert you make when you want to impress but need to relax. It’s the treat you prep on Sunday for a sweet surprise on Wednesday.
I hope you give it a try and make it your own. Tag me @Feastical if you do—I love seeing your kitchen creations! Now, go raid your pantry, grab that yogurt, and let your fridge do the rest. Happy (non-)baking!
Always in good taste,
Beau
Save This Recipe For Later!