
When a Cannoli Met a Cookie: And Lived Happily Ever After
Hey friends, Beau here! Let’s be real for a second. Is there anything more glorious than a perfectly crisp, creamy-filled cannoli? That satisfying shell crack, the rich, sweet ricotta, the little bursts of chocolate… it’s a little piece of Sicilian heaven. But let’s also be real about the other part: the mess. The delicate shells that shatter if you look at them wrong, the filling that squirts out the other end on the first bite, and the inevitable powdered sugar mustache. It’s a delicious, beautiful disaster.
What if I told you we could capture every single bit of that magical cannoli flavor, but in a form that’s made for sharing, for packing in lunches, for enjoying with a cup of coffee without needing three napkins? Enter my Irresistible Cannoli Cookies. This is the recipe that takes all the heart of the classic pastry and bakes it into a soft, golden, impossibly tender cookie that cradles that luscious ricotta cream filling.
These cookies are my go-to when I want to impress without the stress. They look like you spent all day in a professional bakery, but the process is straightforward, fun, and honestly, kind of therapeutic. We’re making a simple, forgiving cookie dough, whipping up a no-cook filling that’s pure bliss, and assembling them into little sandwich-style delights. So, preheat your oven, grab your favorite mixing bowl, and let’s create some kitchen magic that’s part cookie, part cannoli, and 100% delicious.
A Sweet Memory in Every Bite
This recipe always takes me back to my Nonna’s kitchen. Well, my friend Maria’s Nonna, to be exact. I didn’t have a Sicilian grandmother, but Maria’s family adopted me as an honorary grandson every Sunday. The star of the show was always her legendary cannoli, which she would make from scratch, frying the shells in a bubbling pot of oil right on the stove. We weren’t allowed to touch them until dessert, and the anticipation was a physical presence in the house.
One particularly hot summer day, the fried shells just wouldn’t cooperate. They were soft, they were soggy, and Nonna was not having it. With a determined glint in her eye, she looked at the big bowl of sweetened ricotta filling and then at a batch of simple sugar cookie dough she had resting in the fridge. “We improvise,” she declared. She rolled out the dough, cut it into circles, baked them, and sandwiched the cannoli cream inside. They were a hit! While my version has evolved a bit, the spirit is the same: it’s about the joy of the flavor, not the perfection of the form. It’s a lesson in kitchen resilience that has stuck with me ever since.
Gathering Your Cannoli Cookie Crew
Here’s your shopping list for this flavor fiesta! Don’t worry, I’ve included all my favorite chef insights and substitution hacks to make this recipe your own.
For the Cookies:
- 2 ½ cups all-purpose flour: The reliable backbone of our cookie. It gives just the right amount of structure without making them tough.
- ½ tsp baking powder: Our little leavening agent that gives the cookies a slight puff and a tender, cake-like crumb.
- ¼ tsp salt: Never, ever skip the salt! It’s the flavor enhancer that makes the sweet notes pop and balances the entire cookie.
- ¾ cup unsalted butter, softened: The key to richness and that melt-in-your-mouth texture. “Softened” means you can press your finger into it easily. If it’s melty, the cookies will spread too much.
- ¾ cup granulated sugar: For sweetness and that lovely, lightly crisp edge. For a deeper flavor, you can swap half for light brown sugar.
- 1 large egg: Our binding agent, bringing the dough together and adding moisture.
- 1 tsp vanilla extract: The warm, aromatic soul of so many baked goods. Use the real stuff—it makes a difference!
- 1–2 tbsp milk: This is our “as needed” ingredient. Depending on your flour and the humidity, your dough might need a tiny splash to come together into a soft, pliable ball.
For the Ricotta Filling:
- 1 ½ cups whole milk ricotta cheese: This is the star of the show! Pro Chef Tip: Drain your ricotta well. Place it in a fine-mesh strainer over a bowl for at least 30 minutes. This step is non-negotiable for a thick, non-watery filling.
- ½ cup powdered sugar: It dissolves instantly into the ricotta, giving us a silky-smooth cream without any graininess.
- ½ tsp vanilla extract: A little more vanilla love to perfume the filling.
- ¼ tsp cinnamon (optional): My personal touch. It adds a warm, subtle depth that whispers “cannoli.” Feel free to leave it out if you’re a purist!
- ½ cup mini chocolate chips: The mini ones are perfect here—they distribute evenly and don’t clog your piping tip. I prefer semi-sweet to balance the sweetness.
For the Topping:
- Powdered sugar for dusting: For that classic, snowy, bakery-style finish.
- Additional mini chocolate chips: A sprinkle on top makes them look irresistible and gives a hint of what’s inside.
Let’s Get Baking: Your Step-by-Step Roadmap to Cookie Bliss
Follow these steps, and you’ll be a cannoli cookie pro in no time. I’ve packed each one with little hacks I’ve learned along the way.
Step 1: Make the Cookie Dough
First, in a medium bowl, whisk together your flour, baking powder, and salt. This isn’t just busywork—whisking ensures the leavening and salt are evenly distributed, so every cookie bakes up perfectly. Now, in a larger bowl, cream together the softened butter and granulated sugar. We’re not just mixing here; we’re creaming. Beat it on medium-high speed for 2-3 minutes until it’s pale, fluffy, and beautiful. This step incorporates air, which is part of what gives our cookies their lovely texture. Scrape down the bowl, then beat in the egg and vanilla until just combined.
Step 2: Bring the Dough Together
With your mixer on low, gradually add the dry ingredients to the wet. Mix until the flour just disappears and a soft dough forms. Now, take a look. If it’s holding together when you pinch it, you’re golden. If it seems a bit crumbly, add a tablespoon of milk at a time until it comes together. Don’t overmix! Overworking the dough leads to tough cookies, and we want tender.
Step 3: Chill Out
This is a crucial step, my friends. Wrap your dough in plastic wrap and chill it for at least 30 minutes. Why? Chilling firms up the butter, which prevents the cookies from spreading into flat puddles in the oven. It also gives the flour time to hydrate, resulting in a better texture. Use this time to clean up or start on your filling!
Step 4: Bake to Golden Perfection
Preheat your oven to 350°F (175°C) and line your baking sheets with parchment paper. This is my secret for easy cleanup and no sticking! Scoop the dough into small, tablespoon-sized balls. I use a small cookie scoop for uniformity—it’s a game-changer. Place them on the sheet a couple of inches apart and give them a gentle flatten with the palm of your hand or the bottom of a glass. They don’t spread a ton, but they need a little room to breathe. Bake for 10-12 minutes, just until the edges are set and have a hint of golden brown. The centers might look slightly soft—that’s perfect! They’ll firm up as they cool. Let them cool on the baking sheet for 5 minutes before transferring them to a wire rack to cool completely. Patience is key here! If you try to fill warm cookies, the filling will melt and make a mess.
Step 5: Whip Up the Dreamy Filling
While the cookies are cooling, let’s make the magic. Take your well-drained ricotta and place it in a clean bowl. Add the powdered sugar, vanilla, and cinnamon (if using). Whisk it all together until it’s smooth and creamy. Now, fold in the ½ cup of mini chocolate chips with a spatula. Be gentle! Cover the bowl and pop it in the fridge to firm up a bit while the last cookies cool.
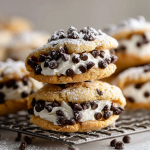
Step 6: The Grand Finale: Assembly!
You’ve made it! Time to bring it all home. You have two options here: you can make closed sandwich cookies, or you can go open-faced. For sandwiches, pair up your cooled cookies by size. Spoon a generous tablespoon of filling onto the flat side of one cookie and gently press its partner on top. For open-faced, just dollop or pipe the filling onto the top of a single cookie—it looks gorgeous and is a bit easier. If you want to be fancy, use a piping bag with a star tip. Top your assembled masterpieces with a light dusting of powdered sugar and a sprinkle of extra mini chocolate chips.
How to Serve These Little Pieces of Heaven
Presentation is part of the fun! I love arranging these on a rustic wooden board or a beautiful vintage platter. The contrast of the white filling and powdered sugar against the dark wood just makes them pop. They are the ultimate shareable dessert for a party or potluck.
For a truly next-level experience, serve them with a strong cup of espresso or a dark roast coffee. The bitterness of the coffee is a perfect counterpoint to the sweet, creamy cookie. They’re also fantastic with a glass of cold milk for the kids (or the kids at heart). If you’re feeling extra, a small glass of Moscato or a sweet Marsala wine would be a stunningly authentic pairing.
Make It Your Own: Creative Cannoli Cookie Twists
Once you’ve mastered the classic, the world is your cannoli! Here are a few of my favorite ways to mix things up:
- The Citrus Zest Zinger: Add the zest of one orange or lemon to the ricotta filling. The bright, citrusy notes cut through the richness and add a whole new dimension of flavor.
- The “Everything but the Kitchen Sink”: Fold chopped pistachios and dried cherries into the filling along with the chocolate chips. You get sweet, tart, crunchy, and creamy all in one bite.
- The Chocolate-Dipped Dream: Instead of making sandwich cookies, bake your cookies as single rounds. Once cooled, dip half of each cookie in melted dark chocolate and let it set before adding the filling to the top. It’s decadent and gorgeous.
- The Gluten-Free & Vegan Friend: Use a 1:1 gluten-free flour blend for the cookies. For the filling, swap the ricotta for a thick, strained vegan yogurt or a firm vegan cream cheese sweetened with powdered sugar.
Beau’s Chef’s Notes: A Few Parting Wisdom Nuggets
This recipe has been a living, evolving thing in my kitchen. The first time I made them, I was in such a rush I didn’t drain the ricotta. Let’s just say I ended up with cannoli cookie *soup*. It was a delicious, messy lesson learned! Now I always, always drain it.
I’ve also found that these cookies are at their absolute best the day they are assembled. The cookie has a slight crispness that contrasts beautifully with the cream. If you need to get a head start, you can bake the cookies and make the filling up to two days ahead. Store them separately and assemble no more than a few hours before serving to keep that perfect texture. Most of all, have fun with it! Cooking is about joy, not perfection.
Your Cannoli Cookie Questions, Answered!
Q: My filling is a bit runny. What did I do wrong and how can I fix it?
A: The number one culprit is undrained ricotta! For future batches, drain it longer, even up to an hour. If you’re in a pinch with your current batch, you can stir in a tablespoon or two of instant pudding mix (vanilla or cheesecake flavor works great) to help thicken it up quickly. You can also gently fold in a bit of whipped cream.
Q: Can I freeze these cookies?
A: You absolutely can, but with a strategy! The baked (unfilled) cookies freeze beautifully for up to 3 months in an airtight container. The ricotta filling does not freeze well—it becomes watery when thawed. So, freeze the cookie components and assemble with fresh filling when you’re ready to serve.
Q: My cookies spread too much! Why?
A> This usually points to butter that was too warm or an insufficient chill time. Make sure your butter is just softened, not melted, and don’t skip that 30-minute fridge rest for the dough. Also, check that your baking powder is fresh!
Q: Can I use mascarpone instead of ricotta?
A: Yes! Mascarpone will give you an even richer, denser, and creamier filling, almost like a cannoli-cheesecake hybrid. It’s delicious. Just be aware that it’s thicker, so you might need to whip it with a tiny splash of milk or cream to get it to a pipeable consistency.
Irresistible Cannoli Cookies with Creamy Ricotta Filling
Description
All the joy of a classic cannoli, no pastry tubes required! These Cannoli Cookies capture the essence of the beloved Italian dessert—crisp edges, soft centers, and a luscious ricotta cream filling dotted with mini chocolate chips. They’re elegant enough for a dinner party, easy enough for a weeknight treat, and guaranteed to make any coffee break feel special. A bite of nostalgia, a touch of Nonna’s love, and a whole lot of flavor—these cookies are pure edible happiness.
Ingredients
For the Cookies:
-
2½ cups all-purpose flour
-
½ tsp baking powder
-
¼ tsp salt
-
¾ cup unsalted butter, softened
-
¾ cup granulated sugar
-
1 large egg
-
1 tsp vanilla extract
-
1–2 tbsp milk (as needed)
For the Filling:
-
1½ cups whole milk ricotta cheese, well-drained
-
½ cup powdered sugar
-
½ tsp vanilla extract
-
¼ tsp cinnamon (optional)
-
½ cup mini chocolate chips
For the Topping:
-
Powdered sugar, for dusting
-
Extra mini chocolate chips, for garnish
Instructions
-
Make the Dough: Whisk flour, baking powder, and salt. In another bowl, beat butter and sugar until fluffy (2–3 min). Mix in egg and vanilla. Gradually add dry ingredients until a soft dough forms. Add milk if needed.
-
Chill: Wrap dough and refrigerate 30 minutes to prevent spreading.
-
Bake: Preheat oven to 350°F (175°C). Scoop 1 tbsp portions onto parchment-lined trays. Flatten slightly. Bake 10–12 min until edges are just golden. Cool completely.
-
Prepare Filling: In a bowl, mix drained ricotta, powdered sugar, vanilla, and cinnamon. Fold in mini chocolate chips. Chill for 15 min to firm up.
-
Assemble: Spread or pipe filling onto half of the cookies. Top with remaining cookies to make sandwiches or leave open-faced. Dust with powdered sugar and extra chips.
Notes
-
Always drain ricotta for at least 30 minutes for thick, creamy filling.
-
Bake cookies a day ahead, fill before serving for best texture.
-
Try flavor twists with orange zest, chopped pistachios, or mascarpone for a luxurious variation.
Crispy, creamy, and charmingly nostalgic—these Cannoli Cookies are love at first bite.
Nutrition
- Calories: 190 Cal Per Serving
- Sugar: 11g
- Fat: 9g
- Carbohydrates: 22g
Nutritional Info (Because Knowledge is Power!)
Okay, let’s be clear: these are a treat, and they are meant to be enjoyed as such! But I believe in transparency. Here’s a rough breakdown per cookie (assuming one sandwiched cookie). Remember, these are estimates and can vary based on specific ingredients used.
- Calories: ~170
- Protein: 3g
- Fat: 8g
- Carbohydrates: 20g
- Sugar: 11g
- Fiber: 1g
The ricotta does provide a bit of protein and calcium, which is a nice bonus. To lighten them up a touch, you could use part-skim ricotta and reduce the chocolate chips slightly, but honestly? Life’s too short not to enjoy the real deal once in a while.
Final Thoughts from My Kitchen to Yours
And there you have it! My take on the cookie that stole my heart and became a Feastical favorite. These Irresistible Cannoli Cookies are more than just a dessert; they’re a conversation starter, a memory maker, and a perfect example of how a little kitchen creativity can lead to something truly special.
I hope you love making them as much as I do. I hope your kitchen fills with the warm, sweet smell of baking cookies, and I hope you get to see the smiles on the faces of the people you share them with. That’s what Feastical is all about.
So, give this recipe a try, and let me know how it goes! Tag me on social with #Feastical so I can see your beautiful creations. Until next time, happy baking!
– Beau