
Pure Chocolate Bliss—100% Vegan & Shockingly Simple
Hey, friends! Beau here, welcoming you back to my kitchen. Today, we’re diving fork-first into one of those recipes that feels like a little bit of magic. We’re talking about a Vegan Chocolate Mousse Cake that is so decadent, so silkily rich, and so unbelievably creamy, it’ll make you do a double-take. I’m not kidding. The best part? We’re not turning on the oven. Not even for a second.
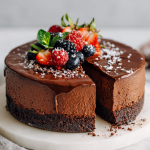
I know what you might be thinking. “Beau, a no-bake, vegan chocolate cake? Is it going to taste like… well, compromise?” Let me stop you right there. This cake is the opposite of compromise. It’s a triumph. It’s a celebration of deep, dark chocolate flavor that gets its incredible texture from a secret, plant-based powerhouse you might be throwing away. We’re creating a cloud-like, intense chocolate mousse layer and crowning it with a luscious, glossy ganache that would make any pastry chef proud.
This is the dessert you make when you want to impress absolutely everyone at the table—the vegan skeptics, the dessert connoisseurs, your gluten-free friend, and most importantly, yourself. It’s perfect for a fancy holiday centerpiece, a show-stopping dinner party finale, or just a Tuesday night when your soul needs a chocolate hug. So, grab your favorite mixing bowl and let’s create some pure, unadulterated chocolate joy together.
The Magic of Aquafaba: A Kitchen Accident Turned Triumph
I have to come clean. The first time I whipped up a can of chickpea brine—aquafaba—I fully expected a kitchen disaster. I was experimenting with vegan desserts for a friend’s birthday, determined to create something that didn’t feel “less than.” I remember staring into that bowl of cloudy liquid, my electric mixer whirring, thinking, “This is never going to work.” But then, a few minutes in, magic started to happen. The liquid began to foam, then froth, and then—I kid you not—it transformed into these beautiful, glossy, snow-white peaks that held their shape perfectly.
My mind was utterly blown. I carefully folded in the melted chocolate, holding my breath, terrified the whole thing would collapse into a puddle. But it didn’t. It stayed light and airy. After a few hours in the fridge, I took my first bite. The texture was a revelation—ethereally light yet profoundly rich. It was a “holy moly” moment that changed my entire perspective on plant-based baking. It taught me that the coolest kitchen discoveries often come from a place of playful experimentation and a willingness to be surprised. This cake is that happy accident, perfected and shared with all of you.
Gathering Your Chocolate Dream Team
One of the best things about this recipe is its beautiful simplicity. You only need a handful of ingredients to create pure magic. Here’s your shopping list, complete with my chef-ly insights to set you up for success.
For the Chocolate Mousse Layer:
- 2 cups vegan dark chocolate chips or chopped chocolate: This is the star of the show, so use a brand you genuinely love to eat. The quality of your chocolate directly impacts the flavor. Look for a 70% dark chocolate for a perfect balance of bitter and sweet. A quick tip: Make sure your chocolate chips are explicitly vegan, as some contain milk fat.
- 1 ¾ cups aquafaba (the liquid from a can of chickpeas), room temp: Our magical, mousse-making hero! Don’t toss that brine! I find that reduced-sodium chickpea brine works best. Make sure it’s at room temperature for maximum volume when whipping. Pro tip: A standard 15-oz can usually yields just about this amount.
- ¼ tsp cream of tartar: This isn’t just an optional add-in; it’s our stability superstar. It helps the aquafaba whip up stiffer and hold its shape much longer, ensuring our mousse doesn’t deflate. If you’re in a pinch, a few drops of lemon juice can work, but cream of tartar is my #1 choice.
- Pinch of salt: This is my secret weapon for making any dessert, especially chocolate, taste more like itself. It enhances and deepens the chocolate flavor, cutting through the sweetness perfectly.
For the Ganache Topping:
- 1 cup vegan dark chocolate: You can use chips or chopped bars again here. Using the same chocolate as the base ensures a harmonious flavor profile.
- ½ cup full-fat canned coconut milk: The “full-fat” part is non-negotiable! You need that rich, creamy fat to create a silky-smooth, pourable ganache. Shake the can well before opening. The thick cream at the top is pure gold for this.
Optional Toppings for Pizzazz:
- Fresh berries (raspberries are a classic!)
- Vegan whipped cream
- Shaved chocolate or crunchy cacao nibs
- A delicate sprinkle of sea salt flakes
Crafting Your No-Bake Masterpiece: A Step-by-Step Guide
Ready to work some kitchen wizardry? Follow these steps, and you’ll have a stunning dessert that looks and tastes like it came from a professional patisserie. The key here is patience and a gentle hand.
- Melt the Chocolate (Like a Pro): Place your 2 cups of chocolate for the mousse layer into a heatproof bowl. You can melt this using a double boiler (a bowl set over a pot of gently simmering water, making sure the bottom of the bowl doesn’t touch the water) or in the microwave in 20-second bursts, stirring well after each burst. Either way, our goal is smooth, melted chocolate. Chef’s Hack: Once melted, let it cool down until it’s just barely warm to the touch. If it’s too hot, it will deflate our precious aquafaba foam. This is a crucial step!
- Whip the Aquafaba (The Magic Moment): Pour your room-temperature aquafaba into a large, impeccably clean mixing bowl. Glass or metal is best. Add the cream of tartar and that tiny pinch of salt. Now, using an electric hand mixer or a stand mixer with the whisk attachment, start whipping on medium-high speed. I won’t lie—this takes a little time, about 8-10 minutes. You’ll go from a cloudy liquid to froth, to soft peaks, and finally to beautiful, stiff, glossy peaks. You’ll know you’re there when you can turn the bowl upside down over your head (a classic chef test!) and nothing moves. Chef’s Hack: A clean bowl is essential. Any trace of grease can prevent the aquafaba from whipping properly.
- The Grand Fold (Gentleness is Key): This is the most important part of the process. We need to incorporate the chocolate into the aquafaba without knocking out all the air we just worked so hard to create. Add about one-third of the cooled, melted chocolate to the whipped aquafaba. Using a large spatula, gently fold it in by cutting down through the middle of the bowl, sliding the spatula along the bottom, and folding the mixture over on top of itself. Rotate the bowl and repeat. It will look streaky at first—that’s okay! Add the next third, and fold, then the final third, folding just until no white streaks remain. Chef’s Hack: A figure-eight motion works wonders here. Be patient and resist the urge to stir!
- Set the Mousse: Lightly grease a 7 or 8-inch springform pan and line the bottom with a circle of parchment paper for easy removal. Gently pour your beautiful mousse mixture into the pan and smooth the top with your spatula. Give the pan a little tap on the counter to release any large air bubbles. Now, pop it into the fridge to chill and set for at least 3-4 hours, or until it’s firm to the touch. Overnight is even better!
- Create the Ganache Topping: When your mousse layer is almost set, it’s ganache time! Place your 1 cup of chocolate for the ganache in a clean bowl. In a small saucepan, heat the ½ cup of full-fat coconut milk until it’s just steaming—you should see small bubbles around the edges, but don’t let it boil. Pour the hot coconut milk over the chocolate, and let it sit, untouched, for one full minute. This allows the chocolate to gently melt. After a minute, start stirring slowly from the center outward until you have a perfectly smooth, shiny, and luxurious ganache. Let it cool for about 5-10 minutes so it’s still pourable but won’t melt the mousse layer.
- The Grand Finale: Top & Final Chill: Slowly and evenly pour the slightly cooled ganache over the top of your set mousse layer. You can tilt the pan to help it spread into a perfect, glossy coat. Return the whole cake to the fridge for at least another hour, or until the ganache is beautifully set.
- Serve and Impress: To serve, carefully run a thin, warm knife around the edge of the springform pan before releasing the clamp. Lift the ring away, slide the cake (on its parchment paper base) onto a serving plate, and get ready for the “oohs” and “aahs.” Use a hot, clean knife to slice clean pieces, wiping the blade between cuts for picture-perfect slices.
Plating Your Perfect Slice of Heaven
This cake is a stunner all on its own, but a few simple garnishes can take it from “wow” to “WOWZA!” Here’s how I love to serve it:
For a touch of elegance, place a slice on a simple white plate. Add a small dollop of vegan whipped cream on the side and a few fresh, vibrant raspberries. The tartness of the berries cuts through the richness of the chocolate beautifully. For a bit of texture and a pro-baker touch, sprinkle a few cacao nibs over the top or add some delicate shavings of vegan chocolate. My absolute favorite finish? A tiny, flaky sprinkle of sea salt right on top of the ganache. It amplifies the chocolate flavor in the most incredible way and makes the whole experience feel gourmet.
This cake is rich, so slices can be on the smaller side. It pairs wonderfully with a cup of strong black coffee, a glass of oat milk latte, or even a nice dessert wine if that’s your thing. Remember, you’re not just serving dessert; you’re serving a conversation piece!
Make It Your Own: Delicious Twists & Swaps
The beauty of this recipe is its versatility. Once you’ve mastered the classic, feel free to get creative and play with flavors!
- Orange Zest Dream: Add the zest of one large orange to the melted chocolate for the mousse layer. The bright, citrusy notes of orange and dark chocolate are a match made in heaven.
- Mint Chocolate Chip: Fold ½ cup of finely chopped vegan dark chocolate (or mini chocolate chips) into the mousse at the very end, and add ¼ teaspoon of peppermint extract to the melted chocolate. It’s like a grown-up, sophisticated version of your favorite ice cream.
- Mocha Kick: Dissolve 1-2 teaspoons of instant espresso powder into the hot coconut milk for the ganache. This will create a stunning mocha-flavored topping that coffee lovers will adore.
- Nutty Crunch Base: Feeling like a crust? Combine 1 ½ cups of vegan biscuit or cookie crumbs (like Oreos or graham crackers) with ⅓ cup of melted vegan butter. Press firmly into the bottom of your springform pan before adding the mousse layer for a delightful textural contrast.
- Berry Swirl: Before chilling the mousse layer, gently dollop 3-4 tablespoons of seedless raspberry jam on top and use a knife or skewer to swirl it beautifully into the mousse.
Beau’s Back-Pocket Tips & Stories
This recipe has become a staple in my home, and it’s evolved a bit over the years. The first time I made it, I was so impatient that I tried to add the chocolate when it was still warm, and let’s just say… I ended up with chocolate soup. A delicious soup, but a soup nonetheless. So, my number one piece of advice is to let that chocolate cool!
I’ve also found that this cake actually gets even better after a full 24 hours in the fridge. The flavors meld and the texture becomes even more uniform and velvety. So, if you have the time, make it a day ahead for a truly stress-free, impressive dessert. It’s a little gift from present-you to future-you.
Your Questions, Answered!
I’ve gotten a lot of questions about this cake over the years, so I’ve compiled the most common ones to help you out.
Q: My aquafaba won’t whip up! What did I do wrong?
A: The most common culprits are a greasy bowl or beaters, or the aquafaba being too cold. Make sure everything is squeaky clean and that your aquafaba is at room temperature. Also, be patient—it can sometimes take a full 10-12 minutes to reach stiff peaks. Don’t give up!
Q: Can I make this without a springform pan?
A: You can! A deep-dish pie plate will work, though it will be trickier to get clean slices out. You can also use a standard 8×8 or 9×9 square baking dish and just scoop it out like a mousse trifle—it will taste just as amazing!
Q: How long will this cake keep in the fridge?
A: It holds up beautifully! Covered tightly, it will stay perfect for 4-5 days. I do not recommend freezing it, as the texture of the mousse can become a bit grainy upon thawing.
Q: I can’t find cream of tartar. Is there a substitute?
A> Yes, you can use an equal amount of lemon juice or white vinegar. While it works, the cream of tartar does provide the most stable and voluminous results, so it’s worth tracking down if you can.
Insanely Good Vegan Chocolate Mousse Cake : Rich, Creamy & No Bake!
Description
Hey friends! This Vegan Chocolate Mousse Cake is rich, silky, and completely no-bake. Using aquafaba (the liquid from canned chickpeas), we create a light, airy mousse layered with a glossy, decadent ganache. Perfect for impressing anyone—vegan or not—without turning on the oven.
Ingredients
Chocolate Mousse Layer
-
2 cups vegan dark chocolate chips or chopped chocolate (70% recommended)
-
1 ¾ cups aquafaba (chickpea liquid), room temperature
-
¼ tsp cream of tartar (or lemon juice as a substitute)
-
Pinch of salt
Ganache Topping
-
1 cup vegan dark chocolate
-
½ cup full-fat canned coconut milk
Optional Garnishes
-
Fresh berries (raspberries, strawberries)
-
Vegan whipped cream
-
Shaved chocolate or cacao nibs
-
Flaky sea salt
Instructions
-
Melt the Chocolate: In a double boiler or microwave, melt the chocolate for the mousse. Let it cool slightly—just warm to the touch.
-
Whip the Aquafaba: In a clean bowl, combine aquafaba, cream of tartar, and salt. Whip with a hand or stand mixer on medium-high speed for 8–10 minutes until stiff, glossy peaks form.
-
Fold in Chocolate: Gently fold the melted chocolate into the whipped aquafaba in three additions. Use a spatula and a figure-eight motion, folding until smooth but keeping the mousse airy.
-
Set the Mousse: Lightly grease a 7–8 inch springform pan and line the bottom with parchment paper. Pour in the mousse, smooth the top, and tap gently to remove air bubbles. Chill 3–4 hours or overnight until firm.
-
Prepare the Ganache: Heat coconut milk in a small saucepan until steaming. Pour over chocolate for the ganache, let sit 1 minute, then stir until smooth. Cool slightly before pouring over the mousse. Chill at least 1 hour until set.
-
Serve: Run a warm knife around the pan before releasing. Slice with a hot, clean knife for perfect pieces. Garnish with berries, whipped cream, or chocolate shavings.
Notes
-
Orange Chocolate: Fold in orange zest to the mousse.
-
Mint Chocolate: Add peppermint extract and mini chocolate chips.
-
Mocha Ganache: Dissolve instant espresso in the coconut milk for a coffee kick.
-
Nutty Base: Press vegan cookie crumbs with melted vegan butter into the pan before mousse.
-
Berry Swirl: Swirl in raspberry jam before chilling the mousse.
Nutrition
- Calories: 290 Cal Per Serving
- Fat: 20 g
- Protein: 3 g
A Quick Nutritional Glance
While we’re all here for the incredible taste, it’s nice to know what’s in our food! This cake is naturally gluten-free and packed with the rich, satisfying flavors of dark chocolate and coconut. Dark chocolate is a known source of antioxidants, and using aquafaba is a fantastic way to reduce food waste. A typical slice (based on 10 servings) contains roughly:
- Calories: ~290 kcal
- Fat: 20g
- Carbohydrates: 25g
- Protein: 3g
Remember, these are estimates and can vary based on the specific brands of ingredients you use. This is a rich, indulgent treat, and a little slice goes a long way in satisfying your sweet tooth!
Final Thoughts from My Kitchen to Yours
Well, there you have it, my friends. My go-to recipe for a dessert that never fails to delight and amaze. This Vegan Chocolate Mousse Cake is proof that you don’t need complicated techniques or a pantry full of obscure ingredients to create something truly spectacular. All you need is a little bit of kitchen magic (and a can of chickpeas!).
I hope this recipe brings as much joy to your table as it has to mine. It’s more than just a dessert; it’s a reminder that the best food is often the simplest, made with a dash of love