The Sweet, Savory Star of Your Easter Table: Let’s Make Some Magic!
Hey friend, Beau here! Can you smell it? That incredible, unmistakable aroma that starts wafting through the house hours before the big meal? It’s the scent of sweet honey and smoky brown sugar caramelizing into a sticky glaze, mingling with the gentle spice of cloves and the tropical hint of pineapple. It’s the smell of family gathering, of laughter echoing from the living room, of spring finally deciding to show up. It’s the smell of an Easter ham, my absolute favorite holiday centerpiece.
There’s something wonderfully comforting about a beautifully glazed ham sitting proudly in the middle of the table. It’s not just dinner; it’s a showstopper, a tradition, a promise of deliciousness for days (hello, leftover ham sandwiches and scrambles!). But for some reason, a lot of home cooks get a little nervous about tackling it. They think it’s complicated or easy to mess up. I’m here to tell you, with a wink and a nudge, that it’s one of the most forgiving, rewarding dishes you can make. It’s already cooked! We’re just warming it through and giving it a personality—a sweet, shiny, utterly irresistible personality.
Today, I’m walking you through my go-to Honey-Glazed Easter Ham with Pineapple. This isn’t just a recipe; it’s a blueprint for creating a memory. We’ll keep it simple, soulful, and packed with those “chef-y” little hacks that make all the difference. So, tie on your favorite apron, preheat that oven, and let’s create a masterpiece that’ll have everyone reaching for their phones to take a picture before they even think about taking a bite. Get ready for the warmest, tastiest hug your Easter table has ever had.
My Grandma’s Glaze and the Power of a Pineapple Ring
My love for this ham is 100% rooted in my childhood. Every Easter, without fail, my Grandma Eleanor would be the commander-in-chief of the ham. I was her eager (and slightly messy) sous-chef. My job? The all-important “clove studder.” She’d hand me the jar of whole cloves and point to the diamonds she’d scored into the ham’s fat cap. “One in each intersection, Beau. Make it pretty.” I took my job so seriously, meticulously pressing each little woody bud into place, feeling like I was performing essential surgery.
But the real magic happened with the glaze. Grandma didn’t measure. She’d scoop brown sugar from the bag, squeeze honey from the bear, and whisk in mustard from a jar with a faded label. Then came her secret weapon: the juice from the can of pineapple rings. “It’s got the sweet and the acid, all in one,” she’d say, winking. As it baked, that glaze would bubble and thicken, dripping down the sides and forming these incredible, crackly bits around the pineapple rings. The smell was pure nostalgia. To this day, the scent of cloves and caramelizing sugar instantly transports me to her kitchen, standing on a step-stool, feeling like the most important chef in the world. That’s the feeling I want to help you create in your own kitchen.
Gathering Your Cast of Flavor Characters
Here’s everything you need to bring this sunny, savory showstopper to life. Think of each ingredient as a member of a band—they all play a crucial part in the final symphony!
- 1 fully cooked, bone-in ham (7–9 lbs): This is our star! “Fully cooked” means most of the work is done for us—we’re just heating and flavoring. I highly recommend bone-in for two reasons: the bone adds incredible depth of flavor to the meat as it heats, and leftover ham bones are gold for making the best split pea or bean soup you’ve ever had. If you can find a “spiral-cut” ham, that’s fantastic for easy serving, but a traditional one gives us a beautiful canvas for scoring and glazing.
- 1 can (20 oz) pineapple rings in juice: Don’t you dare drain that juice down the sink! The rings give us that classic, gorgeous presentation and their sugars caramelize beautifully. The juice is liquid gold for our glaze, adding a bright, fruity acidity that balances the sweetness. Chef’s Tip: If you’re feeling fancy, fresh pineapple works too! Just know it might release more water and won’t be as uniformly round.
- Whole cloves (about 20-30): These little guys are for studding, not for eating whole (they’re quite strong!). They infuse the ham with that warm, aromatic, quintessentially “holiday” spice that permeates the meat and makes your whole house smell amazing.
- ¾ cup packed brown sugar: Light or dark both work! Dark brown sugar has a deeper molasses flavor, which I love for a richer glaze. This is our primary caramelizer, creating that gorgeous, crackly crust.
- ¼ cup honey: The floral sweetness of honey is irreplaceable here. It adds a beautiful gloss and a flavor complexity that plain sugar can’t match. For a fun twist, try using a local wildflower or orange blossom honey!
- 2 tbsp Dijon mustard: “Wait, mustard?!” Trust me. This is the genius ingredient that keeps the glaze from being one-dimensionally sweet. The Dijon adds a subtle tang and sharpness that cuts through the fat of the ham, making every bite perfectly balanced. It’s the secret weapon.
Let’s Build That Beautiful Glaze & Bake!
Ready to roll up your sleeves? Follow these steps, and you’ll have a ham that’s not only gorgeous but also juicy and packed with flavor in every single slice.
Step 1: Preheat & Position. Fire up your oven to 325°F (165°C). Get out your roasting pan (a 9×13 baking dish can work in a pinch for a smaller ham). Place the ham in the pan, cut side down. This creates a stable base and allows the juices to baste the ham as it heats. No rack needed!
Step 2: Score & Stud for Flavor. Using a very sharp knife, score the surface fat of the ham in a diamond pattern. Don’t cut too deep—just about ¼ inch into the fat and outer layer. This does three wonderful things: it lets the glaze seep in, creates more surface area for caramelization, and makes it look professionally done. Now, channel your inner artist and press a whole clove into the center of each diamond. It’s oddly satisfying, I promise.
Step 3: Whisk Up the Glaze. In a small saucepan over low heat, combine the brown sugar, honey, Dijon mustard, and 2-3 tablespoons of the reserved pineapple juice. Whisk until it’s smooth, glossy, and just beginning to bubble at the edges. This should only take 3-5 minutes. Chef’s Hack: Taste it! Adjust to your liking—a tiny pinch of black pepper can be amazing here, or a splash of apple cider vinegar for more tang.
Step 4: Pineapple Party! Open your can of pineapple rings. Arrange them artistically over the top and sides of the ham, overlapping slightly if you like. If they’re sliding, you can secure them with toothpicks, but they usually stay put once you add the glaze. Now, take half of your warm glaze and brush it generously all over the ham and pineapple. Get it in those cracks!
Step 5: The Low & Slow Bake. Loosely tent the entire ham with aluminum foil. This creates a little steam oven inside, ensuring the ham heats through without drying out. Pop it in the oven. The rule of thumb is about 15 minutes per pound for a fully cooked ham to reach the perfect internal temperature of 140°F. For a 9-pound ham, that’s roughly 2 hours and 15 minutes. But we’re not just setting a timer and walking away!
Step 6: The Basting Ritual. Every 20-30 minutes, pull the ham out (carefully!), remove the foil, and brush on more of that glorious glaze. This is the key to building layers of flavor and that deep, sticky coating. Don’t skip this step! It’s your moment to connect with the dish.
Step 7: The Grand Finale – Caramelization. For the last 20 minutes of cooking, remove the foil for good. Crank the oven up to 375°F (190°C). Let that glaze bubble, darken, and caramelize into a stunning, glossy finish. Keep an eye on it—this is when the magic really happens!
Step 8: The Crucial Rest. Once the ham hits 140°F internally and looks like a jewel, take it out. LET IT REST for at least 15-20 minutes before you even think about slicing. This allows the frantic juices to redistribute throughout the meat, guaranteeing a moist, juicy slice instead of a dry one. It’s non-negotiable, my friend.
Plating Your Holiday Masterpiece
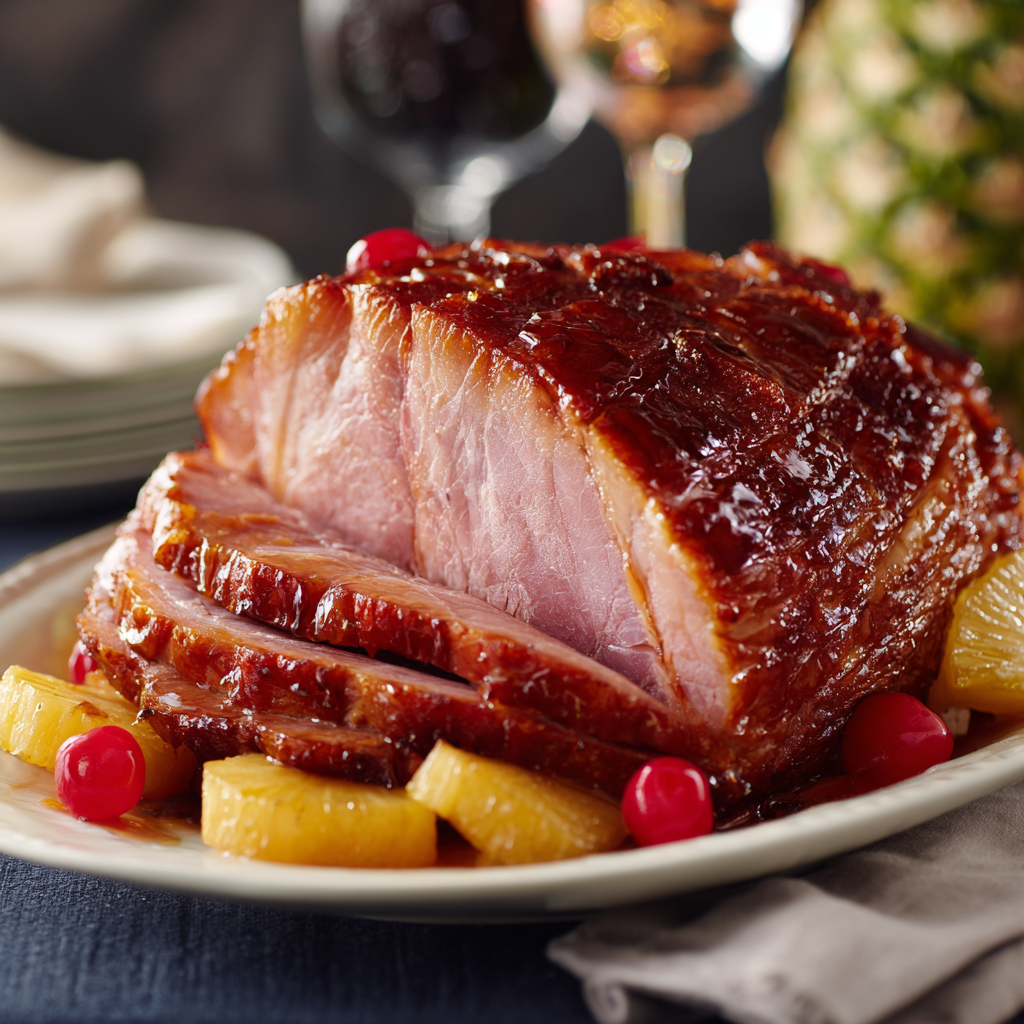
Presentation is part of the joy! Once rested, transfer your ham to a large serving platter or a cutting board with a groove to catch juices. Spoon any of the incredible pan drippings over the top for extra shine. I love to garnish the platter with fresh herbs like rosemary or thyme sprigs, and maybe a few extra pineapple rings or maraschino cherries for a pop of color.
Now, let’s talk about the supporting cast—the sides that make this meal sing! That creamy, rich Scalloped Potatoes are the ultimate comfort foil to the sweet ham. The bright, crisp Roasted Asparagus with Lemon cuts through the richness perfectly. And those soft, Buttery Dinner Rolls? They’re essential for making mini ham sliders at the table and for sopping up every last bit of glaze on the plate. Don’t forget a big, grainy mustard on the side for those who love an extra kick!
Make It Your Own: Delicious Twists on the Classic
This recipe is a fantastic foundation. Want to play? Here are a few of my favorite riffs:
- The Bourbon Brown Sugar Twist: Add 2 tablespoons of bourbon or whiskey to the glaze mixture. It adds a wonderful smoky, oaky depth that’s absolutely incredible with the ham.
- Spicy & Sweet: Add 1-2 teaspoons of chipotle powder or a few generous cracks of black pepper to your glaze. The heat plays so nicely with the sweet honey and sugar.
- Maple Mustard Magic: Swap the honey for pure maple syrup and use a grainy whole-grain mustard instead of Dijon. You’ll get a more rustic, robust flavor profile that screams autumn, but is just as welcome in spring.
- Citrus Zing: Replace the pineapple juice in the glaze with fresh orange juice and add a tablespoon of orange zest. Use orange slices instead of, or in addition to, the pineapple rings for a sunny citrus vibe.
- Pineapple-Ginger Buzz: Add 1-2 tablespoons of finely minced fresh ginger or 1 teaspoon of ground ginger to the glaze. The zingy warmth of ginger is a fantastic friend to both ham and pineapple.
A Few More Thoughts From My Kitchen to Yours
This recipe has evolved so much since my grandma’s “a little of this, a little of that” days, but the soul is the same. One year, I got overzealous with the broiler during the caramelization step and created a glaze that was… let’s call it “extra crunchy.” Lesson learned: watch it like a hawk! Another time, I tried using agave instead of honey, and while it was good, it just didn’t have that same nostalgic flavor. Stick with honey if you can.
The best part? This ham is arguably even better the next day. The flavors have more time to mingle and get to know each other. I always make sure I have a plan for the leftovers (think: ham fried rice, omelets, mac and cheese with ham, or that epic soup I mentioned). Cooking should be fun, a little messy, and always full of love. Don’t stress about perfection. If a pineapple ring slides, just nudge it back. If you forget to baste once, the world won’t end. You’re creating something wonderful.
Your Questions, Answered!
Q: Can I use a spiral-cut ham for this recipe?
A: Absolutely! It’s a great shortcut for serving. The only differences: you won’t need to score it (it’s pre-sliced), and be extra gentle when brushing on the glaze so you don’t tear the slices. Also, because it’s pre-sliced, it may heat a bit faster, so start checking the temperature a little earlier.
Q: My glaze is too thin/too thick! Help!
A: No panic! If it’s too thin, let it simmer on the stove for another minute or two to reduce and thicken. If it’s too thick (like a paste), simply whisk in another tablespoon or two of pineapple juice or even water until it’s a brushable consistency. It’s very forgiving.
Q: How can I make this ahead of time?
A: You can make the glaze up to 2 days ahead and store it in the fridge. Warm it slightly on the stove or in the microwave to loosen it up before using. You can also score and stud the ham the night before, cover it tightly, and refrigerate. On the day-of, just bring it out while the oven preheats, then glaze and bake as directed.
Q: How long do leftovers last, and how should I store them?
A: Once cooled, store leftover ham in an airtight container in the fridge for 3-4 days. For longer storage, you can freeze sliced ham in freezer bags for 1-2 months. The bone? Wrap it tightly and freeze it for your next pot of soup!

Honey-Glazed Easter Ham with Pineapple : Classic Holiday Centerpiece
Description
This honey-glazed pineapple ham is a classic holiday showstopper that looks impressive but is actually very simple to make. Since the ham is already cooked, your job is just to warm it gently and build a glossy, caramelized glaze packed with sweet, tangy, and lightly spiced flavor. Perfect for Easter lunch, spring gatherings, and amazing leftovers the next day.
Ingredients
-
1 fully cooked, bone-in ham (7–9 lb / 3–4 kg)
-
1 can (20 oz / 565 g) pineapple rings in juice (juice reserved)
-
¾ cup packed brown sugar
-
¼ cup honey
-
2 tbsp Dijon mustard
-
2–3 tbsp pineapple juice (from the can)
-
20–30 whole cloves (optional but traditional)
Instructions
1️⃣ Preheat & Prep
Heat oven to 325°F (165°C). Place ham cut-side down in a roasting pan.
2️⃣ Score the Surface
With a sharp knife, lightly score the fat in a diamond pattern (about ¼ inch deep). This helps the glaze soak in and caramelize.
3️⃣ Add Cloves (Optional)
Press one whole clove into the center of each diamond for classic holiday aroma.
4️⃣ Make the Glaze
In a small saucepan over low heat, whisk:
-
brown sugar
-
honey
-
Dijon mustard
-
pineapple juice
Heat 3–5 minutes until smooth and glossy.
5️⃣ Add Pineapple
Arrange pineapple rings over the ham. Secure with toothpicks if needed. Brush about half the glaze over everything.
6️⃣ Bake Covered
Tent loosely with foil and bake about 15 minutes per pound, until internal temperature reaches 140°F (60°C).
→ A 8-lb ham takes about 2 hours.
7️⃣ Baste Regularly
Every 25–30 minutes, uncover and brush with more glaze.
8️⃣ Caramelize Finish
For the last 20 minutes, remove foil and raise oven to 375°F (190°C) to caramelize the glaze. Watch closely so it doesn’t burn.
9️⃣ Rest Before Slicing
Rest 15–20 minutes before carving to keep it juicy.
Notes
-
Bone-in ham = more flavor and better leftovers for soup.
-
Don’t skip resting time — it keeps slices moist.
-
If glaze thickens too much, whisk in a little warm pineapple juice.
-
If browning too fast, loosely re-cover with foil.
-
Save the pan juices — they’re liquid gold for serving.
Final Thoughts
While holiday meals are about celebration and indulgence, I believe in mindful enjoyment. This information is an estimate per 4-ounce serving of the glazed ham (about the size of a deck of cards). Remember, a little goes a long way with such a flavorful centerpiece!
Approximate Nutrition (Per Serving):
Calories: 420 | Protein: 32g | Carbohydrates: 28g | Fat: 20g | Saturated