
Homemade Crumbl Cookies: Your Kitchen, Your New Favorite Bakery
Hey friends, Beau here! Let’s talk about a universal truth: few things in life beat the pure, unadulterated joy of a truly fantastic cookie. I’m not talking about a dainty, crisp little thing. No, no. I’m talking about a giant, puffy, bakery-style masterpiece with a slightly crisp edge that gives way to a center so soft and gooey it practically whispers sweet nothings to your soul. You know the ones I mean—the kind that made Crumbl a household name almost overnight.
But here’s the thing about those famous cookies: the lines can be long, the flavors change weekly (heartbreaking when you miss your favorite), and let’s be real, sometimes you just want to enjoy that magic in your pajamas. That’s exactly why I became obsessed with cracking the code. After more batches than I can count—my friends have officially appointed me their personal cookie dealer—I’ve perfected a Homemade Crumbl Cookies recipe that delivers all that iconic charm, right from your own oven.
This recipe is your golden ticket. We’re making thick, pillow-soft cookies that are massive, shareable (or not, I won’t judge), and completely customizable. Whether you’re a classic chocolate chip devotee or dreaming of a cookies & cream explosion, this one base dough is your new best friend in the kitchen. So, preheat those ovens and grab your favorite mixing bowl—we’re about to make your kitchen smell like a five-star bakery.
The Cookie Jar That Started It All
This whole cookie obsession? It takes me right back to my grandma’s kitchen. She had this ceramic cookie jar shaped like a plump, smiling pig, and it was never, ever empty. It was a sacred space. The rule was simple: you could have a cookie anytime, but you had to listen to a story with it. She’d tell me about her first date with Grandpa over a snickerdoodle, or about my mom learning to ride a bike while we shared a chocolate chip cookie still warm from the pan.
For her, cookies weren’t just a treat; they were the punctuation marks of a life well-lived. They were the “well done” after a hard day, the “welcome home” for a visitor, and the “I love you” when words weren’t enough. When I bite into one of these giant, homestyle cookies, I’m right back at her table. That’s the spirit I want to bring to Feastical—that feeling of connection, of comfort, of a warm hug in edible form. This recipe is my way of keeping that cookie jar forever full.
Gathering Your Cookie Crew: The Ingredients
Great cookies start with great ingredients. This isn’t about being fancy; it’s about understanding the role each one plays in creating that perfect, thick, and soft texture. Here’s your shopping list and my chef-y insights for each.
- 1 cup (226g) unsalted butter, softened – This is the heart of the cookie’s rich flavor and tender crumb. “Softened” is key here! It should be cool to the touch but leave a slight indent when you press it. Pro tip: if you forget to take it out, you can cube it and give it a quick 10-second blast in the microwave, but watch it like a hawk! For a chewier texture, some bakers swear by browning the butter first and letting it cool—a game-changer if you have an extra 10 minutes.
- ¾ cup (150g) brown sugar & ½ cup (100g) granulated sugar – This dynamic duo is non-negotiable. The molasses in the brown sugar gives our cookies moisture, chew, and that classic caramel-like depth, while the white sugar helps them spread just enough and get those beautiful golden edges.
- 2 large eggs – They act as a binder, holding our dough together and adding structure. Make sure they’re at room temperature to blend seamlessly with the butter and sugar, creating a smoother, more emulsified dough.
- 1 tbsp vanilla extract – Yes, a full tablespoon! This is our secret weapon for a deep, warm flavor base that makes the cookies taste professionally baked. Don’t be shy with it.
- 3 cups (375g) all-purpose flour – The foundation. I highly recommend using a kitchen scale for accuracy, as scooping can pack too much flour in and lead to dry cookies. If you don’t have one, fluff your flour with a spoon, spoon it into your measuring cup, and level it off.
- 1 tsp baking soda & ½ tsp baking powder – Our leavening dream team. The baking soda helps the cookies spread and brown, while the baking powder gives them that signature puff and cake-like softness. Using both is the magic behind that perfect texture.
- ½ tsp salt – The flavor enhancer! Salt makes the sweet flavors pop and balances the richness of the butter and chocolate. Never, ever skip it.
- 1½ cups of your favorite mix-ins – This is where you make it your own! Classic semi-sweet chocolate chips are a win, but feel free to go wild with milk chocolate chunks, white chocolate and macadamia nuts, or even a cup of crushed Oreos for a Cookies & Cream vibe.
Let’s Get Baking: The Step-by-Step Magic
Alright, team, it’s go time. Follow these steps, pay attention to my little hacks, and you’ll be a cookie hero in no time.
- Cream the Butter & Sugars: The Foundation of Fluffiness. In a large bowl, beat the softened butter, brown sugar, and granulated sugar together on medium-high speed for a full 2-3 minutes. I’m serious—don’t rush this! You’re not just mixing; you’re beating tiny air bubbles into the fat. This is what gives the cookie its light texture and prevents it from being dense. You’ll know it’s ready when the mixture turns a paler color and looks wonderfully fluffy.
- Add Eggs & Vanilla: Bringing it All Together. Now, mix in the eggs one at a time, letting each one fully incorporate before adding the next. This ensures a smooth, emulsified dough. Then, pour in that glorious tablespoon of vanilla and mix just until combined. Your kitchen should already be smelling incredible.
- Combine the Dry Ingredients: The Structural Support. In a separate bowl, whisk together the flour, baking soda, baking powder, and salt. Why whisk? It evenly distributes the leavening agents so you don’t get a bitter bite of baking soda in one cookie and a flat cookie from another. Chef’s hack: I sometimes add a tiny pinch of cornstarch (about a teaspoon) to the dry ingredients for an even softer, more bakery-style chew.
- Bringing Wet & Dry Together: The Gentle Merge. With your mixer on low speed, gradually add the dry ingredients to the wet mixture. Mix only until the flour streaks disappear. Overmixing at this stage develops gluten and can make your cookies tough. A few tiny flour specks are okay—we’re about to mix one more time!
- Fold in the Fun: The Mix-Ins! This is the best part. Dump in your 1½ cups of chocolate chips, crushed cookies, or whatever you’ve chosen. Use a spatula or wooden spoon to fold them in gently by hand. This prevents overworking the dough and ensures your goodies are evenly distributed.
- Scoop & Chill: The Secret to Thick Cookies. Here is the most crucial step for that iconic Crumbl thickness: CHILL THE DOUGH. Using a large cookie scoop or a ¼-cup measuring cup, portion out your dough into large balls. Place them on a parchment-lined baking sheet and pop the whole sheet into the fridge for at least 30 minutes (an hour is even better). This solidifies the butter, so the cookies don’t spread into thin pancakes in the oven. Trust me on this!
- Bake to Perfection: The Grand Finale. Preheat your oven to 350°F (175°C). Place your chilled dough balls on a new parchment-lined baking sheet, leaving plenty of room for spreading (I do 4 per standard sheet). Bake for 12-14 minutes. They are done when the edges are lightly golden but the centers still look soft, puffy, and slightly underdone. They will continue to cook on the hot baking sheet as they cool. This is the secret to that gooey, soft center!
- The Cool Down: A Test of Willpower. This is the hardest part. Let the cookies cool on the baking sheet for at least 15-20 minutes. They need this time to finish setting up. If you try to move them too soon, they’ll fall apart. I promise, the wait is worth it for that perfect texture.
How to Serve Your Masterpiece
Presentation is part of the fun! For the full Crumbl experience, serve these bad boys warm on a crisp, white plate. A giant cookie like this is a statement all on its own. If you’re feeling extra, here’s how to level up:
- Frosted Sugar Cookie Style: Once completely cool, whip up a simple vanilla glaze with powdered sugar, milk, and vanilla extract. Spread it generously over the top for that classic pink-frosted cookie look.
- Chocolate Lover’s Dream: Drizzle melted chocolate or a simple chocolate ganache over the top. A little flaky sea salt sprinkled on top cuts the sweetness beautifully.
- The Ultimate Comfort: Serve one slightly warm in a bowl with a scoop of vanilla ice cream melting over the top. It’s a cookie sundae that dreams are made of.
And don’t forget the milk! A tall, ice-cold glass of milk is the only required pairing for a cookie of this magnitude.
Mix It Up! Creative Recipe Variations
The beauty of this base dough is its versatility. Once you’ve mastered the classic, the cookie world is your oyster! Here are a few of my favorite twists:
- Cookies & Cream: Replace ½ cup of the flour with ½ cup of black cocoa powder for a deep chocolate flavor and color. Fold in 1½ cups of crushed Oreo pieces (creams and all!). Frost with a vanilla or even a cream cheese frosting.
- S’mores Delight: Fold in ¾ cup of milk chocolate chips, ¾ cup of crushed graham crackers, and after baking, while still warm, press a few mini marshmallows on top. Pop them under the broiler for 30 seconds to toast the marshmallows to perfection.
- Peanut Butter Paradise: Replace ½ cup of the butter with ½ cup of smooth peanut butter. Fold in 1 cup of peanut butter chips and ½ cup of chopped Reese’s Peanut Butter Cups.
- Lemon Poppy Seed: For a brighter option, omit the vanilla and use 2 teaspoons of lemon extract and the zest of one lemon. Fold in 2 tablespoons of poppy seeds. Top with a tangy lemon glaze.
- Gluten-Free Swap: You can easily use a 1:1 gluten-free all-purpose flour blend. Just ensure your mix-ins are also certified gluten-free.
Beau’s Chef’s Notes & Kitchen Confessions
This recipe has truly evolved in my kitchen. The first time I made it, I was so impatient I skipped the chill time. The result? A batch of delicious, but comically flat, cookie puddles. My dog even gave me a look of pity. I’ve also learned that the type of baking sheet matters! Dark, non-stick pans can cause the bottoms to brown too quickly. I’m a sworn believer in light-colored aluminum pans or, even better, insulated baking sheets for the most even bake.
The best part of this journey has been seeing the joy these cookies bring. I once made a triple batch for a friend’s moving day, and she texted me later saying it was the best housewarming gift she could have asked for. That’s the Feastical spirit—spreading comfort, one giant cookie at a time.
Your Cookie Questions, Answered!
Q: My cookies spread too much and got flat. What happened?
A: This is almost always due to warm dough or inaccurate flour measurement. Did you chill the dough? Was your butter too melty? Also, double-check your flour—if you scoop directly from the bag, you can pack in 20% more flour than intended, which throws off the whole recipe. Use the spoon-and-level method or a scale!
Q: Can I make the dough ahead of time and bake it later?
A: Absolutely! This dough is a fantastic make-ahead option. After scooping the balls, you can store them in an airtight container in the fridge for up to 3 days, or freeze them for up to 3 months. When you’re ready, just bake from frozen, adding 1-2 minutes to the baking time.
Q: My cookies are cakey, not chewy. How can I fix that?
A> A cakey texture usually means too much flour or overmixing after adding the flour. Next time, be extra gentle when combining the wet and dry ingredients, and mix only until just combined. Also, try using one extra tablespoon of brown sugar for more moisture.
Q: Why do you use both baking soda and baking powder?
A> Great question! It’s all about texture control. Baking soda promotes spreading and browning, giving us that nice edge. Baking powder provides an extra lift from within, creating that tall, soft, almost muffin-like interior we’re after. Together, they create the perfect bakery-style crumb.
Homemade Crumbl Cookies : Giant, Gooey Bakery-Style Cookies at Home
Description
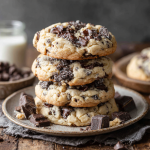
There’s nothing quite like a bakery-style cookie that’s thick, puffy, and soft in the center with a slightly crisp edge. These Homemade Crumbl Cookies bring that iconic experience right into your kitchen. They’re perfect for customizing with your favorite mix-ins—chocolate chips, Oreos, peanut butter cups, or even a cookies & cream explosion. With this recipe, you’ll be creating giant, gooey masterpieces your friends and family will rave about.
Ingredients
Cookie Dough
-
1 cup (226g) unsalted butter, softened
-
¾ cup (150g) brown sugar
-
½ cup (100g) granulated sugar
-
2 large eggs, room temperature
-
1 tbsp vanilla extract
-
3 cups (375g) all-purpose flour
-
1 tsp baking soda
-
½ tsp baking powder
-
½ tsp salt
-
1½ cups mix-ins (chocolate chips, chunks, crushed Oreos, etc.)
Optional Mix-In Ideas
-
Cookies & Cream: crushed Oreos
-
S’mores: chocolate chips, crushed graham crackers, mini marshmallows
-
Peanut Butter: peanut butter chips or chopped Reese’s
-
Lemon Poppy Seed: lemon zest + poppy seeds
Instructions
1. Cream Butter & Sugars
-
In a large bowl, beat softened butter, brown sugar, and granulated sugar on medium-high for 2–3 minutes until light and fluffy. This creates the airy texture that makes cookies soft and tender.
2. Add Eggs & Vanilla
-
Mix in eggs one at a time, fully incorporating each before adding the next.
-
Stir in vanilla extract until combined.
3. Combine Dry Ingredients
-
Whisk together flour, baking soda, baking powder, and salt in a separate bowl. Optional: add 1 tsp cornstarch for extra soft chew.
4. Merge Wet & Dry
-
Gradually add dry ingredients to wet, mixing on low just until flour streaks disappear. Don’t overmix—some small streaks are okay.
5. Fold in Mix-Ins
-
Gently fold in your chosen mix-ins by hand with a spatula or wooden spoon.
6. Scoop & Chill
-
Using a ¼-cup measuring cup or large cookie scoop, form dough balls and place on a parchment-lined baking sheet.
-
Chill dough for 30–60 minutes. This step ensures thick, bakery-style cookies that don’t spread too thin.
7. Bake to Perfection
-
Preheat oven to 350°F (175°C).
-
Place chilled dough balls on a new parchment-lined sheet, leaving room for spreading.
-
Bake 12–14 minutes: edges lightly golden, centers still soft.
8. Cool & Serve
-
Let cookies cool on the baking sheet for 15–20 minutes. They’ll finish setting without falling apart.
-
Optional: drizzle melted chocolate, spread vanilla glaze, or top with sea salt.
Notes
-
Chill dough for thick cookies.
-
Don’t overmix after adding flour.
-
Use light-colored or insulated baking sheets for even baking.
-
Mix-ins are limitless—make it your own!
Nutrition
- Calories: 480 Cal per cookie
- Sugar: 35g
- Fat: 24g
- Carbohydrates: 58 g
Let’s Talk Nutrition (The Fun Kind!)
Look, we’re here for a good time, not a long time. These are indulgent, celebratory cookies, and they’re proud of it! This nutritional info is a rough estimate based on the classic chocolate chip version and is here to help you budget your joy. Remember, variations will change these numbers.
- Servings: This recipe makes about 8 gloriously large cookies.
- Calories per cookie: Approximately 480 kcal
- Macros: Fat: 24g | Carbohydrates: 58g | Sugar: 35g | Protein: 5g
My philosophy? Enjoy every single bite mindfully and without guilt. Bake them for a special occasion, share them with people you love, and savor the moment. That’s the real nourishment.
Final Thoughts
And there you have it, friends! Your complete guide to creating giant, gooey, show-stopping Homemade Crumbl Cookies. This recipe is more than just a list of ingredients; it’s an invitation to create your own moments of joy. Whether you’re baking them for a birthday, as a weekend project with the kids, or just because it’s Tuesday, I hope these cookies bring a little extra warmth and sweetness to your day.
I’d love to see your creations! Tag me @Feastical on social media so I can cheer you on. Now, go forth and bake something legendary. Your inner cookie monster will thank you.
With a full heart and an even fuller cookie jar,
Beau
<!–