
Your Morning Coffee, But Make It a Dessert Dream
Hey friends, Beau here from Feastical! Let’s have a little heart-to-heart about our morning routines. For so many of us, that first cup of coffee is a sacred ritual. It’s the warm, comforting handoff from sleepyhead to fully-functioning human. But let’s be real, sometimes that plain brew can feel a little… well, plain. And while those store-bought creamers are convenient, have you ever turned the bottle around to read the ingredients? It can look more like a science experiment than something meant to bring you joy.
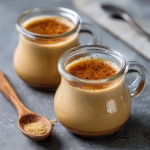
That’s exactly why I’m so fired up to share this recipe with you today. We’re taking that daily ritual and turning it into a moment of pure, unapologetic indulgence. We’re talking about a Homemade Crème Brûlée Coffee Creamer that’s so silky, so rich, and so perfectly sweet, it’ll make your kitchen smell like a Parisian patisserie. Imagine the deep, caramel notes of brown sugar, the warm, aromatic hug of real vanilla, and a luxuriously smooth texture that transforms your coffee into a liquid dessert.
The best part? This isn’t just a “make-it-and-use-it” recipe. This little jar of happiness is made for canning. That means you can whip up a big batch, process it in jars, and have this decadent creamer on your shelf for weeks, ready to elevate your morning or become the most thoughtful, homemade gift for the foodies in your life. So, grab your favorite saucepan and let’s create some magic together. Your coffee (and your future self) will thank you.
The Day I Spilled (and Spilled) the Sugar
This recipe takes me right back to my first “real” kitchen job. I was a teenager, wide-eyed and desperately trying to look like I knew what I was doing. The pastry chef, a formidable woman named Margot, decided my initiation would be mastering the crème brûlée station. For a whole week, my life was custard cups and a terrifying propane torch.
One particularly hectic Saturday, I was carrying a tray of freshly torched brûlées, their sugar tops glistening like amber glass. I took a corner too fast, and the whole tray did a slow-motion slide right out of my hands. Sugar and custard went everywhere—on the floor, the walls, even the ceiling. The kitchen fell silent. I was mortified. But Margot just looked at me, covered in dessert, and started laughing. “Well, Collier,” she said, wiping a tear from her eye, “at least we know it smells good. Now, grab a mop. The only way out is through.”
That messy disaster taught me a valuable lesson: the pursuit of incredible flavor is always worth a little chaos. This creamer captures the soul of that classic dessert—the crackle of the torched sugar, the velvety custard beneath—but without any of the stress (or cleanup!). It’s all the joy, poured straight into your cup.
Gathering Your Creamer Dream Team
One of the things I love most about this recipe is its beautiful simplicity. You only need a handful of pantry staples to create something truly spectacular. Here’s the lineup:
- 1 can (12 oz) Evaporated Milk: This is our secret weapon for richness without overwhelming heaviness. It’s milk that’s had about 60% of its water removed, giving it a subtly sweet, concentrated flavor and a gorgeous creamy body that holds up perfectly in hot coffee. Chef’s Insight: Don’t confuse this with sweetened condensed milk! That would make this creamer cloyingly sweet. We want to control our sugar here.
- ½ cup Brown Sugar: This is the heart of the “crème brûlée” flavor. The molasses in the brown sugar gives us those warm, caramel, toffee-like notes that mimic the torched sugar top of the classic dessert. Substitution Tip: You can use light or dark brown sugar. Dark brown will give you a deeper, more molasses-forward flavor, which I personally love.
- 1½ cups Milk: This is where you can customize based on what you have and how rich you want your creamer. Whole milk will give you the creamiest result, but 2% or even fat-free works perfectly well. Feeling decadent? Swap this entire amount for half-and-half or even heavy cream for an ultra-luxurious treat. Chef’s Insight: Using a higher-fat milk will also make the creamer a little thicker, which is a delightful bonus.
- 2 teaspoons Vanilla Extract: Please, for the love of all that is good and holy, use the real stuff! That imitation vanilla just can’t compete. The pure extract adds a beautiful, floral complexity that ties the whole creamer together. Pro Hack: If you’re feeling fancy, scrape the seeds from a real vanilla bean pod into the mix for those gorgeous little black specks and an even more intense vanilla aroma.
Let’s Get Cooking: Your Foolproof Creamer Method
Ready to see how easy this is? We’re going to walk through this step-by-step. No fancy techniques, no scary equipment—just you, a saucepan, and a little bit of stirring. Let’s do this!
- Combine the Base. Grab a medium-sized saucepan—non-stick is great for easy cleanup. Pour in the entire can of evaporated milk, your 1½ cups of milk, and the ½ cup of brown sugar. Now, place this over medium heat. Chef’s Hack: Before you turn on the heat, give everything a good whisk. This helps break up the brown sugar clumps right from the start, leading to a smoother creamer.
- Warm and Dissolve. This is the most important step. Stir the mixture constantly with a wooden spoon or a whisk. You’re not trying to boil it; you just want to warm it up enough to completely dissolve the brown sugar. You’ll know it’s ready when you rub a little between your fingers and don’t feel any grittiness. This should take about 5-7 minutes. Critical Tip: Do NOT let it boil! Boiling can cause the milk to scorch or develop a “skin,” and it can sometimes alter the texture. We’re going for warm and smooth, not hot and angry.
- Incorporate the Vanilla. Once the sugar is fully dissolved and the mixture is steaming happily, take the saucepan off the heat. Now, stir in those 2 glorious teaspoons of vanilla extract. The reason we add it off the heat is to preserve its delicate flavor. High heat can cause some of those beautiful aromatic compounds to evaporate. Chef’s Note: Ahhh, smell that? That’s the sound of success right there.
- Jar It Up (For Canning). If you’re planning to can your creamer (which I highly recommend!), you need to work while the mixture is still hot. Carefully pour the hot creamer into sterilized jars, leaving about ½ inch of space at the top (this is called “headspace”). Wipe the rims of the jars with a clean, damp cloth to ensure a perfect seal. Pro Tip: Use a canning funnel! It makes this process clean and easy, with no dribbles down the side of your jars.
- Process the Jars. Apply your lids and rings, fingertip-tight (don’t crank them on with all your might!). Process the jars in a boiling water bath for 15 minutes. Carefully remove them and let them cool completely, undisturbed, on a towel on your countertop. You’ll be rewarded with the satisfying *pop* of the seals as they set. Chef’s Reminder: Always check the seals after 24 hours. The lid should be concave and not flex when you press the center. If a jar didn’t seal, no worries! Just pop it in the fridge and use it first.
How to Serve This Liquid Gold
Okay, the hard part is over (and it wasn’t even hard!). Now for the fun part: enjoying the fruits of your labor. Brew your favorite coffee—whether it’s a dark roast, a light blend, or even a strong cold brew. Pour a generous splash (or two, I don’t judge) of your homemade Crème Brûlée Creamer into your mug and watch it swirl into your coffee like a creamy dream.
Want to take it to the next level? Here are a few of my favorite ways to serve it:
- The Classic: Just coffee and creamer. It’s perfect as is.
- The Dessert Coffee: Top your mug with a dollop of whipped cream and a tiny sprinkle of brown sugar or a drizzle of caramel sauce.
- The Iced Indulgence: This creamer is fantastic in iced coffee! Because it’s already sweetened and flavored, it mixes in beautifully without crystallizing at the bottom of your glass. Pour over ice for the ultimate afternoon pick-me-up.
However you take it, take a moment. Sip it slowly. This isn’t just fuel; it’s a experience.
Get Creative: Shake Up Your Creamer Game!
Once you’ve mastered the classic, the kitchen playground opens up! This recipe is an incredible base for so many other flavors. Here are a few of my favorite twists to get your creative juices flowing:
- Maple Cinnamon Brûlée: Replace the brown sugar with ⅓ cup of pure maple syrup and add one cinnamon stick to the saucepan while warming. Remove the stick before jarring.
- Toasted Coconut Dream: Use canned coconut milk instead of the regular milk for a dairy-free version. The tropical flavor pairs amazingly with the brown sugar and vanilla.
- Bourbon Vanilla Splash: For a grown-up twist, reduce the vanilla extract to 1 teaspoon and add 1 teaspoon of good-quality bourbon along with it. The oaky notes are incredible.
- Chocolate Hazelnut Bliss: Whisk in 2 tablespoons of chocolate hazelnut spread (like Nutella) along with the milks and sugar. Make sure it’s fully melted and incorporated for a creamer that tastes like a liquid Ferrero Rocher.
- Pumpkin Spice Latte (The Real Deal): Add 2 tablespoons of pumpkin puree and ½ teaspoon of pumpkin pie spice to the mix. You’ve just created a homemade PSL that puts any chain version to shame.
A Few Parting Thoughts from My Kitchen
This recipe has become a staple in my home, especially around the holidays. I make a giant batch, can it all, and suddenly I have the most heartfelt, homemade gifts for my neighbors, my mail carrier, and my kid’s teachers. It always gets a huge reaction because it’s made with love, not just bought from a store.
It’s also evolved over time. My first attempt was far too sweet because I got overzealous with the sugar. Another time, I got distracted and let it simmer, which gave it a slightly “cooked” milk flavor. But that’s the beauty of cooking! You learn, you tweak, and you make it your own. This version you have here is the culmination of all those little experiments—perfected for you.
Your Creamer Questions, Answered!
I know you might have a question or two, so I’ve gathered the most common ones here. Think of this as our little kitchen huddle.
Q: Do I HAVE to can it? How long does it last if I don’t?
A: Not at all! Canning is just an option for long-term shelf storage. If you skip the canning process, just let the creamer cool and pour it into a clean bottle or jar. It will keep perfectly in the refrigerator for 7-10 days. Shake it well before each use, as natural separation can occur.
Q: My creamer seems a little thin. How can I thicken it?
A> Great question! The thickness will depend on the milk you use. For a thicker creamer, simply replace the 1½ cups of milk with an equal amount of half-and-half or heavy cream. The higher fat content will give you a much richer, thicker result that feels truly decadent.
Q: Can I use a sugar substitute?
A> You can experiment, but it will change the final product. The deep, caramel flavor of brown sugar is integral to the “crème brûlée” taste. A brown sugar substitute like Swerve or a liquid sweetener like monk fruit might work, but the flavor profile will be different. I’d recommend making a very small, single-serving batch to test it first!
Q: Why did my jars not seal in the water bath?
A> This usually comes down to a few common issues: 1) The rims weren’t wiped clean, 2) The lids were old or damaged (always use new lids for canning!), or 3) The rings were screwed on too tightly, which prevented the air from venting during processing. Don’t be discouraged! Just pop that unsealed jar in the fridge and enjoy it first.
Homemade Crème Brûlée Coffee Creamer
Description
So today, we’re elevating your daily brew with a touch of dessert decadence. My Homemade Crème Brûlée Coffee Creamer is silky, rich, and perfectly sweet, with brown sugar caramel notes and a whisper of vanilla that’ll make your kitchen smell like a Parisian café.
Ingredients
-
1 can (12 oz) evaporated milk
-
½ cup brown sugar (light or dark)
-
1½ cups milk (whole for richness, or 2%/fat-free to lighten it up)
-
2 teaspoons pure vanilla extract
Chef’s Tip:
Swap the milk for half-and-half or heavy cream if you want it extra luxurious. For visible vanilla specks, scrape in half a vanilla bean.
Instructions
1. Combine the Base
Whisk together evaporated milk, milk, and brown sugar in a medium saucepan (nonstick works great).
2. Warm and Dissolve
Place over medium heat, stirring often until the sugar completely dissolves (about 5–7 minutes). Don’t boil—just gently steam.
3. Add the Vanilla
Remove from heat and stir in vanilla extract. This keeps the aroma intact and prevents bitterness.
4. Jar It Up (Optional Canning Step)
Pour the hot creamer into sterilized jars, leaving ½ inch of headspace. Wipe rims clean, seal, and process in a boiling water bath for 15 minutes. Cool completely before storing.
5. Chill and Serve
If not canning, let cool, pour into a bottle or jar, and refrigerate for up to 10 days. Shake before each use.
Notes
-
Don’t let it boil—gentle heat keeps it silky.
-
Use a canning funnel for mess-free pouring.
-
Higher-fat milk = thicker, creamier texture.
-
For the deepest flavor, opt for dark brown sugar.
Nutrition
- Calories: 60Cal Per 2 Tbsp Serving
- Sugar: 9g
- Fat: 2g
- Carbohydrates: 10g
- Protein: 2g
Nutritional Information (Because We’re All Curious!)
Okay, let’s talk numbers. I’m a big believer in balance. This creamer is a treat, and knowing what’s in it helps you enjoy it mindfully. The following info is an estimate per 2-tablespoon serving, which is a really generous amount for one cup of coffee!
- Calories: ~60 kcal
- Fat: 2 g
- Carbohydrates: 10 g
- Sugar: 9 g
- Protein: 2 g
- Sodium: 30 mg
Compare that to many store-bought creamers, which can be loaded with high-fructose corn syrup, hydrogenated oils, and a longer list of preservatives. Here, you’re in control. You know every single ingredient that went into it. By making it yourself, you’re choosing real food, and that’s something you can feel genuinely good about.
Your Cup Runneth Over
And there you have it, my friend! You are now the proud creator of a truly spectacular homemade coffee creamer. This isn’t just about saving a trip to the store; it’s about reclaiming a little piece of your day. It’s about starting your morning with a ritual that feels special, indulgent, and deeply satisfying.
I hope this recipe brings as much warmth and joy to your kitchen as it has to mine. Remember, the best food—and the best coffee!—is the kind that’s made with a little bit of love and a whole lot of flavor.
Now, I’d love to hear from you! Did you try one of the fun variations? Have a kitchen story of your own? Share it with me in the comments below or tag me on social with #Feastical. Until next time, keep your whisks busy and your coffee mugs full.
Happy Sipping,