
Bring the Magic of the Holidays Home with Homemade Peppermint Sticks
Hey friends, Beau here! Is there anything that screams “holidays” quite like the sweet, cool zing of a peppermint stick? I’m not just talking about the ones you unwrap from a plastic sleeve—I’m talking about the real deal. The kind you make with your own two hands, filling your kitchen with the unmistakable scent of sugar and mint that feels like a warm, festive hug. Welcome to my favorite holiday kitchen project: Homemade Christmas Peppermint Sticks!
If the idea of making candy from scratch sounds a little intimidating, I’m here to tell you to take a deep breath. You’ve got this. We’re going to walk through this together, step-by-step, and I promise it’s more fun than trying to untangle a string of Christmas lights. This isn’t just about the candy; it’s about the experience. It’s about gathering your favorite people, turning up the holiday tunes, and creating something magical that’s infused with laughter and love.
These peppermint sticks are the ultimate multi-taskers. They’re gorgeous homemade gifts that show you put in a little extra thought. They’re the perfect stocking stuffers that will make your kids’ eyes light up. And my personal favorite? They make the most incredible stirrers for a steaming mug of rich hot chocolate. As they melt slowly into the cocoa, they create a swirl of minty sweetness that’s pure bliss on a cold winter’s night. So, are you ready to roll up your sleeves and create some holiday magic? Let’s get cooking!
A Sticky-Fingered Memory: My First Peppermint Stick
I’ll never forget the first time I helped my Grandma Eleanor make these. I must have been about seven years old, standing on a wobbly stool so I could see clear into the big steel pot. The air was thick with the smell of melting sugar, and Grandma warned me, “Now, Beau, this is hotter than a summer sidewalk, so no tasting!”
But the best part came after the syrup cooked. She’d butter my little hands generously, and we’d wait for the candy to cool just enough to handle. Then, the pulling began! We’d stretch and fold, stretch and fold, and like magic, the clear, glass-like syrup would turn opaque and pearly white. My arms would get tired, but I refused to let go. We’d laugh as I tried to twist my red rope with her white one, inevitably creating a sticky, beautiful mess. Those peppermint sticks tasted better than any store-bought candy, not because of a secret ingredient, but because we made them together. That’s the spirit I want to bring into your kitchen today.
Gathering Your Peppermint Potion: The Ingredients
One of the beautiful things about this recipe is its simplicity. You only need a handful of ingredients to create pure magic. Here’s what you’ll need, along with a few of my chef-y insights to set you up for success.
- 2 cups granulated sugar: This is the foundation of our candy. Regular white sugar gives us a clean, sweet base and that beautiful clear syrup that we’ll later turn opaque. Don’t try to substitute brown sugar here—its molasses content will change the texture and flavor completely.
- ⅔ cup light corn syrup: Now, I know some folks like to avoid corn syrup, but in candy-making, it’s a superstar. It prevents the sugar from crystallizing, ensuring our peppermint sticks are smooth and glassy, not grainy and cloudy. If you need a swap, you can use golden syrup or even agave nectar, but the texture might be slightly different.
- ½ cup water: Simple H2O! It helps the sugar dissolve evenly before we bring it up to a boil. Just use regular tap water.
- ½ teaspoon peppermint extract: This is where the magic happens! Use a good quality extract for the best flavor. A little goes a long way. If you’re feeling adventurous, you could try a mix of peppermint and a tiny drop of vanilla extract for a more complex flavor profile.
- Red food coloring (gel is best!): For those classic candy-cane stripes. I highly recommend gel food coloring over the liquid kind. The gel is more concentrated, so you get vibrant color without adding extra liquid that could throw off your sugar syrup.
- Powdered sugar (for dusting): We’ll use this to lightly dust our work surface to prevent sticking. It’s much better than flour, which can cook into the hot candy.
- Butter (for greasing): Your best friend during this process! You’ll use it to grease your hands, your scissors, and your work surface. It creates a barrier against the super-sticky candy.
The Fun Part: Let’s Make Some Candy!
Okay, team. This is where we turn simple ingredients into holiday gold. Read through all the steps first, and let’s do this together. Active voice, engaged minds, and buttered hands at the ready!
- Combine and Dissolve: In a medium, heavy-bottomed saucepan (this is key for even heating!), combine the granulated sugar, light corn syrup, and water. Stir it over medium heat just until the sugar dissolves. You’ll feel the grittiness disappear. Chef’s Hack: Use a pastry brush dipped in water to wash down any sugar crystals on the sides of the pan. This little trick is a game-changer for preventing crystallization!
- Boil Without Peeking (Well, Stirring): Once the sugar is dissolved, stop stirring! I know it’s tempting, but stirring can cause sugar crystals to form. Bring the mixture to a rolling boil. Clip your candy thermometer to the side of the pan, making sure the tip isn’t touching the bottom. Now, we play the waiting game. Cook until the mixture reaches 280°F, also known as the “soft-crack stage.” This usually takes about 15-20 minutes. Why 280°F? This temperature gives the candy its signature hard-but-snapable texture. If you go too low, it will be chewy; too high, and it might be brittle.
- Extract and Color: As soon as you hit 280°F, immediately remove the pan from the heat. Carefully stir in the peppermint extract—it might bubble up a bit, so stand back! Now, quickly pour about half of the hot syrup onto a buttered marble slab, silicone baking mat, or a large, rimmed baking sheet that you’ve generously buttered. To the remaining half in the pot, add several drops of red gel food coloring and stir quickly to combine, then pour that out onto another buttered spot.
- The Cool Down (Briefly!): Let the candy cool for just a minute or two. You want it to be cool enough to handle but still very pliable. Test it by poking the edge with a buttered finger. If it’s firm but you can make an indentation, you’re good to go.
- Butter Up and Pull! This is the most fun part. Butter your hands REALLY well. I’m not kidding—get between those fingers! Pick up one of the candy masses (start with the white one) and begin to pull. Stretch it out, fold it back on itself, give it a twist, and pull again. You’ll see a magical transformation: the clear candy will become opaque, white, and pearly. This process incorporates air, creating the classic texture. Do the same with the red portion. Pro-Tip: If the candy gets too hard to pull, you can pop it on a buttered baking sheet in a 200°F oven for a minute to soften it up.
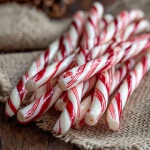
- Twist and Shape: Once both colors are pulled and opaque, roll each one into a long, smooth rope about ½ to ¾ inch thick. Lay the red and white ropes side-by-side. Now, gently twist them together, creating the iconic spiral pattern. Don’t worry if it’s not perfect—the charm is in the handmade look!
- Cut into Sticks: Using a pair of well-oiled kitchen scissors, quickly cut the long twisted rope into your desired peppermint stick lengths, about 4-6 inches long. If the candy starts to harden and crack while cutting, you can gently warm the rope again with a hairdryer or in the low oven to make it pliable. Place the finished sticks on a parchment-lined tray to cool completely and harden.
How to Serve Your Sweet Creations
You’ve made it! You’re officially a candy artisan. Now, how do you show off these beautiful creations?
The Classic Stocking Stuffer: Let’s start with the obvious. Once completely cool and hard, wrap each stick individually in cellophane or clear treat bags, tying the ends with a festive ribbon. Tuck them into stockings for a sweet surprise on Christmas morning.
The Ultimate Hot Cocoa Stirrer: This is my absolute favorite way to enjoy them. Serve a homemade peppermint stick alongside a big mug of rich hot chocolate. Let your guests use it as a stirrer, watching as it slowly melts and sweetens their drink. It’s an experience, not just a beverage!
A Stunning Homemade Gift: Gather a bunch of sticks and arrange them upright in a tall, clear mason jar. Tie a ribbon around the jar with a cute tag that says “Handmade with Love.” It’s a heartfelt, impressive gift that costs very little but means so much.
Simple Sweet Jar: Keep a jar of these on your kitchen counter or holiday dessert table for guests to grab and enjoy. They’re a beautiful and delicious decoration all on their own!
Mix It Up! Fun Flavor Twists
Once you’ve mastered the classic, why not get creative? Here are a few of my favorite twists on the traditional peppermint stick.
- Chocolate-Dipped Dreams: Melt some high-quality dark or semi-sweet chocolate and dip one end of each cooled peppermint stick. Place them on parchment paper to set. The combination of mint and chocolate is timeless.
- Fruity Fun: Swap the peppermint extract for other flavors. Cherry extract with red coloring makes a delicious “candy cane,” or try orange extract with orange food coloring for a citrusy twist.
- Swirled Colors: Go beyond red and white! Divide the syrup into three parts and color them green, white, and red for a truly festive tri-color stick. You can also try blue and white for a “winter wonderland” theme.
- A Little Spice: Add a pinch of cinnamon or a tiny drop of cinnamon oil to the peppermint extract for a warm, spiced peppermint flavor that’s extra cozy.
- Crunchy Candy Cane Bits: Instead of forming perfect sticks, break the cooled candy into small, irregular pieces with a knife. These are perfect for sprinkling on top of ice cream, cupcakes, or your morning oatmeal.
Beau’s Chef’s Notes & Kitchen Confessions
This recipe has been a labor of love in my kitchen for years. The first time I tried it alone, I’ll admit, I panicked when I saw sugar crystals forming. I learned the hard way about the “no-stir” rule! But that’s the beauty of cooking—every “mistake” is a lesson. Over time, I’ve learned that a good candy thermometer is worth its weight in gold, and that butter is your absolute best friend during the pulling process.
One year, my dog, Biscuit, managed to snag a freshly pulled rope of red candy off the counter. Let’s just say he had a very festive, very sticky red beard for a few days, and I learned to always work on a high surface! The point is, don’t strive for perfection. Strive for fun. The slightly lopsided sticks made by tiny hands are the ones you’ll remember most. This recipe is about the joy of creating, the mess, and the memories. The delicious candy is just a wonderful bonus.
Your Candy Questions, Answered!
I’ve gotten a lot of questions about this recipe over the years. Here are the most common ones to help you troubleshoot like a pro.
Q: My candy turned out grainy and sugary. What did I do wrong?
A: This is almost always caused by sugar crystals forming, either from stirring after the sugar dissolved or from crystals on the side of the pan. Next time, be diligent about not stirring during the boil and use a wet pastry brush to wash down the sides of the pan at the beginning.
Q: The candy hardened too fast and I couldn’t pull or shape it! Help!
A: This is a common speed bump! Candy-making is a race against the clock. If it hardens, don’t despair. Place the hard piece on a buttered baking sheet and warm it in a 200°F oven for just a minute or two until it becomes pliable again. You can also use a hairdryer to gently warm a specific spot.
Q: Can I make this without a candy thermometer?
A: You can, but it’s a bit of a gamble. The “cold water test” is the old-school method: drop a small bit of the syrup into a cup of cold water. At the soft-crack stage (280°F), the syrup will form hard, flexible threads that you can bend slightly. A thermometer takes the guesswork out and is highly recommended for beginners.
Q: How long do these peppermint sticks last, and how should I store them?
A: Stored correctly in an airtight container at room temperature, they will stay fresh and crunchy for up to a month. The key is keeping moisture out, so a glass jar with a tight seal is perfect. If your kitchen is humid, you can add a silica gel packet to the container to absorb any moisture.
Homemade Christmas Peppermint Sticks
Description
There’s nothing quite like the sweet, cool zing of a peppermint stick to make your kitchen feel festive. Making peppermint sticks from scratch is easier than you think—and the aroma of sugar and mint filling your home is pure holiday magic. These treats make perfect gifts, stocking stuffers, or even stirring sticks for a rich cup of hot chocolate.
Ingredients
-
2 cups granulated sugar
-
⅔ cup light corn syrup
-
½ cup water
-
½ teaspoon peppermint extract
-
Red gel food coloring
-
Powdered sugar (for dusting)
-
Butter (for greasing hands and work surface)
Instructions
-
Combine and Dissolve
In a medium, heavy-bottomed saucepan, combine sugar, corn syrup, and water. Stir over medium heat until the sugar dissolves. Use a wet pastry brush to wash down sugar crystals on the sides of the pan to prevent crystallization. -
Boil to Soft-Crack Stage
Stop stirring once dissolved. Clip a candy thermometer to the side and bring to a rolling boil until it reaches 280°F (soft-crack stage), about 15–20 minutes. -
Add Flavor and Color
Remove from heat. Stir in peppermint extract carefully. Pour half of the syrup onto a buttered marble slab, silicone mat, or rimmed baking sheet. Add red gel food coloring to the remaining syrup, stir quickly, and pour onto another buttered surface. -
Cool Slightly
Let candy cool 1–2 minutes until firm but pliable. Test with a buttered finger. -
Butter and Pull
Generously butter your hands. Pull the white candy repeatedly, folding and stretching until it turns opaque and pearly. Repeat with the red candy. -
Twist and Shape
Roll each color into a long rope (½–¾ inch thick). Lay red and white ropes side by side and twist gently for the classic candy-cane spiral. -
Cut into Sticks
Using oiled scissors, cut into 4–6 inch sticks. If candy hardens, gently warm in a 200°F oven or with a hairdryer. Let cool completely.
Notes
-
Avoid Grainy Candy: Do not stir the syrup once boiling; wash down side crystals with water.
-
Candy Hardens Too Fast? Warm briefly in a low oven or use a hairdryer.
-
No Thermometer? Use the cold water test: syrup dropped in water forms flexible threads at soft-crack stage.
-
Storage: Keep in an airtight container at room temperature up to 1 month. Avoid moisture.
Nutrition
- Calories: 120 Cal Per Stick
- Sugar: 28g
- Sodium: 5g
- Fat: 0g
- Carbohydrates: 30g
Nutritional Information (Approximate)
Let’s be real, friends—this is a holiday treat, a special indulgence! Here’s a rough nutritional breakdown per peppermint stick (based on a yield of 12 sticks). Remember, these are estimates, and the exact values can vary based on the specific ingredients you use.
- Prep Time: 10 minutes
- Cook Time: 20 minutes
- Cool Time: 30 minutes
- Total Time: ~1 hour
- Servings: About 10–12 sticks
Per Stick (approximate):
- Calories: 120
- Total Carbohydrates: 30g
- Sugars: 28g
- Total Fat: 0g
- Sodium: 5mg
This is a fun, sugar-based candy, so the best approach is to enjoy it mindfully as part of your holiday celebrations!
Final Thoughts from My Kitchen to Yours
Well, there you have it! My complete guide to creating unforgettable Homemade Christmas Peppermint Sticks. This recipe is more than just a list of ingredients and steps; it’s an invitation to slow down and savor the season. It’s about the laughter that happens when your hands are covered in butter, the focus required to hit that perfect temperature, and the pride of presenting something you made from scratch.
So this year, I encourage you to give it a try.