Homemade Angel Biscuits: Your New Secret Weapon for Fluffy, Buttery Bliss
Hey friends, Beau here! Let’s talk about a little piece of edible magic that lives somewhere between a buttery biscuit and a pillowy dinner roll. I’m talking about Homemade Angel Biscuits. If you’ve never had one, you’re in for a life-changing treat. If you have, well, you already know the deal—you’re probably nodding along with a dreamy look in your eyes.
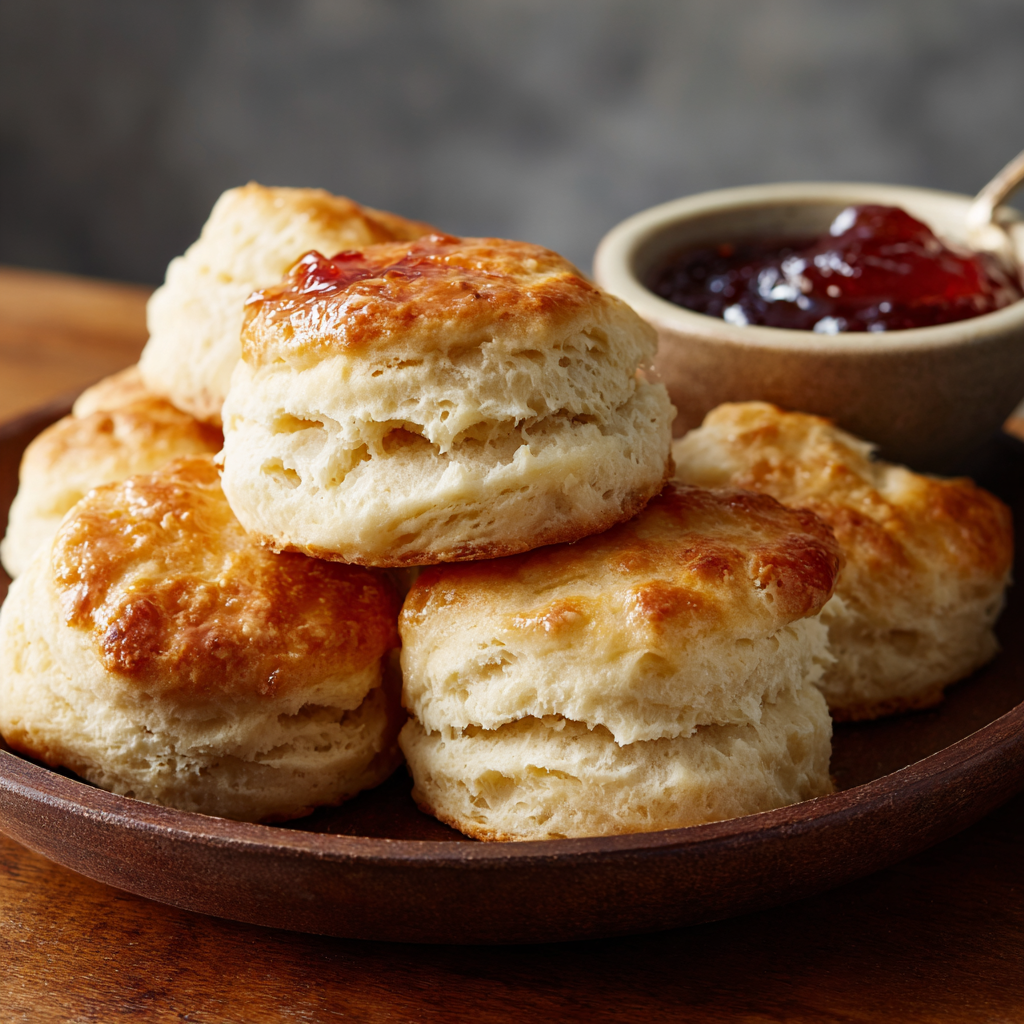
These aren’t your average biscuits. They’re the overachievers of the bread basket. They get their incredible lift and tender, feather-light crumb from a brilliant Southern hack: using both baking powder *and* yeast. That means you get the best of both worlds—the quick rise of a traditional biscuit and the soft, airy structure of a yeast roll. The result? A biscuit so tender it practically floats off the plate, with golden, flaky layers that shatter beautifully with each bite.
Whether you’re setting a gorgeous brunch table, need the ultimate side for a pot of stew, or are crafting the world’s best breakfast sandwich, these angel biscuits have your back. They’re forgiving, they can be made ahead, and they have this magical ability to make any meal feel like a special occasion. So, tie on your apron, friends. We’re about to bake up a batch of pure, unadulterated comfort.
The Biscuit That Stole My Heart (And My Grandma’s Secret Weapon)
My love affair with angel biscuits started not in a fancy restaurant, but in my Grandma Dottie’s sun-drenched kitchen. She was a woman who believed in preparedness, especially where carbs were concerned. For her, the “company’s coming” alarm meant two things: the good china came out, and a bowl of angel biscuit dough went into the fridge.
I remember watching her, flour dusted up to her elbows, cutting the cold butter into the flour with a swift, confident hand. “The secret, Beau,” she’d whisper, like she was sharing state secrets, “is letting the dough think about what it’s done.” She meant the chill time. That dough would rest overnight, and the next morning, she’d roll and cut biscuits fresh for breakfast. The smell of them baking—yeasty, buttery, warm—was my childhood alarm clock. She called them her “peacekeeping biscuits,” because no family gathering, no matter how hectic, could stay tense once a basket of these warm, heavenly puffs hit the table. One bite, and everyone just… smiled. That’s the power of a perfect biscuit, and it’s a legacy I’m thrilled to pass on to you.
Gathering Your Cloud-Making Ingredients
Here’s everything you need to create these little masterpieces. The beauty is in the simplicity and the quality. Remember, in biscuits, cold is gold, and quality fats are your best friends!
- 5 cups all-purpose flour: The reliable workhorse. It gives structure without being too heavy. For a slightly more tender biscuit, you can swap out 1 cup for cake flour, but all-purpose works perfectly.
- ¼ cup sugar: Just a touch! It feeds the yeast gently and balances the flavors without making the biscuit sweet. It’s the secret to that beautiful golden-brown top.
- 1 tablespoon baking powder: Our first leavening hero. It gives the biscuits their initial “oomph” in the hot oven. Make sure yours is fresh for the best rise!
- 1 teaspoon baking soda: Partner-in-crime with the buttermilk. This reacts with the acidity to create even more lift and a gorgeous, tender texture.
- 1 teaspoon salt: Non-negotiable. It enhances every single flavor in the biscuit. Without it, they’ll taste flat.
- 2 teaspoons active dry yeast: The “angel” part! This is what gives the biscuits their soft, roll-like quality and allows them to be made ahead. Instant yeast works too—just mix it right in with the dry ingredients.
- ¼ cup warm water (105°F to 115°F): To wake up the yeast. Think baby bathwater warm, not hot. Hot water will send your yeast to an early grave.
- ½ cup unsalted butter, COLD and cubed: The king of flavor. I use unsalted so I can control the salt level. The key is COLD. We want it to stay in little solid pieces to steam in the oven, creating flaky layers.
- ½ cup shortening, COLD: The flakiness emperor. Shortening has a higher melting point than butter, which helps create those stunning, separate layers. Keep it cold too! You can use all butter if you prefer, but the texture will be slightly different.
- 2 cups cold buttermilk: The tangy tenderizer. Its acidity works with the baking soda and adds incredible moisture and flavor. No buttermilk? No sweat! Stir 2 tablespoons of lemon juice or white vinegar into 2 cups of regular milk and let it sit for 5 minutes.
Step-by-Step: Let’s Build Some Flaky Layers!
Don’t be intimidated! I’ll walk you through each step. We’re not aiming for perfection, we’re aiming for delicious, flaky results. Read through once, then dive in.
- Wake Up the Yeast: In a small bowl, sprinkle the yeast over the warm water. Give it a tiny stir and let it sit for 5-10 minutes. You’re looking for a creamy, foamy top—this is your sign the yeast is alive and ready to party. If it doesn’t foam, your water was either too hot or the yeast was old. Start fresh!
- Whisk the Dry Team: In a large mixing bowl, whisk together the flour, sugar, baking powder, baking soda, and salt. I love this step—it’s like introducing all the players before the game. Make sure everything is evenly distributed.
- Cut in the Fats – Keep it Cool! Add the cubed cold butter and cold shortening to the flour mixture. Now, using a pastry blender, two forks, or even your clean fingertips (work quickly so the heat from your hands doesn’t melt the butter!), cut the fats into the flour. Stop when the mixture looks like coarse, pebbly sand with some larger pea-sized pieces of butter remaining. Those visible butter bits are your future flaky layers. Chef Hack: You can also grate frozen butter on a box grater for super easy, even incorporation!
- Bring It All Together: Make a well in the center of your flour-butter mixture. Pour in the foamy yeast and the cold buttermilk. Using a sturdy wooden spoon or a spatula, gently stir until a shaggy, sticky dough forms. It will look messy and that’s perfect! Don’t overmix. Overworking = tough biscuits.
- The Magic Chill: This is Grandma Dottie’s wisdom. Cover the bowl tightly with plastic wrap and tuck it into the refrigerator for at least 1 hour, or up to overnight. This step is genius. It re-chills the fats, relaxes the gluten, and allows the yeast to slowly develop flavor. Overnight is absolute magic for flavor and ease.
- Roll & Cut with Confidence: Lightly flour your work surface and turn the chilled dough out onto it. Sprinkle a little flour on top. Gently pat or roll the dough to about ½-inch thickness. Pro Tip: Use a floured biscuit cutter (or a clean glass) and press straight down—do NOT twist! Twisting seals the edges and prevents a good rise. Re-roll the scraps gently.
- The Final Rise: Place your cut biscuits close together on a parchment-lined baking sheet. They like to be cozy—it helps them rise up, not out. Cover them lightly with a clean kitchen towel and let them rest in a warm, draft-free spot for about 30 minutes. They won’t double, but they will get puffier.
- Bake to Golden Perfection: While the biscuits rest, preheat your oven to a hot 400°F (200°C). Bake for 12-15 minutes. You’re looking for tall, gorgeous biscuits with tops that are a deep, golden brown. A heavenly smell will fill your kitchen. That’s your cue!
- The Brush-Up (Optional but Awesome): As soon as the biscuits come out of the oven, you can brush the tops with a little melted butter for extra flavor and a soft, shiny crust. It’s a finishing touch they deserve.
How to Serve These Heavenly Creations
The real question is, how can you *not* serve them? They’re the ultimate versatile player.
For breakfast or brunch, serve them warm in a basket lined with a checkered napkin. Set out honey, your best jam, softened butter, and maybe some lemon curd for the adventurous souls. They make the base for an epic sausage, egg, and cheese sandwich that will ruin drive-thrus for you forever.
At dinner, they are the ultimate sidekick. Split one open next to a bowl of hearty soup, stew, or chili. They’re classic with fried chicken (obviously), and they’re the perfect tool for sopping up gravy from a pot roast. For a real showstopper, use them as the topping for a chicken and biscuit casserole.
My personal favorite? Still warm from the oven, split, with a thick slice of sharp cheddar and a piece of honey ham tucked inside. Perfection doesn’t need to be complicated.
Make Them Your Own: Fun Twists & Swaps
The basic recipe is flawless, but here’s where you can get creative and make it yours!
- Herb & Cheese Heaven: When cutting in the fats, add 1 cup of shredded sharp cheddar and 2 tablespoons of finely chopped fresh herbs (chives, rosemary, and thyme are amazing).
- Sweet Cinnamon Sugar: After brushing with melted butter post-bake, dip the top in a mix of cinnamon and sugar. Or, roll the dough out, brush with melted butter, sprinkle heavily with cinnamon sugar, roll it up like a log, slice into pinwheels, and bake!
- Everything Bagel Biscuits: Before baking, brush the tops with a little buttermilk or egg wash and sprinkle generously with everything bagel seasoning.
- Gluten-Free Friendly: Use a reputable 1:1 gluten-free all-purpose flour blend (like Bob’s Red Mill or King Arthur). You may need a touch more buttermilk, as GF flours tend to thirstier.
- Vegan Version: Use plant-based butter and shortening, and swap the buttermilk for cold, unsweetened plant milk (soy or oat work best) mixed with 2 tbsp lemon juice. Use a vegan egg wash or just plant milk for browning.
Beau’s Biscuit Chronicles: Notes from My Kitchen
This recipe has been my faithful companion for years, and it’s evolved with me. I once, in a pre-coffee haze, used hot buttermilk straight from the microwave. Let’s just say I made hockey pucks that day. Lesson learned: cold is key.
The overnight rest isn’t just a suggestion—it’s a game-changer for busy hosts. I’ve made the dough on a Friday night, baked them fresh for Saturday morning guests, and gotten all the credit for being a “kitchen wizard.” Our little secret, right?
And don’t stress the scraps! When you re-roll the dough after cutting, those biscuits might be slightly less tall, but I swear they taste just as good. My dog, Biscuit (yes, really), always stations himself hopefully under the counter during this step, waiting for a buttery scrap to “fall.”
Your Biscuit Questions, Answered
Q: Can I freeze angel biscuit dough?
A: Absolutely! You have two great options: 1) Freeze the shaped, unbaked biscuits on a pan, then transfer to a bag. Bake from frozen, adding 2-4 minutes to the bake time. 2) Freeze the whole dough log, wrapped tightly. Thaw overnight in the fridge before rolling and cutting.
Q: My biscuits didn’t rise much. What happened?
A: Let’s troubleshoot! Likely culprits: 1) Your baking powder or yeast was old (check expiration dates!). 2) You used hot liquid that killed the yeast. 3) You overworked the dough when mixing or twisted the cutter, sealing the edges. 4) Your oven wasn’t fully preheated. An oven thermometer is a cheap and priceless tool!
Q: Can I use all butter instead of butter and shortening?
A: You can! They will be delicious, with a richer butter flavor. The texture will be slightly more crumbly/cakey and less flaky/layered than with the shortening combo. Still a winner!
Q: Why is my dough so sticky?
A: Stickiness is normal! That’s why we chill it—it firms up beautifully. Use plenty of flour on your hands and surface when handling it. A bench scraper is also a hero tool for moving sticky dough without over-flouring.

Homemade Angel Biscuits : Soft, Fluffy, and Southern-Style
Description
Homemade Angel Biscuits
If a biscuit and a dinner roll had the perfect baby, this would be it. Angel biscuits are soft, fluffy, buttery, and beautifully layered. The secret? They use both baking powder and yeast. That means you get the quick lift of a biscuit and the tender texture of a yeast roll—all in one heavenly bite.
They’re perfect for brunch, holiday dinners, or turning an ordinary weeknight meal into something special. Best of all? The dough can be made ahead, making them a stress-free favorite.
Ingredients
-
5 cups all-purpose flour
-
1/4 cup sugar
-
1 tablespoon baking powder
-
1 teaspoon baking soda
-
1 teaspoon salt
-
2 teaspoons active dry yeast
-
1/4 cup warm water (105–115°F / 40–46°C)
-
1/2 cup unsalted butter, cold and cubed
-
1/2 cup shortening, cold
-
2 cups cold buttermilk
Optional for brushing:
-
2 tablespoons melted butter
Instructions
1. Activate the Yeast
In a small bowl, sprinkle yeast over warm water.
Let sit 5–10 minutes until foamy.
If it doesn’t foam, start again with fresh yeast.
2. Mix Dry Ingredients
In a large bowl, whisk together:
-
Flour
-
Sugar
-
Baking powder
-
Baking soda
-
Salt
3. Cut in the Fats
Add cold butter and shortening to the flour mixture.
Using a pastry cutter, forks, or fingertips, cut the fats into the flour until the mixture resembles coarse crumbs with pea-sized bits of butter remaining.
Tip: Keep everything cold. Cold fat = flaky layers.
4. Add Liquids
Make a well in the center.
Pour in the foamy yeast mixture and cold buttermilk.
Stir gently until a shaggy dough forms. Do not overmix.
5. Chill the Dough
Cover tightly and refrigerate at least 1 hour (or up to overnight).
This step improves flavor and makes the dough easier to handle.
6. Roll and Cut
Lightly flour your surface.
Roll or pat dough to about 1/2-inch thick.
Use a floured biscuit cutter and press straight down (do not twist).
Place biscuits close together on a parchment-lined baking sheet.
7. Let Rise
Cover loosely and let rest 30 minutes in a warm spot.
8. Bake
Preheat oven to 400°F (200°C).
Bake 12–15 minutes until tall and golden brown.
Brush tops with melted butter while warm, if desired.
Notes
-
Use cold butter and shortening for flaky texture.
-
Don’t twist the cutter—this seals edges and limits rise.
-
Avoid overmixing; gentle handling keeps them tender.
-
Overnight chilling gives the best flavor.
-
Bake biscuits close together for taller rise.
Nutritional Info (Because We’re Curious!)
Okay, let’s be real—we’re not eating angel biscuits because they’re a salad. We’re eating them because they’re a soul-warming, buttery delight. But it’s always good to know what’s on your plate! This info is per biscuit (assuming the recipe makes 24). Remember, these are estimates and can vary based on specific ingredients and exact size.
Per Biscuit: Calories: ~210 | Total Fat: 11g | Saturated Fat: 5g | Cholesterol: 15mg | Sodium: 220mg | Total Carbohydrates: 24g | Dietary Fiber: 1g | Sugars: 3g | Protein: 4g
They provide a little energy from carbs, a bit of protein, and yes, some fat (that’s where the flavor and texture live!). Enjoy them as part of a balanced meal—maybe pair one (or two!) with some
Final Thoughts: More Than Just a Biscuit
So there you have it, friends—my grandma’s peacekeeping recipe, passed from her flour-dusted hands to your kitchen. As you pull that baking sheet from the oven and the golden tops greet you, I hope you feel a fraction of the joy those biscuits brought to our family table.
These Homemade Angel Biscuits truly are more than the sum of their ingredients. They’re a lesson in patience (that overnight chill is worth it!), a testament to the magic of simple chemistry, and above all, an invitation. An invitation to slow down, to get a little flour on your favorite apron, and to create something that makes people stop, smile, and take a deep, contented breath.
Whether you’re slathering one with jam on a quiet Sunday morning, using it to sop up the last bit of stew at a weeknight dinner, or stacking it high with ham for the perfect party slider, know that you’re holding a little piece of Southern baking tradition. It’s forgiving, it’s foolproof, and it has a way of making any moment feel a little more special.
Clickable Pin Titles
Option 1 (Curiosity-Driven):
The Secret to the Fluffiest Biscuits You’ll Ever Eat
Option 2 (Descriptive & Keyword Rich):
Homemade Angel Biscuits: Flaky, Buttery, and Made with Yeast
Pinterest Pin Description (SEO-Optimized)
Imagine a biscuit so light and tender, it tastes like it came straight from heaven. These Homemade Angel Biscuits are the best of both worlds—combining the flaky layers of a buttermilk biscuit with the soft, airy texture of a yeast roll. Made with a simple handful of ingredients and a genius make-ahead dough, this recipe is the secret to stress-free entertaining. Perfect for holiday brunch, Thanksgiving dinner, or the ultimate breakfast sandwich. Learn how to get that perfect golden crust and tender crumb every single time. Save this pin for your next baking day!