
Your New Favorite Dessert Just Got a Protein-Packed Upgrade!
Hey friends, Beau here! Let’s talk about one of life’s greatest culinary dilemmas: you’re craving something decadent, something that feels like a luxurious treat, but you also want to feel good about what you’re eating. You want that “wow” factor without the “ugh, I shouldn’t have” feeling afterward. Sound familiar? For the longest time, my beloved tiramisu lived firmly in the “special occasion only” category in my mind. It was a restaurant dessert, a holiday treat, something packed with mascarpone, sugar, and eggs that left me needing a nap.
But what if we could change that? What if we could capture all the magic of a classic tiramisu—the bold coffee, the delicate, soaked ladyfingers, the creamy, cloud-like layers, and that iconic dusting of cocoa—and give it a makeover that’s not only guilt-free but actually good for you?
Well, pull up a chair, because I’ve been tinkering in the Feastical kitchen, and I’ve created something truly spectacular. This High-Protein Yogurt Tiramisu is my new obsession. It’s incredibly light and creamy, has no eggs, requires zero baking, and is packed with protein to keep you satisfied. It’s the perfect dessert for a weeknight treat, a brilliant breakfast meal prep (yes, you read that right!), or a show-stopping dish to bring to a gathering that will have everyone asking for the recipe. It’s simple, soulful, and I promise, it tastes like a warm, caffeinated hug. Let’s make it!
The Tiramisu That Started It All
My love affair with tiramisu began not in a fancy Italian restaurant, but in my Nonna’s best friend’s kitchen. Zia Lucia, as I called her, was a force of nature. She didn’t so much cook as she conducted a symphony of flavors, and her tiramisu was the grand finale. I remember watching, utterly mesmerized, as she assembled it. There was no recipe card, just intuition and a well-loved ceramic dish. The air was thick with the scent of freshly brewed espresso and sweet Marsala wine. She’d let me lick the mascarpone bowl, and it was pure heaven.
But as I got older and my own cooking style evolved towards feel-good, energizing food, I found myself missing that experience. I wanted to recreate that same feeling of joy and comfort, but in a way that fit my active lifestyle. This High-Protein Yogurt Tiramisu is my tribute to Zia Lucia. It’s my way of saying that the soul of a dish—the layers, the textures, the love—can live on, even when you change the ingredients. It might not be her exact recipe, but every time I make it, I’m right back in that warm, fragrant kitchen, and that’s a feeling worth sharing.
Gathering Your Tiramisu Toolkit
Part of the beauty of this recipe is its simplicity. You likely have most of these ingredients already, and the ones you don’t are easy finds at any grocery store. Here’s the lineup for our protein-packed masterpiece:
- 40 Ladyfingers (Savoiardi): These light, airy biscuits are the backbone of any tiramisu. Chef’s Insight: Look for them in the international aisle or the bakery section. Their dry, sponge-like texture is perfect for soaking up all that coffee goodness without turning to complete mush.
- 1.4 kg Protein Yogurt: This is our superstar! This is where the magic happens. Explanation: I use a pre-mixed vanilla protein yogurt (like a high-protein Greek yogurt or Skyr) for convenience and sweetness. Substitution Tip: If you can only find plain Greek yogurt or quark, no worries! Just mix in 2 tablespoons of maple syrup, honey, or your favorite liquid sweetener to taste.
- 2 Cups Strong Black Coffee, cooled: This is non-negotiable for that authentic tiramisu flavor. Chef’s Hack: Brew it strong! I use about 50% more coffee grounds than I normally would for drinking. If you’re not a coffee drinker, a good-quality instant espresso powder dissolved in hot water works beautifully. Let it cool completely before using.
- 2 tbsp Vanilla Protein Powder (Optional): This is our secret weapon for an extra protein boost and a richer, more decadent-tasting cream. Explanation: It thickens the yogurt slightly and deepens the vanilla flavor. If you don’t have any, you can simply omit it—the recipe will still be fantastic!
- 1 tsp Vanilla Extract: Only needed if you’re using plain, unflavored yogurt. It just helps round out that warm, comforting vanilla base.
- 10g Unsweetened Cacao Powder: For that iconic, beautiful finish. Chef’s Insight: Using a fine-mesh sieve to dust the cocoa gives you that professional, snow-like sprinkle. It’s a small step that makes a huge visual difference!
- Optional Grown-Up Twist: A splash of coffee liqueur (like Kahlúa) in the coffee for a more traditional kick, or some dark chocolate shavings on top for a bit of textural contrast and extra chocolatey bliss.
Let’s Build Our Masterpiece: Step-by-Step
Alright, team, it’s assembly time! This is where the fun begins. We’re not cooking, we’re crafting. Put on some good music, and let’s create some layers of joy.
- Whip Up Your Creamy Filling. Grab a large mixing bowl and plop in all of your protein yogurt. If you’re using the optional protein powder and/or vanilla extract (for plain yogurt), add it now. Take a whisk or a spatula and stir everything together until it’s smooth, creamy, and perfectly combined. Give it a little taste. Is it sweet enough for you? Feel free to adjust here. Once it’s perfect, set it aside. Chef’s Hack: For an even fluffier, lighter texture, you can whisk the yogurt mixture for a full minute. You’ll be amazed at the airy volume you can get!
- Get Your Coffee Station Ready. Pour your completely cooled, strong coffee into a shallow bowl or a pie dish. The wider the dish, the easier it is to dip. If you’re adding that splash of coffee liqueur for a grown-up version, now’s the time to stir it in. Pro Tip: Have your serving dish (a 25-30 cm / 9×13 inch dish is perfect) and your ladyfingers lined up next to the coffee. This creates an efficient assembly line.
- The Art of the Dip. This is the most crucial step! Take one ladyfinger and quickly, I mean quickly, dip it into the coffee. We’re talking one second per side, max. You want it to absorb the coffee and become moist, but you do NOT want it waterlogged and falling apart in your fingers. Think of it as a quick swim, not a deep-sea dive. Little Chef Story: I learned this the hard way with my first test batch. I got distracted, let a few soak for too long, and ended up with a tiramisu soup. A quick dunk is all you need, I promise!
- Create Your First Layer. As you dip each ladyfinger, immediately place it in your serving dish. Arrange them in a single layer, side-by-side, to cover the entire bottom of the dish. You might need to break one or two to fill in the gaps—that’s totally fine! We’re going for rustic, not perfect.
- Spread on the Cloud. Now, take half of your creamy yogurt mixture and plop it right on top of the ladyfinger layer. Use a spatula to gently spread it into an even, smooth layer, making sure to cover the edges. You’ve just created your first glorious stratum!
- Repeat the Magic. Just like before, dip your next round of ladyfingers and create a second layer on top of the yogurt. Then, swoop in with the rest of your yogurt mixture and spread it out for the grand finale cream layer. Use the back of your spoon or spatula to make some soft peaks and swirls—it makes the final product look even more inviting.
- The Grand Finale: Cocoa Snow. Take your unsweetened cocoa powder and your fine-mesh sieve. Hold it over the entire dish and gently tap the side to create a beautiful, even dusting of chocolatey goodness. This is the moment it truly becomes tiramisu! Tip: For the cleanest look, you can lay parchment paper strips over parts of the dish to create lines, but I love the rustic, full-coverage look.
- The Tortuous Wait. I know, I know. You want to dig in right now. But trust me on this. Gently cover your tiramisu with plastic wrap or a lid and slide it into the fridge. Let it chill for at least 4 hours, but honestly, overnight is the real game-changer. This waiting period is when the alchemy happens. The ladyfingers soften fully, the flavors meld together, and the whole dessert transforms from separate components into one cohesive, incredible treat.
How to Serve This Stunner
The wait is over! You’ve pulled your gorgeous tiramisu out of the fridge, and it’s set perfectly. Now, how do you serve it like a pro?
For a beautiful presentation, take a sharp knife and dip it in hot water, wiping it clean between each cut. This will give you those pristine, clean-edged portions. I love serving it in shallow bowls rather than on flat plates because it contains any potential saucy goodness.
For a little extra flair, right before serving, add a final light dusting of fresh cocoa powder to make it pop. A few fresh raspberries or a mint leaf on the side adds a lovely touch of color and a hint of freshness that cuts through the richness beautifully.
And here’s my favorite way to enjoy it: for breakfast! That’s right. Because it’s high in protein and not overly sweet, a square of this tiramisu with a side of fruit is the most exciting, feel-good way to start your day. It’s meal prep that actually feels like a treat.
Make It Your Own: Delicious Twists & Swaps
One of the best things about this recipe is its versatility. Feel free to get creative and play with the flavors! Here are a few of my favorite variations:
- Chocolate Orange Dream: Add the zest of one orange to the yogurt mixture and use a chocolate-flavored protein powder. It’s like a Terry’s Chocolate Orange in tiramisu form!
- Tropical Escape: Swap out the coffee for cold brew coffee with a hint of coconut, or even a light coconut milk. Layer in some finely chopped toasted coconut into the yogurt cream for a piña colada vibe.
- Berry Bliss (No Coffee): Not a coffee fan? No problem! Dip your ladyfingers in a mixture of melted raspberry or strawberry jam thinned out with a little warm water or lemon juice. The result is a bright, fruity, and stunningly pink dessert.
- Dairy-Free Delight: Easily make this vegan! Use your favorite plant-based yogurt (a thick, coconut-based one works best) and ensure your ladyfingers are egg-free and vegan-friendly. They’re surprisingly easy to find these days!
- Mocha Madness: Stir 1-2 tablespoons of unsweetened cocoa powder right into the yogurt mixture for a double-chocolate, mocha-infused experience.
Beau’s Kitchen Notes & Stories
This recipe has been a fun journey of experimentation. The first time I made it, I was so nervous it wouldn’t set. I must have opened the fridge a dozen times to “check on it,” which, as any chef will tell you, is the worst thing you can do! But patience paid off, and the result was even better than I’d hoped.
Over time, I’ve found that using a really thick yogurt, like Icelandic Skyr or a strained Greek yogurt, gives the absolute best, most mousse-like texture. It holds its shape beautifully and makes the dessert feel incredibly indulgent. This tiramisu has now become my go-to potluck dish. It travels like a dream, and I love the look of surprise on people’s faces when I tell them it’s packed with protein. It’s a conversation starter that ends with empty plates and happy smiles.
Your Tiramisu Questions, Answered!
I’ve made this a bunch, and I’ve also heard from many of you. Here are the most common questions and how to fix them.
Q: My tiramisu is too runny! What happened?
A: The most common culprit is over-soaking the ladyfingers. If they’re too wet, they release liquid into the dessert. Another reason could be a particularly runny yogurt. Next time, ensure a quick dip and, if using plain yogurt, consider straining it through a cheesecloth for 30 minutes to remove excess whey.
Q: Can I make this ahead of time?
A: Absolutely! In fact, I highly recommend it. This dessert is at its absolute best after a full 24 hours in the fridge. The flavors have so much time to get to know each other and become best friends. You can make it up to 2 days in advance.
Q: I don’t have a big dish. Can I make individual portions?
A> That’s a fantastic idea! This recipe is perfect for making in individual glasses or mason jars. Just break the ladyfingers to fit, and layer away. It makes for a gorgeous, personalized presentation.
Q: Is there a way to reduce the sugar even more?
A> For sure. Use plain, unflavored yogurt and sweeten it minimally with a natural sweetener like stevia or monk fruit to taste. Also, ensure you’re using unsweetened cocoa powder for the topping.
The Healthy Scoop (Because We’re Curious!)
Now, let’s be clear: I’m a chef, not a dietitian. These figures are estimates based on the specific ingredients I used and a standard nutritional calculator. Your exact numbers will vary depending on your brand of yogurt, ladyfingers, etc. But to give you a general idea of why this dessert feels so good:
This High-Protein Yogurt Tiramisu is a nutritional powerhouse compared to its traditional counterpart. A serving (roughly 1/20th of the dish) comes in at around 130 calories, with an impressive 12 grams of protein! That protein comes from the yogurt and optional protein powder, and it’s key to keeping you full and satisfied. You’re looking at about 10 grams of carbs, 2 grams of fat, and only about 4 grams of sugar. Compared to a traditional tiramisu that can easily be 300-400 calories per serving with much more sugar and fat, this is a feel-good win that doesn’t sacrifice an ounce of flavor.
Print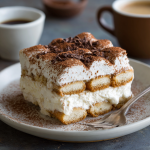
High-Protein Yogurt Tiramisu (No Eggs, No Bake, Light & Creamy)
Description
Craving a dessert that feels indulgent but actually fuels you? This High-Protein Yogurt Tiramisu captures all the magic of classic tiramisu—the rich coffee, soft ladyfingers, and creamy layers—but with no eggs, zero baking, and a protein boost to keep you satisfied. Perfect for a weeknight treat, breakfast, or impressing guests.
Ingredients
-
40 ladyfingers (Savoiardi)
-
1.4 kg vanilla protein yogurt (or Greek yogurt mixed with 2 tbsp honey/maple syrup)
-
2 cups strong black coffee, cooled
-
2 tbsp vanilla protein powder (optional, for extra protein and richness)
-
1 tsp vanilla extract (only if using plain yogurt)
-
10 g unsweetened cocoa powder (for dusting)
-
Optional: splash of coffee liqueur, dark chocolate shavings
Instructions
-
Prepare the creamy filling:
In a large bowl, whisk together the protein yogurt, optional protein powder, and vanilla extract until smooth. Taste and adjust sweetness if needed. -
Set up the coffee station:
Pour cooled coffee into a shallow dish. Stir in coffee liqueur if using. Keep your serving dish nearby for easy assembly. -
Dip the ladyfingers:
Quickly dip each ladyfinger into the coffee—just 1 second per side—to absorb flavor without becoming soggy. -
Layer the tiramisu:
-
Place the first layer of dipped ladyfingers in the dish.
-
Spread half of the yogurt mixture over them.
-
Repeat with the remaining ladyfingers and yogurt for a second layer.
-
-
Dust with cocoa:
Use a fine-mesh sieve to evenly dust the top with unsweetened cocoa powder. -
Chill:
Cover and refrigerate for at least 4 hours, ideally overnight, to allow flavors to meld and the dessert to set.
Notes
-
For fluffier cream: Whisk yogurt mixture for 1–2 minutes before layering.
-
Fruit twist: Replace coffee with raspberry or strawberry jam thinned with water for a fruity tiramisu.
-
Chocolate lovers: Mix 1–2 tbsp cocoa powder into the yogurt for a mocha version.
-
Dairy-free: Use thick coconut yogurt and vegan ladyfingers.
Nutrition
- Calories: 130 Cal Per Serving
- Fat: 2 g
- Carbohydrates: 10 g
- Protein: 12 g
Final Thoughts from My Kitchen to Yours
And there you have it, friends. My heart and soul (and a whole lot of protein yogurt) poured into this recipe. This High-Protein Yogurt Tiramisu is proof that you don’t have to give up the foods you love to feel your best. It’s all about smart, simple swaps and a whole lot of love in the assembly.
This dessert is a celebration—of flavor, of health, and of the simple joy that comes from creating something delicious with your own two hands. I hope this recipe finds its way into your regular rotation and becomes a new favorite in your home, just like it has in mine.
So, did you make it? I’d love to see