
Turn Your Kitchen into a Spooky Pizza Parlor This Halloween!
Hey there, Feastical family! Beau here. Is there anything better than the smell of pizza wafting through the house? It’s pure, unadulterated joy. Now, imagine mixing that incredible smell with the infectious, giddy energy of Halloween. That’s the magic we’re cooking up today. Forget the store-bought, sugar-loaded treats for a second—let’s create something that’s not only a total blast to make but is also a real, honest-to-goodness meal that your kids (and let’s be real, you) will actually be excited to eat.
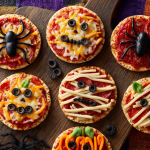
I’m talking about a Halloween Pizza Night that’s so fun, it’ll become a new family tradition. We’re crafting mini masterpieces: creepy crawly olive spiders, grinning jack-o’-lantern faces, and adorable string cheese mummies, all on a canvas of golden, crispy crust. This isn’t about being a perfect pastry chef; it’s about grabbing your favorite little helpers, rolling up your sleeves, and making a wonderful, delicious mess together. The best memories are often made covered in a little bit of flour and a whole lot of laughter. So, preheat those ovens, put on a spooky playlist, and let’s turn pizza night into the main event of your fright night festivities. This is hands-on, feel-good food at its most festive!
The Spooky Tradition That Stuck
This whole Halloween pizza night thing started years ago, totally by accident. My nephew, Leo, was about five and was already a pint-sized pizza critic. One rainy October afternoon, we were tasked with making lunch, and the only things in the fridge were pizza dough, cheese, and a rogue jar of olives. As I was slicing the olives for a topping, Leo pointed at one and declared, “That looks like a bug!” A lightbulb went off. We started arranging them with little olive-legs, and before we knew it, we had a whole colony of “spider” pizzas. We used pepperoni to make silly faces and he giggled the entire time. His absolute delight was more satisfying than the pizza itself (and that’s saying something!). That simple, unplanned kitchen moment sparked a yearly ritual. Now, every October, Leo demands our “spooky pizza party,” and it’s my favorite kitchen date of the year. It proves that the recipes you remember aren’t just about taste—they’re about the story you cook up along the way.
Gathering Your Spooky Supplies
Here’s your shopping list for frightfully good fun! The beauty of this is its flexibility—use what you love and have on hand.
- 4–6 mini pizza crusts (or English muffins/pita rounds): This is your blank canvas! I love using pre-made mini naan or flatbreads for a super easy start. English muffins give a fantastic nook-and-cranny texture that holds toppings perfectly, and pita rounds get wonderfully crispy. Chef’s Insight: For a from-scratch option, my simple no-knead pizza dough is foolproof and fun for kids to punch down!
- 1 cup pizza sauce: Use your favorite jarred brand to save time, or simmer a can of crushed tomatoes with a pinch of salt, dried oregano, and a garlic clove for 10 minutes for a quick fresh version.
- 1 1/2 cups shredded mozzarella cheese: The glue that holds our monster creations together! I highly about shredding your own from a block—it melts so much creamier and doesn’t have the anti-caking additives that pre-shredded bags do.
- Sliced black olives (for spiders): These are the star of the show for our eight-legged friends. The slices are perfect for the body and the legs. Don’t like olives? Thin slices of mushroom or even little strips of ham can work for a different kind of critter.
- Pepperoni slices: Essential for the jack-o’-lantern faces! Their round shape and red-orange color are just right. For a healthier twist, try thin slices of summer sausage or even use roasted red pepper strips to form the face.
- Orange bell peppers, cut into thin strips: These are perfect for creating the classic pumpkin face features—triangles for eyes and a jagged mouth. Their sweet, crunchy flavor is a great contrast to the savory cheese and pepperoni.
- String cheese (for mummy wraps): This is the ultimate hack for mummy pizzas! Simply peel the string cheese into thin, perfect “bandage” strips. So easy and effective.
- Optional toppings: mushrooms, onions, basil, or any favorites: This is where you get creative! Add some “eyeballs” with half a mushroom (pupil made from an olive bit). Green onion scraps can be witch’s hair. Let your imagination run wild!
Let’s Build Some Monster Pizzas!
Step 1: Preheat and Prep
Fire up your oven to 400°F (200°C). This is the perfect temperature for getting a crispy crust and beautifully melted, bubbly cheese without burning our delicate toppings. While it’s heating, line a baking sheet with parchment paper. Chef’s Hack: Parchment paper is a lifesaver for easy cleanup—because we’re about to make a fun mess!
Step 2: Sauce Your Canvas
Lay out your chosen crusts on the prepared baking sheet. Using a spoon, spread a thin, even layer of pizza sauce on each one, leaving a small border around the edge for the crust. Pro Tip: Don’t over-sauce! A thick layer will make the crust soggy. We’re going for a base coat, not a swimming pool.
Step 3: The Main Event—Decorating!
This is where the party starts! Assign each crust a monster personality or let the artists go wild.
- For Spider Pizzas: Place one olive slice in the center for the body. Then, take four more olive slices and carefully tear or cut each one in half. Arrange eight of these half-moon pieces around the body to create the spider’s legs. They don’t have to be perfect—wonky legs are extra spooky!
- For Jack-o’-Lantern Pizzas: Create a circle of pepperoni slices to form the pumpkin shape. Then, use your thin strips of orange bell pepper to create a classic (or silly!) jack-o’-lantern face inside the pepperoni circle. Triangles for eyes and a jagged smile are classic, but let the kids design their own.
- For Mummy Pizzas: Sprinkle a light layer of shredded mozzarella first (this acts as the glue). Then, take your string cheese “bandages” and lay them across the pizza in a haphazard criss-cross pattern, like a wrapped mummy. Leave a small gap near the top for the eyes! After baking, you’ll add the olive eyes.
Step 4: Bake to Perfection
Carefully slide your spooky creations into the hot oven. Bake for 8-10 minutes, but start watching at the 8-minute mark. You’re looking for the cheese to be fully melted and bubbly and the edges of the crust to turn a beautiful golden brown. Ovens vary, so keep an eye on them! The mummy pizzas might need a minute less since the string cheese strips are delicate.
Step 5: The Final Touch (Mummy Eyes!)
As soon as the mummy pizzas come out of the oven, press two small olive pieces or slices into the gap you left to create the eyes. The residual heat will warm them up and make them stick perfectly.
How to Serve Up the Spookiness
Presentation is part of the fun! Don’t just slide these onto plates. Arrange them on a large, dark wooden cutting board or a slate platter to make the colors pop. Scatter a few extra olive “spiders” and pepperoni “pumpkins” around the board for effect. Label them with little placards: “Arachnid Alley,” “Pumpkin Patch,” and “Mummy’s Tomb.” Serve with a side of extra warm pizza sauce for dipping, and watch them disappear faster than a ghost in the night!
Spooky Swaps & Creative Twists
This recipe is a fantastic template for all sorts of dietary needs and wild ideas!
- Gluten-Free Ghouls: Use your favorite gluten-free pizza crust, English muffin, or even portobello mushroom caps as the base!
- Dairy-Free Dread: Excellent vegan mozzarella shreds and string cheese alternatives are available now. For the mummy, you could even use very thin strips of vegan white cheese or tofu.
- Meat-Lover’s Monstrosity: Use crumbled cooked sausage as “dirt,” with olive spiders crawling through it. Pepperoni bats? Yes, please!
- Green Goblin Pizzas: Use pesto instead of tomato sauce for a green base. Create a monster face with broccoli florets for hair, olive eyes, and a red pepper mouth.
- Break-of-Dawn Zombies: Make breakfast pizzas! Use a gravy or cheese sauce base, scrambled egg “brains,” and bacon bit “worms.”
Beau’s Kitchen Confidential
This recipe has evolved so much since that first day with Leo. We’ve had pizzas with so many toppings they looked like abstract art, and we’ve had a few that were a little *too* well-done (I call them “zombified”). The key is to lean into the imperfection. The pizzas with one lopsided eye are always the ones that make us laugh the hardest. One year, we tried making a spider with waaaay too many legs—it was less a spider and more a terrifying eldritch horror. We still ate it, and it was delicious. The goal isn’t a Pinterest-perfect pizza (though if you make one, tag me!); it’s about the experience. Put on some Halloween tunes, let the kids assign everyone a “monster chef” name, and enjoy the process. The mess is just proof of a great time.
Your Spooky Pizza Questions, Answered!
Q: My crust got soggy. What happened?
A: The most common culprit is too much sauce! Remember, we’re just painting a thin layer. Also, make sure your oven is fully preheated. A hot oven will crisp the bottom quickly, preventing sogginess. If you’re using a particularly moist ingredient like fresh mushrooms, you can sauté them briefly first to release their water.
Q: Can I make these ahead of time for a party?
A: You can definitely do some prep ahead! You can pre-slice all your toppings and store them in separate containers in the fridge. You can even sauce the crusts and keep them on the sheet pan. But I’d highly recommend assembling and baking right before serving. They are best fresh out of the oven when the cheese is gloriously gooey.
Q: The string cheese on my mummy pizza burned a little. How can I prevent that?
A: Great catch! String cheese can be a bit more delicate. You have two options: 1) Bake the mummy pizzas for a minute or two less than the others, or 2) Add the string cheese “bandages” halfway through the baking process. Bake the sauced crust with the base layer of shredded cheese for about 5 minutes, then take it out, add the string cheese strips, and pop it back in for the remaining 3-4 minutes.
Q: My spider legs keep falling off! Help!
A: No worries! This is a common kitchen conundrum. Try pressing them lightly into the sauce so it acts like glue. You can also place a tiny dot of sauce on the back of each olive leg to help it adhere. If all else fails, a light sprinkle of cheese over the very ends of the legs can help anchor them down.
Halloween Pizza Night
Description
Spooky Halloween Mini Pizzas
Transform your kitchen into a festive pizza parlor with creepy, fun, and delicious mini pizzas! Perfect for kids, family nights, or Halloween parties.
Ingredients
Ingredients (4–6 mini pizzas)
-
Mini pizza bases: 4–6 mini pizza crusts, English muffins, pita rounds, or mini naan
-
Sauce: 1 cup pizza sauce (jarred or quick homemade)
-
Cheese: 1 1/2 cups shredded mozzarella cheese
-
Toppings for creativity:
-
Sliced black olives (spiders)
-
Pepperoni slices (jack-o’-lanterns)
-
Orange bell pepper strips (jack-o’-lantern features)
-
String cheese, peeled into strips (mummies)
-
Optional extras: mushrooms, onions, basil, green onions, roasted red pepper, cooked sausage
-
Instructions
1. Prep
-
Preheat oven to 400°F (200°C).
-
Line a baking sheet with parchment paper.
2. Sauce the crust
-
Spread a thin, even layer of pizza sauce on each crust, leaving a small border.
3. Decorate your pizzas
Spider Pizza
-
Place one olive slice in the center for the body.
-
Cut four more olives in half and arrange eight half-slices around the body as legs.
Jack-o’-Lantern Pizza
-
Arrange pepperoni slices to form a pumpkin shape.
-
Use thin orange bell pepper strips to create triangle eyes and jagged mouth.
Mummy Pizza
-
Sprinkle a light layer of shredded mozzarella as glue.
-
Lay string cheese strips haphazardly across the pizza for “bandages,” leaving a small gap at the top for eyes.
-
Add small olive slices to the gap after baking.
4. Bake
-
Bake for 8–10 minutes until cheese is melted, bubbly, and edges are golden.
-
Mummy pizzas may need 1–2 minutes less to avoid burning string cheese.
5. Serve
-
Arrange on a platter or cutting board for presentation.
-
Add extra olive spiders or pepperoni pumpkins for fun!
-
Serve with extra warm pizza sauce for dipping.
Notes
-
Prevent soggy crust: Use a thin layer of sauce; preheat oven fully.
-
Mummy string cheese: Bake for a shorter time or add halfway through baking.
-
Spider legs: Press lightly into sauce or secure with a tiny dot of cheese.
-
Prep ahead: Slice toppings and sauce crusts in advance, but bake fresh.
Nutrition
- Calories: 280Cal
- Fat: 12g
- Carbohydrates: 28g
- Protein: 14g
Nutritional Information (Approximate, per mini pizza)
Calories: 280 | Protein: 14g | Carbohydrates: 28g | Fat: 12g
Note: This is a rough estimate and can vary greatly based on the specific crust and toppings you use. The real value is in the fun and togetherness!
Final Thoughts from Beau
And there you have it—your ticket to the most memorable Halloween dinner on the block. This isn’t just about feeding hungry goblins and ghosts; it’s about creating those loud, messy, and absolutely priceless moments of togetherness. The best part? There are no rules. If your spider has ten legs or your mummy’s bandages are a little too neat, it doesn’t matter. What matters is the laughter and the pride on your little chef’s face when they pull their creation out of the oven.