Spooky, Soft, and Seriously Delicious: Your New Favorite Halloween Cookie!
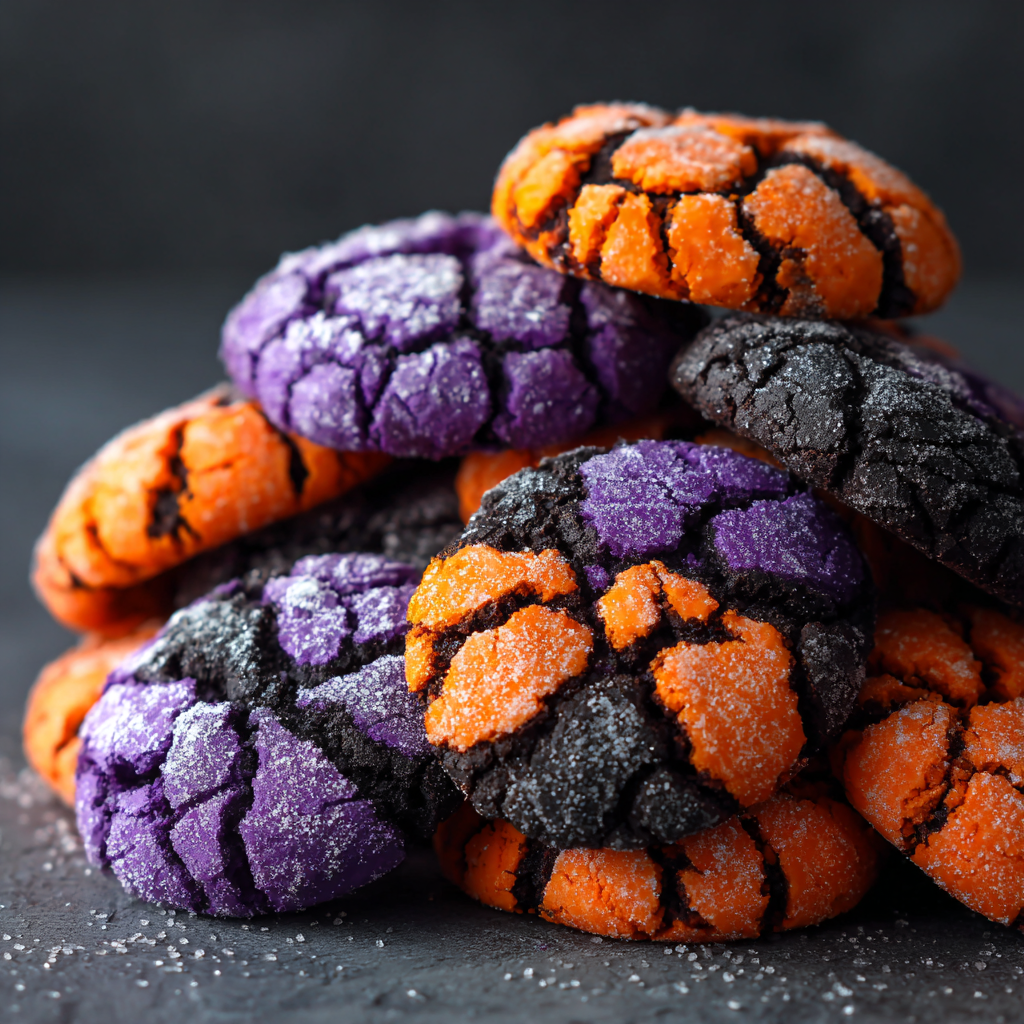
Hey friends, Beau here from Feastical! Is there anything better than the smell of something sweet baking in the oven? Now, imagine that smell, but with a spooky, fun Halloween twist. I’m talking about cookies that look like they’ve been dusted with ghostly powdered sugar and have these incredible, web-like cracks revealing a burst of color underneath. That’s the magic of Halloween Crinkle Cookies, and let me tell you, they are about to become the star of your Halloween party spread.
These aren’t just any cookies. They’re the perfect blend of rich, fudgy texture and a melt-in-your-mouth sweetness that both kids and adults go absolutely wild for. The best part? They’re deceptively easy to make. Whether you’re a baking pro or someone who considers ordering takeout a form of “cooking,” this recipe is for you. We’re keeping it simple, soulful, and oh-so-satisfying.
So, put on your favorite apron (the one with the questionable stain from last year’s frosting fight), cue up your spooky season playlist, and preheat that oven. We’re about to create a batch of cookies that are equal parts delicious and delightfully creepy. They’re soft, they’re chewy, and they’re about to bring so much joy to your kitchen. Let’s get baking!
A Cookie That Casts a Spell: My First Crinkle Cookie Memory
You know, every great recipe has a story, and this one takes me back. It wasn’t even Halloween. I was about ten years old, rummaging through my grandma’s kitchen—a place that always smelled like cinnamon and unconditional love. She was a wizard with a whisk, and on this particular day, she was making what she called her “Crackled Snowball” cookies. They were these simple, pale vanilla cookies rolled in a mountain of powdered sugar.
I watched, mesmerized, as she pulled the baking sheet from the oven. The cookies had transformed! They’d magically cracked open, creating a beautiful, craggy landscape against the stark white sugar. I was convinced it was actual magic. She let me have one straight from the sheet, and I burned my tongue because I was too impatient to wait. That first hot, soft, sugary bite was pure bliss. Years later, I started playing with her recipe, adding cocoa for a chocolate version, and then, the real fun began with food coloring for Halloween. Every time I make these, I think of her and that magical kitchen. It’s my little way of keeping her spirit—and her incredible talent for creating joy through food—alive and well in my own kitchen.
Gathering Your Magical Ingredients
Part of the fun of baking is gathering your tools and ingredients—it’s like preparing a potion! Here’s everything you’ll need to conjure up two dozen perfectly spooky cookies. Don’t worry, I’ve included some chef insights and easy swaps to make this recipe work for you.
- 1 cup all-purpose flour: The trusty foundation of our cookie. It gives them structure. For a gluten-free twist, a 1:1 gluten-free baking blend works wonderfully here.
- 1/2 cup unsweetened cocoa powder: This is what gives our cookies that deep, dark, rich chocolatey base that makes the colors pop! Use natural cocoa powder for the best flavor. If you’re making vanilla-based cookies (see variations below!), you’ll simply omit this.
- 1 tsp baking powder: Our leavening agent! This is the secret helper that gives the cookies a little lift and helps create those iconic crinkles as they bake and expand.
- 1/4 tsp salt: Never, ever skip the salt! It’s not to make things salty; it’s a flavor enhancer that makes the chocolate taste richer and the sweetness feel more balanced.
- 1 cup granulated sugar: Sweetness and tenderness! The sugar dissolves into the dough, helping create that wonderfully chewy texture we’re after.
- 1/4 cup vegetable oil: Oil keeps these cookies incredibly moist and fudgy, more so than butter would. I use a neutral oil like canola or vegetable. Melted coconut oil also works if you like a subtle coconut hint.
- 2 large eggs: Our binding agent. They bring the dough together and contribute to the structure. Make sure they’re at room temperature for a smoother, easier-to-mix dough!
- 1 tsp pure vanilla extract: The classic flavor booster. It adds a warm, comforting depth that pairs perfectly with chocolate.
- Gel food coloring (orange, purple, or black): This is where the Halloween magic happens! I strongly recommend gel food coloring over liquid. It’s more concentrated, so you get vibrant, bold colors without throwing off the liquid balance of your dough.
- 1/2 cup powdered sugar (for rolling): This creates the iconic “crinkle” or cracked effect. As the cookie expands in the oven, the powdered sugar coating cracks, revealing the colorful dough beneath. It’s edible theater!
Brewing the Batch: Your Step-by-Step Guide to Cookie Magic
Alright, let’s get our hands dirty (probably literally, if you’re using that black food coloring!). Follow these steps, and you’ll have perfect crinkle cookies every single time.
Step 1: The Dry Team Assemble!
In a medium-sized bowl, grab your whisk and combine the all-purpose flour, cocoa powder, baking powder, and salt. Whisk it all together until it’s one uniform, chocolaty powder. This isn’t just about mixing; it’s about aerating the dry ingredients and making sure the baking powder and salt are evenly distributed. No one wants a bite of just baking powder! Set this bowl aside. Chef’s Hack: I like to sift the cocoa powder if it’s particularly lumpy to ensure a super smooth dough.
Step 2: The Wet Team Unite!
In a larger mixing bowl, combine the granulated sugar, vegetable oil, eggs, and vanilla extract. Use a hand mixer or a sturdy whisk to beat this together for a good 1-2 minutes. You want it to be smooth, slightly pale, and well-incorporated. Now, for the fun part: add your gel food coloring! Start with a small amount (a toothpick’s worth for gel) and mix it in. You can always add more to intensify the color. Remember, the color will darken slightly as it bakes. Chef’s Hack: If you’re going for black, be patient! It can take quite a bit of black gel to overcome the brown of the chocolate. You might end up with a very dark gray, which is perfectly spooky!
Step 3: Bring the Teams Together!
Gradually add your dry ingredient mixture to your wet, colorful mixture. I usually do this in two or three batches, folding it in with a spatula. Mix until *just* combined and no streaks of dry flour remain. Do NOT overmix! Overmixing develops gluten and can lead to tougher cookies. We want fudgy, not toughy. The dough will be gloriously shiny and thick. Chef’s Hack: If the dough feels too sticky to handle, that’s perfect! It’s supposed to be. The chilling step is coming to rescue us.
Step 4: The All-Important Chill Session
This is the step you absolutely cannot skip! Cover the bowl with plastic wrap and pop it into the refrigerator for at least 1 hour, or up to 3-4 hours. This does a few crucial things: it chills the fat, which prevents the cookies from spreading too much in the oven. It also allows the flour to hydrate fully, giving us that dense, fudgy center. Most importantly, a cold dough is MUCH easier to handle and roll into balls later. Chef’s Hack: In a serious time crunch? You can pop the dough into the freezer for about 30 minutes instead, but the fridge is best.
Step 5: Preheat and Prepare!
Once your dough is nicely chilled, preheat your oven to 350°F (175°C). This ensures it’s at the perfect temperature when your cookies are ready to go. Line two baking sheets with parchment paper. Trust me, this prevents sticking and makes cleanup a dream.
Step 6: Roll, Coat, and Place!
Place your powdered sugar for rolling in a small bowl. Using a tablespoon or a small cookie scoop (my personal favorite for uniform cookies), portion out the dough. Roll each portion between your palms into a smooth, compact ball. Now, roll each ball generously in the powdered sugar until it’s completely coated. You want it to look like a little ghost! Place the sugar-coated balls about 2 inches apart on your prepared baking sheets. They need room to spread and crinkle! Chef’s Hack: For an extra-thick, snowy coating, roll the balls in powdered sugar a second time right before baking. It creates a more dramatic contrast!
Step 7: Bake to Crackled Perfection!
Bake for 10-12 minutes. The cookies are done when they have spread out and the surfaces have cracked beautifully. The centers should still look slightly soft and underbaked—this is the secret to a chewy cookie! They will firm up as they cool. Chef’s Hack: Ovens can vary, so keep an eye on them after the 9-minute mark. It’s better to pull them out a little early than overbake them.
Step 8: The (Hardest Part) Patience!
Remove the baking sheets from the oven and let the cookies cool on the sheet for at least 5 minutes. They are very delicate when hot. After that, you can transfer them to a wire rack to cool completely. This stops the cooking process and lets them set up perfectly.
How to Serve These Spooky Sensations
Presentation is part of the fun! Pile these crackled cookies high on a rustic wooden board or a stark black plate to make the colors really stand out. For a real party vibe, create a platter with all three colors—orange, purple, and black—together. They look fantastic nestled next to other Halloween treats like popcorn balls or chocolate-dipped pretzel rods. Serve them with a cold glass of milk, a mug of hot cocoa, or even a pumpkin spice latte for the ultimate fall experience. They’re the perfect hand-held dessert for a Halloween party, a lunchbox surprise, or just a cozy night in watching scary movies.
Spooky Swaps & Creative Twists
Feel like playing mad scientist? Here are a few fun ways to mix up this classic recipe:
- Vanilla Bean Crinkles: Omit the cocoa powder and add an extra 1/4 cup of flour. Use the seeds from one vanilla bean or an extra 1/2 tsp of vanilla extract for a beautiful, classic vanilla crinkle cookie.
- Peanut Butter Boo-nanza: Replace the vegetable oil with 1/4 cup of creamy peanut butter. The dough will be thicker, but you’ll get a amazing chocolate-peanut butter flavor combo.
- Minty Monster Mash: Add 1/2 tsp of peppermint extract along with the vanilla for a cool, refreshing twist that pairs wonderfully with chocolate.
- Gluten-Goblin Free: As mentioned, swap the all-purpose flour for your favorite 1:1 gluten-free baking blend. The result is just as fudgy and delicious!
- Spice It Up! Add 1 tsp of cinnamon or even a pinch of cayenne pepper to the dry ingredients for a warm, unexpected kick.
Beau’s Chef Notes & Kitchen Tales
This recipe is a living thing in my kitchen—it’s evolved so much from my grandma’s original! The first time I tried to make black cookies, I used liquid food coloring. Big mistake. I ended up with a soupy, gray mess that stained everything it touched, including my favorite apron and my dog’s nose (don’t ask). That’s when I learned the golden rule: gel coloring for the win!
I also used to be impatient and skip the chill time. My cookies would spread into thin, flat pancakes in the oven. They still tasted good, but they looked more like spooky lace doilies than plump, crackled cookies. Chilling the dough is truly the magic spell that makes this recipe work. These days, I often make the dough the night before, let it chill overnight, and then bake them fresh the next day. The flavor is even better! So learn from my messy, impatient mistakes, and you’ll have perfect cookies on the first try.
Your Crinkle Cookie Questions, Answered!
Q: My cookies didn’t crinkle much. What went wrong?
A: The most common culprit is not chilling the dough long enough. A warm dough will spread too quickly in the oven, before the surface has time to set and crack. Make sure your dough is thoroughly chilled! Another reason could be old baking powder. If it’s lost its potency, it won’t create the lift needed for those beautiful cracks.
Q: Can I make this dough ahead of time?
A: Absolutely! This dough is a great make-ahead candidate. You can keep it covered in the fridge for up to 2 days. You can also roll the dough into balls, coat them in powdered sugar, and freeze them on a baking sheet. Once frozen solid, transfer them to a freezer bag. You can bake them straight from the freezer, just add 1-2 minutes to the baking time.
Q: My powdered sugar coating disappeared into the dough. How do I prevent that?
A: This usually happens if the dough is too wet or sticky when rolled. Ensuring a full 1-hour chill will help firm up the dough. Also, make sure you’re rolling the balls in a really thick, generous layer of powdered sugar. A second roll right before baking creates a more defined, white coating.
Q: Are these cookies soft or crispy?
A: When baked correctly (pulled out when the centers are still soft), these cookies are wonderfully soft and fudgy on the inside with a slightly crisp edge from the powdered sugar. If you prefer a crispier cookie, you can bake them for a minute or two longer, but watch them carefully!
Print
HALLOWEEN CRINKLE COOKIES
- Total Time: 32 minutes
Description
These Halloween crinkle cookies are the perfect mix of spooky fun and fudgy flavor. With their crackled powdered-sugar tops revealing vibrant orange, purple, or black dough beneath, they’re the star of any Halloween spread. Soft, chewy, and melt-in-your-mouth delicious—these cookies are easy enough for beginners and magical enough to impress every ghost and goblin at your table.
Ingredients
-
1 cup all-purpose flour (or 1:1 GF blend)
-
½ cup unsweetened cocoa powder
-
1 tsp baking powder
-
¼ tsp salt
-
1 cup granulated sugar
-
¼ cup vegetable oil (or melted coconut oil)
-
2 large eggs (room temp)
-
1 tsp vanilla extract
-
Gel food coloring (orange, purple, or black)
-
½ cup powdered sugar (for rolling)
Instructions
-
Mix dry – Whisk flour, cocoa, baking powder, and salt.
-
Mix wet – Beat sugar, oil, eggs, and vanilla until smooth. Add gel coloring.
-
Combine – Stir dry ingredients into wet until just combined.
-
Chill – Cover and refrigerate at least 1 hr (or 30 min in freezer).
-
Prep – Preheat oven to 350°F (175°C). Line baking sheets with parchment.
-
Shape – Roll dough into 1 tbsp balls. Coat generously in powdered sugar.
-
Bake – Place 2″ apart and bake 10–12 min until cracked but soft in the center.
-
Cool – Let sit on baking sheet 5 min before transferring to a rack.
Notes
-
Chill the dough fully for dramatic cracks.
-
Double-roll in powdered sugar for bolder contrast.
-
For variety, make three colors (orange, purple, black) and serve together for a spooky platter.
- Prep Time: 20 min
- Cook Time: 12 min
Nutrition
- Calories: 90 Cal per cookie
- Fat: 3g
- Carbohydrates: 14g
- Protein: 2g
Nutritional Information (Approximate, per cookie)
Calories: 90 | Protein: 2g | Carbohydrates: 14g | Fat: 3g | Saturated Fat: 0.5g | Sugar: 9g
Final Thoughts: A Spellbinding Treat for All
So there you have it, friends—your complete guide to creating cookies that are as fun to make as they are to eat. These Halloween Crinkle Cookies are more than just a dessert; they’re a experience. They’re a chance to create a little magic in your kitchen, to get your hands a little colorful, and to fill your home with the incredible aroma of chocolate and Halloween spirit.
Whether you’re baking them for a party, for your family, or just for yourself as a spooky season treat, this recipe is designed to deliver joy. It’s a beautiful blend of simple technique and spectacular results, a treat that honors tradition while encouraging you to play with color and make it your own.
Hi, these look so good! How many cookies in a batch?