
Unwrap a Little Holiday Magic: Grinch Hot Cocoa Bombs
Hey friends, Beau here from Feastical! Is there anything better than the moment you sink into the couch after a long day of holiday chaos, a warm mug in your hands, and your favorite festive movie on the screen? I’m talking about that deep, soul-warming feeling of pure, unadulterated coziness. For me, that moment isn’t complete without a truly spectacular cup of hot chocolate. But we’re not just talking about a packet of powder stirred into hot water. Oh no. We’re making an event out of it.
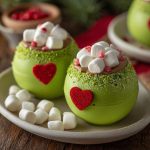
This year, I’m throwing open the kitchen doors and inviting you to create the most whimsical, fun, and downright delicious holiday treat I’ve made in ages: Grinch Hot Cocoa Bombs. These aren’t your average cocoa bombs. They’re vibrant green spheres of white chocolatey joy, hiding a fluffy, marshmallow-filled surprise inside, all crowned with a tiny red heart. When you pour steaming milk over one, it slowly cracks open like a festive present, releasing a river of creamy cocoa and marshmallows. It’s a showstopper in a mug, and I promise, it’s so much easier to make than it looks. So, grab your favorite apron, put on some holiday tunes, and let’s make some magic together!
A Story of Stolen Sweaters and Sweet Redemption
This recipe always takes me back to a particularly chaotic Christmas Eve at my Grandma Lou’s house. I was about eight, and my entire extended family was crammed into her cozy living room. My cousin Danny, who fancied himself a real-life Grinch, had “borrowed” my favorite reindeer sweater without asking. I was fuming, plotting my revenge from behind the Christmas tree.
Just as I was about to unleash a well-aimed toss of tinsel, Grandma Lou emerged from the kitchen with a tray of the most incredible-looking mugs. She had made us all rich, minty hot chocolate, each one topped with a mountain of whipped cream and a single red cinnamon heart. She handed the first mug to Danny and the second to me. “A warm heart melts a cold one,” she whispered with a wink. We sipped our cocoa in a temporary truce, and by the time we hit the bottom of the mugs, the sweater feud was forgotten, lost to the power of a shared sweet treat. These Grinch Bombs are my edible tribute to that lesson – a little bit of green on the outside, but a whole lot of heart waiting to get out.
Gathering Your Cocoa Bomb Crew: The Ingredients
This double batch makes a full dozen bombs—perfect for keeping a few, gifting a few, and definitely taste-testing one (or two)! The beauty of this recipe is in its simplicity. Here’s your shopping list, complete with my chef-y insights to set you up for success.
- 2 cups vibrant green candy melts: This is the star of the show! Candy melts (or candy wafers) are my go-to because they set hard and have a perfect consistency for molding. Chef’s Tip: You can use high-quality white chocolate mixed with green candy coloring, but candy melts are more forgiving for beginners.
- 12 tbsp white hot chocolate mix: That’s one tablespoon per bomb. Using a white chocolate mix inside the green shell gives that iconic “Grinch” color contrast. Feel free to use your favorite store-bought brand or whip up a homemade blend with powdered sugar, dry milk powder, and white chocolate powder.
- 6 tbsp mini marshmallows: The mini ones are non-negotiable! They fit perfectly inside the bomb and create that classic fluffy texture we all love.
- 12 red heart sprinkles (Wilton or similar): This tiny detail makes all the difference. It’s the heart that grows three sizes! If you can’t find hearts, a red M&M or a red candy pearl works in a pinch.
- Optional twists:
- 1 tsp peppermint extract: Stir this right into your melted candy coating for a refreshing, minty shell. It’s a classic holiday flavor pairing!
- Crushed peppermint or green sanding sugar: For a little extra texture and festive sparkle on the outside of your bombs.
- Edible glitter: Because why not? A little shimmer makes these bombs truly magical.
Let’s Get Building: Your Step-by-Step Guide
Don’t let the fancy look intimidate you. We’re going to break this down into simple, foolproof steps. Read through once, then let’s dive in!
Step 1: Melt Your Chocolate
Pour your green candy melts into a microwave-safe bowl. Heat them in the microwave in 30-second bursts, stirring well after each interval. This is crucial! Rushing this step by microwaving for too long will scorch your chocolate and make it seize up into a grainy mess. Be patient. Once it’s smooth and glossy, stir in the peppermint extract if you’re using it.
Step 2: Coat Your Molds
You’ll need two silicone hemisphere molds (the 6-cavity, 2.5-inch ones are perfect). Using a small spoon or a pastry brush, carefully coat the inside of each cavity with the melted chocolate. You want a nice, even layer—not too thin, or your bombs will be fragile; not too thick, or they’ll be hard to eat. This is your first coat. Pop the molds into the refrigerator for exactly 10 minutes to set. This quick chill helps the chocolate firm up. Once the first coat is set, add a second, thinner coat to each cavity. This double-layer technique ensures a sturdy bomb that won’t crack when you pop it out or seal it. Chill again for another 10-15 minutes, until completely firm.
Step 3: The Great Unmolding
This is the satisfying part! Carefully flex your silicone mold. The chocolate spheres should start to release on their own. Gently push on the bottom of each cavity and pop them out. If they’re being stubborn, a few more seconds in the fridge usually does the trick. You should now have 12 beautiful green chocolate hemispheres. Lay them out on a parchment-lined tray.
Step 4: The Fill-Up
Take 6 of your hemispheres—these will be the bottoms. Fill each one with 1 tablespoon of the white hot chocolate mix, followed by ½ tablespoon of mini marshmallows. Then, lovingly place a single red heart sprinkle right on top. This is the secret center of joy!
Step 5: The Seal
This is the only slightly tricky part, but you’ve got this! Take an empty hemisphere (a top) and gently press its open edge onto a warm surface for just 2-3 seconds. I use the bottom of a warm mug heated with hot water and dried, but a hot plate or even a pan warmed on the stove for a few seconds works great. This melts the edge just enough to act as glue. Quickly and carefully, place the warmed top onto a filled bottom, matching the edges. Gently press and hold for a few seconds to seal. You can smooth the seam with your finger (dipped in a little melted chocolate) if needed.
Step 6: Decorate!
Now for the fun! Melt a little extra green candy melt and drizzle it over the sealed bombs. Immediately sprinkle on some crushed peppermint, green sanding sugar, or edible glitter before the drizzle sets. This hides any imperfections in the seam and makes them look professionally decorated. Let them set completely at room temperature.
How to Serve Up the Grinch-y Goodness
The grand finale! Place one gorgeous Grinch bomb in the bottom of your favorite holiday mug. Heat up about 1 ½ cups of milk (whole milk makes it extra creamy, but any milk works) until it’s steaming hot but not boiling. Slowly and dramatically, pour the hot milk directly over the bomb. Watch the magic happen! The shell will begin to melt and crack, revealing the treasure inside. Give it a good stir with a spoon until everything is beautifully combined into a smooth, creamy, and utterly delightful cup of hot cocoa. The transformation is half the fun! Pair it with a plate of soft gingerbread cookies or a candy cane for stirring—pure bliss.
Mix It Up: Fun Flavor Twists
Once you’ve mastered the classic, the kitchen is your playground! Here are a few of my favorite ways to mix up the Grinch bomb formula.
- The Cindy Lou Who: For a fruity twist, use a raspberry or strawberry powder inside instead of white chocolate mix. The pink filling peeking through the green shell is just adorable.
- The Max Dog: Make it a mocha! Add a teaspoon of instant espresso powder to the white chocolate mix inside for a coffee-chocolate hybrid that adults will go crazy for.
- The Whoville Feast (Dairy-Free): No problem! Use dairy-free white chocolate chips for the shell and a dairy-free hot chocolate mix inside. The marshmallows might need to be swapped for Dandies or another vegan brand.
- The Frosted Grinch: Add a tablespoon of caramel bits or butterscotch chips into the filling along with the marshmallows for a rich, buttery surprise.
- The Chilly Grinch: Kick up the mint factor by adding a few chopped-up Andes mints inside the bomb along with the marshmallows.
Beau’s Chef Notes & Kitchen Confessions
I’ve made these more times than I can count, and they’ve become a Feastical holiday tradition. The recipe has evolved—I used to struggle with cracked shells until I learned the double-coating trick. And I’ll never forget the first time I tried to seal them without warming the edge… let’s just say I had a lot of “Grinch cocoa rubble” that year! The key is to not get discouraged. Even if they aren’t perfect, they will still taste incredible. The best kitchen tool you have is a sense of humor. Put on some music, maybe sample a few marshmallows for quality assurance, and enjoy the process. Food made with joy always tastes better.
Your Questions, Answered: FAQs & Troubleshooting
Q: My chocolate shell cracked when I unmolded it! What did I do wrong?
A: This usually means your first layer was too thin. The double-coat method is your best defense against cracks. If you do get a crack, don’t panic! You can use a little extra melted chocolate as “glue” to patch it up. It will be hidden once you decorate.
Q: Can I use real chocolate instead of candy melts?
A: You can, but it requires an extra step called tempering to ensure it sets hard and has a snap. For beginners, candy melts are the way to go for their ease and reliability.
Q: How should I store these, and how long do they last?
A: Store them in a single layer in an airtight container at cool room temperature for up to two weeks. Avoid the fridge, as condensation can make the cocoa mix clumpy and cause the chocolate to “sweat.”
Q: My bomb didn’t melt all the way when I added the milk. Help!
A: This means your milk wasn’t hot enough! Make sure you heat the milk until it’s steaming hot. The bomb needs that heat to properly melt and release its goodies.
Grinch Hot Cocoa Bombs
Description
There’s nothing quite like sinking into the couch with a warm mug in hand after a day of holiday chaos. These Grinch Hot Cocoa Bombs turn an ordinary cup of cocoa into a festive, magical experience. Each bright green sphere hides a fluffy marshmallow-filled surprise, crowned with a tiny red heart. Pour hot milk over one, watch it melt, and enjoy a rich, creamy, show-stopping treat that’s easier to make than it looks!
Ingredients
Makes 12 cocoa bombs
-
2 cups green candy melts (or white chocolate with green candy coloring)
-
12 tbsp white hot chocolate mix (1 tbsp per bomb)
-
6 tbsp mini marshmallows
-
12 red heart sprinkles (or red M&M/candy pearl)
Optional:
-
1 tsp peppermint extract (stir into melted candy for a minty shell)
-
Crushed peppermint or green sanding sugar
-
Edible glitter for decoration
Instructions
1. Melt the Chocolate
-
Place candy melts in a microwave-safe bowl. Heat in 30-second bursts, stirring after each, until smooth and glossy.
-
Stir in peppermint extract if using.
2. Coat the Molds
-
Using silicone hemisphere molds, coat the inside of each cavity with melted chocolate.
-
Refrigerate 10 minutes to set, then add a thinner second coat for sturdiness. Chill another 10–15 minutes.
3. Unmold the Hemispheres
-
Carefully flex molds and gently push out chocolate halves. Lay on parchment.
4. Fill the Bombs
-
Place 1 tbsp white hot chocolate mix and ½ tbsp mini marshmallows in 6 hemispheres.
-
Top each with a red heart sprinkle.
5. Seal the Bombs
-
Warm the edge of an empty hemisphere on a hot surface for 2–3 seconds, then place over filled half. Press gently to seal.
-
Smooth seams with melted chocolate if needed.
6. Decorate
-
Drizzle extra melted green candy melts on top. Sprinkle with crushed peppermint, sanding sugar, or edible glitter. Let set completely.
Notes
-
Use a double coat for sturdy shells.
-
Warm edges just enough to seal; too hot will melt the hemisphere.
-
Store in a single layer at cool room temperature for up to 2 weeks.
-
Use steaming hot milk for proper melting.
Nutrition
- Calories: 160 Cal per Bomb
- Fat: 7g
- Saturated Fat: 6g
- Carbohydrates: 22g
A Quick Note on Nutrition & Prep
Let’s be real—these are a special holiday treat, a moment of pure indulgence. Here’s the breakdown so you can enjoy them mindfully.
Prep Time: 20 min | Chill Time: 30 min | Total Time: 50 min | Yield: 12 bombs
Per bomb (approximate):
Calories: 160 | Fat: 7g | Saturated Fat: 6g | Carbohydrates: 22g | Sugar: 19g | Protein: 1g
Remember, these numbers can vary based on the specific brands of ingredients you use. To lighten them up a bit, you could use a sugar-free hot chocolate mix inside and a light drizzle on top.
Final Thoughts from My Kitchen to Yours
Well, friends, we’ve done it! You are now officially a certified Grinch Bomb expert. More importantly, you’ve created not just a delicious drink, but a memory. Whether you’re gifting these in little cellophane bags with a festive ribbon or serving them up on Christmas morning, you’re spreading a whole lot of joy. That’s what Feastical is all about—taking simple, feel-good ingredients and turning them into something that brings people together.
I’d love to see your creations! Tag me @feastical on Instagram or Pinterest so I can share in your holiday kitchen adventures. From my family to yours, have the coziest, most delicious holiday season.
Stay warm and keep cooking,