Ditch the Lunchtime Rut with Garlic Herb Chicken Meal Prep
Hey friends, Beau here from Feastical! Let’s have a real chat for a second. How many times have you stared into the fridge at noon on a Tuesday, feeling that familiar dread? You’re hungry, you need something good, but the thought of assembling a decent meal feels like climbing a mountain. Maybe you reach for that sad-looking sandwich or, worse, start browsing takeout apps. Sound familiar? I’ve been there more times than I’d like to admit.
But what if I told you that lunch could be something you actually look forward to? I’m talking about a meal that’s juicy, flavorful, and feels like a warm hug in the middle of a hectic day. That’s the magic of a solid meal prep routine, and it all starts with this superstar recipe: my Garlic Herb Chicken Meal Prep.
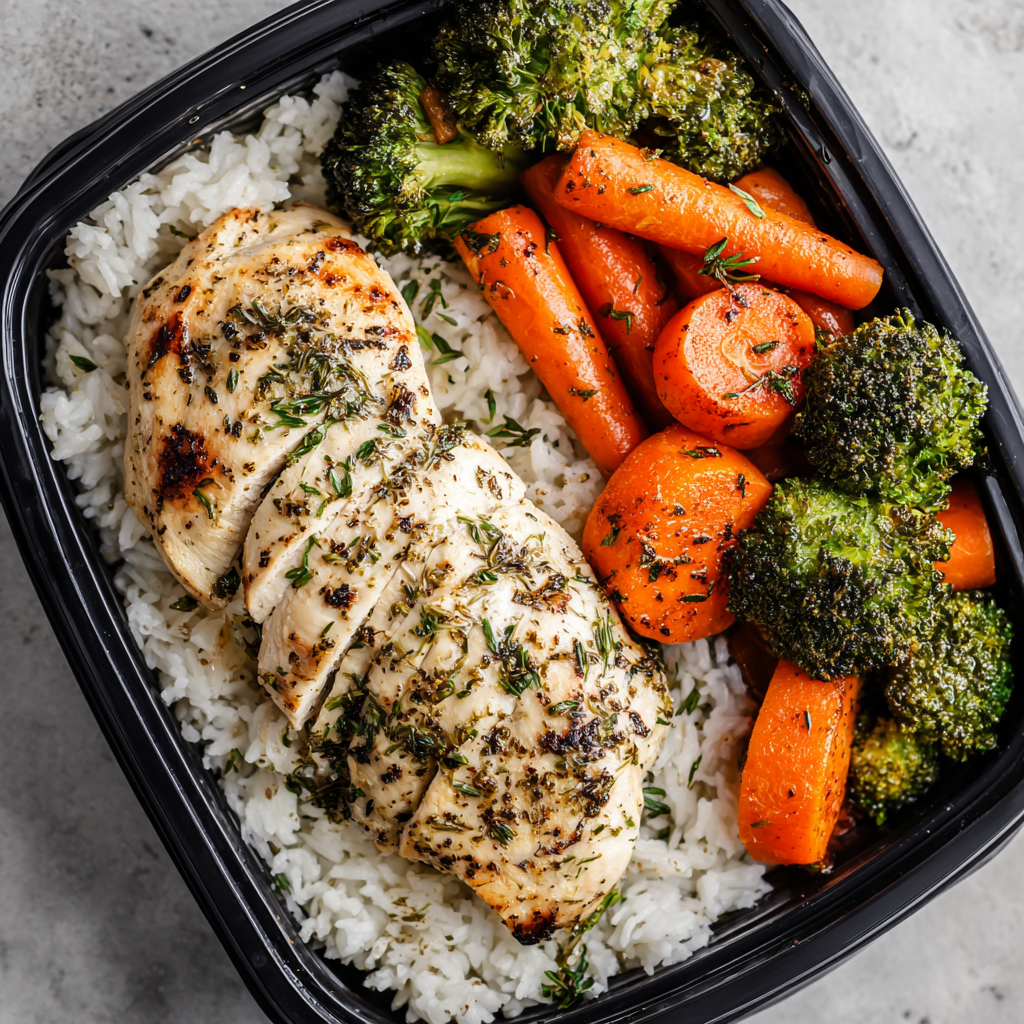
This isn’t just about cooking chicken and rice. This is about creating a symphony of textures and tastes that will power you through your week. We’re talking tender, herb-rubbed chicken breasts, fluffy rice soaking up all those delicious juices, crisp-tender broccoli, and sweet, caramelized roasted carrots. It’s a balanced, high-protein plate that’s as beautiful as it is satisfying. And the best part? In about 40 minutes of active time, you’ve got four lunches ready to go, freeing up your future self for more important things—like finally figuring out what that mysterious button on your microwave actually does.
So, grab your favorite cutting board and let’s turn that lunchtime dread into a moment of pure, feel-good deliciousness. You’ve got this!
The “Aha!” Moment That Started It All
This recipe has a special place in my heart because it was born from a genuine kitchen disaster. Picture this: It was my first “real” job after college, and I was determined to be an Adult™ who brought a healthy, homemade lunch every day. On Sunday, I’d cooked a giant batch of unseasoned chicken breast and plain broccoli. By Wednesday, my lunch was so dry and bland that I’d rather have eaten the paper my report was printed on. I was defeated.
That Friday, I went to my grandma’s house, and the smell that hit me when I walked in was incredible. She was roasting a chicken with what she called her “happy little herbs”—a simple mix of thyme, oregano, and a ton of garlic. The chicken was golden, the kitchen was warm, and I realized my mistake instantly. I was treating meal prep like a chore, not an opportunity to create food that genuinely excited me.
I went home that weekend and combined her herb wisdom with my need for efficiency. The result? This very recipe. It taught me that a little bit of love and flavor goes a long, long way. Meal prep shouldn’t be about punishment; it should be about giving your future self a delicious gift.
Gathering Your Flavor Arsenal
One of the secrets to great cooking is understanding your ingredients. This list is simple, but each component plays a crucial role. Here’s the breakdown for 4 perfectly portioned meals.
For the Star of the Show: The Chicken
- 4 Boneless, Skinless Chicken Breasts: Look for breasts that are roughly the same size so they cook evenly. Chef’s Insight: If you have time, brining them in saltwater for 20 minutes before cooking works wonders for juiciness!
- 2 Tablespoons Olive Oil: This helps the herbs stick and creates a beautiful sear. Substitution: Avocado oil works great for high-heat cooking, too.
- 2 Teaspoons Garlic Powder: Yes, we’re using powder! It gives a consistent, mellow garlic flavor that won’t burn like fresh garlic can in the pan. Chef’s Insight: This is my meal prep secret weapon.
- 1 Teaspoon Each of Onion Powder, Dried Thyme, and Dried Oregano: This trio is the flavor foundation. The thyme and oregano bring that warm, earthy, “classic chicken” vibe we all love.
- Salt and Pepper, to taste: Don’t be shy! Salt is essential for bringing out all the other flavors. I use about 1 tsp of kosher salt and ½ tsp of black pepper.
- Juice of ½ Lemon (optional): A bright squeeze at the end cuts through the richness and makes the flavors pop. Highly recommended!
For the Supporting Cast: The Sides
- 2 Cups Cooked White or Brown Rice: White rice is fluffy and quick, while brown rice offers more fiber and a nutty flavor. Pro-Tip: Cook your rice in chicken broth instead of water for an extra flavor boost!
- 2 Cups Broccoli Florets: We want crisp-tender broccoli, not mushy. Look for bright green, tight florets.
- 2 Large Carrots, Sliced: Peel and slice them into coins or batons. Roasting them caramelizes their natural sugars—it’s a game-changer.
- 1 Tablespoon Olive Oil, Salt, and Pepper: Simple seasoning is all these vibrant veggies need.
Let’s Get Cooking: Your Foolproof Guide
Okay, team, apron on! We’re going to multitask like a pro. The goal is to have everything finishing up around the same time. I’ll walk you through it step-by-step.
- Preheat and Prep the Veggies. Fire up your oven to 400°F (200°C). While it’s heating, peel and slice your carrots. Toss them on a baking sheet with that 1 tablespoon of olive oil, a good pinch of salt, and a crack of black pepper. Get your hands in there and make sure every piece is lightly coated. Pop them in the oven for 20-25 minutes. You’ll know they’re done when you can easily pierce them with a fork and the edges are starting to caramelize. Chef’s Hack: Line your baking sheet with parchment paper for zero scrubbing later!
- Cook the Rice. While the carrots are roasting, get your rice cooking according to the package directions. Remember my tip about using broth? Do it! Once it’s cooked, fluff it with a fork and let it hang out, uncovered, so it doesn’t get gummy.
- Conquer the Broccoli. About 10 minutes before the carrots are done, it’s broccoli time. You have two great options here:
- Sauté: Heat a splash of olive oil in a pan over medium-high heat. Toss in the broccoli florets, season with a pinch of salt, and cook for 5-7 minutes, stirring occasionally, until they’re bright green and slightly crisp.
- Steam: Place the broccoli in a steamer basket over boiling water for 4-5 minutes. This is the best method for preserving that vibrant color and crisp-tender bite.
The key is to not overcook it. It will soften a tiny bit more when you reheat it later.
- Create Flavor-Packed Chicken. This is the main event! Pat your chicken breasts dry with a paper towel—this is CRITICAL for getting a golden sear, not a steam. Place them on a plate or in a shallow dish. Drizzle with the 2 tablespoons of olive oil and rub it all over. Now, sprinkle both sides evenly with the garlic powder, onion powder, thyme, oregano, salt, and pepper. Massage those herbs right into the meat. It might feel silly, but you’re building layers of flavor!
- Cook to Perfection. Heat a grill pan, skillet, or actual grill over medium heat. Once hot, add the chicken. Cook for 5-6 minutes on the first side without moving it. You’re looking for a nice golden-brown crust. Flip and cook for another 5-7 minutes on the other side, or until the internal temperature reaches 165°F (74°C) on a meat thermometer. Chef’s Non-Negotiable Tip: PLEASE let the chicken rest for at least 5 minutes after cooking before you slice it. This allows the juices to redistribute throughout the meat, guaranteeing it stays juicy.
- The Grand Finale: Assemble! By now, everything should be ready. Slice the rested chicken against the grain into strips. Grab your four meal prep containers. Evenly divide the fluffy rice, followed by the roasted carrots, the bright green broccoli, and finally, the beautifully sliced garlic herb chicken. If you’re using the lemon juice, give a little squeeze over the chicken in each container before sealing the lid.
Plating Up for Maximum Joy
Even though these are going into containers, I’m a firm believer that we eat with our eyes first! When you’re assembling, think like an artist. Create little sections of color: the white or brown rice, the vibrant orange carrots, the emerald green broccoli, and the golden-brown chicken. It makes opening that container at lunchtime a genuinely happy moment.
If you’re serving this for dinner right away, plate it the same way! A little sprinkle of fresh chopped parsley or a tiny extra drizzle of olive oil right before serving takes it to restaurant-quality levels. This dish pairs wonderfully with a simple side salad or a crusty piece of bread to sop up any lingering juices.
Make It Your Own: Delicious Twists & Swaps
The beauty of this recipe is its versatility. Once you’ve mastered the base, feel free to get creative! Here are a few of my favorite variations:
- Lemon Herb Bliss: Add the zest of one lemon to the herb rub along with the juice. It intensifies the citrus flavor beautifully.
- Spicy Cajun Kick: Swap the thyme and oregano for 2 tablespoons of your favorite Cajun seasoning blend. Serve with a creamy dipping sauce like a yogurt-based ranch.
- Mediterranean Vibe: Replace the sides with quinoa and a chopped Greek salad (cucumber, tomato, red onion, kalamata olives, and a little feta cheese kept on the side).
- Dairy-Free “Creamy” Version: Create a simple sauce by mixing ½ cup of dairy-free yogurt (like unsweetened almond or coconut yogurt) with a minced garlic clove, lemon juice, and chopped dill. Drizzle over the chicken after reheating.
- Sweet Potato Power: Swap the carrots for cubed sweet potatoes. They roast up just as easily and add a different nutritional profile and sweetness.
Beau’s Kitchen Confidential
This recipe has been my lunchtime guardian angel for years, and it’s evolved with me. I once tried to add fresh garlic to the rub instead of powder before pan-searing… let’s just say I learned the hard way that burnt garlic is bitter! The powder is the undisputed champion for this application.
Another funny story: I was so proud of my first successful batch that I took a container to a friend. He texted me later: “Dude, this chicken is amazing. What’s your secret?” I told him it was just dried herbs. He didn’t believe me! It just goes to show that sometimes the simplest techniques, executed well, yield the most impressive results. Don’t overcomplicate it. Good food is about heart, not hassle.
Your Questions, Answered!
Q: My chicken always turns out dry. What am I doing wrong?
A: The most common culprits are overcooking and not resting. A meat thermometer is your best friend—pull the chicken at 165°F. And I can’t stress this enough: let it rest for 5 minutes! Also, if your chicken breasts are very thick, you can pound them to an even ½-inch thickness for more consistent cooking.
Q: How long will these meals last in the fridge?
A: Safely, they’ll last for 3-4 days in airtight containers. Make them on a Sunday, and you’re set through Wednesday or Thursday. If you want to prep for the whole week, freeze a couple of containers on Sunday and move them to the fridge on Tuesday night to thaw for Wednesday and Thursday.
Q: My broccoli gets mushy when I reheat it. Any tips?
A> This is a classic issue! The key is to slightly undercook it initially. Aim for crisp-tender. When reheating, leave the lid of your container slightly ajar or remove it for the last 30 seconds to let excess steam escape. This helps it stay brighter and crisper.
Q: Can I use chicken thighs instead?
A> Absolutely! Boneless, skinless chicken thighs are actually more forgiving and often more flavorful. Just increase the cooking time by a few minutes per side, and always check for an internal temperature of 165°F.

Garlic Herb Chicken Meal Prep
Description
This meal prep recipe is perfect for busy weekdays—juicy herb-rubbed chicken, fluffy rice, crisp-tender broccoli, and caramelized roasted carrots. Makes 4 lunches.
Ingredients
Chicken:
-
4 boneless, skinless chicken breasts (even size for even cooking)
-
2 tbsp olive oil
-
2 tsp garlic powder
-
1 tsp each: onion powder, dried thyme, dried oregano
-
Salt & pepper, to taste
-
Juice of ½ lemon (optional)
Sides:
-
2 cups cooked white or brown rice (cook in chicken broth for extra flavor)
-
2 cups broccoli florets
-
2 large carrots, sliced
-
1 tbsp olive oil, salt, and pepper
Instructions
1. Roast Carrots
-
Preheat oven to 400°F (200°C).
-
Toss carrots with olive oil, salt, and pepper.
-
Roast 20–25 mins until tender and caramelized.
2. Cook Rice
-
Prepare rice according to package directions.
-
Fluff with a fork and let cool slightly.
3. Cook Broccoli
-
Sauté: 5–7 mins in olive oil over medium-high heat.
-
Steam: 4–5 mins over boiling water.
-
Goal: bright green, crisp-tender.
4. Prepare Chicken
-
Pat chicken dry. Rub with olive oil and seasonings.
-
Cook on medium heat: 5–6 mins per side until golden and internal temp 165°F (74°C).
-
Rest 5 mins before slicing.
5. Assemble
-
Slice chicken against the grain.
-
Divide rice, carrots, broccoli, and chicken evenly into 4 containers.
-
Optional: squeeze lemon juice over chicken.
Notes
-
Prevent dry chicken: Use a thermometer and let it rest.
-
Broccoli stay crisp: Slightly undercook; vent container lid when reheating.
-
Storage: 3–4 days in fridge; freeze extras for later.
Nutrition
- Calories: 420 Cal per serving
- Fat: 15g
- Carbohydrates: 32g
- Protein: 36g
The Good Stuff: Fueling Your Body
Let’s talk about why this meal is such a powerhouse. Each container is designed to be a balanced plate, providing sustained energy to keep you full and focused throughout the afternoon.
Per Serving (Approximate):
- Calories: ~420
- Protein: 36g (Essential for muscle repair and keeping you satiated)
- Carbohydrates: 32g (Provides energy from the rice and veggies)
- Fat: 15g (Healthy fats from olive oil for hormone health and vitamin absorption)
This meal is naturally gluten-free and packed with nutrients. The broccoli and carrots deliver a healthy dose of fiber, vitamins A, C, and K, while the chicken provides lean protein. It’s a meal that truly tastes as good as it makes you feel.
You’ve Got This!
And there you have it, my friends—your ticket to a week of stress-free, delicious lunches. This Garlic Herb Chicken Meal Prep is more than just a recipe; it’s a strategy for winning your week. It proves that eating well doesn’t have to be complicated, expensive, or boring.
I hope this guide gives you the confidence to get into the kitchen and take control of your lunchtime. Remember, the Feastical community is all about sharing the joy of food. If you make this, I’d love to see it! Tag me on social @Feastical with your creations.
Now go forth, prep like a pro, and get ready to experience the pure joy of a lunch you actually can’t wait to eat. Happy prepping!
Beau