
Wake Up to Pure Joy: Easy Gluten-Free Oat Waffles
Hey friends, Beau here! Tell me something: is there any sound more deliciously promising than the sizzle of batter hitting a hot waffle iron on a lazy weekend morning? That crisp, golden aroma swirling through the kitchen, the anticipation of that first syrupy bite… pure magic. But if you’ve ever felt like gluten-free breakfasts meant settling for cardboard-textured “treats,” I’m here to flip that script! These Easy Gluten-Free Oat Waffles are my absolute go-to for a reason. Imagine this: shatteringly crisp edges giving way to a cloud-like, fluffy interior, all made with simple, wholesome ingredients. No fancy gums, no weird aftertaste—just the cozy, nutty goodness of oat flour working its charm. They’re naturally gluten-free (just grab certified GF oats if needed!), endlessly adaptable, and seriously foolproof. Whether you’re wrangling hungry kids, hosting brunch, or just treating yourself to a little “slow morning” luxury, these waffles deliver pure, uncomplicated joy. They taste like a warm hug for your taste buds, proving that feel-good food doesn’t need complicated labels or hard-to-find ingredients. So grab your favorite mug of coffee, fire up that waffle iron, and let’s make breakfast the happiest part of your day!
Why These Waffles Feel Like Home
Okay, confession time: my love affair with these oat waffles started with a near-disaster! Picture it: a snowy Sunday morning years ago, my niece (who’s gluten-sensitive) was visiting. I’d promised her “the best waffles ever,” only to realize my regular flour stash was empty. Cue panic! All I had were rolled oats. In a sweaty-palmed frenzy, I blitzed them into flour, crossed my fingers, and hoped for the best. The batter looked… suspiciously thin. But when that first waffle emerged—golden, crisp, smelling like toasted oats and maple dreams—we both did a happy dance right there in the kitchen. The look on her face, piled high with berries and syrup? Priceless. That messy morning taught me something beautiful: sometimes the best recipes are born from happy accidents and pantry improvisation. These waffles became our tradition. Every time she visits now, it’s “Uncle Beau, waffle time?” That simple bowl of batter connects us, turning an ordinary breakfast into a little ritual of love and laughter. It’s proof that food isn’t just fuel; it’s the glue for our sweetest, syrup-dripped memories.
Your Simple, Soulful Toolkit
Gathering your ingredients is like assembling your breakfast dream team! Here’s what you’ll need (and why each one shines):
- 1½ cups (128g) oat flour (certified GF if needed): The star! Oats add a lovely nutty flavor and natural tenderness. Chef’s Tip: Blitz rolled oats in a blender until fine for instant, budget-friendly flour! Just make sure it’s super fine.
- 2 tsp baking powder: Our fluffy-maker! Gives those waffles their irresistible lift. Must be fresh – test it by stirring ½ tsp into hot water; it should fizz vigorously!
- ½ tsp salt: Balances the sweetness and makes the flavors pop. Don’t skip it!
- Pinch of cinnamon (optional): My favorite cozy upgrade! Adds warmth without overpowering. Swap for nutmeg or cardamom if you’re feeling adventurous.
- ¾ cup room temperature milk (any kind!): Dairy, almond, oat, coconut – they all work! Room temp is key to prevent melted coconut oil or butter from seizing up.
- ¼ cup + 1 tbsp melted coconut oil or 5 tbsp unsalted butter, melted: Creates that dreamy crisp exterior. Coconut oil (refined for neutral taste) is great for dairy-free, while butter adds rich flavor. Let it cool slightly before adding!
- 2 large eggs: The glue! Binds everything and adds structure and fluff. Sub Tip: For vegan, try flax eggs (2 tbsp ground flax + 5 tbsp water, sit 5 mins).
- 2 tbsp maple syrup: Sweetens gently and adds depth. Honey works too, but the flavor changes slightly.
- 1 tsp vanilla extract: The flavor enhancer! Pure vanilla makes it sing.
See? Nothing complicated, just good, honest ingredients ready to transform into breakfast magic. Let’s get mixing!
Let’s Make Some Waffle Magic: Step-by-Step!
Ready to become a waffle wizard? Follow these simple steps – I’ve packed them with my favorite hacks for guaranteed success!
- Preheat Your Waffle Iron: Crank it up to medium-high! A properly hot iron is CRUCIAL for crispness. While it heats (give it a good 5-10 mins), gather your bowls. Chef’s Hack: Place a baking sheet in your oven on its lowest setting to keep cooked waffles perfectly crisp while you finish the batch.
- Whisk the Dry Team: Grab a large bowl and whisk together the oat flour, baking powder, salt, and that optional cinnamon. Whisking = no lumps and even distribution of our fluffy-maker (baking powder!). Set it aside with a smile.
- Unite the Wet Crew: In a medium bowl, combine the room temp milk, slightly cooled melted oil or butter, eggs, maple syrup, and vanilla. Whisk it like you mean it until smooth and gorgeous. Watchpoint: If your melted fat is too hot, it’ll scramble the eggs! Cool it down first.
- The Grand Merge (Gently!): Pour the wet ingredients into the dry. Now, channel your inner zen master: stir with a spatula just until combined. A few lumps? Totally fine! Overmixing = tough waffles. We want tender clouds!
- The Power of Patience (5 mins!): Let the batter sit on the counter. This is non-negotiable magic time! The oats absorb the liquid, thickening the batter for fluffier waffles that won’t stick. Chef’s Secret: This rest also activates the baking powder for maximum lift. Use this time to prep toppings!
- Grease & Glamour: Lightly brush or spray your preheated waffle iron plates with oil or non-stick spray. Do this even if it’s non-stick – oats can be clingy! Reapply between batches if needed.
- Cook to Golden Perfection: Pour the right amount of batter onto the center of the iron (check your iron’s manual for capacity – usually ½ to ⅔ cup). Close the lid and DO NOT PEEK for at least 2-3 minutes! Chef’s Test: Steam slowing down significantly? That’s your cue they’re nearly done. Cook until deeply golden brown and crisp. They release easier when fully cooked!
- Serve the Joy: Use a fork to gently lift the waffle out. Place it directly on that warm baking sheet in the oven if you’re batch cooking. Repeat with the remaining batter, re-greasing as needed.
That’s it! You’ve just crafted waffle greatness. Now, for the best part…
Dress to Impress (Your Taste Buds!)
How you serve these beauties is half the fun! Pile them high – the stackability is real. For the classic: drown them in pure maple syrup and watch it pool in those perfect squares. Feeling fruity? Top with a mountain of fresh berries (strawberries, blueberries, raspberries!) or sautéed cinnamon apples. Craving creamy? A dollop of Greek yogurt or coconut whip adds tangy richness. Nut butter lovers, swirl on some almond or peanut butter before the syrup! For a decadent twist, sprinkle with dark chocolate chips while they’re hot. Serve immediately – that crisp-soft contrast is everything!
Mix It Up! 5 Tasty Twists
These waffles are your blank canvas! Try these easy swaps:
- Berry Blast: Fold 1 cup fresh or frozen blueberries (tossed in 1 tsp oat flour) into the batter after resting.
- Chocolate Chip Celebration: Stir in ½ cup mini chocolate chips (dairy-free if needed) for melty pockets of joy.
- Pumpkin Spice Delight: Add ⅓ cup pure pumpkin puree + 1 tsp pumpkin pie spice to the wet ingredients.
- Protein Power-Up: Stir 2 tbsp vanilla protein powder into the dry ingredients (add an extra splash of milk if batter thickens too much).
- Savory Sensation: Omit the cinnamon, maple syrup, and vanilla. Add ½ cup shredded cheese (cheddar/gruyere), 2 tbsp chopped herbs (chives, parsley), and ¼ tsp garlic powder. Serve with fried eggs!
Beau’s Back-Pocket Waffle Wisdom
Over the years, this recipe has become my trusty sidekick, evolving with every batch. Remember that first panicky oat-blitzing session? Now, I always keep a big jar of homemade oat flour in the pantry – it’s a lifesaver! One hilarious flop involved forgetting the baking powder… let’s just say hockey pucks weren’t on the menu. Lesson learned! The batter thickness can vary slightly depending on your oat flour grind and milk type – if it feels too thick after resting, add a splash more milk. Too thin? Sprinkle in a little extra oat flour. These waffles freeze like a dream too! Cool them completely, layer between parchment paper, and freeze in a zip-top bag. Reheat straight from frozen in the toaster for instant weekday bliss. Honestly, the biggest evolution? Realizing perfection isn’t the goal. A slightly lopsided waffle dripping with syrup and shared with laughter tastes infinitely better than a flawless one eaten alone.
Your Waffle Questions, Answered!
Let’s tackle those common kitchen quandaries:
Q: Can I make the batter ahead of time?
A: I don’t recommend it for the fluffiest results. The baking powder starts working as soon as it gets wet! Mix the dry and wet ingredients separately the night before, then combine and cook in the morning.
Q: Help! My waffles are sticking to the iron!
A> Three likely culprits: 1) The iron wasn’t hot enough before adding batter. 2) It wasn’t greased well enough (reapply between each waffle!). 3) You tried to open it too soon – wait until steam drastically reduces. Also, ensure they’re fully cooked; undercooked waffles stick more.
Q: Why let the batter rest? Can I skip it?
A> Patience, grasshopper! Resting is KEY. It allows the oat flour to hydrate fully, thickening the batter for better structure, fluffiness, and easier release. Skipping it often leads to thinner, gummier waffles that stick. Use the time to brew coffee!
Q: Can I freeze these waffles?
A> Absolutely! It’s my favorite hack. Cool cooked waffles completely on a wire rack. Layer them in a single layer in a freezer bag with parchment between each. Freeze for up to 3 months. Reheat in a toaster, toaster oven, or air fryer until hot and crisp – no thawing needed!
Easy Gluten-Free Oat Waffles
- Total Time: 25 min
Description
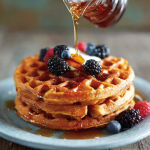
These golden oat waffles are everything breakfast should be—crisp on the outside, fluffy within, and made entirely from simple, gluten-free goodness. Whether you’re serving hungry kids or savoring a solo Sunday, this recipe brings you comfort, crunch, and that maple-syrup magic. With no gums, no gluten, and no guesswork, these waffles are the delicious proof that joy lives in the little things—like a hot waffle iron and a big appetite.
Ingredients
• 1½ cups oat flour (certified gluten-free)
• 2 tsp baking powder
• ½ tsp salt
• Pinch cinnamon (optional)
• ¾ cup milk (any kind, room temp)
• ¼ cup + 1 tbsp melted coconut oil or 5 tbsp butter
• 2 large eggs (or flax eggs)
• 2 tbsp maple syrup
• 1 tsp vanilla extract
Optional Toppings
Maple syrup, berries, nut butter, yogurt, dark chocolate chips
Instructions
-
Heat iron to medium-high. Preheat oven to low and place a baking sheet inside to keep waffles warm.
-
Whisk dry ingredients in a large bowl: oat flour, baking powder, salt, cinnamon.
-
Mix wet ingredients in another bowl: milk, melted oil or butter, eggs, syrup, vanilla.
-
Combine wet and dry gently—don’t overmix! Let batter rest 5 minutes.
-
Grease waffle iron and pour in batter (½–⅔ cup per waffle). Cook until steam slows and waffles are golden and crisp.
-
Keep warm in oven while finishing the batch. Serve hot with toppings of choice!
Notes
– Let batter rest for fluffier waffles and easier release
– Freeze leftovers! Toast from frozen for weekday treats
– Use blender oats for DIY oat flour – budget win!
- Prep Time: 10 min
- Cook Time: 15 min
Nutrition
- Calories: 300 Cal Per Waffle
- Sugar: 5g
- Fiber: 3g
- Protein: 7g
Nourishment Notes (Because You Asked!)
Per large waffle (approx): Calories: ~300 | Protein: ~7g | Fiber: ~3g | Sugar: ~5g (excludes toppings). Made with wholesome oats and minimal added sugar, these offer sustained energy thanks to complex carbs and fiber. Using plant-based milk and oil keeps them dairy-free friendly!
Final Thoughts: More Than Just a Waffle
These gluten-free oat waffles are a quiet rebellion against the idea that “healthy” means sacrificing joy. They’re proof that simplicity—oats, eggs, a touch of sweetness—can create something extraordinary. But beyond the recipe, what I love most is how food becomes a catalyst for connection: the niece who lights up at “waffle time,” the friends gathered around a syrup-drizzled stack, or the quiet morning ritual of savoring a crisp bite with coffee in hand.
So here’s my challenge to you: Make these waffles your own. Burn the first batch (I still do sometimes!). Drench them in absurd amounts of toppings. Share them with someone you love. Because the best recipes aren’t just about ingredients—they’re about the memories you fold into the batter. Now go forth and waffle wildly!