
Easy Apple Crisp: Your New Go-To Warm Hug of a Dessert
Hey friends, Beau here from Feastical! Let’s get real for a second. Is there anything better than the smell of cinnamon and apples wafting through your kitchen? It’s the universal signal that something cozy, delicious, and utterly soul-satisfying is about to happen. That’s exactly why I’m so pumped to share this recipe with you today.
This Easy Apple Crisp is my dessert soulmate. It has all the heartwarming, nostalgic flavor of a classic apple pie, but here’s the kicker—there’s no finicky pie crust involved. Nope. Just a mountain of juicy, spiced apples hidden under a blanket of buttery, crispy, oat-y goodness that bakes up into pure gold. It’s the dessert you can whip up on a busy Tuesday because you deserve a treat, or the showstopper you proudly serve to a table full of friends on a chilly Saturday night.
Whether you’re a seasoned pro who can julienne a carrot in your sleep or you’re just starting your kitchen journey (we’ve all been there—where DOES that spatula go?), this recipe is for you. It’s forgiving, flexible, and designed to make you feel like a rockstar. So, tie on your apron, preheat that oven, and let’s create some magic. This isn’t just dessert; it’s a edible reminder that the best things in life are often the simplest.
The Apple Doesn’t Fall Far From the Tree (Or the Crisp!)
This recipe takes me straight back to my grandma’s linoleum-floored kitchen. She was the queen of “a little of this, a pinch of that” cooking, and her apple crisp was legendary. I remember standing on a wobbly step-stool, “helping” her slice apples (read: eating more than made it into the bowl), and being utterly mesmerized as she used her fingers to work the cold butter into the flour and oats. “The secret,” she’d whisper, like she was sharing state secrets, “is getting it just crumbly enough.”
The real ritual, though, was the waiting. That 45 minutes in the oven felt like an eternity. We’d play cards at the kitchen table, the scent wrapping around us like a promise. When that timer finally dinged, she’d pull out the bubbling, golden dish and, without fail, let me have the first spoonful straight from the corner—blowing on it furiously so I wouldn’t burn my tongue. It was more than sugar and spice; it was love, patience, and the simple joy of creating something wonderful together. Every time I make this crisp, I’m right back there, and I hope this recipe creates a similar warm memory for you.
Gathering Your Apple Crisp Dream Team
Part of the beauty of this dessert is the short, sweet ingredient list. We’re using pantry staples to create something extraordinary. Here’s everything you’ll need, with a few chef-y insights to guide you.
For the Apple Filling:
- 6 medium apples, peeled and sliced – This is where the flavor party starts! I love a mix of Granny Smith (for their tartness and structure) and Honeycrisp or Gala (for their sweetness and softness). Using two types gives you a perfect balance. Chef’s Tip: No need to be perfect! Just slice them about 1/4-inch thick so they cook evenly.
- 1/4 cup granulated sugar – This sweetens the apples and helps pull out their natural juices to create that glorious syrupy filling.
- 1/2 teaspoon ground cinnamon – The classic cozy spice. Don’t be shy here—this is the soul of the filling.
- 1 tablespoon lemon juice – A little bright acid to balance the sweetness and prevent the apples from browning while you prep. Fresh is great, but bottled works in a pinch!
- 1 tablespoon all-purpose flour – Our thickening agent. It soaks up the apple juices as they bake, so you get a luscious sauce, not a soupy puddle. A great gluten-free swap is an equal amount of cornstarch.
For the Buttery Oat Topping:
- 3/4 cup old-fashioned rolled oats – These give the topping its signature hearty texture and crispiness. Quick oats will work but yield a softer, less textured topping. Avoid steel-cut—they won’t cook through.
- 1/2 cup all-purpose flour – The base of our crumble. It creates those irresistible buttery clumps.
- 1/3 cup packed brown sugar – Hello, molasses notes! The brown sugar adds a deep, caramel-like flavor and helps the topping crisp up beautifully. Light or dark both work.
- 1/2 teaspoon ground cinnamon – We’re echoing the flavor in the filling, tying the whole dish together.
- 1/4 teaspoon salt – Do not skip this! Salt is the flavor amplifier. It makes the sweet taste sweeter and the buttery taste richer.
- 1/2 cup (1 stick) COLD butter, cut into small pieces – This is the non-negotiable star. Cold butter is the key to a crisp, not soggy, topping. When the cold butter hits the hot oven, it steams and creates flaky, separate crumbs. I cut it into cubes and then pop it back in the fridge until the very last second.
Let’s Build Some Deliciousness: Step-by-Step
Ready? Let’s turn those ingredients into the cozy dessert of your dreams. I’ll walk you through each step with my favorite kitchen hacks.
- Preheat and Prep. Fire up your oven to 350°F (175°C). Take an 8×8-inch baking dish (or a similar 2-quart dish) and give it a light coating of butter, baking spray, or a quick wipe of oil. This little step guarantees easy serving later—no stuck-on apple casualties! Beau’s Hack: If I’m feeling fancy or serving a crowd, I’ll use a pretty ceramic or cast-iron skillet. It goes straight from oven to table for major “wow” factor.
- Create the Apple Filling. In a large mixing bowl, combine your sliced apples, granulated sugar, cinnamon, lemon juice, and flour. Now, get in there with your (clean!) hands and toss it all together. You want every single apple slice to get a light, friendly coating of the sugary, spiced mixture. This ensures every bite is perfectly balanced. Pour this fragrant apple mountain into your waiting baking dish and spread it into an even layer. Don’t wash that bowl yet!
- Make the Magical Topping. In the same bowl (see? less dishes!), whisk together the oats, flour, brown sugar, cinnamon, and salt. Make sure the brown sugar is broken up and evenly distributed. Now, scatter those cold butter cubes over the top. Here’s the fun part: use a pastry cutter, two forks, or my personal favorite—your fingertips—to work the butter into the dry ingredients. Pinch and rub the mixture between your fingers until it resembles a rough, crumbly texture with pea-sized (and some smaller) butter pieces throughout. The goal is not a uniform paste, but a shaggy, crumbly mess. Those visible butter bits are what will melt and create crispy pockets of joy.
- Assemble and Bake to Golden Perfection. Sprinkle the oat topping evenly over the apples. No need to press it down—let it be fluffy! Slide the dish onto the middle rack of your preheated oven. Now, the hardest part: the wait. Bake for 40-45 minutes. You’re looking for a topping that’s deeply golden brown (almost toasted-looking) and a filling that is visibly bubbling around the edges. That bubble is the sound of success—it means your filling is thick and juicy.
- The Crucial Rest. I know, I know. You want to dive in. But trust me on this: let the crisp rest for at least 15-20 minutes after pulling it from the oven. This allows the bubbling filling to settle and thicken up just enough so that when you scoop it, you get a perfect, cohesive serving and not apple soup. It’s worth the wait, I promise.
How to Serve This Beauty (The Best Part!)
This is where your apple crisp becomes an experience. Sure, you can eat it straight from the dish with a spoon (no judgment here), but let’s talk about elevating the moment.
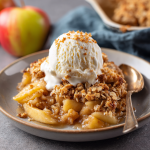
The Classic & Unbeatable: A generous scoop of high-quality vanilla ice cream melting over the warm crisp is a match made in heaven. The hot-and-cold, creamy-and-crispy contrast is everything.
The Cozy Alternative: A dollop of softly whipped cream or a spoonful of thick, tangy Greek yogurt adds a lovely richness and cuts the sweetness perfectly.
For Breakfast? (Yes, Really): Leftover apple crisp is absolutely fantastic reheated and served with a pour of cold milk or a scoop of vanilla yogurt. I fully endorse dessert for breakfast when it involves fruit and oats!
However you serve it, do it warm. That’s when the flavors sing and the textures are at their peak. It’s comfort in a bowl.
Make It Your Own: Delicious Twists & Swaps
One of my favorite things about this recipe is its versatility. Feel free to play and adapt it to your taste or pantry!
- Pear & Ginger Crisp: Swap out half the apples for ripe, peeled pears. Add 1 teaspoon of freshly grated ginger or 1/2 teaspoon of ground ginger to the filling for a bright, zippy twist.
- Berry-Apple Harvest: Add 1 cup of fresh or frozen blueberries or blackberries to the apple mixture. The berries will burst and create a gorgeous, vibrant purple-pink filling.
- Nutty Crunch: Stir 1/2 cup of chopped pecans or walnuts into the oat topping before sprinkling it on. It adds an incredible toasted flavor and extra crunch.
- Gluten-Free & Dairy-Free Friendly: Use a 1:1 gluten-free flour blend in both the filling and topping. For the butter, swap in a high-quality, firm vegan butter stick (keep it cold!). The result is just as delicious.
- Maple Sweetness: Replace the brown sugar in the topping with 1/3 cup of pure maple syrup. You may need to add an extra 2-3 tablespoons of flour to compensate for the extra liquid and keep the topping crumbly.
Beau’s Kitchen Notebook
This recipe has been with me through countless potlucks, holiday feasts, and “I need chocolate—wait, no, apple crisp” moments. It’s evolved from my grandma’s “pinch of this” method to these written-down measurements, but the spirit is the same. Over the years, I’ve learned that the type of apple truly changes the game—tart apples give a more grown-up, complex flavor, while sweet apples feel like instant nostalgia.
A funny story: I once was so eager to make this for a date that I forgot to add the flour to the filling. The result was essentially sweet, spiced apple soup with a floating oat raft. We laughed so hard, ate it with straws (joking, kind of), and it’s still a story we tell. Even the “failures” are memorable. So don’t stress. Cooking is about joy, not perfection. Now, go preheat that oven!
Your Apple Crisp Questions, Answered
Q: Can I make this apple crisp ahead of time?
A: Absolutely! You can assemble the crisp completely (cover tightly) and refrigerate it for up to 24 hours before baking. You may need to add 5-10 extra minutes to the bake time since it’s going into the oven cold. You can also bake it, let it cool completely, cover, and reheat it in a 300°F oven for 15-20 minutes before serving.
Q: My topping is soggy! What happened?
A: The usual suspects: 1) The butter was too soft or melted when you mixed it. Always start with cold butter. 2) The crisp didn’t bake long enough. Ensure the top is a deep golden brown and you see active bubbling around the edges. 3) Let it rest! The filling continues to thicken as it cools outside the oven.
Q: Can I use frozen apples?
A: You can, but don’t thaw them first. Toss the frozen slices directly with the filling ingredients (you might need an extra half-tablespoon of flour) and bake. Expect a slightly more liquidy filling, and potentially a longer bake time.
Q: What’s the best way to store leftovers?
A: Cover the baking dish with foil or transfer leftovers to an airtight container. They’ll keep in the fridge for 3-4 days. Reheat single servings in the microwave for a minute, or reheat the whole dish in a 325°F oven until warmed through.
Easy Apple Crisp : Warm, Classic Dessert with a Buttery Oat Topping
Description
Hey friends, Beau here from Feastical! This Easy Apple Crisp is everything we love about apple pie—warm cinnamon apples, buttery sweetness, and pure nostalgia—without the stress of rolling out dough. Juicy apples bake beneath a golden, oat-studded crumble that’s crisp on top and tender underneath. It’s simple, forgiving, and endlessly comforting, whether you’re baking for guests or just treating yourself on a quiet night in.
Ingredients
Apple Filling
-
6 medium apples, peeled and sliced (Granny Smith + Honeycrisp is ideal)
-
¼ cup granulated sugar
-
½ teaspoon ground cinnamon
-
1 tablespoon lemon juice
-
1 tablespoon all-purpose flour (or cornstarch for gluten-free)
Buttery Oat Topping
-
¾ cup old-fashioned rolled oats
-
½ cup all-purpose flour
-
⅓ cup packed brown sugar
-
½ teaspoon ground cinnamon
-
¼ teaspoon salt
-
½ cup (1 stick) cold butter, cubed
Instructions
-
Preheat oven to 350°F (175°C). Lightly grease an 8×8-inch baking dish.
-
Make the filling
In a large bowl, toss apples with sugar, cinnamon, lemon juice, and flour until evenly coated. Spread into the prepared baking dish. -
Prepare the topping
In the same bowl, mix oats, flour, brown sugar, cinnamon, and salt. Cut in cold butter using fingers or a pastry cutter until the mixture is crumbly with pea-sized butter pieces. -
Assemble & bake
Sprinkle topping evenly over apples. Bake uncovered for 40–45 minutes, until the topping is golden and the filling is bubbling around the edges. -
Rest before serving
Let cool for 15–20 minutes to allow the filling to set.
Notes
-
Use cold butter for a crisp, not soggy, topping
-
Mix apple varieties for balanced sweet-tart flavor
-
Deep golden topping = success — pale topping means underbaked
-
Let it rest so the filling thickens properly
Nutritional Info (Approximate & For Your Info!)
Here’s a general breakdown per serving (based on 6 servings). Remember, this is a treat meant to be enjoyed soulfully!
Calories: ~300 | Total Fat: 12g | Saturated Fat: 7g | Cholesterol: 30mg | Sodium: 150mg | Total Carbohydrates: 48g | Dietary Fiber: 4g | Sugars: 32g | Protein: 2g
Please note: These values are estimates calculated using online tools and will vary based on specific ingredients used (like apple type, butter brand, etc.). For precise dietary needs, use your preferred nutritional calculator with your exact ingredients.
Final Thoughts from My Kitchen to Yours
And there you have it, friends—my heart-on-a-plate, Easy Apple Crisp. This recipe is more than just a list of steps; it’s an invitation to slow down, to create something with your hands, and to fill your home with a smell that feels like a celebration. It’s proof that you don’t need complicated techniques or fancy equipment to make a dessert that people will absolutely rave about.
I hope this crisp becomes a regular in your recipe rotation, a solution for last-minute guests, and a treat that makes an ordinary day feel special. Most of all, I hope you have as much fun making it as I do. Now, go grab that ice cream! And when you make it, tag me over at @Feastical—I’d love to see your masterpiece.
Until next time, keep it simple, keep it soulful, and always keep a fork handy.
– Beau