The Ultimate Easter Dirt Cake: A Fun-Filled, No-Bake Tradition
Hey friends, Beau here from Feastical! Pull up a chair and let’s talk about one of the most joy-sparking, crowd-pleasing desserts to ever grace a spring table: the legendary Easter Dirt Cake. Now, if you’ve never experienced the magic of a dirt cake, you’re in for a treat that’s equal parts delicious and downright whimsical. We’re talking layers of creamy, dreamy chocolate pudding, fluffy clouds of sweetened cream cheese, and that iconic “dirt” made from crushed chocolate cookies. All of it comes together in a no-bake masterpiece that ends with a garden of candy eggs and maybe a marshmallow bunny or two peeking out. It’s the dessert that gets kids (and let’s be honest, adults too) giggling with delight before they even take a bite.
In a season often filled with elaborate meals and fancy pastries, this dessert is our delicious rebellion. It’s unpretentious, it’s playful, and it’s an open invitation to have fun with your food. The best part? You don’t need to be a pastry chef to pull it off. Whether you’re hosting a big Easter brunch, need a showstopper for the school potluck, or just want to make a regular Tuesday feel special, this recipe is your secret weapon. It’s the kind of creation that builds memories – the process of layering the “dirt” and “worms” (well, candy eggs in this case!) is as much a part of the experience as eating it. So, grab your favorite mixing bowl and let’s create a dessert that’s guaranteed to bring smiles, spark conversation, and disappear from the serving dish faster than you can say “Happy Easter!”
Why This Recipe Holds a Special Place in My Kitchen
This recipe takes me straight back to my grandma’s linoleum-floored kitchen, where the rules were simple: if you made a mess, you’d better be creating something wonderful. One rainy spring Saturday, she pulled out a bag of chocolate cookies, a tub of cool whip, and a box of instant pudding. “We’re making mud pies, Beau,” she announced with a wink. My job, as her appointed five-year-old sous-chef, was to annihilate the cookies inside a plastic bag with a rolling pin. Flour flew, crumbs escaped, and I was utterly convinced I was the strongest kid alive. She let me “plant” the jelly bean flowers on top, my tiny fingers pressing them into the creamy layers with utmost seriousness.
When we served it after Sunday dinner, my uncles – normally stoic – cracked huge grins. My aunt pretended to be horrified we’d served actual dirt. The laughter around that table, the shared silliness over a dessert, is what food is all about for me. It wasn’t just a pudding cake; it was an experience, a moment of pure, unadulterated joy. That’s the spirit I want to bring to your table with this recipe. It’s more than ingredients; it’s a ticket to play, to connect, and to create a little delicious mischief together.
Gathering Your “Garden” Ingredients
Here’s everything you’ll need to build your edible Easter garden. Remember, cooking is an adventure, so don’t stress if you need to swap something out—I’ve got your back with tips!
- 400 g (about 36-40) Chocolate Sandwich Cookies: The “dirt”! Classic Oreos are perfect. For a fun twist, try the golden ones for “sandy soil.” Chef’s Insight: Don’t bother removing the cream filling—it just adds to the delicious texture and flavor. A quick pulse in a food processor is my go-zero-effort method.
- 2 boxes (3.4 oz / 96 g each) Instant Chocolate Pudding Mix: The rich, chocolatey layer that holds it all together. Instant is key here—no cooking required. Substitution Tip: Vanilla or butterscotch pudding makes a fantastic “blonde dirt” version!
- 700 ml Cold Milk: Whole milk gives the pudding its luscious, creamy body. Chef’s Hack: The colder the milk, the quicker and thicker your pudding will set. I sometimes pop my milk in the freezer for 10-15 minutes before I start.
- 225 g Cream Cheese, softened: This is the secret weapon for decadence. It adds a tangy depth that balances the sweetness. Pro Tip: Leave it on the counter for a good hour. Truly soft cream cheese blends seamlessly without any lumps.
- 100 g Powdered Sugar: Sweetens and smooths out the cream cheese mixture. Sift it if you have time to avoid any little sugar clumps.
- 225 g Whipped Topping (like Cool Whip), thawed: Adds incredible lightness. Substitution Tip: An equal amount of freshly whipped heavy cream works beautifully. Just whip 1 ½ cups of heavy cream with 2 tbsp of the powdered sugar until stiff peaks form.
- Candy Eggs, Marshmallow Bunnies, Gummy Worms: The Easter parade on top! This is where you and the kids can get creative. Robin’s eggs, speckled malted milk eggs, or even little chocolate bunnies make it festive.
Building Your Easter Masterpiece: Step-by-Step
Alright, team, let’s get our hands dirty (figuratively, of course!). Follow these steps for a foolproof, gorgeous dessert.
- Create the “Dirt”: Toss your chocolate cookies into a food processor and pulse until they resemble rich, dark soil. No processor? No problem! Seal them in a heavy-duty zip-top bag and channel your inner superhero with a rolling pin. Set this delicious dirt aside. Chef’s Hack: Reserve about ½ cup of the finest crumbs for the very top layer—it gives a beautiful, fine “earth” finish.
- Whip Up the Pudding Layer: In a large bowl, whisk both boxes of instant pudding mix with the 700 ml of ICE COLD milk. Whisk for a full two minutes—set a timer! It will seem thin at first but will thicken up right before your eyes. Let it sit for 5 minutes to fully set while you work on the next layer.
- Master the Creamy Cloud: In another large bowl, beat the softened cream cheese with the powdered sugar. Use an electric mixer on medium until it’s completely smooth, fluffy, and no lumps remain. This is crucial for a silky texture. Now, gently fold in the thawed whipped topping (or your freshly whipped cream) with a spatula. Use a folding motion (turn the bowl as you go) to keep it light and airy.
- Marry the Cream and Pudding: Here’s where the magic happens. Add the set chocolate pudding to the cream cheese mixture. Gently fold them together until you have one homogenous, luscious, chocolate-cream dream. No streaks! Be patient and gentle to preserve that fluffy texture.
- The Art of the Layer: Grab your serving dish—a clear glass trifle bowl, a 9×13 pan, or even individual cups. Start with a generous layer of cookie crumbs, patting it down lightly. Follow with a thick layer of your creamy pudding mixture. Repeat! I usually do 2-3 layers of each, always ending with a final dusting of cookie crumbs on top.
- Decorate and Chill: Now for the best part: the Easter garnish! “Plant” your candy eggs, tuck in a few gummy worms, and position your marshmallow bunnies. Then, and this is the hardest part, walk away. Cover it and refrigerate for at least 2 hours, ideally overnight. This chill time lets the flavors meld and the cookies soften just slightly into a cake-like texture. Trust me, it’s worth the wait.
How to Serve Your Easter Dirt Cake
Presentation is half the fun! If you used a clear trifle bowl, you’ve already got a showstopper—just set it in the center of the table. For a 9×13 pan, I love to create a mini “garden scene.” Use extra cookie crumbs to make little dirt mounds, place a few bunny figurines alongside the edible ones, and maybe even add a picket fence cookie for charm. When scooping servings, use a large spoon to dig all the way down, getting every glorious layer in each bite. Serve it in colorful bowls or even brand-new (clean!) terra cotta flower pots lined with foil for the ultimate garden-party vibe. A sprig of fresh mint on the side can add a lovely touch of green. The goal? Make it look as fun and festive as it tastes!
Get Creative: Fun Twists on the Classic
Once you’ve mastered the classic, the garden of creativity is yours to explore! Here are a few of my favorite spins:
- Carrot Patch Cake: Use golden Oreos for “sandy soil.” Mix orange food coloring into some of the cream mixture and pipe little “carrots” on top using a ziplock bag. Use chopped parsley or green licorice for the carrot tops!
- Cookies & Cream Bliss: Fold ½ cup of mini chocolate chips into the pudding mixture and use cookies and cream flavored pudding mix. Top with crushed peppermint patties for a cool twist.
- Peanut Butter Paradise: Add ½ cup of smooth peanut butter to the cream cheese mixture. Use peanut butter Oreos or Nutter Butters for the crumbs, and top with chopped peanut butter cups.
- Dairy-Free/Gluten-Free Garden: Use your favorite gluten-free chocolate sandwich cookies. For the filling, choose dairy-free cream cheese, plant-based milk, and coconut whipped topping. It’s just as delicious and inclusive for all your guests.
- Berry “Dirt” Cake: Make vanilla pudding and fold in 1 cup of finely chopped fresh strawberries. Use crushed graham crackers or vanilla wafers for the “dirt” and top with more berries and a drizzle of white chocolate.
Beau’s Chef Notes & Kitchen Confessions
This recipe has been my reliable joy-bringer for years, and it’s evolved in fun ways. I once, in a pre-coffee haze, accidentally used cooked vanilla pie filling instead of instant pudding. The result was a delicious, albeit *very* firm, “dirt brick.” We still ate it, but lesson learned! Over time, I’ve found that the overnight chill is non-negotiable for the perfect texture. I’ve also learned to double the recipe if kids are involved—it disappears at an alarming rate. The biggest evolution? Letting go of perfection. Some of the best versions have been assembled by tiny hands, with jelly beans buried deep and crumbs everywhere. That’s the real magic. It’s a dessert that encourages play, and that’s something we could all use a little more of.
Your Questions, Answered!
Q: My pudding mixture seems too runny. What did I do wrong?
A: Don’t panic! The most common culprit is not using cold enough milk, or not whisking for the full two minutes. Pop the whole bowl into the fridge for 20-30 minutes; it will continue to set up. Next time, ensure your milk is fridge-cold or even slightly colder.
Q: Can I make this ahead of time?
A> Absolutely, and I highly recommend it! Assemble the cake (without the final candy decorations if they might get soggy) up to 24 hours in advance. Cover and refrigerate. Add the candy eggs and bunnies just before serving so they stay fresh and bright.
Q: What can I use instead of a food processor for the cookies?
A> Your trusty rolling pin and a sturdy zip-top bag are the classic tools! You can also place cookies in a large bowl and use the bottom of a glass or mug to crush them. It’s a great way to release a little stress!
Q: The cream cheese is lumpy in my mixture. How can I fix it?
A> Prevention is key: ensure your cream cheese is truly soft at room temperature. If you have small lumps, you can try to beat the mixture vigorously with your electric mixer. If that doesn’t work, pushing the entire filling through a fine-mesh sieve can save it, though it’s a bit of a task.

Easter Dirt Cake : Fun Layered Pudding Dessert for Kids
Description
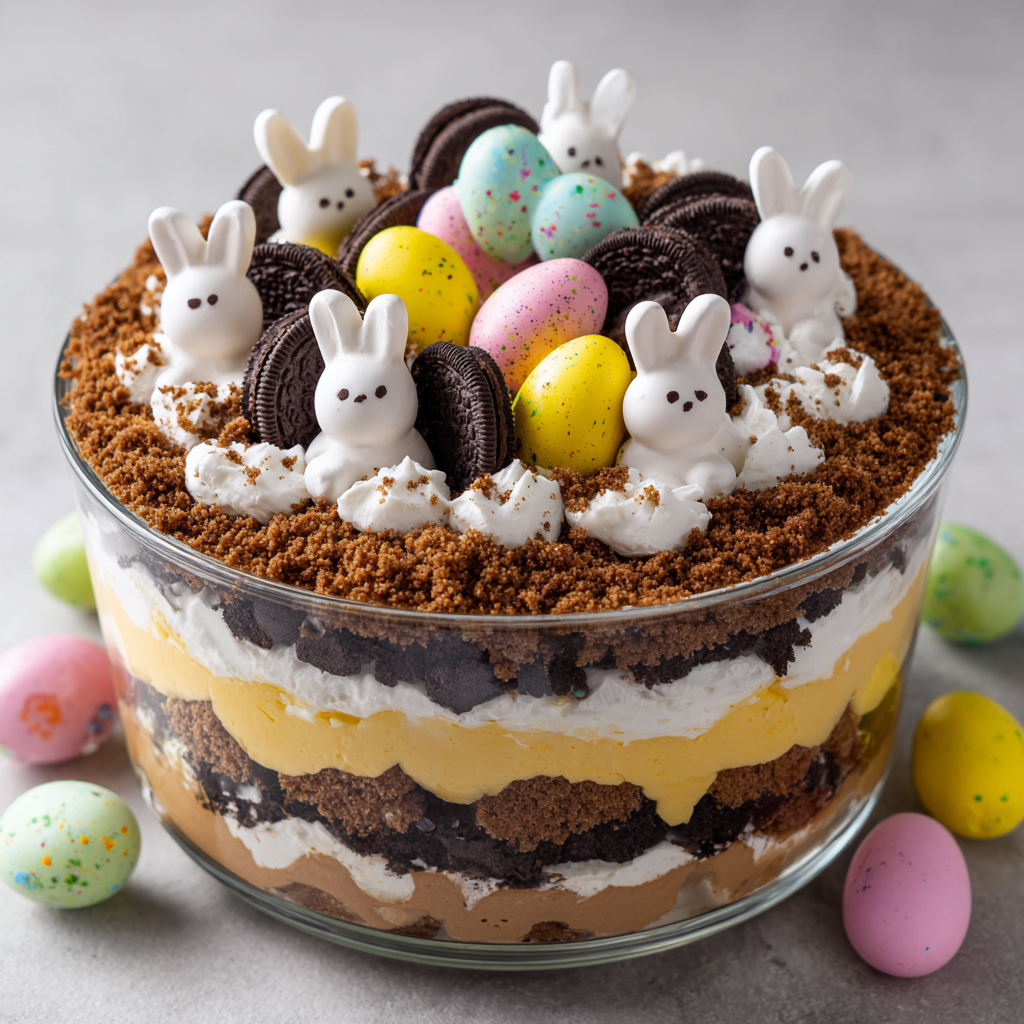
Easter Dirt Cake is one of those playful desserts that’s just as fun to make as it is to eat. With layers of creamy chocolate pudding, fluffy cream filling, and crushed chocolate cookies for the “dirt,” it’s a no-bake treat that always gets smiles. Perfect for Easter tables, family gatherings, or making with kids.
Ingredients
-
400 g (about 36–40) chocolate sandwich cookies
-
2 boxes (3.4 oz / 96 g each) instant chocolate pudding mix
-
700 ml cold milk
-
225 g cream cheese, softened
-
100 g powdered sugar
-
225 g whipped topping (Cool Whip), thawed
or 1½ cups heavy cream, whipped to stiff peaks -
Candy eggs, gummy worms, marshmallow bunnies (for decoration)
Instructions
-
Make the Cookie “Dirt”
Crush cookies in a food processor until fine crumbs form.
(Or place in a zip bag and crush with a rolling pin.) Set aside. -
Prepare the Pudding
In a large bowl, whisk pudding mix with cold milk for 2 minutes.
Let sit 5 minutes to thicken. -
Make the Cream Layer
In another bowl, beat softened cream cheese and powdered sugar until smooth.
Gently fold in whipped topping until light and fluffy. -
Combine
Fold the thickened pudding into the cream mixture until fully blended. -
Layer
In a trifle bowl or 9×13 pan:-
Add a layer of cookie crumbs
-
Add a layer of cream mixture
Repeat layers, finishing with cookie crumbs on top.
-
-
Decorate & Chill
Add candy eggs and decorations.
Cover and refrigerate at least 2 hours (overnight is best).
Notes
-
✅ Use very cold milk so the pudding sets properly.
-
✅ Make sure cream cheese is fully softened to avoid lumps.
-
✅ Chill overnight for the best cake-like texture.
-
✅ Add candy decorations just before serving so they stay colorful.
-
✅ Serve in clear cups or jars for fun individual portions.
Nutritional Information (Approximate)
Okay friends, let’s keep it real—this is a celebratory treat, meant to be enjoyed with joy and in good company. The following is an approximate nutritional breakdown per serving (based on 12 servings), but remember, your specific ingredients (brand of cookies, type of milk) will cause variations. If you have specific dietary needs, please calculate using your exact products.
- Calories: ~360 kcal
- Carbohydrates: 42 g
- Sugars: 28 g
- Fat: 20 g
- Saturated Fat: 11 g
- Protein: 5 g
- Sodium: 280 mg
Dietary Note: This information is provided as a courtesy estimate. For dietary swaps, please see the “Recipe Variations” section for gluten-free and dairy-free options that will alter these values.
Final Thoughts from My Kitchen to Yours
And there you have it—the complete guide to creating an Easter Dirt Cake that’s guaranteed to be the life of your party. More than just a recipe, I hope this gives you a framework for fun, a reason to gather your people around the kitchen counter, and permission to play with your food. The dishes that stick with us through the years aren’t always the most complicated; they’re the ones filled with laughter, shared effort, and a sprinkle of whimsy. This dirt cake is exactly that. So, from my Feastical family to yours, I wish you a spring season filled with delicious moments, messy hands, and hearts as full as your dessert bowls. Now, go make some magic—and save me a bite!