
Cupid’s Marble Cake: Swirled, Sweet & Valentine-Ready
More Than Just a Pretty Face: Your New Go-To Valentine’s Cake
Hey friends, Beau here! Let’s be real for a second. Valentine’s Day can sometimes feel like a lot of pressure, right? Fancy dinners, extravagant gifts… it can be overwhelming. But you know what never lets you down? A homemade cake, baked with a little bit of love and a whole lot of butter. And that’s exactly why I’m so excited to share my recipe for Cupid’s Marble Cake with you today.
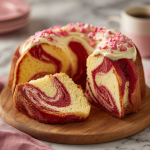
This isn’t just any cake. This is a show-stopping, conversation-starting, “did-you-really-make-that?!” kind of cake. We’re talking a soft, moist, buttery vanilla cake swirled with a gorgeous, vibrant red batter. It’s festive without being fussy, elegant but incredibly easy, and it tastes like a warm, sugary hug. Whether you’re planning a romantic dinner for two, hosting a Galentine’s bash with your besties, or just want to treat yourself because you deserve it (you do!), this marble cake is your perfect partner in crime. So, tie on your favorite apron, preheat that oven, and let’s create some magic that’s as fun to make as it is to eat.
The Cake That Started It All: A Sweet Slice of Memory
This cake takes me right back to my Grandma June’s kitchen. She wasn’t a fancy pastry chef, but boy, could she bake. Her marble cake was legendary. Every Sunday, without fail, one would be cooling on her wire rack, filling the whole house with that sweet, vanilla-kissed aroma. I’d sit at her Formica table, legs swinging, watching with sheer wonder as she’d create those beautiful swirls with nothing more than a butter knife and a steady hand. To me, it was pure wizardry.
She’d always let me have the first slice, still slightly warm from the oven. That first bite was a treasure hunt—would I get more of the classic vanilla or a bite of the deeper, slightly richer chocolate swirl? (Hers was chocolate, my Valentine’s version is a fun, festive twist on her classic). She’d wink and say, “Beau, life is like a marble cake. The best parts are all mixed up together.” This recipe is my love letter to her, to those Sunday afternoons, and to the simple, powerful joy of sharing something delicious with someone you love.
Gathering Your Sweetheart Squad: The Ingredients
One of the best things about this cake is that you probably have most of these ingredients in your pantry right now. It’s all about simple, quality components coming together to create something extraordinary. Let’s break it down.
- 2½ cups all-purpose flour: The trusty foundation of our cake. It gives the crumb that perfect, tender structure. For a slightly lighter cake, you can swap in cake flour, but all-purpose works beautifully.
- 2½ tsp baking powder: Our leavening hero! This is what gives the cake its lift and fluffy texture. Make sure yours is fresh for the best rise.
- ½ tsp salt: Don’t you dare skip it! Salt is the flavor enhancer that makes all the sweet, buttery notes pop. It’s the secret weapon in every baker’s arsenal.
- ¾ cup unsalted butter, softened: This is non-negotiable, friends. “Softened” is the key word here. Leave it on the counter for an hour or so until it’s cool but yields gently to a press. This creams up with the sugar to create an airy, light base for our batter.
- 1¾ cups sugar: For sweetness and that lovely, tender crumb. I use regular granulated sugar here.
- 4 large eggs: Bring these to room temperature, too! Room temp eggs incorporate much more smoothly into the butter and sugar, creating a better emulsion and a loftier cake.
- 1 tbsp vanilla extract: Go for the good stuff! A full tablespoon might seem like a lot, but it gives us that wonderful, warm vanilla flavor that sings through every single bite.
- 1 cup whole milk: I prefer whole milk for its richness, which contributes to a super moist cake. But 2% will work in a pinch. Also, room temp! See a pattern? 🙂
- Red food coloring: This is where the Valentine’s magic happens! I recommend a gel food coloring for a vibrant, bold red without thinning out the batter. You’ll only need a few drops.
Let’s Get Swirling: The Step-by-Step Dance
Ready to play Cupid in the kitchen? Follow these steps, and you’ll have a masterpiece in no time. I’ve packed this section with all my favorite chef hacks to ensure your success.
- Preheat and Prep: First things first, get that oven preheated to a toasty 350°F (175°C). This ensures a consistent temperature from the moment your cake goes in. Now, generously grease your bundt pan or a 9×5 inch loaf pan. I’m a big fan of using a baking spray with flour in it – it’s a lifesaver for easy release! Set your pan aside.
- Whisk the Dry Team: In a medium bowl, grab your whisk and give the flour, baking powder, and salt a good, thorough whisking. We’re not just mixing here; we’re aerating the flour and making sure the baking powder is evenly distributed. This is your first step to a uniform, perfect rise. Set this bowl aside.
- Cream the Butter & Sugar: In a large mixing bowl, beat the softened butter and sugar together. Now, don’t rush this! We’re not just combining them; we’re “creaming” them. Beat on medium-high speed for a good 3-5 minutes, until the mixture turns pale yellow and becomes wonderfully light and fluffy. This process incorporates air, which is crucial for the cake’s texture. This is the heart of the operation, folks.
- Incorporate the Eggs & Vanilla: With the mixer on medium, add the eggs one at a time, beating well after each addition. This prevents the batter from breaking. Then, beat in that glorious tablespoon of vanilla. Scrape down the sides of the bowl with a spatula to make sure everything is homogenous.
- Combine Wet & Dry: Here’s the final mixing phase. With the mixer on low, add about one-third of the dry ingredients, followed by half of the milk. Repeat, ending with the final third of the dry ingredients. Mix just until the flour disappears. Pro-Tip: Overmixing at this stage develops gluten and can lead to a tough cake. A few streaks of flour are okay; we’ll finish mixing when we divide the batter.
- Create the Red Batter: Now for the fun part! Divide the batter evenly between two bowls. Into one bowl, add your red food coloring. I start with a few drops, mix, and then add more until I get that perfect, passionate red hue. Stir gently until the color is fully incorporated.
- The Marbling Magic: Using two spoons or a small scoop, alternate dollops of the red and white batter into your prepared pan. You can be random or create a pattern—there’s no wrong way! Once all the batter is in, take a thin knife or a long skewer and gently swirl it through the batter in a figure-eight or zig-zag motion. Don’t overdo it! 4-5 passes is plenty. We want defined swirls, not a muddy pink cake.
- Bake to Perfection: Slide the pan into your preheated oven and bake for 45-50 minutes. The cake is done when it’s golden on top, pulling away slightly from the sides, and a toothpick inserted into the center comes out clean or with a few moist crumbs. Ovens vary, so start checking at the 40-minute mark.
- The All-Important Cool Down: Once baked, let the cake cool in the pan on a wire rack for 15-20 minutes. This allows the structure to set. Then, carefully invert it onto the rack to cool completely before you even *think* about frosting it. A warm cake will melt your frosting into a puddle!
Dress to Impress: Serving Your Masterpiece
Now that your stunning cake has cooled, it’s time for the finishing touches! I love keeping it simple to let those beautiful swirls take center stage. A simple whipped vanilla frosting piped or spread over the top is just perfect. It’s light, not too sweet, and lets the cake shine. Then, go wild with the decorations! A shower of red and pink sprinkles, a few conversation hearts, or even some fresh raspberries make it look extra special.
For serving, I like to use a serrated knife and a gentle sawing motion to get clean slices that proudly display the marbled interior. Pair each slice with a cold glass of milk, a hot cup of coffee, or even a glass of bubbly prosecco for a truly celebratory feel. This cake is the star of the show, so let it be!
Make It Your Own: Delicious Twists & Swaps
Feel like playing around? This recipe is a fantastic canvas for your creativity. Here are a few of my favorite ways to mix it up:
- Chocolate-Vanilla Classic: Swap the red food coloring for ¼ cup of unsweetened cocoa powder sifted into one half of the batter. Add a tablespoon of extra milk to that portion to keep it the right consistency. Hello, nostalgia!
- Almond Joy Twist: Add ½ teaspoon of almond extract to the white batter and fold a handful of shredded coconut and mini chocolate chips into the red batter before swirling. It’s like a candy bar in cake form!
- Lemon-Raspberry Dream: Add the zest of one lemon to the white batter. For the red batter, use a few tablespoons of raspberry jam instead of food coloring for a natural flavor and color.
- Gluten-Free Friendly: No problem! Use a 1:1 gluten-free all-purpose flour blend. I’ve had great success with this swap, and the results are just as tender.
- Funfetti Valentine: Fold a handful of red and pink sprinkles into the white batter before you divide it. It’s a confetti explosion of joy in every bite!
Beau’s Kitchen Confidential: A Few Parting Tips
This recipe has been a labor of love, and it’s evolved a bit over the years. My first attempt at marbling was… well, let’s just say it looked more like a pink-brown abstract painting than a cake! The key, I learned, is a light hand with the knife. Trust the process.
I also used to be impatient and would frost the cake while it was still warm. The resulting “glaze” was tasty, but not the look I was going for. Letting it cool completely is a game-changer. This cake keeps beautifully in an airtight container at room temperature for several days, if it lasts that long! The flavors actually meld and get even better the next day.
Your Questions, Answered: Cake SOS
I’ve been there, and I’ve got your back. Here are answers to the most common questions I get about this cake.
- Q: My cake is dense and didn’t rise much. What happened?
A: The most common culprits are old baking powder (check the expiry date!), overmixing the batter after adding the flour, or your oven temperature being off. An oven thermometer is a cheap and invaluable tool for any baker!
- Q: How can I get a really vibrant red color?
A: Gel food coloring is your best friend here. Liquid food coloring requires a lot more, which can throw off the liquid balance in your batter. Start with a small amount of gel and build up to your desired shade.
- Q: Can I make this into cupcakes?
A: Absolutely! Line a muffin tin with cupcake liners and fill them ⅔ full. The baking time will be shorter, around 18-22 minutes. Keep a close eye on them!
- Q: My cake stuck to the pan! Help!
A: Oh, the heartbreak! Don’t worry, we’ve all been there. Next time, be extra generous with the baking spray, making sure to get into every nook of the bundt pan. Letting it cool for that 15-20 minutes in the pan is also crucial—it allows the cake to firm up and pull away from the sides naturally.
Cupid’s Marble Cake: Swirled, Sweet & Valentine-Ready
Description
Cupid’s Marble Cake
Ingredients
Dry Ingredients
-
2½ cups all-purpose flour
-
2½ tsp baking powder
-
½ tsp salt
Wet Ingredients
-
¾ cup unsalted butter, softened
-
1¾ cups sugar
-
4 large eggs, room temperature
-
1 tbsp vanilla extract
-
1 cup whole milk, room temperature
-
Red food coloring (gel recommended)
Optional Frosting & Decoration
-
Whipped vanilla frosting
-
Red and pink sprinkles, fresh raspberries, or conversation hearts
Instructions
1️⃣ Prep
-
Preheat oven to 350°F (175°C).
-
Grease a bundt pan or 9×5-inch loaf pan (baking spray with flour recommended).
2️⃣ Mix Dry Ingredients
-
Whisk together flour, baking powder, and salt in a medium bowl. Set aside.
3️⃣ Cream Butter & Sugar
-
In a large bowl, beat butter and sugar 3–5 minutes until pale and fluffy.
-
Add eggs one at a time, then vanilla extract, mixing well.
4️⃣ Combine Wet & Dry
-
On low speed, alternately add flour mixture and milk in thirds, starting and ending with flour. Mix until just combined.
5️⃣ Create Red Batter
-
Divide batter into two bowls.
-
Add red food coloring to one bowl, mixing until fully incorporated.
6️⃣ Marble the Cake
-
Spoon alternating dollops of red and white batter into the pan.
-
Use a knife or skewer to gently swirl 4–5 times, creating defined marbled patterns.
7️⃣ Bake
-
Bake for 45–50 minutes (start checking at 40 minutes).
-
Toothpick should come out clean or with a few moist crumbs.
8️⃣ Cool
-
Cool in pan 15–20 minutes, then invert onto wire rack to cool completely.
9️⃣ Frost & Decorate
-
Spread whipped vanilla frosting over cooled cake.
-
Add sprinkles, raspberries, or conversation hearts for Valentine flair.
Notes
-
Chocolate-Vanilla Twist: Use cocoa powder instead of red food coloring.
-
Almond Joy: Add ½ tsp almond extract to white batter; fold in shredded coconut and mini chocolate chips into red batter.
-
Raspberry-Lemon: Add lemon zest to white batter; fold raspberry jam into red batter.
-
Gluten-Free: Use 1:1 gluten-free flour blend.
-
Cupcake Version: Fill liners ⅔ full; bake 18–22 minutes.
Just the Facts: Nutritional Info*
I believe in balance, friends. Life is about enjoying delicious food, and part of that is being informed. Here’s a rough breakdown per slice (based on 12 slices without frosting). Remember, this is an estimate, and your specific ingredients may vary.
- Calories: 320
- Fat: 14g
- Carbohydrates: 44g
- Sugar: 25g
- Protein: 4g
*This information is approximate and provided for informational purposes only. I’m a chef, not a nutritionist, but I want to give you a helpful guide!
A Sweet Finale
And there you have it! Your guide to creating a truly unforgettable Cupid’s Marble Cake. This recipe is more than just a list of ingredients and steps; it’s an invitation to create, to share, and to make someone’s day a little sweeter. The swirls might not be perfect the first time, and that’s more than okay. It’s the love and the story you bake into it that truly matters.
I’d love to see your beautiful creations! If you make this cake, please share a photo and tag me @FeasticalBeau or use the hashtag #Feastical. You’re not just making a cake; you’re becoming part of our kitchen community. Now go on, preheat that oven and bake someone happy.
With a full heart and an empty mixing bowl,