The Ultimate Party Starter: Crispy Fried Ravioli That’ll Steal the Show
Hey friends, Beau here from Feastical! Let’s talk about one of life’s greatest simple pleasures: that magical moment when you bite into something hot, crispy, and cheesy, and the entire room goes quiet except for the sounds of happy munching. If you’re looking for a guaranteed crowd-pleaser, a recipe that’s equal parts impressive and incredibly easy, you’ve just hit the jackpot. We’re diving fork-first into my recipe for Crispy Fried Ravioli.
Now, I know what some of you might be thinking: “Frying? At home? Beau, that sounds messy!” But trust me on this one. This isn’t a complicated, splatter-filled ordeal. This is about taking a fantastic shortcut (hello, store-bought ravioli!) and transforming it into a golden, crunchy, utterly addictive appetizer that feels straight out of your favorite Italian trattoria. They’re perfect for game day, a fun Friday night with the family, or whenever you need a plate of food that says, “Let’s celebrate!” So, tie on your favorite apron, pour yourself a little something to sip on, and let’s create some kitchen magic together. I promise, these little parcels of joy are about to become your new secret weapon.
A Bite of Nostalgia: My First Taste of Toasted Rav
This recipe always takes me back to a tiny, hole-in-the-wall joint in St. Louis I visited years ago with some college buddies. The place was all checkered tablecloths and the hum of happy conversation. We ordered a plate of something called “toasted ravioli” on a whim, not really knowing what to expect. What arrived were these gorgeous, golden-brown pillows, dusted with parmesan and sitting in a pool of vibrant marinara. One bite and we were absolutely hooked. The contrast of the crunchy exterior giving way to that burst of molten cheese was a revelation.
We ended up ordering two more plates and arguing over the last one. I remember leaning back in my chair, completely satisfied, and thinking, “I have to figure out how to make these at home.” It became a fun mission. I’ve tweaked and tested over the years, but that core memory of shared laughter and incredible flavor is what I try to bake into every batch I make now. It’s more than a recipe; it’s a ticket to that feeling of pure, uncomplicated joy. That’s the spirit I want to bring to your kitchen today.
Gathering Your Golden Goodies: The Ingredients
Part of the beauty of this recipe is its simplicity. You only need a handful of key players to create something truly spectacular. Here’s your shopping list:
- 40 oz refrigerated cheese ravioli: This is our superstar! Using pre-made ravioli is the ultimate time-saver. Look for them in the refrigerated section near the other fresh pasta. Chef’s Insight: Don’t thaw frozen ravioli if you go that route—fry them straight from frozen, just add a minute or two to the cooking time.
- 4 eggs: Our binding agent. They create the glue that helps the breadcrumbs stick for that perfect, even crust.
- 2/3 cup milk: Whisked with the eggs to create an egg wash. This thins it out just enough for a lighter, more manageable coating that doesn’t overwhelm the delicate pasta.
- 4 cups Italian-style breadcrumbs: The source of that iconic crunch and flavor. The Italian seasoning blend (usually with oregano, basil, garlic) is built right in! Substitution Tip: No Italian-style? Use plain breadcrumbs and add 2 tsp of dried Italian herbs, a pinch of garlic powder, and a generous crack of black pepper.
- Oil for frying (vegetable or canola): You’ll need enough to come up about 1.5 inches in your pot or skillet. These oils have a high smoke point, meaning they can get nice and hot without burning. Chef’s Hack: Avocado or peanut oil also work great for high-heat frying.
- 1/2 cup grated parmesan cheese: For finishing! A snowy shower of parm right after frying makes everything better. Use the good stuff from the refrigerated section, not the shelf-stable canister, for the best flavor.
- 2 tbsp chopped fresh parsley: This isn’t just for color (though it adds a beautiful pop!). The fresh, slight bitterness of parsley cuts through the richness of the fried cheese beautifully.
- Marinara sauce, for dipping: The essential sidekick. Use your favorite jarred sauce warmed up, or if you’re feeling fancy, whip up a quick homemade version. It’s the tangy, herby dip that brings the whole dish together.
Let’s Get Frying: Your Step-by-Step Guide to Perfection
Okay, team! Let’s fire up the stove and get these ravioli crisped up to golden perfection. Follow these steps, and you’ll be a frying pro in no time.
- Set Up Your Dredging Station: This is key for an efficient, non-messy process. Get three shallow bowls or plates. In the first, just your ravioli. In the second, vigorously whisk together the eggs and milk until they are completely smooth and unified. In the third, pour your Italian-style breadcrumbs. Line them up: ravioli, egg wash, breadcrumbs. Chef’s Hack: Use one hand for the wet steps (dipping in egg) and your other hand for the dry steps (coating in breadcrumbs). This keeps you from getting “club hands”—fingers completely caked in breading!
- Bread Like a Boss: Working with a few ravioli at a time, gently drop them into the egg wash. Make sure they’re fully submerged. Let the excess drip off, then transfer them to the breadcrumb bowl. Use your dry hand to sprinkle and press the breadcrumbs onto all sides, ensuring a complete, even coating. Place the beautifully breaded ravioli on a clean plate or baking sheet. Repeat until your entire army of ravioli is ready for action!
- Heat the Oil: Pour your oil into a heavy-bottomed Dutch oven or deep, large skillet. You want it to be about 1.5 inches deep. Attach a deep-fry or candy thermometer to the side and heat the oil over medium-high heat until it reaches a steady 350°F (175°C). This is the magic temperature! If you don’t have a thermometer, test the oil by dropping in a single breadcrumb. If it sizzles vigorously and turns golden within 15 seconds, you’re good to go.
- Fry to Golden Glory: Carefully lower a batch of ravioli into the hot oil using a spider strainer or slotted spoon. Don’t overcrowd the pot! This is crucial. If you add too many at once, the oil temperature will plummet, and you’ll end up with greasy, soggy ravioli. We want them to have room to swim. Fry for 2-3 minutes per side, flipping once, until they are a deep, glorious golden brown and incredibly crispy.
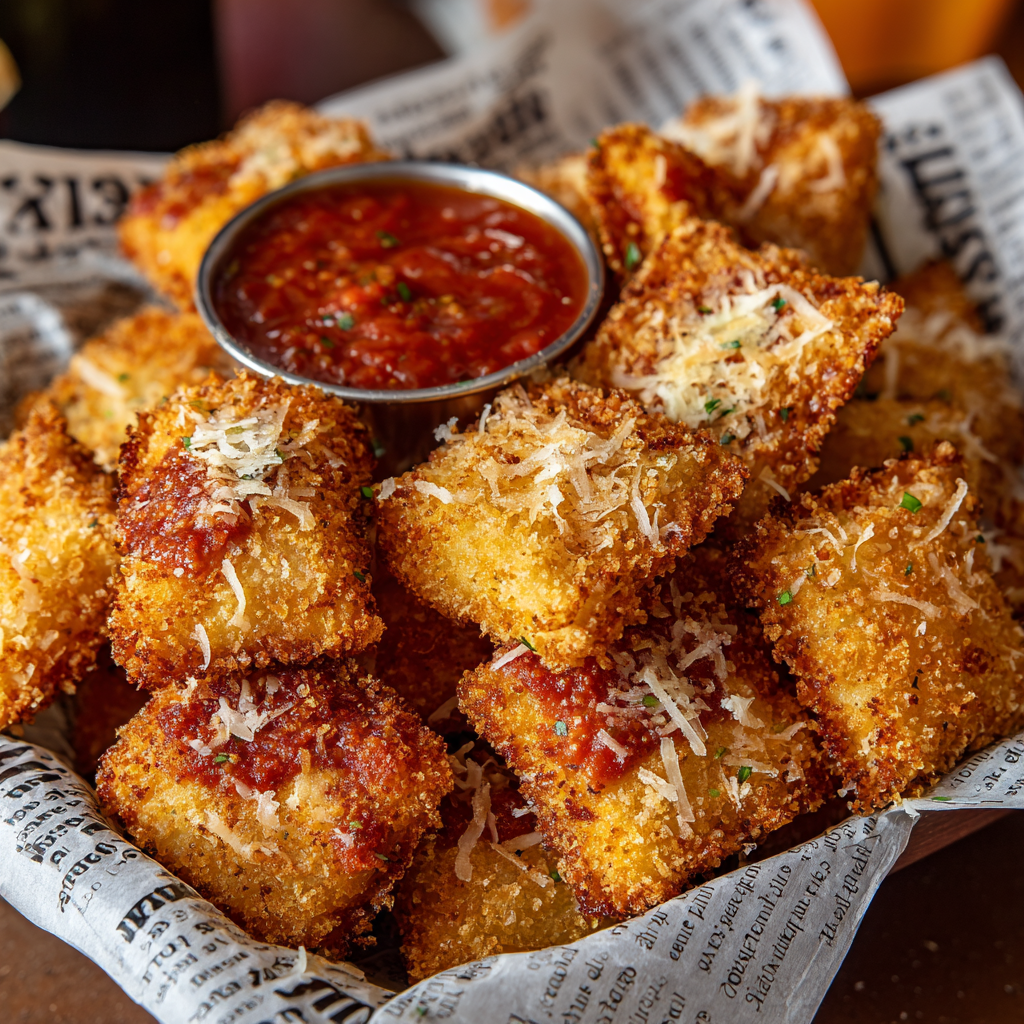
- Drain and Season: Once perfectly fried, use your spider strainer or slotted spoon to lift the ravioli out of the oil, letting any excess oil drip back into the pot. Immediately transfer them to a wire rack set over a baking sheet lined with paper towels. The rack allows air to circulate, preventing the bottom from getting soggy. While they are still piping hot, immediately sprinkle with that glorious grated parmesan and fresh parsley. The heat will help the cheese adhere perfectly.
Plating Up: How to Serve These Golden Gems
Presentation is part of the fun! You’ve created something beautiful, so let it shine. I love serving these family-style on a large, rustic wooden board or a big warm platter. Pile them high so everyone can see what they’re diving into. Pour your warm marinara sauce into a small, cute bowl right in the center of the platter for dipping, or offer a few small ramekins around the table so no one has to reach too far.
This is finger food at its finest, so have plenty of napkins ready! For a full Italian-inspired spread, pair these crispy fried ravioli with a bright, crisp salad to balance the richness, some warm, garlicky breadsticks, and a chilled glass of Pinot Grigio or a light Italian red like Chianti. For a casual night, they’re the perfect centerpiece alongside a big bowl of popcorn and a great movie.
Mix It Up! Delicious Recipe Variations
Once you’ve mastered the classic, the world is your crispy, fried oyster! Here are a few of my favorite ways to mix things up:
- Spicy Kick: Add 1 teaspoon of garlic powder and 1 teaspoon of red pepper flakes directly into your breadcrumb mixture. This gives every single bite a warm, savory heat that’s absolutely irresistible.
- The Variety Pack: Use a mix of cheese, spinach, and meat-filled ravioli! This creates a fun surprise on the platter and caters to all tastes. A three-cheese blend, a veggie option, and a hearty meat option make for a perfect combo.
- Dip Upgrade: While marinara is a classic for a reason, don’t be afraid to experiment! A creamy pesto dip, a spicy vodka sauce, or even a cool, creamy ranch or garlic aioli can be an incredible pairing.
- Zesty Finish: Right after they come out of the fryer, sprinkle them with a little lemon zest along with the parmesan. The bright, citrusy aroma cuts through the richness and adds a whole new dimension of flavor.
- Air Fryer Method: Want a lighter version? You can absolutely make these in an air fryer! Spray the breaded ravioli generously with cooking spray and air fry at 375°F (190°C) for 8-10 minutes, flipping halfway through, until crispy and golden.
Beau’s Chef Notes & Kitchen Stories
This recipe has been a staple in my kitchen for years, and it’s evolved in the funniest ways. I’ll never forget the first time I made them for a big family gathering. I was so focused on frying that I didn’t notice my nephew, about five years old at the time, had set up a “guard post” next to the cooling rack. I’d turn around to fry the next batch, and he’d sneak one. By the time I was done, he’d “sampled” about six of them and had a huge, cheesy grin on his face. Now, I always make a few extra specifically for the kitchen helpers and sneaky taste-testers.
One thing I’ve learned is that the brand of ravioli can make a slight difference. Some have thicker pasta, some thinner. Don’t stress! Just keep an eye on them in the oil. If they’re browning too quickly, lower your heat a touch. The goal is to get the inside molten and hot while the outside achieves that perfect crunch. It’s a dance, and you’ve got the lead.
Your Questions, Answered: FAQs & Troubleshooting
Q: My breading is falling off in the oil! What did I do wrong?
A: This usually happens for one of two reasons. First, the oil might not be hot enough. If the oil isn’t at a steady 350°F, the breading will absorb oil instead of searing instantly, causing it to slip off. Second, make sure you’re letting the excess egg wash drip off before coating in breadcrumbs. Too much egg can act as a slippery layer.
Q: Can I make these ahead of time?
A: You can bread them ahead of time! After coating them in breadcrumbs, place them in a single layer on a baking sheet, cover with plastic wrap, and refrigerate for up to 4 hours before frying. This can actually help the coating set. I don’t recommend frying them too far in advance, as they are truly best served immediately.
Q: My ravioli are browning but the cheese inside isn’t melting.
A: Ah, the oil is likely too hot! The outside is cooking too fast before the heat can penetrate to the frozen or cold filling. Reduce the heat a bit to around 325°F (160°C) and try frying for a minute longer. It’s a balancing act between a crispy exterior and a hot, melted interior.
Q: How do I reheat leftovers and keep them crispy?
A: The oven or air fryer is your best friend here. Never the microwave—it will make them soft and chewy. Spread leftovers on a baking sheet and bake at 375°F (190°C) for 5-8 minutes, or air fry at 375°F for 3-4 minutes, until hot and re-crisped.

Crispy Fried Ravioli – Golden, Cheesy & Crowd-Pleasing
Description
Hey friends! Let’s talk about that magical moment when you bite into something hot, crispy, and cheesy, and the whole room goes quiet except for happy munching. If you’re looking for a guaranteed crowd-pleaser that’s easy, impressive, and utterly addictive, you’ve just hit the jackpot. Today, we’re making Crispy Fried Ravioli—golden, crunchy, and perfectly melty inside.
Ingredients
For the Fried Ravioli
-
40 oz refrigerated cheese ravioli (frozen works too—just fry straight from frozen)
-
4 eggs
-
2/3 cup milk
-
4 cups Italian-style breadcrumbs (or plain breadcrumbs + 2 tsp dried Italian herbs, pinch of garlic powder, black pepper)
-
Oil for frying (vegetable, canola, avocado, or peanut)
For Finishing
-
1/2 cup grated parmesan cheese
-
2 tbsp chopped fresh parsley
-
Marinara sauce, for dipping
Instructions
1. Set Up Your Dredging Station
Use three shallow bowls:
-
Ravioli
-
Egg wash (eggs + milk, whisked smooth)
-
Breadcrumbs
Pro Tip: One hand for wet, one for dry—no sticky fingers!
2. Bread the Ravioli
-
Dip each ravioli in egg wash, letting excess drip off.
-
Coat thoroughly with breadcrumbs.
-
Place on a clean plate or baking sheet. Repeat for all ravioli.
3. Heat the Oil
-
Use a heavy-bottomed skillet or Dutch oven with 1.5 inches of oil.
-
Heat to 350°F (175°C). Test with a breadcrumb—it should sizzle and brown in ~15 seconds.
4. Fry to Golden Perfection
-
Fry in batches, 2–3 minutes per side, until deep golden and crispy.
-
Drain on a wire rack over a paper-towel-lined baking sheet.
5. Finish & Serve
-
While hot, sprinkle with parmesan and parsley.
-
Serve family-style on a platter with warm marinara in the center.
Notes
-
Rustic wooden boards or big platters look beautiful.
-
Pair with a crisp salad, garlic breadsticks, or a light Italian wine for a full Italian-inspired spread.
-
Perfect as finger food—napkins are essential!
Nutrition
- Calories: 260 Cal
- Fat: 14g
- Carbohydrates: 25g
- Protein: 9g
A Quick Note on Nutrition
Hey, we’re all about balance here at Feastical! While these crispy fried ravioli are definitely an indulgent treat, it’s helpful to know what you’re enjoying. The estimated nutritional info per serving (about 4-5 ravioli) is roughly:
Calories: 260 | Fat: 14g | Carbs: 25g | Protein: 9g | Sodium: Moderate
Remember, these are estimates and can vary based on the specific brands of ingredients you use, how much oil is absorbed, and your portion size. The key is to enjoy them mindfully as part of a fun gathering or a special meal! Pairing them with a fresh salad or veggie platter can help create a more rounded eating experience.
Final Thoughts: Your New Go-To Party Recipe
And there you have it, my friends! Your complete guide to creating insanely delicious, crispy fried ravioli that will have everyone asking for the recipe. This dish is proof that you don’t need to be a professional chef to create restaurant-quality magic in your own kitchen. It’s about good ingredients, a few simple techniques, and the intention of sharing something wonderful with the people you love.
I hope this recipe brings as much laughter and empty plates to your table as it has to mine. Remember, cooking is an adventure—don’t be afraid to get a little sizzle in your life! If you make them (and I really hope you do), tag me @Feastical on social media so I can see your beautiful creations. Now, go forth and fry!