
Easy Easter Trifle Dessert with Colorful Cake and Creamy Layers
Hey friends, Beau here from Feastical! Is there anything better than a dessert that’s both a total showstopper and secretly easy to pull off? I don’t think so. That’s exactly why this Colorful Easter Trifle has become my go-to for spring celebrations. We’re talking layers of soft, pastel-hued cake, a cloud-like creamy filling, and all the festive vibes your table can handle.
This isn’t just a dessert; it’s an experience. It’s the “ooh” and “aah” moment when you bring it to the table. It’s the fun of getting creative with food coloring. And most importantly, it’s the joy of digging into a spoonful that tastes like a celebration. Whether you’re hosting a big family Easter brunch or just want to bring a little extra sunshine to your week, this trifle is your ticket. So, tie on your favorite apron, cue up some good music, and let’s make something magically delicious together. Trust me, this is one recipe where playing with your food is not only allowed – it’s encouraged!
A Dessert That Sparked a Family Tradition
This recipe takes me straight back to my grandma’s kitchen, which was always buzzing before a holiday. One Easter, when I was about ten, she decided we were going to make a “rainbow cake.” Well, let’s just say our ambitious layer cake turned out… a bit lopsided. But my grandma, never one to waste a single crumb of something sweet, looked at our colorful, leaning tower of cake and declared, “We’re not making a cake, Beau. We’re making a parfait!”
She grabbed her big glass bowl, crumbled up those pastel cake layers, and layered them with whatever whipped cream and berries she had. That accidental trifle was the hit of the dinner. It was messy, it was vibrant, and it was made with a whole lot of love (and a little improvisation). This recipe is my polished, cream-cheese-enriched homage to that day. It captures that same spirit of playful, colorful, shareable joy. It proves that sometimes the best memories – and the best desserts – come from happy little kitchen “oops” moments.
What You’ll Need to Build Your Easter Masterpiece
Here’s your shopping list! I’ve added my little chef notes next to each one because knowing the why makes you a more confident cook.
- 2 boxes of white cake mix (plus required ingredients: Usually oil, water, and eggs. White cake is our perfect blank canvas for those beautiful pastel colors. Feel free to use your favorite from-scratch vanilla cake recipe if you prefer – you’ll need enough batter for two 8-inch rounds.
- Gel food coloring in Red, Blue, Yellow, & Green: I strongly recommend gel colors over liquid. They’re more potent, so you need less, and they won’t throw off the consistency of your batter. They give you those vibrant, bakery-style hues without any fuss.
- 8 oz whipped cream cheese, softened: The “secret weapon” in our filling! It adds a tangy depth and incredible stability that plain whipped cream can’t match. Full-fat is best for flavor and texture. Make sure it’s truly softened to room temp so it blends seamlessly.
- 1 can (14 oz) sweetened condensed milk: This is the sweet, rich, sticky-smooth glue that holds our creamy filling together. It’s non-negotiable for that classic, lush trifle texture. Don’t substitute evaporated milk – it’s not the same!
- 12 oz Cool Whip, thawed: The fluffy foundation of our filling. Using Cool Whip keeps it stable and easy. For a from-scratch vibe, you can substitute with an equal amount of homemade stabilized whipped cream (heavy cream whipped with a little sugar and a splash of vanilla).
Let’s Build It, Layer by Beautiful Layer
Alright, team! This is where the magic happens. We’re baking, coloring, and assembling. Read through once, then just have fun with it.
Step 1: Bake Your Rainbow of Cakes
Prepare your two cake mixes according to the package directions. Now, here’s the fun part: divide the total batter evenly among four separate bowls.
Chef Beau’s Color Mixing Guide:
Purple: 6 drops red + 5 drops blue gel color.
Yellow: 5 drops yellow gel color.
Pink: 6 drops red + 1 tiny drop blue gel color (the blue knocks it back from orange to a perfect pink).
Blue: 4 drops blue + 2 drops green gel color (this gives it a lovely Easter egg aqua tone).
Stir each thoroughly until the color is uniform. Don’t be shy – get those colors bright!
Pour each colored batter into its own greased 8-inch round cake pan. Bake according to the mix’s time (usually 23-28 minutes), but start checking early. A toothpick inserted in the center should come out clean. Let the cakes cool completely in the pans on a wire rack. Pro Hack: Once cool, you can pop them in the freezer for 30 minutes. This makes them much easier to crumble neatly!
Step 2: Whip Up the Dreamy Filling
In a large mixing bowl, beat the softened cream cheese with an electric mixer until it’s smooth and fluffy, about 1 minute. Scrape down the sides. With the mixer on low, slowly pour in the entire can of sweetened condensed milk. Beat until it’s completely combined and silky.
Now, gently fold in the thawed Cool Whip. I use a big rubber spatula and a “fold and turn” motion to keep all that airy fluffiness. Mix just until no white streaks remain. You should have a big bowl of luscious, spreadable cream. Cover and pop it in the fridge while you handle the cake.
Step 3: The Grand Assembly (The Best Part!)
Take your cooled cakes and crumble them with your hands into a large bowl. You want a mix of chunkier pieces and finer crumbs for great texture. Before you start layering, set aside about ¼ cup of each cake color in small separate piles for your garnish.
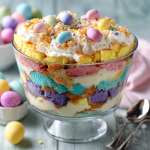
Grab your large, clear trifle bowl (the show is in the layers!). Start with a generous scoop of the cream mixture on the very bottom – this anchors everything. Then, add your first layer of cake crumbs. I like to go in rainbow order: purple, then yellow, then pink, then blue. Press the crumbs down gently. Add another thick layer of cream, spreading it to the edges so the colors show.
Repeat! Cake, cream, cake, cream. Build it up until you run out, finishing with a beautiful, swoopy top layer of the cream filling. Now, artfully sprinkle your reserved cake crumbs on top. You can make stripes, a color burst, or just a joyful confetti sprinkle.
Step 4: The Patient Part (It’s Worth It!)
Cover the trifle tightly with plastic wrap and refrigerate for at least 3-4 hours, ideally overnight. This waiting time is crucial. It lets the cake soften just enough and allows all the flavors to marry into one incredible, cohesive dessert.
How to Serve Your Easter Showstopper
Presentation is everything with a trifle! Use a large, clear-glass serving spoon to dig all the way down to the bottom, so each serving gets every glorious layer. For individual servings, use pretty clear glasses or mason jars to build mini trifles – kids love having their own personal rainbow.
I love to add a few fresh touches right before serving. A scattering of fresh berries (strawberries, raspberries, blueberries) adds a pop of freshness. A few sprigs of mint makes it look extra elegant. And if you really want to go for it, a light dusting of powdered sugar over the top looks like a spring morning frost. Place it right in the center of your table and watch the smiles appear.
Make It Your Own: Fun Twists & Swaps
One recipe, endless possibilities! Here are a few ways to play with your trifle:
- Lemon Berry Bliss: Add 2 teaspoons of lemon zest to the creamy filling. Between the cake layers, add fresh raspberries or blueberries. The citrus brightens up the whole dessert.
- Spring Confetti: Skip the solid colored layers and make one big batch of “confetti” cake! Mix a few drops of each color into one bowl of batter for a swirled, tie-dye effect before baking.
- Angel Food Lighten-Up: Use a store-bought or homemade angel food cake instead of white cake. Tear it into pieces. The result is lighter and airier, and the colors still look gorgeous against the white cake.
- Dairy-Free Delight: Use a vegan cake mix, dairy-free cream cheese, coconut whipped topping, and a can of full-fat coconut milk (chilled, the solid part only) mixed with sugar as a swap for sweetened condensed milk.
- Cookie & Cream: For a non-cake version, use crumbled pastel-colored Oreos or shortbread cookies as your layers. So simple and so good.
Beau’s Kitchen Confidential
This recipe has evolved so much since that first lopsided cake with my grandma. The cream cheese filling was my own addition – I found it held up better for a crowd and had that perfect sweet-and-tangy balance. A funny note: one year, I got a little too enthusiastic with the blue food coloring and ended up with a slightly Smurf-esque layer. The lesson? Always add color gradually! No one has ever complained, though. In fact, the more colorful, the more kids (and let’s be honest, adults) seem to love it. This trifle is forgiving, flexible, and full of joy. That’s what Feastical is all about.
Your Questions, Answered
Q: Can I make this ahead of time?
A: Absolutely! In fact, I recommend it. Assemble the trifle the night before, cover, and refrigerate. The flavors blend and the texture becomes perfect. It’s the ultimate stress-free holiday dessert.
Q: My filling seems runny. What happened?
A: This usually means the cream cheese wasn’t fully softened or the Cool Whip wasn’t completely thawed. If it’s too runny to layer nicely, just pop the whole bowl of filling into the fridge for 30 minutes to firm up before assembling.
Q: I don’t have four 8-inch pans. Can I still make it?
A: Yes! You can bake the colors in batches, washing the pan in between. Just let the pan cool completely before re-greasing and adding the next batter. Or, bake all the batter in a 9×13 sheet pan, then cut it into quarters to color each quarter separately in a bowl (this is a bit more work but totally doable!).
Q: How long will leftovers last?
A: Covered tightly in the fridge, your trifle will stay delicious for 3-4 days. The cake will continue to soften, but it’s still a delightful treat.
Colorful Easter Trifle Dessert Recipe
Description
Easy Easter Trifle Dessert with Colorful Cake and Creamy Layers
Looking for a spring dessert that gets big “wow” reactions but is actually simple to make? This Easy Easter Trifle is your answer. With soft pastel cake, fluffy cream layers, and a bright, festive look, it’s perfect for Easter brunch, family gatherings, or any spring celebration. It’s also make-ahead friendly — which means less stress and more fun.
Ingredients
Cake Layers
-
2 boxes white cake mix (plus eggs, oil, and water as package directs)
-
Gel food coloring: red, blue, yellow, green
Creamy Filling
-
8 oz cream cheese, softened
-
1 can (14 oz) sweetened condensed milk
-
12 oz whipped topping (like Cool Whip), thawed
Optional Garnish
-
Fresh berries
-
Easter candy or sprinkles
-
Mint leaves
-
Powdered sugar dusting
Instructions
1️⃣ Color and Bake the Cakes
-
Prepare cake batter according to package directions.
-
Divide batter evenly into 4 bowls.
-
Tint each bowl with gel food coloring to create pastel shades (pink, yellow, purple, blue, etc.).
-
Pour into greased pans (8-inch rounds or bake in batches if needed).
-
Bake according to package time.
-
Cool completely. For easier crumbling, chill or freeze cakes 20–30 minutes.
2️⃣ Make the Cream Layer
-
Beat softened cream cheese until smooth.
-
Slowly mix in sweetened condensed milk until silky.
-
Gently fold in whipped topping until fully combined.
-
Refrigerate while preparing cake.
3️⃣ Crumble the Cake
-
Break each colored cake into chunks and crumbs.
-
Reserve a small handful of each color for the top garnish.
4️⃣ Assemble the Trifle
In a clear trifle bowl or large glass dish:
-
Spread a layer of cream on the bottom.
-
Add a layer of mixed cake crumbs (or color-by-color stripes).
-
Add another cream layer.
-
Repeat layers until used up.
-
Finish with cream on top.
-
Sprinkle reserved colored crumbs over the top.
5️⃣ Chill
-
Cover and refrigerate at least 3–4 hours (overnight is even better).
This helps the layers soften and the flavors blend.
Notes
-
Use a deep spoon to scoop all layers in each serving.
-
Add fresh berries or candy eggs right before serving.
-
For parties, build mini trifles in clear cups or jars.
A Note on Nutrition
Let’s keep it real, friends: this is a celebratory, special-occasion dessert meant to be shared and savored. The nutritional information provided is for the recipe as written, making about 12 generous servings. It’s rich, sweet, and indulgent – and that’s okay! For those looking to lighten it up, please see the variations above (like using angel food cake or incorporating fresh fruit). Remember, food is about joy and connection, especially around the holidays. Enjoy a slice, share it with people you love, and savor every colorful bite.
- Servings: 12
- Prep Time: 30 minutes
- Chill Time: 3-4 hours (or overnight)
- Calories per Serving: ~1716 kcal*
- Carbohydrates: 313g | Protein: 22g | Fat: 44g | Sugar: 166g
*Please note: This is a large, celebratory dessert. Nutritional info is an estimate from a third-party calculator based on specific brands used. Values can vary widely.
Final Thoughts from My Kitchen to Yours
And there you have it – my heart-on-a-plate (or rather, in a bowl) Easter Trifle. It’s more than just a dessert recipe; it’s an invitation to be playful, to create something beautiful with your hands, and to share a whole lot of sweetness. I hope this recipe becomes a part of your family’s traditions, sparking its own funny stories and happy memories.
If you make it (and I truly hope you do!), tag me @Feastical or use #FeasticalEaster so I can see your beautiful creations. Nothing makes me happier than seeing your kitchen wins. From my festive table to yours, have a wonderful, delicious, and joy-filled Easter. Now, go grab that trifle bowl and get layering!
Happy Cooking,
Beau Collier