Coconut Cream Bunny Parfaits: Your New Favorite Easter Tradition
Hey friends, Beau here from Feastical! Can you smell it? That soft, sweet hint of coconut and vanilla floating from the kitchen, mixed with the excited chatter of your favorite people gathered around the table. That’s the sound and scent of a holiday memory in the making, and I’m absolutely here for it. Easter, for me, has always been less about formality and more about pure, unadulterated joy—the pastel colors, the hopeful spring sunshine, and, let’s be real, the absolutely epic desserts.
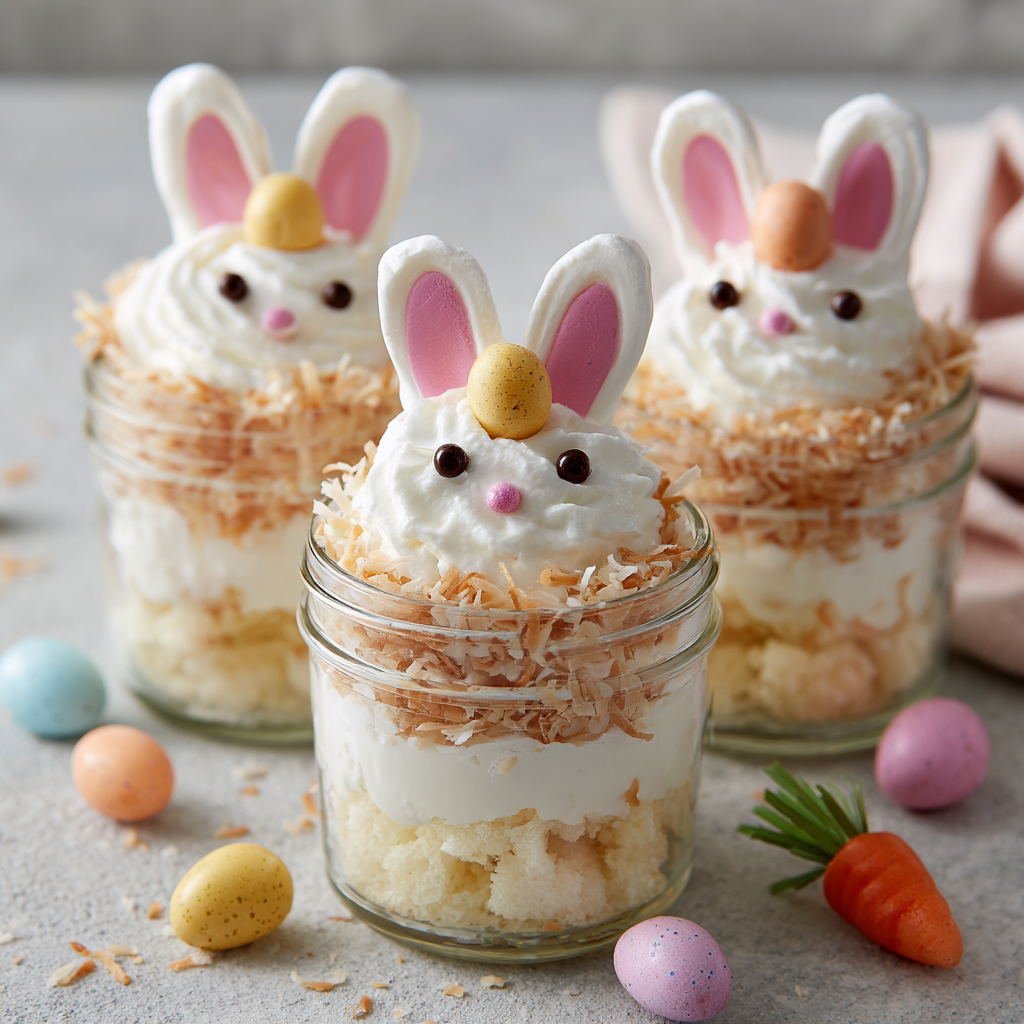
But I know what you’re thinking: “Beau, I want to make something show-stopping, but I don’t have all day to fuss with complicated pastry.” My friend, that is exactly why I created these Coconut Cream Bunny Parfaits. We’re talking individual jars of happiness: layers of fluffy coconut cream, soft vanilla cake, and billowy whipped cream, all topped with a playful bunny hiding in toasted coconut “grass.” It’s a dessert that looks like you fussed for hours, but secretly comes together with a wink and a smile. It’s the perfect project to do with helpers of all ages, and the final “ta-da!” moment when you set them on the table is pure magic. So, grab your favorite mixing bowl and let’s make an Easter treat that’s as fun to create as it is to devour.
The Bunny That Started It All
This recipe takes me right back to my grandma’s linoleum-tiled kitchen. Every Easter, alongside the glorious glazed ham, she’d make her famous “Bunny Trifle” in this giant, clear glass bowl she called her “showpiece.” Us kids would press our noses against the fridge door, watching the layers magically appear throughout the day. She’d let me sprinkle the bright yellow “peeps” on top, a responsibility I took very seriously. It wasn’t just a dessert; it was the centerpiece of our celebration, the sweet promise that the meal was almost ready.
These parfaits are my personal spin on her masterpiece. I’ve swapped the big bowl for personal jars (no fighting over who got the corner piece with the most topping!), traded the sometimes-too-sweet peeps for simple homemade marshmallow ears, and infused that creamy layer with my love for tropical coconut. It’s a nod to her tradition, but with a Feastical twist. Every time I layer one up, I can almost hear her saying, “Don’t skimp on the whipped cream, Beau!” Wise words to live by.
Gathering Your Bunny Brigade: Ingredients & Insights
Here’s the crew you’ll need to summon these adorable desserts to life. I’ve added my little chef’s notes because knowing *why* we use something is just as important as the *what*.
- Coconut Pudding (2 cups, prepared): The star of the show! Using a good-quality instant pudding mix is a total weeknight win, but if you’re feeling fancy, a homemade pudding with real coconut milk will send the flavor into the stratosphere. Chef’s Tip: For extra coconut punch, use coconut milk instead of regular milk to prepare your instant pudding.
- Vanilla Cake Cubes (3 cups): The soft, comforting base. A store-bought angel food or pound cake works beautifully here—no shame in that game! Want to go homemade? My one-bowl vanilla cupcake recipe (baked in a 9×13 pan) is perfect. Day-old cake actually works best, as it soaks up the creamy layers without getting mushy.
- Sweetened Whipped Cream (2 cups): Our cloud layer. I highly recommend whipping your own heavy cream with a bit of sugar and vanilla. The texture and flavor are incomparable. Chef’s Hack: Chill your bowl and whisk attachment for 10 minutes before whipping. You’ll get stiffer peaks in half the time!
- Shredded Coconut, Toasted (1 cup): This is our “grass” and it brings essential texture and a nutty depth. Toasting is non-negotiable—it transforms chewy coconut into a fragrant, golden crunch.
- Large Marshmallows & Pink Decorating Sugar/Candy Melts: The bunny ears! Large marshmallows are the perfect canvas. The pink sugar adds that iconic touch. In a pinch, a tiny drop of pink food gel works too.
- Mini Chocolate Eggs: The final festive sprinkle. They add little pops of color and a delightful chocolatey surprise. Use your favorite brand—cadbury mini eggs, robin’s eggs, or even pastel M&Ms all work wonderfully.
Let’s Build Some Bunny Magic: Step-by-Step
Alright, team! Let’s roll up our sleeves and create some edible art. This is where the fun really begins.
- Toast Your “Grass”: Preheat your oven to 325°F (160°C). Spread your shredded coconut in a thin layer on a baking sheet. Pop it in for 5-7 minutes, but stay close! Stir it once halfway through. You’re looking for a light, even golden brown, not deep amber. It can burn in a heartbeat. Once perfect, pull it out and let it cool completely on the sheet. This is your first layer of flavor—toasted, nutty, and ready to crunch.
- Create the Bunny Ears: Grab your large marshmallows and a clean pair of kitchen scissors. Snip each one diagonally from one top corner to the opposite bottom corner. You’ll get two perfect, plump ear shapes. Now, for the cute pink detail: pour a little pink decorating sugar onto a small plate. Simply press the sticky, cut side of each marshmallow ear into the sugar. If using candy melts, melt a small amount and brush a pink line onto each ear. Let them set on a piece of parchment paper. Look at you, already a candy sculptor!
- Master the Layering: This is the zen part. Grab your clear jars, glasses, or even sturdy plastic cups. Start with a base layer of vanilla cake cubes—gently press them down just a bit. Next, spoon a generous layer of your coconut pudding. Follow that with a fluffy dollop of whipped cream. Repeat if your jar is tall enough! The key is to create distinct, visible stripes. I like to finish with the whipped cream layer to create a perfect “canvas” for our toppings.
- The Grand Decoration: Here comes the “awww” moment. Take a big pinch of your cooled toasted coconut and sprinkle it liberally over the whipped cream top to create a nest of grassy goodness. Gently press your two marshmallow ears into the “grass” near the edge of the jar. Finally, scatter a handful of mini chocolate eggs around, as if your bunny is guarding its treasure.
- The Patient Chill: I know it’s tempting to dig right in, but trust me on this one. Cover the parfaits loosely and let them chill in the fridge for at least an hour. This allows the layers to settle, the cake to get beautifully soft, and the flavors to become best friends. It’s the secret to that perfect, cohesive bite.
Presenting Your Easter Masterpiece
Presentation is half the fun! Line these parfaits up down the center of your Easter table for a stunning centerpiece. Tie a pastel ribbon or twine around each jar neck and tuck a sprig of fresh mint or a tiny faux flower into the bow. For a casual brunch, set each one on a small napkin-lined plate with a pastel spoon tucked alongside. The beauty is in the individual serving—no slicing, no serving fuss, just pure, portable delight. Watch as your guests peek into the jars, smiling before they even take a bite. That’s the Feastical feeling right there.
Make It Your Own: Delicious Twists & Swaps
Love the idea but want to mix it up? Go for it! Cooking is about creativity.
- Lemon Berry Bliss: Swap the coconut pudding for lemon curd or lemon pudding. Use lemon pound cake cubes and layer in fresh raspberries or blueberries. Top with lemon zest in the whipped cream.
- Chocolate Carrot Patch: Use chocolate pudding and chocolate cake cubes. Mix a tablespoon of orange zest into the whipped cream. For the “grass,” use crushed chocolate wafer cookies or Oreo crumbs, and top with candy carrots instead of eggs!
- Tropical Escape: Add a layer of diced mango or pineapple between the cake and pudding. Use toasted *sweetened* coconut for an extra caramelized grass.
- Adult Elegance: Fold a tablespoon of Malibu rum or coconut liqueur into the pudding. A drizzle of dark chocolate sauce over the top layer adds sophistication.
- Dietary-Friendly: Use your favorite gluten-free cake and ensure your pudding mix is gluten-free. For a dairy-free version, use coconut whipped cream and ensure your pudding is made with coconut or almond milk.
Beau’s Kitchen Confidential
This recipe is a living, breathing thing in my house. One year, I was out of marshmallows and in a panic, I used halved strawberries as ears—it was a huge hit and looked so fresh! Another time, my nephew decided the bunnies needed “faces,” so we dotted on little eyes and mouths with melted chocolate. It was messy and perfect. The point is, don’t stress over perfection. The first time I made these, I was so focused on neat layers that I forgot to toast the coconut. We ate it anyway, and you know what? It was still delicious. Let the recipe be a guide, not a rulebook. The real magic is in the laughter and stories you share while you’re making them.
Your Questions, Answered
- Q: Can I make these parfaits a day ahead?
A: You can absolutely prep the components! Toast the coconut, make the pudding, cube the cake, and whip the cream. Store each separately in the fridge. Assemble the layers (minus the final decorative toppings) up to 4 hours before serving. Add the coconut “grass,” ears, and eggs right before you serve to keep everything looking sharp and prevent soggy ears. - Q: My whipped cream is getting runny. Help!
A: This usually means your cream, bowl, or kitchen was too warm. For a more stable whipped cream that holds for days, try this trick: add a tablespoon of instant vanilla pudding powder to the cream as you start to whip. It stabilizes it beautifully without affecting the flavor. - Q: I don’t have clear jars. What can I use?
A: No problem at all! Clear glass is just for the “wow” factor of seeing the layers. You can use any cute cup, mug, small bowl, or even a wine glass. A mason jar is a classic, inexpensive option you can find anywhere. - Q: Can I use fresh coconut?
A: You absolutely can! Freshly grated coconut will have a more delicate texture and flavor. Toast it very carefully, as it can brown even faster than the shredded kind. It’s a lovely, gourmet touch.
Coconut Cream Bunny Parfaits : Adorable Easter Dessert in a Jar
Description
These Coconut Cream Bunny Parfaits are the kind of Easter dessert that makes people smile before they even take a bite. Fluffy coconut pudding, soft vanilla cake, and whipped cream are layered into individual jars, then topped with toasted coconut “grass,” candy eggs, and adorable marshmallow bunny ears. They look bakery-fancy but are surprisingly simple to make — perfect for holiday tables and family kitchen fun.
Ingredients
-
2 cups coconut pudding (instant or homemade)
-
3 cups vanilla cake, cut into small cubes (store-bought or homemade)
-
2 cups sweetened whipped cream
-
1 cup shredded coconut
-
6–8 large marshmallows
-
Pink decorating sugar or pink candy melts
-
Mini chocolate eggs or pastel candy-coated chocolates
Instructions
-
Toast the coconut
-
Heat oven to 325°F (160°C).
-
Spread shredded coconut on a baking sheet.
-
Bake 5–7 minutes, stirring once, until lightly golden.
-
Cool completely.
-
-
Prepare bunny ears
-
Cut each marshmallow diagonally to form two ear shapes.
-
Press the sticky cut side into pink decorating sugar.
-
If using candy melts, brush a thin pink stripe inside each ear and let set.
-
-
Layer the parfaits
-
Use clear jars or glasses.
-
Add a layer of cake cubes.
-
Spoon over coconut pudding.
-
Add a layer of whipped cream.
-
Repeat layers if your container is tall enough.
-
Finish with whipped cream on top.
-
-
Decorate
-
Sprinkle toasted coconut over the top to make “grass.”
-
Insert two marshmallow ears near the edge.
-
Add mini chocolate eggs around the ears.
-
-
Chill
-
Refrigerate at least 1 hour before serving so layers soften and flavors blend.
-
Notes
-
Use day-old cake — it holds texture better in layers.
-
Chill before serving for the best spoonable texture.
-
Toast coconut carefully — it browns quickly near the end.
-
Stabilize whipped cream by adding 1 tablespoon instant pudding powder while whipping if you need it to hold longer.
-
Add toppings last if making ahead, so decorations stay neat.
A Quick Nutritional Glance
Let’s keep it real—this is a celebratory dessert, meant to be enjoyed fully! Each parfait (assuming 6 servings) comes in around 420 calories. The main contributors are the wholesome fats from the coconut and cream, and the carbohydrates from the cake and sugar. It’s a treat packed with joy. To lighten it up slightly, you can use a sugar-free pudding mix, light whipped topping, and a lower-sugar cake. But for Easter, I’m a firm believer in embracing the celebration. Enjoy every creamy, coconutty, chocolate-eggy bite!
Final Thoughts from My Kitchen to Yours
And there you have it, my friends—your ticket to becoming the Easter dessert hero. These Coconut Cream Bunny Parfaits are more than just a recipe; they’re a little jar of happiness, a conversation starter, and a delicious way to create a moment of pure, simple joy around the table. Remember, the best meals and the best memories aren’t about perfection. They’re about the love you stir in, the people you share it with, and the fun you have along the way. I hope these bunnies hop right into your heart and your holiday tradition. If you make them, I’d love to see your creations! Tag me over at @Feastical or drop a comment on the blog. Now, go forth and make something Feastical!
With a full heart and a sweet tooth,
Beau