
Let’s Make Some Magic: The Ultimate Guide to Classic Hard Candy
Hey friends, Beau here from Feastical! Pull up a stool and get ready for a sweet adventure. Today, we’re diving headfirst into one of the most magical, satisfying, and downright fun recipes you can make in your kitchen: Classic Homemade Hard Candy. Now, I know what you might be thinking—”Beau, that sounds… intimidating. Isn’t that for professional candy makers with fancy copper pots?”
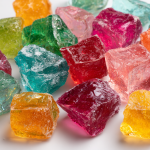
I’m here to tell you, with a big, reassuring smile, absolutely not. This is for us. This is for anyone who has ever unwrapped a piece of colorful, glassy candy and wondered at the sheer delight of it. It’s for the gift-givers, the holiday enthusiasts, the curious cooks, and anyone who believes food should be a little bit of fun. We’re talking about creating stunning, flavor-packed gems that are completely customizable. Want a batch of fiery cinnamon red hots? You got it. A rainbow of fruity treats for a birthday party? Consider it done. A soothing, homemade peppermint candy for the holidays? Let’s make it happen.
The process is a beautiful dance of sugar, heat, and timing. It’s alchemy in a saucepan, and I’ll be your guide every step of the way. We’ll keep it simple, soulful, and—most importantly—successful. So, grab your favorite heavy-bottomed pot and that candy thermometer you’ve been meaning to use. We’re about to create something truly spectacular that’s as joyful to make as it is to eat. Let’s dig in!
A Sweet Slice of Nostalgia: My Grandma’s Candy Kitchen
For me, the smell of melting sugar will forever be tied to my Grandma Eleanor’s kitchen around Christmastime. The air would be thick with the scent of pine, gingerbread, and the distinct, dangerous, and delicious aroma of sugar syrup hitting the hard crack stage. To my young eyes, she was a wizard. She’d wield her saucepan like a wand, and with a flick of her wrist and a drop of peppermint oil, she’d conjure up these glistening, blood-red shards of candy that would put any store-bought candy cane to shame.
I was her official “Taste Tester” and “Powdered Sugar Dust-er,” jobs I took very seriously. She’d pour the molten candy onto her greased baking sheet, and we’d watch it spread into a shimmering, hot lake. The rule was absolute: “Don’t you dare touch it, Beau Michael!” The waiting was agony. But the reward… oh, the reward. That first *crack* with the blunt end of a butter knife, the sound of sugar snapping into perfect, irregular pieces, and the explosive flavor of that first piece—it was pure magic. It wasn’t just candy; it was a tradition. It was patience, science, and love, all crystallized into something you could hold in your hand. That’s the spirit I want to bring to your kitchen today.
Gathering Your Candy-Making Crew: The Ingredients
One of the best things about this recipe is its beautiful simplicity. You only need a handful of core ingredients to create an infinite world of flavors. Here’s your shopping list, with a little chef-ly insight for each one.
- 3¾ cups Granulated Sugar: This is the foundation of our candy. Sugar crystals are what will give our treat its structure and that satisfying, solid snap. Make sure your sugar is fresh and free of any lumps for the smoothest results.
- 1½ cups Light Corn Syrup: “But Beau, can I skip this?” I get asked this a lot. The answer is, I don’t recommend it for your first time. The corn syrup is the guardian angel of your candy. It prevents the sucrose (the granulated sugar) from recrystallizing back into a grainy, messy texture. It ensures our final product is gloriously clear and glass-like. You can experiment with alternatives like golden syrup later, but for now, let’s stick with the classic.
- 1 cup Water: Good ol’ H2O. This is the vehicle that dissolves our sugar and corn syrup evenly so everything can cook together harmoniously. Just use regular tap water!
- 1 tsp Flavor Extract (per batch): This is where your personality shines! Use high-quality extracts for the best, most potent flavor. Think peppermint, lemon, cherry, orange, cinnamon, even butter rum! Pro Chef Tip: Have this measured and ready to go before your sugar hits 300°F. Speed is key here.
- Food Coloring (to match flavor): Go for gel or paste food coloring rather than the liquid kind. The liquid can add too much moisture and affect the candy’s texture, while gels and pastes provide vibrant, bold color without watering things down.
- Powdered Sugar (optional, for dusting): This isn’t for the candy itself, but for after it’s broken. A light dusting prevents the pieces from sticking together in your candy jar, like a little edible insurance policy.
The Main Event: Cooking Your Candy to Perfection
Alright, team. This is where the fun begins. Read through all the steps once before you start. Mise en place—that’s just a fancy way of saying “get everything in its place”—is your absolute best friend here. You can’t walk away once this process starts.
- Prep Your Station: First things first, line a large, rimmed baking sheet with aluminum foil or a silicone baking mat. Grease it lightly with a neutral oil (like canola or vegetable oil) or a non-stick spray. If you’re using fun silicone candy molds, have those ready on the counter. Now, measure out your flavor extract and have your food coloring uncapped and waiting. Last thing: make sure your candy thermometer is attached to the side of your heavy-bottomed saucepan. Trust me, you do not want to be searching for this with a pot of 300°F sugar on the stove.
- Combine and Dissolve: In your heavy saucepan, combine the granulated sugar, light corn syrup, and water. Turn your burner to medium heat. Using a wooden spoon or heatproof spatula, stir constantly until the sugar has completely dissolved. This is crucial. You should see no granules swirling at the bottom of the pot. Once it’s clear, stop stirring. I mean it! Chef Hack: To check if the sugar is dissolved, dip a spoon in and feel the back of it. It should feel smooth, not gritty.
- Cook Without Disturbance: This is the test of patience. Once the sugar is dissolved, stop stirring entirely. Attach your candy thermometer and let the mixture come to a boil. Do not stir it during this phase. Stirring can cause the syrup to splatter onto the sides of the pan where it can crystallize and potentially cause a chain reaction, making your candy grainy. Just let it do its thing. It will bubble away, going from clear to a rolling, furious boil. Watch the thermometer, not the clock.
- Hit the Magic Number: Watch that thermometer closely. We are waiting for it to hit exactly 300°F (150°C), also known as the Hard Crack Stage. You can test this without a thermometer by dropping a small bit of the syrup into a glass of cold water. If it forms hard, brittle threads that snap when bent, you’re there! But a good candy thermometer is your most reliable partner.
- The Flavor Flash: The second that thermometer hits 300°F, immediately remove the pan from the heat. Working quickly but carefully (the steam is hot!), stir in your 1 teaspoon of flavor extract and several drops of your chosen food coloring. The mixture will bubble and steam aggressively—that’s normal. Stir just until everything is incorporated evenly. Don’t over-mix!
- Pour With Purpose: Immediately pour the hot candy syrup onto your prepared baking sheet. Tilt the pan to spread it into a relatively even layer, or carefully pour it into individual candy molds. Safety First: This stuff is like edible lava. Be super careful and keep kids and pets away during this step.
- The Cool Down: Now, the hardest part: walk away. Let the candy cool completely at room temperature. Do not try to speed this up in the fridge, as the sudden temperature change can cause it to become sticky or attract moisture. It should take about 30 minutes. You’ll know it’s ready when it’s completely firm to the touch.
- Break It Up: Once cool, lift the giant candy disc from the foil. Grab a kitchen mallet, the back of a heavy knife, or even your hands (protected, maybe with clean gloves) and break it into beautiful, irregular shards. For a cleaner break, you can score the candy lightly with a knife while it’s still slightly warm. If you used molds, just pop them out!
- The Final Touch (Optional): If your candy is at all sticky, or if you plan to store it in layers, give the pieces a light toss in a bowl with a bit of powdered sugar. This will keep them separated and looking gorgeous.
Sharing the Sweetness: How to Serve Your Masterpiece
You’ve just created edible art! Now, how do you show it off? The possibilities are endless.
For gifting, this homemade candy is a showstopper. Fill clear cellophane bags tied with a rustic ribbon for a charming, old-fashioned treat. Layer different colors and flavors in a glass mason jar for a truly personal and stunning gift that says, “I made this just for you.” It’s perfect for holiday teacher gifts, party favors, or a just-because surprise for a neighbor.
For serving at home, presentation is key. Pile the colorful shards high in a beautiful ceramic bowl or a vintage candy dish as the centerpiece of your dessert table. During the holidays, crush up some peppermint candy and use it as a dazzling garnish on top of cupcakes, brownies, or even your morning oatmeal for a festive twist.
And let’s not forget the ultimate serving suggestion: sneaking a piece directly from the baking sheet the moment it’s cool enough, standing over the kitchen counter and savoring the fruits of your labor. I won’t tell anyone.
Get Creative: Flavor Twists and Dietary Swaps
The basic formula is your playground. Once you’ve mastered the classic, try these fun variations!
- The Rainbow Array: Instead of making one big batch of one color, divide the cooked syrup among several heatproof bowls right after you take it off the heat. Quickly stir a different flavor and color into each one, then pour them onto the sheet side-by-side or swirl them gently for a gorgeous marbled effect.
- The Spicy Kick: Add ¼ to ½ teaspoon of cayenne pepper to a batch of cinnamon candy for a “Fiery Cinnamon” treat that has a real kick. It’s an amazing grown-up flavor combination.
- The Creamsicle Dream: Combine orange extract and a touch of vanilla extract (about ¾ tsp orange + ¼ tsp vanilla) with orange coloring for a candy that tastes just like a dreamsicle.
- Vegan & Gluten-Free Friendly: Good news! This recipe is naturally gluten-free and vegan as written. Just double-check that your sugar is certified vegan (some refined white sugars use bone char in processing, but most organic sugars do not) and that your extracts don’t contain any sneaky animal products.
- Sour Power: For a sour version, toss the cooled, broken candy pieces in a zip-top bag with a mixture of citric acid (find it in the canning aisle or online) and a little extra sugar. Give it a good shake to coat. The sour coating paired with the sweet interior is irresistible.
Beau’s Kitchen Chronicles: A Few Parting Thoughts
This recipe has evolved in my kitchen from a once-a-year holiday spectacle to an anytime creative outlet. I’ve learned a few things along the way. I once tried to “multitask” and answer an email while the syrup was boiling. I learned that sugar goes from 290°F to 320°F (burnt and bitter!) in what feels like ten seconds. I also learned that adding the flavoring oil too early (before taking it off the heat) can cause the volatile oils to evaporate, leaving you with bland candy. The biggest lesson? The mess is always worth it. There’s something incredibly grounding and satisfying about making something from scratch that most people only ever buy in a store. You’re not just making candy; you’re making memories.
Your Questions, Answered: Candy Troubleshooting
Q: My candy turned out sticky and doesn’t snap. What happened?
A: This usually means the sugar syrup didn’t quite make it to the hard crack stage (300°F). The most common culprit is an inaccurate candy thermometer. Test your thermometer in boiling water; it should read 212°F (100°C). If it’s off, you’ll know to adjust. Humidity on a rainy day can also make candy sticky after it’s broken.
Q: Why is my candy cloudy or grainy?
A: Graininess is caused by sugar crystals forming. This can happen if sugar granules splashed onto the side of the pan and crystallized, or if you stirred the mixture after it started boiling. Always wash down the sides of the pan with a wet pastry brush in the initial dissolving stage to prevent crystals from forming. And remember, no stirring once it boils!
Q: Can I double this recipe?
A: I don’t recommend it for beginners. A larger volume of sugar syrup will take much longer to reach the desired temperature, which can throw off your timing and increase the risk of burning or recrystallization. It’s best to make multiple separate batches for different flavors.
Q: How do I store homemade hard candy?
A: Store it in an airtight container at room temperature, away from light and moisture. If you’ve dusted it with powdered sugar, place parchment paper between layers. Properly stored, it should last for several weeks… if it doesn’t get eaten first!
Classic Hard Candy
Description
Classic Homemade Hard Candy
Glassy, colorful, and infinitely customizable.
Ingredients
-
3¾ cups granulated sugar
-
1½ cups light corn syrup
-
1 cup water
-
1 tsp flavor extract (peppermint, lemon, cherry, orange, cinnamon, etc.)
-
Food coloring (gel or paste recommended)
-
Powdered sugar (optional, for dusting)
Equipment
-
Heavy-bottomed saucepan
-
Candy thermometer
-
Rimmed baking sheet lined with foil or silicone mat
-
Heatproof spatula or wooden spoon
Instructions
1. Prep Your Station
-
Line a baking sheet with foil or a silicone mat. Grease lightly.
-
Have your flavor extract measured and food coloring ready.
-
Attach your candy thermometer to the saucepan.
2. Combine & Dissolve
-
In the saucepan, combine sugar, corn syrup, and water.
-
Stir constantly over medium heat until sugar dissolves completely.
-
Once dissolved, stop stirring.
3. Boil to Hard Crack Stage
-
Bring syrup to a boil without stirring.
-
Watch candy thermometer until it reaches 300°F (150°C).
-
Optional cold water test: drop a bit of syrup into cold water; it should snap.
-
4. Add Flavor & Color
-
Remove pan from heat. Quickly stir in flavor extract and food coloring.
-
Be careful: syrup will bubble and steam aggressively.
5. Pour & Cool
-
Pour syrup onto prepared baking sheet or molds. Spread evenly.
-
Let cool completely at room temperature (about 30 minutes).
6. Break & Store
-
Once firm, break candy into shards using a mallet or knife.
-
Optional: toss lightly with powdered sugar to prevent sticking.
-
Store in an airtight container at room temperature, layered with parchment if needed.
Notes
-
Sticky candy: Likely didn’t reach 300°F. Check thermometer accuracy.
-
Cloudy/grainy candy: Avoid stirring after syrup starts boiling; wash down sides early.
-
Doubling recipe: Not recommended for beginners; make multiple smaller batches.
-
Storage: Airtight container, away from moisture and light.
Nutritional Information (For Your Info!)
Alright, let’s be real: we’re not making health food here. We’re making joy food. But it’s always good to know what you’re enjoying. This nutritional info is an estimate per piece (assuming the batch yields about 65 pieces).
Estimated per piece: ~50 kcal | 0g fat | 13g carbs | 0g protein
Since this candy is primarily sugar, it’s a source of quick energy. It’s a treat, perfect for savoring one or two pieces to satisfy a sweet tooth. Because it’s made with simple ingredients, it’s free of the preservatives and artificial flavors you might find in some store-bought versions, which is a win in my book!
The Last Bite
Well, my friends, we’ve done it. We’ve taken sugar, water, and a little bit of science and turned it into something magical. I hope this recipe empowers you to get into the kitchen and play. Don’t be afraid of the thermometer. Embrace the steam and the snap. Make a mess. Make a memory.
This classic hard candy is more than just a sweet snack; it’s a testament to the fact that the most delightful things often come from the simplest ingredients and a little bit of courage. I’d love to see your creations! Tag me @Feastical on social media and show me your colorful candy masterpieces.
Until next time, keep your spoons scraping and your ovens warm!