Chocolate Mousse Pie – Silky, Rich & No-Bake: Your New Secret Weapon
Hey friend, Beau here from Feastical. Pull up a chair and let’s talk about one of life’s greatest, simplest pleasures: a perfect slice of chocolate pie. You know the kind. The one that looks like it belongs in a fancy bakery case but secretly comes together in your kitchen without breaking a sweat. The kind where the first bite makes everyone at the table go completely, blissfully silent. That’s exactly what we’re making today.
This isn’t just any dessert. This is my go-to, no-bake chocolate mousse pie, and it’s about to become yours, too. We’re talking about a crisp, buttery chocolate cookie crust cradling a cloud of the silkiest, richest, most ethereal chocolate mousse you’ve ever tasted. It’s decadent without being heavy, elegant without being fussy, and it requires exactly zero oven time. Seriously. If you can melt chocolate and whip cream, you are already a champion in the making.
Whether you’re gearing up for a holiday feast, hosting a last-minute dinner party, or just decided that Tuesday night deserves a standing ovation, this pie is your answer. It’s the dessert that says “I’m an incredible cook” while you’re quietly laughing inside because you know how easy it was. So, let’s ditch the complicated recipes and the stress. Grab your favorite mixing bowl, and let’s make a little magic—the kind that tastes like pure chocolate bliss.
A Pie That Tastes Like a Memory
This recipe always takes me back to my grandma’s linoleum-floored kitchen. She was a wizard with three ingredients and a whole lot of love. Her version of “fancy” was a Jell-O pudding pie, but to my eight-year-old self, it was the height of sophistication. I’d sit at that Formica table, swinging my legs, watching her whisk with a calm focus I now recognize as culinary love.
One summer, I decided to “help” by adding an entire, unmeasured handful of chocolate chips to her filling. Instead of a scolding, she just laughed that wonderful, crinkly-eyed laugh of hers and said, “Well, Beau, let’s see how our experiment turns out.” What emerged from the fridge hours later was a firmer, profoundly chocolatey masterpiece. It was a mess, frankly, with chocolate smudges everywhere, but it was our mess. That was the day I learned that the best recipes aren’t about perfection—they’re about joy, a dash of bravery, and sharing the delicious results. This pie is my grown-up, slightly more refined homage to that lesson. It’s for creating your own sweet, delicious memories, one perfectly imperfect slice at a time.
Gathering Your Chocolate Treasure
Here’s the beautiful part: the ingredient list is short and sweet. Quality is our secret weapon here, especially with the chocolate. Let’s break it down.
For the Crust:
- 1 ½ cups chocolate cookie crumbs (about 20 Oreo cookies, filling scraped out) – The foundation! I use classic Oreos for that deep chocolate flavor. The little bit of filling left behind after scraping just adds to the richness. Chef’s Insight: You can also use chocolate graham crackers or even generic chocolate sandwich cookies. For a gluten-free crust, gluten-free chocolate cookies work perfectly.
- 5 tablespoons unsalted butter, melted – This is the glue that holds our crunchy dream together. Using unsalted butter lets us control the salt level. Substitution Tip: If you only have salted butter, just omit the pinch of salt later in the filling. Vegan butter works great for a dairy-free crust!
For the Luscious Filling:
- 1 ½ cups heavy cream or heavy whipping cream, divided – This is our two-in-one wonder. We’ll use half to melt the chocolate into a ganache and whip the other half into fluffy peaks. Chef’s Insight: Make sure your cream is cold, straight from the fridge, for the whipping part. Chilling your bowl and beaters helps it whip up faster and higher.
- 1 ½ cups semi-sweet or dark chocolate chips – The star of the show! I prefer a good-quality semi-sweet chip (around 55-60% cacao) for a balanced, not-too-bitter flavor. Pro Move: For an ultra-silky texture, chop up a high-quality baking chocolate bar instead of using chips. It melts more evenly.
- 1 teaspoon pure vanilla extract – The flavor enhancer. It rounds out the chocolate and adds a warm, comforting depth. Don’t skip it!
- A generous pinch of fine sea salt – This is NOT optional! Salt makes chocolate taste more chocolatey. It cuts the sweetness and brings all the flavors into sharp, delicious focus.
For the Grand Finale (Optional but Encouraged):
- Extra whipped cream for piping – Because more cream is always a good idea.
- Chocolate shavings or curls – Use a vegetable peeler on a chocolate bar for instant elegance.
- A sprinkle of flaky sea salt – Trust me on this. A few crystals on each slice is a game-changer.
Let’s Build Our Masterpiece: Step-by-Step
Ready? Tie on an apron (or don’t—live dangerously), and let’s get to the fun part. Read through all the steps once before you start. You’ve got this!
Step 1: Crafting the No-Bake Crust
First, grab your trusty 9-inch pie dish. Place your cookies (filling scraped out) in a zip-top bag and crush them with a rolling pin until you have fine, even crumbs. No big chunks! Pour the crumbs into a bowl and drizzle the melted butter over them. Use a fork to mix until every single crumb looks like dark, damp sand. It should hold together when you pinch it. Dump this glorious mixture into your pie dish and press it firmly and evenly across the bottom and up the sides. I like to use the bottom of a flat measuring cup to really pack it in. Pop the crust in the fridge to set up while you make the filling. This 15-minute chill gives us a solid base.
Chef’s Hack: Rinse your hands with cold water before pressing the crust to prevent the buttery crumbs from sticking to your fingers!
Step 2: Creating the Chocolate Heart (The Ganache)
Now, for the magic. Pour your chocolate chips into a medium, heat-proof bowl. In a small saucepan, heat ¾ cup of the heavy cream over medium heat. We don’t need a rolling boil—just bring it to a gentle simmer where you see small bubbles forming around the edges. Immediately pour the hot cream over the chocolate chips. Walk away. Let it sit, untouched, for a full 3 minutes. This patience allows the heat to gently melt the chocolate from within.
After 3 minutes, take a whisk or a spatula and start stirring from the center outwards. You’ll see it transform into a smooth, glossy, heavenly substance called ganache. Once it’s silky, whisk in the vanilla and that all-important pinch of salt. Now, this next part is crucial: let this ganache cool down to room temperature. If it’s too warm when we add the whipped cream, it’ll melt it and we’ll lose our airy mousse texture. You can speed this up by placing the bowl in the fridge, but stir it every 5 minutes so it cools evenly.
Step 3: Whipping & Folding – The Art of Air
While the chocolate cools, grab that other ¾ cup of cold heavy cream. Using a stand mixer, hand mixer, or a whole lot of elbow grease and a whisk, whip the cream until you get stiff peaks. This means when you lift the beaters, the cream stands straight up in a peak that doesn’t flop over. Don’t go past this to butter territory!
Now, check your chocolate. It should be cool to the touch, about the consistency of thick pudding. Add about one-third of the whipped cream to the chocolate bowl. Use your spatula to fold it in. This isn’t stirring! You’re gently cutting through the center, scooping from the bottom, and turning the mixture over itself. This lightens the dense chocolate. Once incorporated, add the remaining whipped cream and continue to fold gently but confidently until no white streaks remain. Be patient—you want to keep all that lovely air you whipped in.
Step 4: The Big Chill
Pull your chilled crust from the fridge. Spoon your fluffy, dreamy chocolate mousse filling into the crust. Smooth the top with your spatula, or make pretty swirls. For the ultimate set and flavor meld, this pie needs to chill in the refrigerator for at least 4 hours, but overnight is even better. I always cover it loosely with plastic wrap so it doesn’t absorb any fridge smells. This wait is the hardest part, but it’s what gives us that perfect, sliceable texture.
Presenting Your Chocolate Masterpiece
The moment of truth! Serving this pie is half the fun. For clean slices, dip a sharp, thin-bladed knife in hot water and wipe it dry between each cut. It will glide right through the creamy filling.
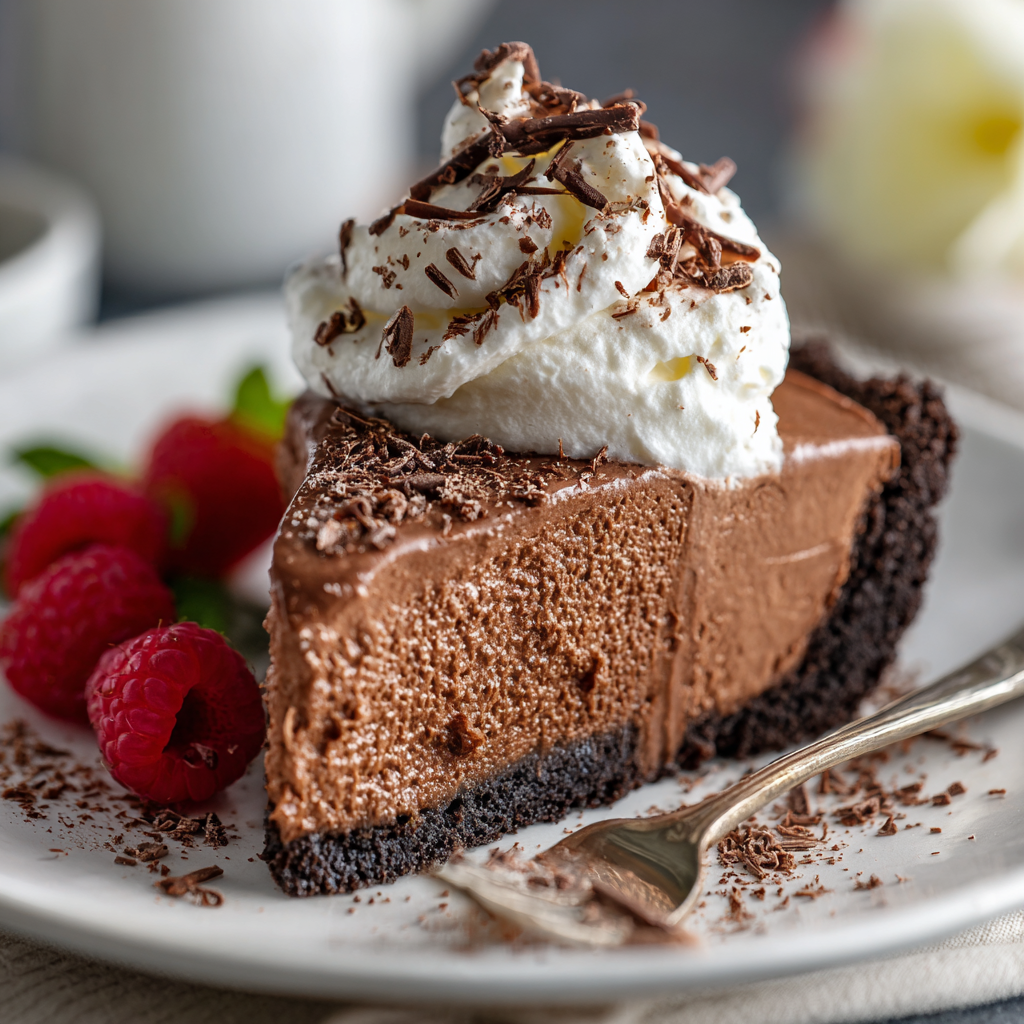
I like to keep it simple: a dollop of freshly whipped cream on each slice, a few delicate chocolate shavings, and that final, artisanal touch—a tiny sprinkle of flaky sea salt. Serve it on plates you love. This pie pairs beautifully with a cup of strong black coffee, a glass of red wine like a Cabernet Sauvignon, or simply the happy silence of your dining table. It’s rich, so small slices are perfectly satisfying (though seconds are always allowed at my table).
Make It Your Own: Delicious Twists & Swaps
This recipe is a fantastic canvas. Here are a few ways to play with the flavors:
- The Mint Chocolate Chip: Add ½ teaspoon of peppermint extract (not mint extract!) to the filling along with the vanilla. Fold in ½ cup of mini chocolate chips at the very end for texture.
- The Salty Bourbon Pecan: Stir 2 teaspoons of good bourbon into the cooled ganache. Before adding the filling, sprinkle the bottom of the crust with ½ cup of chopped, toasted pecans. Top finished slices with a candied pecan.
- The Orange Dream: Add the zest of one large orange to the cream as you heat it for the ganache. Let it infuse as it simmers, then strain it out before pouring over the chocolate. A touch of orange liqueur (like Grand Marnier) in the filling is divine.
- Vegan & Dairy-Free Delight: Use vegan chocolate chips. For the crust, use vegan butter and gluten-free cookies if needed. For the filling, replace the heavy cream with two cans of full-fat coconut milk that have been chilled overnight—scoop out the solid coconut cream to use as your whipping/ganache base. It’s incredibly rich and works like a charm!
- Mocha Madness: Dissolve 1 tablespoon of instant espresso powder into the hot cream before pouring it over the chocolate. It won’t taste like coffee, just like a deeper, more amazing chocolate.
Beau’s Kitchen Notes & Stories
This recipe has been my faithful companion for years, evolving from a more complicated, egg-based mousse into this simple, foolproof version. The first time I served it at a big family potluck, my uncle—a man of few words—ate two slices, looked at me, and simply said, “You can bring this every time.” That’s the highest praise I know.
One hilarious kitchen fail: I once got overzealous with the salt and used a coarse grind instead of fine sea salt. The filling had little crunchy salt bursts. My friends declared it “artisanal” and “intentionally textured,” but I knew the truth! Learn from my mistake: a fine, dissolving salt is key for the filling, save the big flakes for garnish.
Your Questions, Answered
Q: My filling seems a bit grainy, not silky. What happened?
A: This usually means the chocolate got too hot or was stirred too vigorously while melting, causing it to “seize” slightly. Next time, ensure your cream is just simmering, not boiling, and let it sit on the chips undisturbed. If it happens, you can sometimes save it by whisking in a tablespoon of warm cream until smooth.
Q: Can I make this pie ahead of time?
A: Absolutely! That’s one of its best features. Make it up to 2 days in advance. Keep it covered in the fridge. Add whipped cream and toppings just before serving for the freshest look.
Q: My crust is soggy. How do I prevent that?
A: A soggy bottom is often from not packing the crust firmly enough or not chilling it before adding the filling. Really press it in! Also, ensure your filling is completely cooled to room temp before adding it to the chilled crust.
Q: Can I use milk chocolate instead?
A> You can, but the filling will be much sweeter and softer. I’d recommend using only 1 cup of milk chocolate chips and adding an extra ¼ cup of semi-sweet to balance it. And maybe reduce the whipping cream in the mousse by 2 tablespoons for a firmer set.

Chocolate Mousse Pie : Silky, Rich & No-Bake
Description
Sometimes you just need a dessert that feels like a hug—and this no-bake chocolate mousse pie is exactly that. A crisp, buttery chocolate cookie crust cradles a fluffy, creamy chocolate mousse that’s rich without being heavy. Elegant enough for company but simple enough for a weeknight treat, this pie comes together with just a few ingredients and no oven time.
Ingredients
For the Crust:
-
1 ½ cups chocolate cookie crumbs (about 20 Oreo cookies, filling removed)
-
5 tbsp unsalted butter, melted
For the Chocolate Mousse Filling:
-
1 ½ cups heavy cream, divided
-
1 ½ cups semi-sweet or dark chocolate chips
-
1 tsp pure vanilla extract
-
Pinch of fine sea salt
Optional Toppings:
-
Extra whipped cream
-
Chocolate shavings or curls
-
Flaky sea salt
Instructions
-
Make the Crust:
-
Crush cookies into fine crumbs and mix with melted butter.
-
Press mixture firmly into the bottom and up the sides of a 9-inch pie dish.
-
Chill in the fridge for 15 minutes.
-
-
Prepare the Ganache:
-
Heat ¾ cup of cream over medium heat until it just starts to simmer.
-
Pour over chocolate chips and let sit 3 minutes.
-
Stir until smooth, then mix in vanilla and pinch of salt. Cool to room temperature.
-
-
Whip the Cream:
-
Whip the remaining ¾ cup of cold cream to stiff peaks.
-
-
Fold Together:
-
Gently fold one-third of the whipped cream into the cooled ganache to lighten it.
-
Fold in the remaining whipped cream until fully combined.
-
-
Assemble the Pie:
-
Spoon the mousse into the chilled crust. Smooth the top.
-
Refrigerate for at least 4 hours, preferably overnight.
-
-
Serve:
-
Top with whipped cream, chocolate shavings, and a sprinkle of flaky salt if desired.
-
Slice with a sharp knife dipped in hot water for clean cuts.
-
Notes
-
Mint Chocolate: Add ½ tsp peppermint extract and fold in mini chocolate chips.
-
Bourbon Pecan: Stir 2 tsp bourbon into ganache; add toasted pecans to crust or top.
-
Orange Chocolate: Infuse cream with orange zest; optional orange liqueur.
-
Vegan/Dairy-Free: Use coconut cream and vegan chocolate chips; vegan butter for crust.
-
Mocha Twist: Add 1 tbsp instant espresso powder to hot cream before pouring over chocolate.
Serving Suggestions: Pairs beautifully with black coffee, red wine, or a simple glass of milk.
Nutritional Information (For Your Curiosity)
Okay, let’s be real: this is a celebration dessert. It’s rich, decadent, and meant to be savored. Here’s a rough breakdown per slice (based on 8 servings), but remember, these are estimates. Your specific ingredients will cause variations. This pie is a treat for the soul, so enjoy it mindfully and joyfully!
- Calories: ~410
- Total Fat: 30g
- Saturated Fat: 18g
Final Thoughts: A Slice of Simple Magic
And there you have it—the blueprint for a dessert that feels like a decadent secret, but is really just a celebration of simplicity and good ingredients. This no-bake chocolate mousse pie isn’t just a recipe; it’s an invitation. An invitation to slow down, to create something beautiful with your own hands, and to share a moment of pure, chocolatey joy with the people you love.
Remember, the true magic of this pie lies not in perfection, but in the process. In the sound of cookies being crushed, the smell of chocolate melting, and the quiet pride of pulling something this stunning from your own refrigerator. It’s the dessert that turns a regular Tuesday into an occasion and makes a dinner party feel legendary.
So, whether you stick to the classic version or embark on a flavor twist of your own, you’re not just making a pie. You’re weaving a little bit of that Feastical spirit—generous, joyful, and unabashedly delicious—into your kitchen. You’re creating the kind of treat that people remember. The slice they’ll ask you to bring, time and time again.
Now, go forth, whip that cream, fold that mousse, and get ready for the best kind of silence there is: the one that falls over a table when everyone takes their first bite.
With a full heart and an empty mixing bowl,
Beau
From my kitchen to yours.