Chocolate Layer Cake with Cookies and Cream Filling: A Decadent Showstopper Dessert
Hey there, friend! Beau here, welcoming you back to my kitchen at Feastical. You know what I love more than a good, simple weeknight meal? A full-blown, no-holds-barred, celebration-worthy DESSERT. The kind of cake that makes people’s eyes go wide when you carry it to the table. The kind that gets a round of applause before the first slice is even cut. If you’re nodding along, then you and I are on the same delicious wavelength.
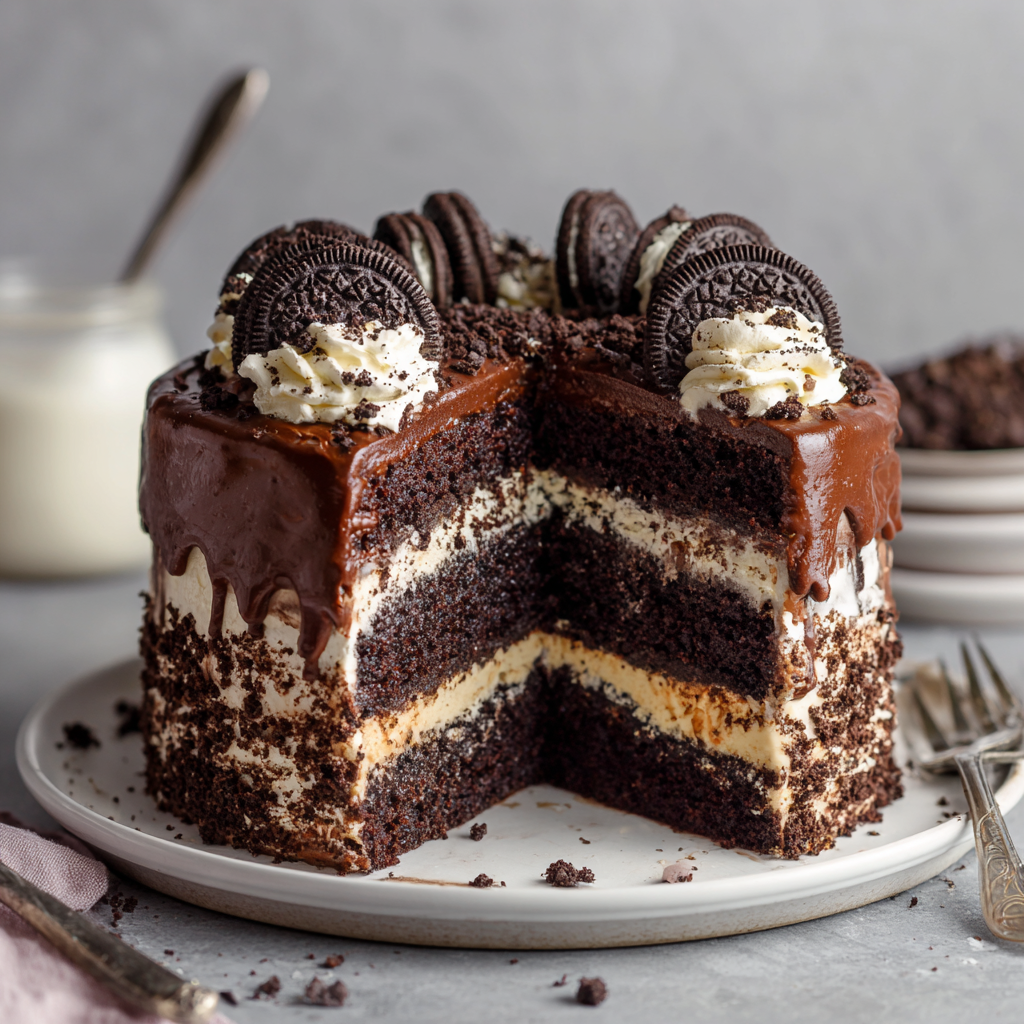
Today, we’re throwing caution to the wind and building a masterpiece: my Ultimate Chocolate Layer Cake with a Cookies and Cream Filling. This isn’t just any chocolate cake. This is a deeply moist, intensely chocolatey cake that stays tender for days, layered with a cloud-like, whipped cream and cookie filling that cuts through the richness perfectly. And we’re finishing the whole thing with a silky, dreamy chocolate frosting that’s so good, you might just find yourself eating it with a spoon. (No judgment here—I’ve been there!)
I know layer cakes can seem a little intimidating, but trust me, we’re going to walk through this together, step-by-step. I’ve packed this guide with all my favorite chef hacks and simple tricks to make you feel like a baking pro. So, tie on your favorite apron, find that spatula (check the dishwasher first, that’s where mine always hides), and let’s create some magic.
The Cake That Started It All
This particular cake recipe holds a special place in my heart. It was the very first “from-scratch” cake I ever dared to make for my mom’s birthday. I must have been about sixteen, feeling wildly overconfident in my limited kitchen skills. I envisioned this towering, gorgeous creation, but what I produced was… well, let’s call it “rustic.” The layers were lopsided, my frosting job was, generously speaking, “textured,” and I may have used an entire box of cookies in the filling because, more is more, right?
But when we sliced into it? The room went quiet. That first bite was a revelation. The cake was so incredibly soft and rich, and the cool, creamy filling with those crunchy cookie bits was a total game-changer. My family demolished it. It didn’t matter that it looked a little messy; it tasted like pure, unadulterated joy. That was the moment I truly understood the power of a homemade dessert. It’s not about perfection; it’s about the love and the fantastic flavor you bake into it. This recipe is that same reliable, soul-satisfying cake, just with a few years of practice and finesse added in.
Gathering Your A-Team: The Ingredients
Great baking starts with great ingredients. Don’t worry, we’re not using anything too fancy—just simple, quality components that work together in perfect harmony. Here’s your shopping list, with a little Beau-style commentary for each one.
For the Chocolate Cake:
- 2 cups all-purpose flour: The trusty foundation of our cake. For a slightly lighter crumb, you can swap it 1:1 with cake flour.
- 2 cups sugar: Sweetness and tenderness, all in one. We’re using granulated white sugar to keep the cake’s color a rich, deep brown.
- ¾ cup unsweetened cocoa powder: This is where the magic happens! Use a good-quality cocoa powder—natural or Dutch-processed will both work beautifully here for that deep chocolate flavor.
- 2 tsp baking powder & 1½ tsp baking soda: Our dynamic leavening duo. They work together to give this dense batter a beautiful, airy rise.
- 1 tsp salt: A must! Salt makes all the other flavors pop and balances the sweetness. Don’t you dare skip it.
- 1 cup buttermilk: The secret weapon for an unbelievably moist and tender crumb. No buttermilk? No problem! Make a quick “sour milk” by adding 1 tablespoon of white vinegar or lemon juice to a cup of regular milk and let it sit for 5 minutes.
- ½ cup vegetable oil: Oil keeps the cake moister for longer than butter would. I use a neutral oil like canola or avocado.
- 2 large eggs: They bind everything together and add structure and richness.
- 2 tsp vanilla extract: The flavor enhancer. It rounds out the chocolate and makes it taste even more complex.
- 1 cup hot water or hot coffee: This is my #1 pro tip! The hot liquid “blooms” the cocoa powder, intensifying its chocolate flavor. Don’t worry, you won’t taste the coffee—it just makes the chocolate taste richer and deeper. The batter will be thin, but that’s exactly what we want!
For the Cookies and Cream Filling:
- 1½ cups heavy cream (or heavy whipping cream): Make sure it’s very cold! This is key for getting those beautiful, stiff peaks.
- ¼ cup powdered sugar: Sweetens the cream without any grittiness.
- 1 tsp vanilla extract: A little flavor boost for our creamy cloud.
- 10 chocolate sandwich cookies, crushed: I use the classic ones, but any brand will do! Crush them with some texture—you want some bigger chunks for that satisfying crunch.
For the Chocolate Frosting & Topping:
- 1 cup (2 sticks) butter, softened: Real butter, please! It should be soft to the touch but not melted for the fluffiest frosting.
- ¾ cup unsweetened cocoa powder: We’re doubling down on that chocolate goodness.
- 3 cups powdered sugar: Sift it if it’s lumpy for an ultra-smooth frosting.
- ¼ cup heavy cream: This loosens the frosting to a spreadable, silky consistency.
- 1 tsp vanilla extract: The finishing touch for our frosting.
- 6-8 crushed chocolate sandwich cookies: For that gorgeous, rustic finish on top of the cake.
Let’s Get Baking: The Step-by-Step Guide
Okay, team. Here’s where the fun begins. Read through all the steps once before you start, and remember: baking is a science, but it’s also an act of love. Let’s do this.
- Preheat and Prep. Fire up your oven to 350°F (175°C). Now, let’s get our cake pans ready. Grease two 9-inch round cake pans with a little butter or non-stick spray. Then, dust them with a tablespoon of flour or cocoa powder, tapping out the excess. For absolute foolproof removal, I like to line the bottoms with a circle of parchment paper. This little hack guarantees your cakes will slide out perfectly.
- Combine the Dry Ingredients. In a large bowl, grab your whisk and give the flour, sugar, cocoa powder, baking powder, baking soda, and salt a really good whisk. We’re not just mixing here; we’re aerating the dry ingredients to ensure everything is evenly distributed. No one wants a pocket of baking soda in their slice! Chef’s Hack: Sifting the dry ingredients together is an even better way to ensure a lump-free, super-light cake base.
- Add the Wet Ingredients (Except the Hot Liquid!). Make a well in the center of your dry ingredients and pour in the buttermilk, oil, eggs, and vanilla. Using an electric mixer on medium speed (or a ton of elbow grease with a whisk), beat this all together until the batter is smooth and beautifully combined. It will be thick and shiny at this point.
- The Magic Step: Add the Hot Water/Coffee. Now, with the mixer on low speed, gradually pour in the hot water or coffee. The batter will become very thin and liquidy. This is NORMAL and exactly what you want! This thin batter is the secret to that incredibly moist texture. Chef’s Insight: Be careful not to overmix at this stage. Just mix until it’s fully incorporated.
- Bake to Perfection. Carefully divide the batter evenly between your two prepared pans. I like to use a kitchen scale for perfect layers, but eyeballing it works too! Slide them into the preheated oven and bake for 30-35 minutes. You’ll know they’re done when the tops spring back lightly when touched, and a toothpick inserted into the center comes out with a few moist crumbs attached, but not wet batter.
- The Most Important Step: Cool Completely. This is the test of your patience! Let the cakes cool in their pans on a wire rack for about 15 minutes. Then, run a knife around the edges and gently invert them onto the rack to cool completely. I’m talking *completely* cool. If you try to frost a warm cake, you’ll have a melty, sliding mess. Trust me, I’ve learned this the hard way.
- Whip Up the Filling. While the cakes are cooling, let’s make that dreamy filling. In a chilled bowl (I pop my bowl and beaters in the freezer for 10 minutes beforehand), beat the heavy cream, powdered sugar, and vanilla on medium-high speed until stiff peaks form. That means when you lift the beaters, the cream stands straight up. Be careful not to overbeat, or you’ll start making butter! Gently fold in the crushed cookies with a spatula, then pop the whole bowl into the fridge to stay firm.
- Create the Chocolate Frosting. In another bowl, beat the softened butter and cocoa powder together until smooth and combined. This might look a little gritty at first, but it will come together. Gradually add the powdered sugar, one cup at a time, alternating with a splash of the heavy cream and vanilla. Beat on medium-high speed for 2-3 minutes until it’s light, fluffy, and wonderfully spreadable. If it’s too thick, add a teaspoon more cream. Too thin? A little more powdered sugar.
- The Grand Finale: Assemble the Cake! Place one cooled cake layer on your cake stand or plate. Spread the entire bowl of chilled cookies and cream filling evenly over the top, going all the way to the edges. Gently place the second cake layer on top. Now, frost the top and sides of the cake with that luscious chocolate frosting. Don’t stress about it being perfectly smooth—a slightly rustic, “homemade” look is full of charm! Finally, press the remaining crushed cookies onto the top and sides of the cake for that final, showstopping touch.
How to Serve This Masterpiece
You’ve built a beautiful cake, now let’s serve it with style! For the cleanest slices, I recommend popping the assembled cake into the fridge for about 30 minutes to let everything set up. When you’re ready, use a long, thin knife. Dip it in hot water, wipe it dry, and then make your cut. This gives you those gorgeous, professional-looking layers in every slice.
This cake is rich, so a modest slice is plenty. I love serving it with a cold glass of milk for the ultimate classic combo, or a strong cup of black coffee to complement the deep chocolate notes. For a real dinner party wow-factor, add a small scoop of vanilla bean ice cream on the side. The warm-cold, creamy-crunchy contrast is absolutely divine.
Make It Your Own: Delicious Recipe Variations
One of the best things about this recipe is how adaptable it is. Feel like mixing it up? Here are a few of my favorite twists:
- Mint Chocolate Chip Twist: Add 1 teaspoon of peppermint extract to the cookies and cream filling and fold in ½ cup of mini chocolate chips instead of the cookies for a refreshing, classic flavor combo.
- Peanut Butter Lover’s Dream: Swap the cookies and cream filling for a peanut butter frosting. Beat 1 cup of creamy peanut butter with ½ cup of softened butter, 2 cups of powdered sugar, and a splash of cream until fluffy. You can even press chopped peanut butter cups on top!
- Cookies and Cream Overload: For the ultimate cookie fan, chop up an extra 5-6 cookies and gently fold them into the cake batter right before dividing it into the pans. It’s cookies and cream in every single bite!
- Dairy-Free Delight: You can still enjoy this! Use your favorite plant-based milk mixed with vinegar for the buttermilk, and use coconut oil. For the filling and frosting, use well-chilled canned coconut cream (just the solid part) and dairy-free sandwich cookies.
- Mini Cake Layer Version: Want more layers? Divide the batter between three 8-inch pans and reduce the baking time to 22-27 minutes. You’ll get a stunning, sky-high cake!
Beau’s Kitchen Notes & Stories
This cake has been my go-to for so many years, and it’s evolved in little ways. I started using hot coffee after a chef friend insisted, and wow, was she right! I also used to be terrified of my filling sliding out, until I started chilling it thoroughly. The funniest mishap was the time I accidentally used salted butter for the frosting and forgot to adjust the salt. Let’s just say it was a *very* savory chocolate experience—my friends still tease me about it! The moral of the story? Laugh it off, learn from it, and know that even the “mistakes” usually still taste pretty darn good.
Your Questions, Answered!
Over the years, I’ve gotten a lot of questions about this cake. Here are the most common ones to help you bake with confidence.
Q: Can I make this cake ahead of time?
A: Absolutely! You can bake the cake layers a day in advance. Let them cool completely, then wrap them tightly in plastic wrap and store at room temperature. You can also freeze the unfrosted layers for up to 2 months. The filling and frosting are best made the day of, but the assembled cake holds up beautifully in the fridge for a day.
Q: My cake layers sunk in the middle. What happened?
A: This is usually a sign of too much leavening (baking soda/powder) or underbaking. Make sure your baking soda and powder are fresh, and use a toothpick to test for doneness—it should come out clean or with a few moist crumbs, not wet batter. Also, avoid opening the oven door too early, as a sudden temperature drop can cause the cake to fall.
Q: Why is my frosting grainy?
A: Grainy frosting is almost always due to powdered sugar that hasn’t fully dissolved. Sifting your powdered sugar before adding it to the butter is the best way to prevent this. Also, make sure you’re beating the frosting for a full 2-3 minutes to incorporate plenty of air and dissolve the sugar.
Q: Can I use a different type of cookie for the filling?
A: Of course! Get creative. Golden Oreos would be fantastic for a vanilla-cookie flavor. Or, try chopping up some peanut butter-filled cookies for a different twist. The recipe is a wonderful canvas for your favorite flavors.

Chocolate Layer Cake with Cookies and Cream Filling : A Decadent Showstopper Dessert
Description
Chocolate Layer Cake with Cookies and Cream Filling
A deeply chocolatey, moist layer cake with a fluffy cookies and cream filling and rich chocolate frosting—a showstopper dessert for any celebration.
Ingredients
Chocolate Cake:
-
2 cups all-purpose flour (or cake flour)
-
2 cups sugar
-
¾ cup unsweetened cocoa powder
-
2 tsp baking powder
-
1½ tsp baking soda
-
1 tsp salt
-
1 cup buttermilk (or 1 cup milk + 1 tbsp vinegar)
-
½ cup vegetable oil
-
2 large eggs
-
2 tsp vanilla extract
-
1 cup hot water or hot coffee
Cookies and Cream Filling:
-
1½ cups cold heavy cream
-
¼ cup powdered sugar
-
1 tsp vanilla extract
-
10 chocolate sandwich cookies, crushed
Chocolate Frosting & Topping:
-
1 cup (2 sticks) butter, softened
-
¾ cup unsweetened cocoa powder
-
3 cups powdered sugar
-
¼ cup heavy cream
-
1 tsp vanilla extract
-
6–8 crushed chocolate sandwich cookies for garnish
Instructions
-
Prep: Preheat oven to 350°F (175°C). Grease and flour two 9-inch cake pans; line bottoms with parchment paper.
-
Mix Dry Ingredients: Whisk flour, sugar, cocoa, baking powder, baking soda, and salt until evenly combined.
-
Add Wet Ingredients: Mix in buttermilk, oil, eggs, and vanilla until smooth.
-
Add Hot Water/Coffee: Mix on low until fully incorporated; batter will be thin—this ensures a moist cake.
-
Bake: Divide batter between pans and bake 30–35 min. Test with a toothpick; it should come out with a few moist crumbs. Cool completely.
-
Make Filling: Beat cold heavy cream, powdered sugar, and vanilla until stiff peaks form. Fold in crushed cookies and chill.
-
Make Frosting: Beat butter and cocoa powder until smooth. Gradually add powdered sugar, alternating with heavy cream, and vanilla. Beat until fluffy and spreadable.
-
Assemble Cake: Place one cake layer on plate, spread filling evenly, top with second layer. Frost top and sides with chocolate frosting. Press crushed cookies onto top and sides.
-
Chill & Serve: Refrigerate 30 min for clean slices. Serve with milk or coffee.
Notes
-
Mint Chocolate Twist: Add peppermint extract and mini chocolate chips to the filling.
-
Peanut Butter Version: Replace filling with peanut butter frosting.
-
Extra Cookie Crunch: Fold additional cookies into the batter.
-
Dairy-Free Option: Use plant-based milk, coconut cream, and dairy-free cookies.
-
Mini Layer Cakes: Use three 8-inch pans for more layers; bake 22–27 min.
Nutrition
- Calories: 480Cal Per Serving
- Fat: 25 g
- Carbohydrates: 58g
- Protein: 5 g
Final Thoughts: A Cake Worth Celebrating
Well, my friend, there you have it. We started with a pile of simple ingredients and transformed them into something truly spectacular. This Chocolate Layer Cake with its dreamy Cookies and Cream Filling is more than just a dessert; it’s an experience. It’s the star of the birthday party, the centerpiece of the anniversary dinner, the “just because” treat that turns an ordinary Tuesday into a occasion.
Remember, the true magic of this cake isn’t in achieving bakery-level perfection on your first try. The magic is in the process—the scent of chocolate filling your kitchen, the satisfaction of whipping that cream into soft peaks, and the proud moment you place that final layer on top. It’s in the shared “oohs” and “aahs” when you reveal your creation, and the happy silence that falls as everyone takes their first, blissful bite.
So, don’t let the layers intimidate you. Embrace the little imperfections; they’re proof that this was made with your own two hands. You now have a go-to, showstopping dessert recipe in your back pocket, one that’s as adaptable as it is delicious.
Thank you for spending this time with me in my kitchen. I hope this cake becomes a part of your own family’s cherished memories, just as it has in mine. Now, go forth and bake with confidence! And don’t forget