
Your New Favorite Cookie Just Walked In: Say Hello to Chocolate-Filled Wonders!
Hey friends, Beau here from Feastical! Let’s be real for a second. Is there anything in this world quite as magical as breaking open a warm cookie to find a river of molten, decadent chocolate waiting inside? I’m talking about that moment of pure, unadulterated joy. The kind of moment that turns a regular Tuesday into a mini-celebration. That’s the exact feeling I wanted to bottle up and share with you today with these insanely good Chocolate Filled Cookies.
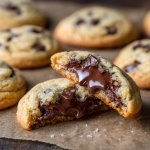
We’re not just making cookies here, folks. We’re crafting little pockets of happiness. These beauties are the ultimate crowd-pleaser, the secret weapon for bake sales, and the perfect “I-deserve-this” treat. On the outside, they’re everything you love about a classic, soft-baked cookie: slightly crisp edges, a golden-brown surface that begs to be broken into, and a tender, cake-like crumb. But then… you take that first bite. The warm, soft cookie gives way to a hidden core of rich, melted chocolate that just oozes out. It’s a surprise every single time, and it never, ever gets old.
I know what you might be thinking: “Beau, that sounds incredible, but is it complicated?” My answer? Absolutely not. If you can make a basic chocolate chip cookie, you can 100% master this recipe. I’ve packed this guide with all my favorite chef hacks and tips to ensure your baking adventure is as fun and foolproof as possible. So, preheat those ovens, grab your favorite mixing bowl, and let’s create some kitchen magic together. Your spatula and your sweet tooth are about to become best friends.
The Cookie That Started It All: A Sweet Slice of Nostalgia
This recipe takes me right back to my grandma’s kitchen, a place that always smelled like cinnamon, love, and something baking in the oven. She was the queen of “doctored-up” box mixes and simple desserts that felt like a million bucks. One rainy afternoon, I was “helping” her make a batch of her famous chocolate chip cookies (my job was predominantly taste-testing the raw dough, a sacred duty I took very seriously).
We were almost done when she got a mischievous glint in her eye. She rummaged through her pantry and pulled out a half-eaten bar of fancy chocolate my grandfather had brought home. “Let’s make them extra special,” she whispered, like we were planning a heist. She showed me how to pinch a little dough, nestle a square of that chocolate inside, and seal it all up like a precious secret. When those cookies came out of the oven, they were transformed. That first pull-apart, gooey bite wasn’t just a cookie; it was a moment of pure, shared magic. It taught me that the best recipes aren’t just about ingredients—they’re about the stories and the surprises we bake into them. This is my homage to her and that perfect, chocolatey surprise.
Gathering Your Cookie Crew: The Ingredients
Here’s the dream team that’s going to make these chocolate-filled wonders happen. Using quality ingredients is key, but I’ve also included my favorite swaps so you can use what you’ve got!
- 1 cup (2 sticks) unsalted butter, softened – This is the foundation of our rich, tender cookie. Softened is key! It should leave a slight indent when you press it, not be melty. Chef’s Tip: For a deeper flavor, try browning one stick of the butter and mixing it with one stick of softened butter. It adds a nutty, almost caramel-like note that’s incredible with chocolate.
- ¾ cup brown sugar & ¼ cup granulated sugar – The dynamic duo! Brown sugar brings moisture and that deep, caramel/molasses flavor, while granulated sugar helps with spreading and crispness. Using mostly brown sugar is my secret for an extra-chewy cookie.
- 2 large eggs – Our binding agent. Make sure they’re at room temperature to emulsify properly with the butter and sugar, creating a smooth, not greasy, dough.
- 2 tsp vanilla extract – The flavor enhancer. Don’t be shy with it! A good quality vanilla makes a world of difference.
- 2 ¼ cups all-purpose flour – The structure of our cookie. For a lighter cookie, fluff your flour with a spoon, sprinkle it into your measuring cup, and level it off. Don’t pack it down!
- 1 tsp baking soda – Our leavening agent. It helps the cookies rise and become beautifully puffy. Check the expiration date! Old baking soda won’t work its magic.
- ½ tsp salt – The flavor balancer. Salt cuts the sweetness and makes the chocolate taste even more chocolatey. I use fine sea salt.
- ½ cup chocolate chips – These are for the dough itself, giving you little pockets of chocolate in every bite, even before you hit the center! I prefer semi-sweet for balance, but milk or dark work too.
- 12–14 chocolate squares or chunks – The STAR of the show! This is your filling. You can use baking chocolate squares (like Ghirardelli), Lindt truffles, Reese’s Peanut Butter Cups, or even a chunk cut from a chocolate bar. The higher the quality, the better the melt!
Let’s Get Baking: The Step-by-Step Guide to Gooey Glory
Alright, team, let’s roll up our sleeves and make some magic. Read through these steps once before you start—it’s like getting the lay of the land before a fun road trip!
- Preheat and Prep: Fire up your oven to 350°F (175°C). This is non-negotiable for even baking. Line your baking sheets with parchment paper. Chef’s Hack: Parchment is your best friend here. It prevents sticking and makes cleanup a breeze. Silicone mats work great too!
- Creaming is Believing: In a large bowl, beat together the softened butter, brown sugar, and granulated sugar. Use an electric mixer (hand or stand) on medium speed for a good 2-3 minutes. We’re not just mixing; we’re “creaming.” This process incorporates air into the dough, which is what gives us a light, tender texture instead of a dense hockey puck. You’ll know it’s ready when the mixture turns pale, fluffy, and looks almost like a light caramel frosting.
- Eggs-cellent Addition: Add the eggs one at a time, beating well after each one. Then pour in that glorious vanilla extract. Scrape down the sides of the bowl with a spatula to make sure everything is getting to know each other.
- Dry Team Assemble: In a separate, smaller bowl, whisk together the flour, baking soda, and salt. This isn’t just busywork—whisking ensures the baking soda is evenly distributed so every cookie rises perfectly. No one wants a baking soda pocket!
- The Gentle Merge: Gradually add the dry ingredients to the wet ingredients, mixing on low speed just until the flour disappears. Chef’s Golden Rule: DO NOT OVERMIX. Overworking the dough develops gluten, which leads to tough, cakey cookies. A few streaks of flour are okay; we’ll take care of them in the next step.
- Chip Party: Switch to a sturdy spatula or wooden spoon and fold in the ½ cup of chocolate chips. This is where you make sure everything is incorporated without over-mixing.
- The Chill Factor: This might be the hardest step—patience! Cover the bowl and pop the dough into the fridge for at least 15-20 minutes. Why? Chilling the dough solidifies the butter, which prevents the cookies from spreading too thin and melting into sad, flat puddles in the oven. It also allows the flour to hydrate, giving us a chewier, more flavorful cookie. Trust me, it’s worth the wait.
- Stuff and Seal: Now for the fun part! Scoop out about a tablespoon of dough. Flatten it slightly in the palm of your hand. Place one of your chocolate squares right in the center. Take another slightly smaller scoop of dough, flatten it, and place it on top like a little hat. Gently pinch and press the edges together, then roll it between your palms to form a seamless ball. Make sure that chocolate is completely enclosed—if it peeks out, it will leak during baking!
- Bake to Perfection: Place your dough balls on the prepared baking sheet, leaving about 2 inches between them. They need room to spread! Bake for 10-12 minutes. Chef’s Secret: They will look underdone. This is what we want! The edges should be set and lightly golden, but the centers will still look soft and puffy. They will continue to cook on the hot baking sheet out of the oven. This is the secret to a soft, not crunchy, cookie.
- The Cool Down: Let the cookies cool on the baking sheet for a full 5-10 minutes. I know, the temptation is real. But this allows them to set enough so you can transfer them to a wire rack without them falling apart. If you try to move them too soon, that molten center will become a molten mess on your counter.
How to Serve These Chocolate-Filled Masterpieces
Okay, they’re baked, they’ve cooled just enough… now what? For the full experience, serve these cookies warm. The chocolate inside will be luxuriously lava-like. Place one in a small bowl, maybe add a small scoop of vanilla bean ice cream on top, and watch it start to melt into the cracks. A glass of cold milk is their classic partner in crime. For a next-level dessert, crumble one over a bowl of ice cream or even enjoy it slightly reheated for 10 seconds in the microwave to bring back that just-baked, gooey magic.
Mix It Up! Delicious Recipe Variations
The fun doesn’t stop here! This recipe is a fantastic canvas for your creativity.
- Peanut Butter Paradise: Use a miniature Reese’s Peanut Butter Cup as your center instead of a plain chocolate square. You could even add ½ cup of chopped peanuts to the dough.
- Mint Chocolate Chip: Add ½ tsp of peppermint extract to the dough along with the vanilla. Use an Andes mint or a square of mint baking chocolate for the center.
- Salted Caramel Delight: Place a soft caramel (like a Kraft square) alongside your chocolate square in the center. After baking, while still warm, sprinkle the tops with a little flaky sea salt.
- Double Nutty: Fold ½ cup of toasted chopped pecans or walnuts into the dough and use a chocolate-nut bar square for the center.
- Gluten-Free Friendly: Swap the all-purpose flour for a 1:1 gluten-free baking blend. I’ve had great success with Bob’s Red Mill and King Arthur blends.
Beau’s Chef Notes & Kitchen Stories
This recipe has evolved so much since that first batch with my grandma. I’ve learned a few things the hard way so you don’t have to! The first time I tried it, I used chocolate chips for the center. Big mistake. They don’t melt into that same smooth, liquid pool—they just get soft. You need a chocolate bar or a truffle designed to melt beautifully.
Another time, I was in a huge rush and skipped the chill time. My cookies turned into one giant, flat, cookie-cake with chocolate lava lakes. It was delicious, but not exactly the presentation I was going for! The chill time is your secret weapon for the perfect thick-and-chewy texture. These cookies have become my go-to for potlucks. I love watching someone take their first bite, their eyes go wide, and they say, “Whoa, there’s chocolate inside!” It never fails to bring a smile. That’s the real recipe right there.
Your Questions, Answered: FAQs & Troubleshooting
Q: My chocolate leaked out everywhere while baking! What did I do wrong?
A: Ah, the great leak! This usually happens for one of two reasons: 1) The chocolate center was too close to the surface. Make sure you seal the dough ball completely and that the chocolate is truly in the center. 2) The filling itself. Some chocolates have a lower melting point. If this happens, try a different brand of baking chocolate or truffle next time.
Q: My cookies came out flat and thin. How can I prevent that?
A: Flat cookies are almost always a temperature issue. The most common culprits are: butter that was too soft or melted, not chilling the dough, or an old baking soda that’s lost its potency. Make sure your butter is just softened (not melted or greasy), never skip the chill step, and always check your baking soda’s expiration date!
Q: Can I make the dough ahead of time and bake it later?
A: Absolutely! This dough is great for make-ahead. After you’ve formed the stuffed dough balls, place them on a plate or tray and freeze until solid. Then, transfer them to a freezer bag. You can bake them straight from the freezer—just add 1-2 minutes to the baking time. Fresh, warm cookies anytime!
Q: How do I store these cookies, and how long do they last?
A: Once completely cool, store them in an airtight container at room temperature for up to 4 days. The texture is best within the first 2 days. The microwave trick (10 seconds) works wonders for reviving that gooey center. You can also freeze the baked cookies for up to 3 months.
Chocolate Filled Cookies
- Total Time: 32 minutes
Description
Breaking into a warm cookie only to discover a molten river of chocolate inside? That’s happiness in its purest form. These cookies are soft, golden, and slightly crisp on the outside, but hide a surprise chocolate core that makes every bite a little celebration. Perfect for bake sales, potlucks, or those “I deserve this” moments—these are cookies with a story.
Ingredients
-
1 cup (2 sticks) unsalted butter, softened (brown 1 stick for deeper flavor, optional)
-
¾ cup brown sugar
-
¼ cup granulated sugar
-
2 large eggs (room temp)
-
2 tsp vanilla extract
-
2 ¼ cups all-purpose flour
-
1 tsp baking soda
-
½ tsp salt
-
½ cup chocolate chips (semi-sweet or preferred)
-
12–14 chocolate squares/truffles (for filling)
Instructions
-
Preheat oven – 350°F (175°C). Line trays with parchment.
-
Cream butter & sugars – Beat until fluffy, 2–3 min.
-
Add eggs & vanilla – Mix well.
-
Whisk dry ingredients – Flour, baking soda, salt in a separate bowl.
-
Combine gently – Add dry mix to wet, just until blended.
-
Fold in chips – Stir in chocolate chips.
-
Chill dough – Cover and refrigerate 15–20 min.
-
Stuff cookies – Scoop dough, flatten, place chocolate square in center, cover with more dough, roll into a sealed ball.
-
Bake – 10–12 min until edges are golden but centers soft.
-
Cool – Rest on tray 5–10 min before transferring.
Notes
-
Use chocolate bars or truffles for a gooey core (chips won’t melt as well).
-
Chill the dough—no skipping! It keeps the cookies thick and chewy.
-
Serve warm with ice cream or a cold glass of milk for the ultimate treat.
- Prep Time: 20 min
- Cook Time: 12 min
Nutrition
- Calories: 260 Cal per cookie
- Sugar: 18g
- Fat: 14g
- Carbohydrates: 32g
Nutritional Information*
*This is an estimated nutritional breakdown per cookie, based on a yield of 14 cookies. Values will vary based on specific ingredients used.
- Calories: ~260
- Fat: 14g
- Saturated Fat: 8g
- Carbohydrates: 32g
- Sugar: 18g
- Protein: 3g
- Sodium: 150mg
Prep Time: 20 min | Bake Time: 12 min | Chill Time: 15 min | Yield: 12–14 cookies
Final Thoughts: Your Journey to Gooey Greatness
Well, friends, there you have it—your complete guide to creating pure, unadulterated joy in cookie form. This isn’t just another recipe; it’s an experience. It’s the thrill of the reveal, the warmth of a shared memory, and the simple, profound happiness of a dessert made with a little bit of love and a whole lot of chocolate.
Remember, baking is an adventure, not a test. So what if a little chocolate leaks out? That just means you get to taste-test a little sooner. Embrace the process, from the creamy fluff of the butter and sugar to the final, triumphant pull-apart shot. You’re not just making cookies; you’re creating moments. You’re crafting the story that someone else might tell years from now, about that time you made the most magical cookies they’d ever eaten.