Chocolate Chip Cookie Bento Cakes: Where Your Favorite Cookie Gets a Cute, Cakey Makeover
Hey there, friend! Beau here, welcoming you back to the Feastical kitchen. Today, we’re mixing up two of my favorite things: the unbeatable, soul-satisfying joy of a perfect chocolate chip cookie and the ridiculously charming, Instagram-worthy world of Korean bento cakes. If you’ve been scrolling lately and felt a pang of dessert envy over those tiny, beautifully decorated mini cakes, I’ve got fantastic news. We’re not just admiring them from afar—we’re baking them! And we’re doing it with the most iconic dessert of all time as our inspiration.
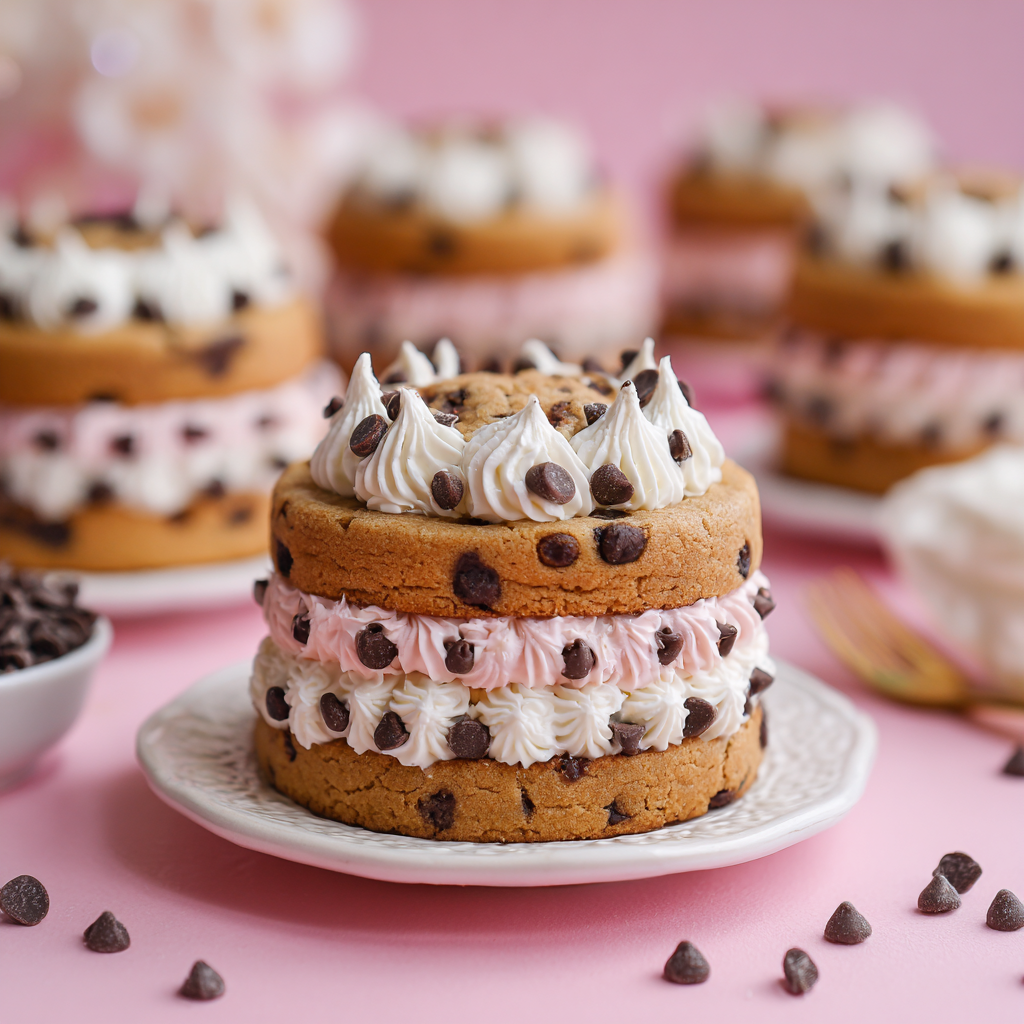
These Chocolate Chip Cookie Bento Cakes are the ultimate feel-good project. Imagine soft-baked, chewy cookie rounds stacked like little cakes, hugged by a cloud of vanilla buttercream, and finished with a personalized piped message or a cute doodle. They’re single-serving moments of pure happiness, perfect for birthdays, “just because” gifts, or that weekend when you need a creative, delicious pick-me-up. The best part? They look fancy but are built on the simple, forgiving foundation of classic cookie dough. No pastry degree required, just a love for good food and a little fun. So, preheat that oven, grab your favorite mixing bowl (you know, the one that feels just right), and let’s turn nostalgia into the cutest edible art you’ve ever made.
My First “Bento” Moment: A Lesson in Sweet Simplicity
This whole bento cake obsession? It takes me right back to my grandma’s kitchen, though she’d never call it that. She was the queen of “a little something sweet.” No occasion was too small. A good report card, helping with the weeds, even just a rainy Tuesday—all warranted a special treat. Her move was to bake one giant cookie in a cast-iron skillet, let it cool just enough, and then slice it into wedges. But for me, her number-one grandson (okay, her *only* grandson), she’d always save the center piece, the perfect bullseye of chocolate chips, and plop a tiny scoop of vanilla ice cream on top. She’d present it on a saucer with a flourish, saying, “There. A cake just for you.”
It wasn’t layered or piped, but in spirit, it was the original bento cake for me. It was personal. It was made with a specific person in mind. It transformed an everyday dessert into a celebrated mini event. That’s the magic we’re capturing here. We’re taking that universal love for the chocolate chip cookie and giving it that same “just for you” treatment. Every time I pipe a wobbly heart or a simple “YAY!” on top of these little cakes, I think of her. It’s not about perfection; it’s about the intention. And that intention, my friend, always tastes incredible.
Gathering Your Sweet Supplies
Here’s everything you’ll need to create these adorable mini masterpieces. I’ve tossed in some chef-y insights and swaps so you can bake with confidence!
For the Cookie Layers:
- 1 cup (2 sticks) unsalted butter, softened – This is our flavor foundation. Unsalted lets you control the salt level. Chef Tip: “Softened” means it gives easily when pressed but isn’t greasy or melted. Take it out of the fridge about an hour ahead.
- 1 cup packed brown sugar – Hello, moisture and that deep, caramel-like flavor! Using mostly brown sugar is the secret to a chewier, softer cookie cake layer.
- ½ cup granulated sugar – The white sugar helps with spreading and that classic crisp edge. For a deeper flavor, try using organic cane sugar.
- 2 large eggs – They bind everything together and add structure. Make sure they’re at room temperature to blend seamlessly with the butter and sugars.
- 2 teaspoons pure vanilla extract – The aromatic workhorse. Don’t skimp! A good vanilla makes the buttercream sing, too.
- 2 ½ cups all-purpose flour – The backbone. For a slightly more tender crumb, you can replace ¼ cup with cornstarch (often called a “cake flour hack”).
- 1 teaspoon baking soda – Our leavening agent, helping the cookies rise and become cakey, not dense.
- ½ teaspoon fine sea salt – Crucial! It balances the sweetness and makes all the other flavors pop. If you only have table salt, use a scant ½ teaspoon.
- 1 ½ cups semi-sweet chocolate chips – The stars of the show! I prefer a mix of chips and chopped chocolate bars for pools of melty chocolate. Feel free to use milk or dark chocolate based on your love language.
For the Vanilla Buttercream:
- 1 cup (2 sticks) unsalted butter, softened – Yes, more butter. This is a celebration. For the fluffiest frosting, ensure your butter is perfectly softened.
- 3 cups powdered sugar, sifted – Sifting is non-negotiable for a silky-smooth frosting. It prevents lumps and makes your piping life so much easier.
- 2 tablespoons milk or heavy cream – Heavy cream will give you a richer, more luxurious consistency. Milk works perfectly fine!
- 1 teaspoon vanilla extract – Keeping the flavor classic and comforting.
- Gel food coloring (optional) – If you want to add pastel colors for decorating, gel colors are best as they won’t thin out your frosting.
Let’s Build Some Mini Magic: Step-by-Step
Ready? Apron on, let’s do this. We’ll break it down into three acts: The Cookie, The Frosting, and The Grand Assembly.
Act 1: Baking the Perfect Cookie “Cake” Layers
Step 1: Preheat your oven to a nice, steady 350°F (175°C). Line two baking sheets with parchment paper. Trust me on the parchment—it prevents sticking and makes cleanup a dream.
Step 2: In a large bowl, cream together the softened butter, brown sugar, and granulated sugar. Use a hand mixer or stand mixer on medium speed for about 2-3 minutes. We’re not just mixing; we’re creaming. You want it light, fluffy, and pale in color. This step incorporates air, which is part of what gives our layers a lovely texture. Little Hack: Scrape down the sides of the bowl halfway through to make sure no butter is hiding.
Step 3: Add the eggs one at a time, beating well after each addition. Then beat in the vanilla. Your mixture might look a little curdled at this point—that’s totally normal! The flour will bring it all together.
Step 4: In a separate bowl, whisk together the flour, baking soda, and salt. This ensures the leavening is evenly distributed. With your mixer on low, gradually add the dry ingredients to the wet ingredients. Mix just until no white streaks remain. Overmixing at this stage can lead to tough cookies, and we want them tender.
Step 5: The best part: fold in the chocolate chips with a spatula. Use a gentle hand to avoid breaking the chips.
Step 6: Now, here’s the key to perfect bento cake layers: we’re making them uniform and slightly thicker than a normal cookie. I use a large cookie scoop (about 3 tablespoons) or I weigh the dough into 75-gram portions. Roll each portion into a ball, then place it on the parchment and gently flatten it into a disc about 3 inches wide and ½ inch thick. They should look like little hockey pucks. Leave about 3 inches between them, as they will spread. Bake for 10-12 minutes, just until the edges are set and golden but the centers still look slightly soft. They will firm up as they cool! Let them cool on the baking sheet for 5 minutes before transferring to a wire rack to cool completely. Patience is a virtue here—warm cookies and frosting are a messy business.
Act 2: Whipping Up the Dreamiest Buttercream
Step 1: In a clean bowl, beat the softened butter on medium-high speed for 3-5 minutes. Seriously, let it go. You want it super pale, fluffy, and almost whipped. This is the secret to a frosting that isn’t overly sweet or heavy.
Step 2: With the mixer on low, gradually add the sifted powdered sugar, about a cup at a time. Once incorporated, add the vanilla and milk/cream. Now, turn the mixer back up to medium-high and beat for another 2-3 minutes until it’s light, airy, and deliciously spreadable. If it’s too thick, add more milk a teaspoon at a time. Too thin? Add a little more powdered sugar.
Act 3: The Adorable Assembly & Decoration
Step 1: Match up your cooled cookie layers into pairs or trios of similar size. Place one layer on a small plate or cake board. Dollop about 1 ½ tablespoons of frosting in the center and spread it almost to the edges with an offset spatula or butter knife. Gently place the next layer on top and press down lightly. Repeat if you’re doing three layers. For a classic “naked cake” look, you can stop here and just add a dollop on top for piping.
Step 2: For a fully frosted look, apply a thin “crumb coat” of frosting all over the mini cake to seal in any crumbs. Pop it in the fridge for 15 minutes to set. Then, apply your final, smoother coat of frosting.
Step 3: DECORATE! This is where you shine. Fit a piping bag with a small round or star tip. You can pipe simple borders, dots, hearts, or write short messages like “HI,” “YUM,” or someone’s initial. Use a toothpick to lightly sketch your design first if you’re nervous. Add sprinkles, a single chocolate chip, or leave it beautifully minimalist. There are no rules, only delicious results.
How to Serve These Little Showstoppers
Presentation is half the fun with bento cakes! I love serving each one on a small, colorful dessert plate or a piece of pretty parchment paper. For the full aesthetic, place them in a simple, clean white or pastel lunchbox (the classic “bento” box) if you have one. A small paper doily underneath adds instant vintage charm.
Pair your cookie cake with a cold glass of milk, a cup of coffee, or even a scoop of vanilla ice cream on the side for the ultimate indulgence. These are meant to be personal, so hand them directly to your favorite person with a smile. Watch their face light up—it’s the best part of the recipe, I swear.
Mix It Up! 5 Fun Twists on the Classic
Once you’ve mastered the basic blueprint, the flavor playground is open! Here are some of my favorite spins:
- Salted Caramel Pretzel: Add ½ cup crushed pretzel pieces to the dough with the chocolate chips. Swap the vanilla buttercream for a salted caramel frosting, and drizzle with extra caramel sauce.
- Funfetti Celebration: Reduce chocolate chips to 1 cup and add ½ cup rainbow sprinkles to the dough. Use brightly colored frosting and more sprinkles on top for instant party vibes.
- Peanut Butter Cup: Use ½ cup creamy peanut butter in the dough (reduce butter to ¾ cup). Fold in chopped peanut butter cups instead of chocolate chips. Frost with a peanut butter buttercream.
- Mocha Chip: Add 1 tablespoon instant espresso powder to the dry ingredients. Use dark chocolate chips. A mocha frosting (add 1 tbsp cocoa powder and a bit more milk) would be incredible here.
- Gluten-Free & Dairy-Free Friendly: Use a 1:1 gluten-free flour blend and vegan butter sticks. For the chips, choose dairy-free chocolate. Use a plant-based milk in the frosting. The structure works beautifully!
Beau’s Kitchen Confidential
This recipe has become my go-to for last-minute “I need something impressive” moments. The first time I tried it, I was so focused on getting the cookies perfectly round that I overbaked them. They were more like biscuit layers! Lesson learned: a soft, slightly underbaked center is your friend for that cakey texture. My other favorite “oops” turned into a win: I once ran out of piping bags and used a small zip-top bag with the corner snipped off. It worked in a pinch, but let’s just say my “Happy Birthday” message got… abstract. Now I call that the “abstract expressionist” decoration style. Embrace the wobbles and the imperfections—they taste just as sweet and have way more personality.
Your Questions, Answered
Q: My cookie layers spread too much and aren’t round! What happened?
A: This usually means the butter was too warm or the dough wasn’t chilled. Next time, after shaping the discs, pop the entire baking sheet in the fridge for 15-20 minutes before baking. This solidifies the fat and helps them hold their shape. Also, make sure you’re measuring your flour correctly (spoon and level, don’t scoop!).
Q: Can I make any parts ahead of time?
A> Absolutely! The cookie layers can be baked, cooled completely, and stored in an airtight container at room temp for 2 days, or frozen for a month. The frosting can be made and refrigerated for up to a week—just let it come to room temp and re-whip before using. Assemble the cakes the day you plan to serve them for the freshest look and texture.
Q: My frosting is too runny/soupy. How can I fix it?
A> If your kitchen is warm, the butter might have gotten too soft. The quick fix is to chill the whole bowl of frosting in the fridge for 20-30 minutes, then re-whip. You can also add a bit more sifted powdered sugar, a tablespoon at a time, until it firms up.
Q: I don’t have piping tips. How can I decorate?
A> No problem! You can use a butter knife to create pretty swirls on top. Use the back of a spoon to make a small indentation and fill it with sprinkles. Or, simply press mini chocolate chips or M&M’s into the frosting in a fun pattern. A little grated chocolate or a dusting of cocoa powder looks elegant, too.

Chocolate Chip Cookie Bento Cakes : The Cutest Dessert Trend You Can Bake
Description
These adorable bento-style cookie cakes combine chewy chocolate chip cookie layers with fluffy buttercream, creating a single-serve treat that’s perfect for gifting, celebrating, or decorating just for fun. They’re simple to make, forgiving, and endlessly customizable.
Ingredients
For the Cookie Layers
-
1 cup (2 sticks) unsalted butter, softened
-
1 cup packed brown sugar
-
½ cup granulated sugar
-
2 large eggs, room temperature
-
2 tsp vanilla extract
-
2 ½ cups all-purpose flour
-
1 tsp baking soda
-
½ tsp fine sea salt
-
1 ½ cups semi-sweet chocolate chips (or chips + chopped chocolate)
Optional Tip:
Replace ¼ cup of the flour with cornstarch for extra tenderness.
For the Vanilla Buttercream
-
1 cup (2 sticks) unsalted butter, softened
-
3 cups powdered sugar, sifted
-
1–2 tbsp milk or heavy cream
-
1 tsp vanilla extract
-
Gel food coloring, optional
Instructions
ACT 1 — Bake the Cookie “Cake” Layers
-
Preheat oven to 350°F (175°C). Line baking sheets with parchment paper.
-
Cream butter, brown sugar, and granulated sugar for 2–3 minutes until fluffy.
-
Add eggs one at a time, then mix in vanilla.
-
Whisk flour, baking soda, and salt separately. Add to wet ingredients on low speed; mix just until combined.
-
Fold in chocolate chips.
-
Scoop dough into 3-inch, ½-inch-thick discs (about 3 tbsp or 75 g each).
-
Bake 10–12 minutes, until edges are golden and centers look soft.
-
Cool 5 minutes on the tray, then transfer to a rack to cool fully.
Tip:
Chill shaped dough discs for 15 minutes before baking if you want perfectly round layers.
ACT 2 — Make the Buttercream
-
Beat softened butter for 3–5 minutes until pale and fluffy.
-
Add powdered sugar gradually on low speed.
-
Add vanilla and 1 tbsp milk/cream. Beat on medium-high for 2–3 minutes until smooth.
-
Adjust consistency:
-
Too thick → add more milk 1 tsp at a time
-
Too thin → add more powdered sugar
-
-
Add gel colors if using.
ACT 3 — Assemble the Mini Cakes
-
Pair cookie layers by size (use 2 or 3 layers).
-
Spread 1–1½ tbsp frosting between each layer.
-
For a clean finish, apply a thin crumb coat, chill 15 minutes, then frost smoothly.
-
Decorate with piping, sprinkles, chocolate chips, or simple designs.
No piping tips?
Use a spoon to swirl frosting or a zip-top bag with the corner snipped.
Notes
Cookies spread too much?
• Butter was too soft or dough wasn’t chilled enough.
• Chill shaped discs 15–20 minutes next time.
• Make sure flour is measured correctly (spoon & level).
Frosting too runny?
• Chill 20–30 minutes, then re-whip.
• Add more powdered sugar if needed.
Make ahead:
• Cookie layers: 2 days at room temp or 1 month frozen.
• Buttercream: 1 week refrigerated; re-whip before using.
• Assemble the day you serve.
Final Thoughts
More than just a dessert, these Chocolate Chip Cookie Bento Cakes are a tiny, edible hug. They take the familiar, comforting soul of a classic chocolate chip cookie and wrap it in the joyful, personal whimsy of a celebration. This project proves that you don’t need complicated techniques or fancy tools to create something truly special—just a reliable recipe, a few simple supplies, and the desire to make someone’s day a little sweeter.
Remember, the magic isn’t in flawless piping or geometrically perfect layers. It’s in the intention behind them. It’s in the moment you hand a personalized, handheld cake to a friend, a family member, or even to yourself, as a testament to the beauty of small, crafted joys. Whether you’re celebrating a milestone or turning a Tuesday into a treat, these mini cakes transform simple baking into an act of connection.
So, embrace the wobbly letters, the slightly uneven layers, and the chocolate chips that peek out just where they want to. That’s where the charm lives. Thank you for letting me share this recipe and a little piece of my story with you. Now, go preheat that oven, and create some mini magic of your own.
Happy baking, friend!
Beau