
Cheesy Garlic Breadsticks – Twisted, Buttery, and Loaded with Flavor
Hey friends, Beau here from Feastical! Let’s talk about one of life’s greatest, simplest pleasures: the smell of garlic and cheese hitting a hot oven. It’s the unofficial scent of “good times about to happen.” If you’ve ever found yourself at a pizza place, secretly more excited for the breadsticks than the actual pizza… raise your hand. (My hand is WAY up).
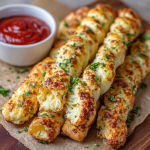
Today, we’re not just making breadsticks. We’re creating LEGENDARY, pull-apart, twisty, dangerously addictive Cheesy Garlic Breadsticks that belong at the center of every game night, movie marathon, and “I-deserve-a-treat” Tuesday. These aren’t an afterthought; they’re the main event. We’re talking soft, fluffy interiors, crisp, golden edges, a garlic butter soak that gets into every nook, and a blanket of melted cheese that’s absolutely mandatory.
The best part? We’re keeping it wonderfully simple. Whether you’re a from-scratch warrior or a savvy shortcut-taker, I’ve got you covered. This recipe is designed for maximum flavor with minimum fuss, because delicious food should bring joy, not stress. So, tie on your apron, and let’s turn your kitchen into the best pizzeria in town.
The Great Breadstick Diplomacy of 2012
This recipe always takes me back to my first “real” apartment after college. My roommate Mike and I had a standing Friday night ritual: cheap pizza and video games. But the pizza joint’s breadsticks? Those were a luxury item on our shoestring budget. One particularly ambitious (and hungry) Friday, I decided to crack the code. The mission: recreate those iconic, cheesy, garlicky sticks at home.
The first attempt was… a solid “C.” The garlic burned. The cheese slid off. But attempt number three? Magic. I brought a pan out to the living room, and the smell alone paused the game. What followed was a silent, focused, beautiful destruction of the entire batch. No words, just happy chewing and satisfied sighs. Those breadsticks became our currency—they patched up arguments, celebrated paychecks, and welcomed new friends. They taught me that the simplest foods, made with a little love, are often the ones that build the best memories. That’s the spirit I’m bringing to this recipe today.
Gathering Your Flavor Arsenal
Here’s everything you’ll need to create this masterpiece. I’ve included my chef notes and swaps so you can make this recipe work with what you’ve got!
- 1 tube refrigerated pizza dough (or 1 lb homemade dough) – This is our fantastic shortcut! I love the kind found in the dairy section. It’s reliable and saves hours. Chef’s Insight: Let it sit at room temp for 20-30 minutes before stretching—it becomes much more cooperative.
- 3 tablespoons unsalted butter, melted – The rich, fatty vehicle for our garlic. Salted butter works too; just maybe ease up on any added salt later.
- 3-4 large garlic cloves, minced – Fresh is non-negotiable here, friends. The pre-minced stuff in water doesn’t toast the same way. That toasted, fragrant garlic flavor is the soul of the dish.
- 1 ½ cups shredded low-moisture mozzarella cheese – The melt-master. Pre-shredded is convenient, but block cheese you shred yourself melts creamier (no anti-caking agents).
- ½ cup freshly grated Parmesan cheese – The flavor booster. The nutty, salty punch takes it to the next level. Please, for the love of all that is cheesy, avoid the canned powder here.
- 2 tablespoons chopped fresh parsley – For that little pop of color and fresh flavor at the end. In a pinch, 2 teaspoons dried parsley or Italian seasoning works.
- ½ teaspoon Italian seasoning (optional) – A little oregano, basil, and thyme never hurt anybody.
- ¼ teaspoon red pepper flakes (optional) – My favorite “optional” item. A subtle heat in the background is just *chef’s kiss*.
- ½ teaspoon kosher salt – To season the garlic butter. If using table salt, use half the amount.
- Marinara sauce, ranch, or garlic aioli for serving – Because dipping is a requirement, not a suggestion.
Let’s Get Twisty: Your Step-by-Step Guide
Follow these steps, and you’re guaranteed golden, cheesy success. I’m walking you through every part!
Step 1: Preheat & Prep. Fire up your oven to 400°F (200°C). Line a large baking sheet with parchment paper. Why parchment? It guarantees no sticking and makes cleanup a dream. No scrubbing baked-on cheese today!
Step 2: Roll & Relax. On a lightly floured surface, roll or stretch your room-temp dough into a rough rectangle, about 10×14 inches. Don’t stress about perfect corners! If it snaps back, let it rest for 5 more minutes. It’s just being shy.
Step 3: Create the Garlic Butter Elixir. In a small bowl, mix the melted butter, minced garlic, and kosher salt. This is the moment. Smell it. That’s the sound of victory right there. Pro Tip: Let it sit for a minute so the garlic flavor infuses into the butter.
Step 4: The Butter Baptism. Using a pastry brush (or the back of a spoon), coat the entire surface of the dough with the garlic butter. Get right to the edges. This buttery layer is what’s going to create that incredible flavor and golden color.
Step 5: The Cheesy Blanket. Sprinkle the shredded mozzarella evenly over the buttered dough, followed by the grated Parmesan. Add the optional Italian seasoning and red pepper flakes now if you’re using them. Don’t skimp! Every bite should be cheesy.
Step 6: The Fold & Slice. Here’s the fun part! Carefully fold the dough in half lengthwise, like you’re closing a giant cheesy book. Gently press the edges to seal it slightly. Now, using a pizza cutter or sharp knife, slice the folded log into 1-inch wide strips. You’ll get about 10-12 strips.
Step 7: Twist & Shout! Grab one strip from each end, give it a gentle but confident 2-3 twists, and place it on your prepared baking sheet. Leave a little space between them—they need room to puff and get crispy. Chef’s Hack: The twisting creates gorgeous texture and traps the cheese inside, creating glorious pockets.
Step 8: Bake to Perfection. Pop them into your preheated oven for 12-15 minutes. You’re looking for deep golden brown edges and bubbly, melted cheese. Ovens vary, so start checking at 12 minutes.
Step 9: The Final Flourish. The second they come out of the oven, sprinkle them with the fresh chopped parsley. It adds a fresh contrast and makes them look professionally fabulous.
Step 10: Serve Immediately! These are at their peak within 10 minutes of leaving the oven. The cheese is stretchy, the butter is aromatic, and life is good.
How to Serve These Golden Wonders
Presentation is part of the fun! I like to pile these breadsticks high on a big wooden board or a large platter. Scatter some extra parsley around, and put your dipping sauces in the center in small bowls. For a real crowd-pleaser, offer a trio: classic marinara, cool creamy ranch, and a zesty garlic aioli. It’s a DIY dipping bar that turns snack time into an event. These are perfect alongside a big, crisp salad (to balance things out, you know), a bowl of soup, or as the undisputed star of your appetizer spread.
Make It Your Own: Delicious Twists
Once you master the classic, the world is your cheesy, garlicky oyster. Try these fun variations:
- Pepperoni Stick Surprise: Before folding, scatter a layer of mini pepperoni over the cheese. It’s like a pepperoni pizza in breadstick form!
- Everything Bagel Breadsticks: Swap the garlic butter for everything bagel seasoning mixed with the butter. Top with cheese and an extra sprinkle of seasoning after baking.
- Breakfast Breadsticks: Use the twisted dough method, but brush with herb butter (no garlic). After baking, top with a drizzle of honey and crumbled cooked bacon. Unreal.
- Three-Cheese Herb Garden: Add ½ cup of shredded sharp cheddar and 2 tablespoons of chopped fresh chives or basil to the cheese mix. Rich and herby!
- Dairy-Free Delight: Use your favorite plant-based butter and vegan mozzarella/Parmesan shreds. The garlic and herb flavors are still fantastic!
Beau’s Kitchen Notes
This recipe is a living, breathing thing in my kitchen. I’ve made it probably a hundred times. The “twist” technique was born from a happy accident—I was trying to make a braid, failed miserably, and twisted instead. The result was BETTER! The twists create more surface area for crisping and make them so fun to eat. Also, a confession: I once accidentally used salted butter AND the full salt in the garlic butter. They were… intensely salty. We still ate them (because, cheese), but it was a good lesson in tasting as you go. Now, I always do a quick taste of the garlic butter before brushing. Cook, learn, adapt, eat. That’s the Feastical way.
FAQs & Troubleshooting
Q: My dough is too sticky to handle! Help!
A: No worries! Just add a light dusting of flour to your hands and the dough. Don’t over-flour the dough itself, just use enough to prevent sticking. Chilling it for 10 minutes can also help firm it up.
Q: Can I make these ahead of time?
A: You can prep them up to the “twist and place on sheet” step a few hours ahead. Cover tightly with plastic wrap and refrigerate. Bake straight from the fridge, adding 1-2 extra minutes. For best results, bake fresh!
Q: Why is my cheese browning/burning before the dough is done?
A: Your oven rack might be too high, or your oven runs hot. Next time, try baking on the middle rack. You can also tent the breadsticks loosely with foil halfway through baking if the cheese is getting too dark.
Q: Can I use garlic powder instead of fresh?
A> I strongly recommend fresh for that true, aromatic toastiness. If you *must* use powder, mix ¾ teaspoon of garlic powder into the melted butter. The flavor will be different but still tasty.
Cheesy Garlic Breadsticks : Twisted, Buttery, and Loaded with Flavor
Description
Ingredients
-
1 tube refrigerated pizza dough (or 1 lb homemade dough, room temp)
-
3 tbsp unsalted butter, melted
-
3–4 garlic cloves, minced
-
½ tsp kosher salt
-
1½ cups shredded low-moisture mozzarella
-
½ cup freshly grated Parmesan
-
½ tsp Italian seasoning (optional)
-
¼ tsp red pepper flakes (optional)
-
2 tbsp fresh parsley, chopped (for finishing)
-
Marinara, ranch, or garlic aioli (for dipping)
Instructions
-
Preheat oven to 400°F (200°C). Line a baking sheet with parchment.
-
Roll dough on a lightly floured surface into a rough 10×14-inch rectangle.
-
Make garlic butter: Mix melted butter, minced garlic, and salt.
-
Brush dough evenly with garlic butter, edge to edge.
-
Add cheese: Sprinkle mozzarella, then Parmesan. Add Italian seasoning and red pepper flakes if using.
-
Fold & cut: Fold dough in half lengthwise. Gently press. Cut into 1-inch strips (10–12).
-
Twist: Twist each strip 2–3 times and place on the baking sheet with space between.
-
Bake 12–15 minutes until golden and bubbly.
-
Finish: Sprinkle with parsley. Serve hot with dipping sauce.
Notes
-
Let dough sit at room temp 20–30 minutes for easy stretching.
-
For extra crisp bottoms, lightly spray parchment before placing twists.
-
Bake on the middle rack to prevent cheese from browning too fast.
Nutritional Info (Because We’re Curious!)
Okay, let’s be real—these are a treat, not a health food. But it’s always good to know what you’re enjoying! This estimated breakdown is for one breadstick (assuming the recipe makes 12). Remember, these values can vary based on the specific brands of dough and cheese you use.
- Calories: ~150-180
- Total Fat: 8-10g
- Saturated Fat: 4-5g
- Carbohydrates: 15-18g
- Protein: 5-7g
- Sodium: ~300-400mg
The protein and carbs come from the dough and cheese, providing a satisfying bite. To lighten it up slightly, you could use part-skim cheeses and brush with a bit less butter—but honestly, sometimes you just need the full, glorious experience.
Final Thoughts
And there you have it, my friends—your new secret weapon for impressing a crowd or just treating yourself right. These Cheesy Garlic Breadsticks are more than a recipe; they’re a ticket to a good time. They’re proof that with a few simple ingredients and a couple of clever twists, you can create something truly magical and memorable in your own kitchen.
I hope you make them, love them, and maybe even create your own “Breadstick Diplomacy” moment. If you do, I’d love to hear about it! Tag me @feastical or shoot me an email. Now, go forth and bake. And remember… always twist with confidence.
With love and a full plate,
Beau