Hey Hungry Friends! Your New Favorite Weeknight Hero Is Here.
Raise your hand if your weeknights feel like a wild kitchen juggling act! Between work, errands, and that ever-growing laundry pile, sometimes you need dinner to be FAST, comforting, and absolutely delicious without emptying your wallet. Sound familiar? That’s exactly why I’m practically doing a happy dance to share this Cheesy Chicken & Broccoli Rice Skillet with you today. Imagine creamy cheddar-kissed rice, tender bites of chicken, and vibrant broccoli florets all cozying up in one pan in under 25 minutes. It’s the kind of meal that tastes like a warm hug after a crazy day – satisfyingly rich but incredibly simple. No fancy techniques, no obscure ingredients hiding in the back of your spice cabinet. Just pure, uncomplicated comfort that feeds 3-4 people (hello, leftovers!) for well under $8. Seriously, friends, this isn’t just dinner; it’s your weeknight superhero cape disguised as a skillet. So grab your favorite pan, and let’s turn “what’s for dinner?” into “wow, that was GOOD!”
The Dorm Room Delight That Stuck Around
Okay, confession time? This recipe’s roots are waaaay less “gourmet chef” and way more “starving college kid.” Picture this: Beau, age 19, in a tiny apartment kitchen barely bigger than the skillet itself. My budget? Tighter than the lid on a stubborn pickle jar. One particularly epic study session (read: procrastination fest), I stared into my near-empty pantry – two boxes of Rice-A-Roni (bought on sale!), a couple of canned chicken pouches (emergency stash!), and a sad little bag of shredded cheese. Desperation met inspiration. Twenty minutes later? Magic. That first cheesy, steaming forkful wasn’t just food; it was victory. It tasted like resourcefulness, like comfort, like knowing I could actually feed myself something decent. Years later, that humble skillet meal never left my rotation. It evolved (hello, fresh broccoli garnish!), got tweaked, but stayed true to its soul: quick, cheap, and crazy comforting. It’s a reminder that sometimes, the best meals aren’t the fanciest, but the ones that simply make life feel easier and tastier. Every time I make it, I get that little flashback – and a big ol’ grin.
Your Simple, Pantry-Friendly Lineup
Gather these heroes – you probably have most already!
- 2 boxes Rice-A-Roni Cheddar Broccoli Flavor (6.5 oz each): The flavor foundation! This little box brings the rice, pasta, seasoning, and broccoli bits. Chef’s Hack: If you find a store-brand “cheddar broccoli rice mix,” grab it! It works just as well and saves a few extra cents.
- 2 cans cooked chicken (12.5 oz each, drained): The ultimate shortcut protein. Look for chunk white meat packed in water. Feeling Fancy? Swap in 2-3 cups of leftover shredded rotisserie chicken – it’s next-level! Use 1 can if you prefer less chicken.
- 1–2 cups shredded cheddar cheese: Because more cheese is always the answer! Sharp cheddar gives the best flavor punch. Got a Block? Shred it yourself! It melts smoother than pre-shredded (which has anti-caking agents). Monterey Jack or a cheddar blend also work great.
- Water & Butter (as directed on rice box): The dynamic duo for cooking the rice. Follow the box amounts precisely – usually around 2 1/2 cups water and 2 tbsp butter per box. Butter Boost: Using real butter (not margarine) makes the rice incredibly rich and flavorful.
Why Canned Chicken Works: Don’t knock it till you try it! Drained well, it’s tender, mild, and absorbs the cheesy sauce beautifully. Perfect for zero-prep protein in a pinch!
Let’s Build That Cheesy Masterpiece (It’s EASY!)
Ready for magic in one pan? Here’s how it goes down:
- Fire Up the Base: Grab your trustiest large skillet (non-stick is great here!) and set it over medium heat. Open both Rice-A-Roni boxes. Dump in the rice/pasta mix from the boxes (save those seasoning packets for the next step!). Add the butter (check your box for the exact amount, usually 4 tbsp total for 2 boxes). Melt the butter and sauté the rice/pasta mix for 2-3 minutes, stirring constantly, until it starts smelling nutty and turns lightly golden. Chef’s Tip: This toasting step is KEY! It unlocks incredible depth of flavor in the rice and pasta. Don’t skip it!
- Simmer & Fluff: Carefully pour in the water (again, box directions – usually 5 cups total for 2 boxes). Sprinkle in BOTH seasoning packets and stir well. Bring the mixture to a lively bubble. Once bubbling, reduce the heat to low, cover the skillet tightly with a lid, and set your timer for 15 minutes. Patience, Grasshopper! Resist the urge to peek! Letting it steam undisturbed is crucial for tender rice. When the timer dings, uncover, fluff the rice gently with a fork, and marvel at the transformation!
- Chicken Time! While the rice cooks, open and thoroughly drain your canned chicken. Use a fork to break up any large chunks. Once the rice is tender and fluffy, add the drained chicken straight into the hot skillet. Gentle Does It: Fold the chicken in gently but thoroughly. You want it warmed through and evenly distributed, not mashed into mush. Let it heat for about 2 minutes.
- The Grand Cheese Finale: Now, the moment we’ve all been waiting for! Sprinkle that glorious shredded cheddar cheese evenly over the entire surface of the chicken and rice mixture. Start with 1 cup, you can always add more! Cover the skillet again (heat OFF or on very low) and let it sit undisturbed for 2-3 minutes. Chef’s Secret: This gentle residual heat melts the cheese perfectly without making it greasy or stringy. After a few minutes, uncover and give it one final, gentle stir – just enough to create beautiful cheesy streaks throughout. See those luscious cheese pulls? Perfection!
Watchpoint: If your rice seems too dry after cooking, splash in 1-2 tbsp of water or broth before adding the chicken. If it’s a bit wet, let it sit uncovered for a minute or two to absorb excess liquid.
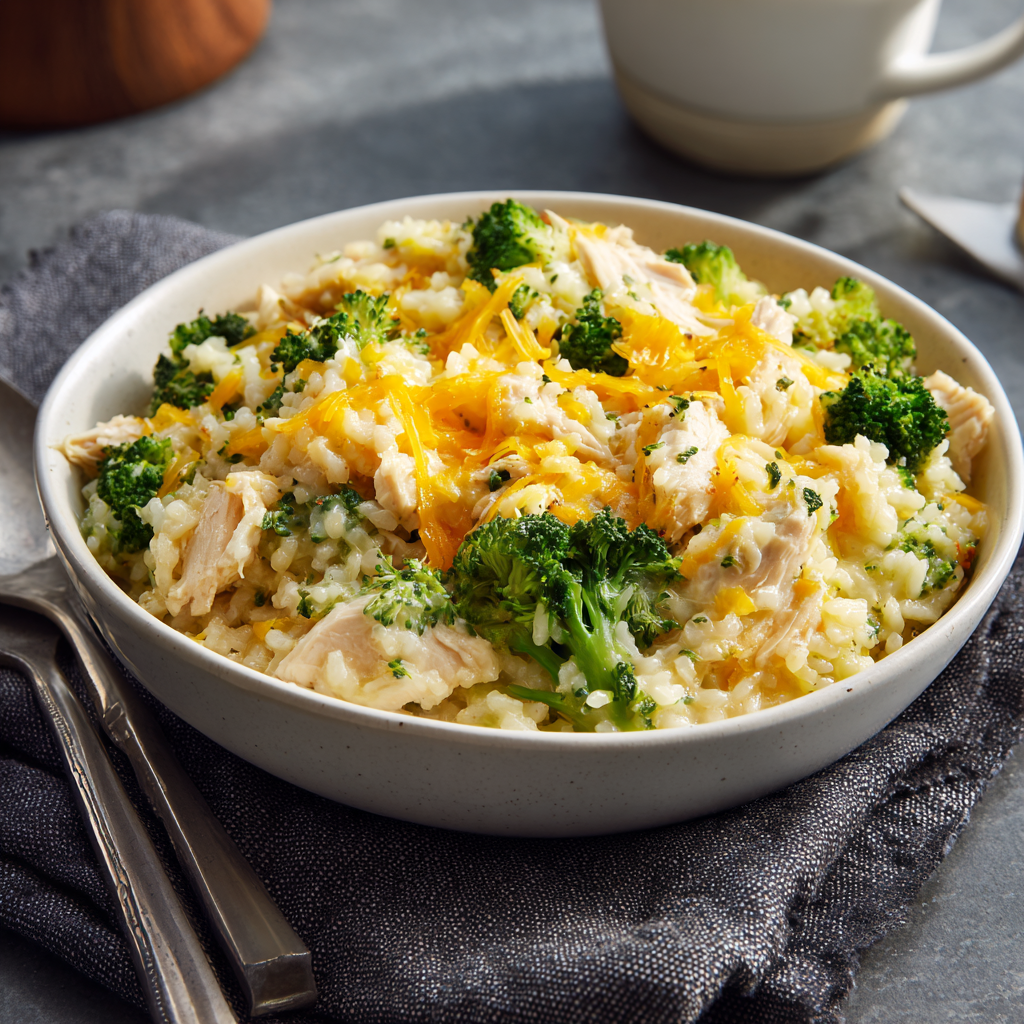
Dishing Up the Comfort
This skillet is basically a warm, cheesy hug in dinner form! Serve it piping hot straight from the pan – rustic charm is totally encouraged. Spoon generous portions into deep bowls. For a pop of freshness and color (and extra veggie power!), I love topping each bowl with a small handful of fresh, finely chopped broccoli florets – the slight crunch is fantastic against the creamy rice. A sprinkle of freshly cracked black pepper or a tiny pinch of smoked paprika adds a lovely finishing touch. It’s incredibly satisfying all on its own, but if you’re feeling extra, a simple side salad with a bright vinaigrette or some garlic toast points for scooping up every last cheesy bit are divine additions. Grab your fork and dig into pure, easy comfort!
Make It Your Own Delicious Adventure!
This recipe is a fantastic blank canvas! Here are a few fun twists:
- Southwest Fiesta: Stir in a drained can of black beans and a cup of frozen corn with the chicken. Top with Monterey Jack cheese, diced avocado, and a dollop of salsa or sour cream after cooking.
- Buffalo Chicken Kick: Toss the drained canned chicken with 1/4 cup of your favorite buffalo sauce before adding it to the rice. Use a blue cheese crumble instead of cheddar (or mix them!) and top with chopped celery.
- “Creamier” Dream (Low-Dairy Option): Swap one box of the cheddar broccoli mix for plain long-grain white rice. Use the seasoning packet from one box only. Stir in 1/2 cup of light cream cheese (softened) with the chicken for extra creaminess without tons more cheese.
- Veggie Powerhouse: Add 1 cup of frozen peas and diced carrots (or a frozen mixed veggie blend) when you add the water. Boost protein with a drained can of white beans instead of chicken.
- Bacon Lover’s Bonus: Cook 4-5 slices of chopped bacon in the skillet before step 1. Remove bacon, drain most fat (leave ~1 tbsp for toasting the rice). Crumble bacon and stir it back in with the cheese!
A Few More Tidbits from My Kitchen to Yours
This recipe is the ultimate proof that delicious doesn’t have to be complicated! Over the years, the biggest “evolution” has been me learning to stop apologizing for using convenient ingredients like boxed rice mix or canned chicken. They’re tools! Embrace them, especially on those chaotic nights. I vividly remember one time, early in my blogging days, I was filming this recipe and accidentally dumped an ENTIRE box of rice onto the stovetop (not in the pan!). Rice pellets went everywhere – it looked like a beige hailstorm! My dog thought it was the best day ever. We laughed, cleaned up, and started over. The takeaway? Kitchen mishaps happen, even to “pros.” Just roll with it! The beauty of this dish is its resilience. It’s forgiving, flexible, and always lands you right in the middle of comfort food heaven. It’s the recipe I text my sister at 5 PM when she texts “HELP! What’s for dinner??”. It just works.
Your Cheesy Skillet Questions, Answered!
Q: My rice came out crunchy/hard. What went wrong?
A: The most common culprit is not enough liquid or heat too high during simmering. Double-check the water amount on the box for TWO boxes (it’s usually 5 cups total). Ensure you bring it to a good bubble *before* reducing the heat to low. And crucially – keep that lid on tight! Peeking lets steam escape. If it’s still a bit firm at the end, sprinkle with 1-2 tbsp water, cover, and let it steam off heat for 5 more minutes.
Q: Can I use fresh or frozen broccoli instead of relying on the mix?
A: Absolutely! The mix has tiny bits, but adding more is great. For fresh: Chop 1 cup small florets. Add them with the water in Step 2. For frozen: Add 1 cup frozen florets (no need to thaw) when you add the chicken in Step 3. They’ll heat through perfectly.
Q: The cheese got clumpy/greasy instead of melty. Help!
A: This usually happens if the heat is too high when melting. When you add the cheese in Step 4, make sure the heat is OFF or on the absolute lowest setting. Rely on the residual heat of the rice to melt it gently. Covering it traps that heat perfectly. Also, shredding your own cheese from a block (instead of pre-shredded) helps immensely, as pre-shredded cheese has starches that can make it clump.
Q: Can I make this ahead of time?
A: It’s best fresh! The rice can dry out when reheated. If you *must*, store cooled leftovers airtight in the fridge for up to 2 days. Reheat gently in the microwave with a splash of water or broth, covered, stirring occasionally. The texture won’t be *quite* as perfect, but the flavor is still great!

Cheesy Chicken & Broccoli Rice Skillet
- Total Time: 25 min
Description
This one-skillet wonder delivers creamy, cheddar-loaded rice, tender chicken, and broccoli in under 25 minutes—without blowing your budget. Born from a hungry college night and perfected over time, it’s proof that convenience ingredients can create pure, homemade comfort. Grab your skillet and get ready for an easy win at the dinner table.
Ingredients
-
2 boxes Cheddar Broccoli Rice Mix (6.5 oz each)
-
2 cans cooked chicken (12.5 oz each, drained) or 2–3 cups leftover shredded chicken
-
1–2 cups shredded cheddar cheese (sharp preferred)
-
Butter & water (as per box directions, ~4 tbsp butter + 5 cups water total)
-
Optional: Fresh broccoli florets for garnish, black pepper, smoked paprika
Instructions
-
Toast the Base – In a large skillet, melt butter over medium heat. Add rice/pasta mix from boxes (reserve seasoning packets) and sauté 2–3 min until lightly golden.
-
Simmer to Tenderness – Add water and seasoning packets. Bring to a boil, then cover, reduce heat to low, and cook 15 min without lifting the lid.
-
Add Chicken – Gently fold drained chicken into the cooked rice. Heat 2 min.
-
Cheese Finale – Sprinkle cheese evenly over the top. Cover and let melt 2–3 min on low or off heat. Stir gently to create cheesy streaks.
-
Serve & Enjoy – Dish into bowls, top with fresh broccoli if desired, and add a pinch of pepper or paprika.
- Prep Time: 5 min
- Cook Time: 20 min
Nutrition
- Calories: 430 Cal
- Sodium: 980mg
- Fat: 17g
- Saturated Fat: 9g
- Cholesterol: 85mg
Nutritional Info (Approximate Per Serving, based on 4 servings with 2 cans chicken & 1.5 cups cheese)
Calories: 430 | Total Fat: 17g | Saturated Fat: 9g | Cholesterol: 85mg | Sodium: 980mg* | Total Carbohydrates: 45g | Dietary Fiber: 2g | Sugars: 2g | Protein: 24g
*Note: Sodium levels are heavily influenced by the specific rice mix and canned chicken brands used. For lower sodium, look for lower-sodium canned chicken and consider using slightly less of the seasoning packet.
Final Thoughts: More Than Just a Recipe
This skillet isn’t just about feeding hungry people quickly—it’s about reclaiming weeknights. It’s a reminder that great food doesn’t require perfection: not a spotless kitchen, not chef-level skills, not a grocery haul that breaks the bank. Some of life’s best meals are born from simplicity, a little creativity, and the willingness to embrace shortcuts without shame.
So whether you’re a college kid surviving on ramen, a parent juggling soccer practice and laundry, or just someone who wants a damn good meal without the fuss, this recipe’s got your back. It’s proof that comfort can be effortless, that joy can simmer in a single pan, and that sometimes, the humblest ingredients—boxed rice, canned chicken, a handful of cheese—can spark the happiest memories.