
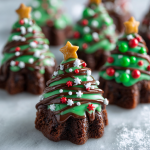
Brownie Candy Melt Christmas Trees: Your New Favorite Holiday Treat!
Hey friends, Beau here from Feastical! Is there anything better than the smell of brownies baking in the oven? It’s like a warm, chocolatey hug for your entire house. Now, imagine taking that incredible feeling and wrapping it up in a festive, fun, and absolutely adorable package that screams holiday cheer. That’s exactly what we’re doing today with these unbelievably cute Brownie Candy Melt Christmas Trees!
I’m a huge believer that holiday baking should be full of joy, not stress. These little edible evergreens are the perfect project—whether you’re baking with wide-eyed kiddos, prepping for a cookie exchange, or just want to add a seriously impressive (yet secretly simple) dessert to your Christmas table. They combine the rich, fudgy heart of a perfect brownie with the smooth, sweet crunch of candy melts, all dressed up in their holiday best with sprinkles and sparkle. They’re the kind of treat that makes people’s eyes light up before they’ve even taken a bite. So, preheat that oven, grab your favorite mixing bowl, and let’s create some edible magic that’s guaranteed to spread smiles.
A Kitchen Full of Laughter & Lopsided Trees
This recipe always takes me back to one particularly chaotic, flour-dusted Christmas Eve at my Grandma Lou’s house. I was maybe ten years old, and my job was to help her decorate the Christmas cookies. Well, I got a little… overzealous with the red sprinkles. Let’s just say Santa looked like he’d had a very unfortunate encounter with a rogue glitter bomb.
Grandma Lou just laughed, her eyes crinkling at the corners. Instead of scolding me, she scooped up a blob of leftover frosting, plopped it on a spare cookie, and said, “Well, Beau, if it’s a mess you want, let’s make a glorious mess! Let’s build a forest!” We proceeded to create the most wildly decorated, lopsided, and sprinkly-encrusted cookie forest imaginable. They were ridiculous. They were perfect. They were the hit of the party because they were made with pure, unadulterated joy.
That’s the spirit I want you to bring to these brownie trees. Don’t worry about perfection. Maybe one tree gets a little extra green coating, or another has a slightly crooked star. Who cares? It just adds to the charm. These aren’t just desserts; they’re little edible memories in the making.
Gathering Your Festive Forest Ingredients
One of the best parts of this recipe is its beautiful simplicity. You likely have most of this hanging around your kitchen already! Here’s your shopping list for these fudgy wonders.
- 1 Box Brownie Mix (plus the ingredients listed on the package) – I’m a firm believer in using a good boxed mix as a fantastic shortcut! It delivers consistent, delicious results every time. My pro tip? Look for a mix labeled “fudgy” or “chocolatey” rather than “cakey” for the richest, densest trees. You’ll typically need oil, water, and an egg, but always double-check your box!
- Non-Stick Baking Spray – This is non-negotiable! Even if you’re using a silicone mold, a quick spritz ensures your brownies pop out cleanly and your candy coating has a smooth surface to adhere to. It’s your best insurance policy against broken trees.
- 2 cups Green Candy Melts (or color of choice) – This is what gives our trees their iconic festive look! Candy Melts (found in the baking aisle) are designed to melt smoothly and set firm. Chef’s Insight: You can use green melting wafers, or even get creative with white chocolate chips mixed with a little green oil-based food coloring. Just avoid water-based food coloring, as it will cause the chocolate to seize up into a grainy mess.
- Holiday Sprinkles, Candy Stars, or M&M’s for Decorating – This is where your personality shines! Raid your sprinkle collection. I love using red and white nonpareils for a classic look, tiny silver balls for shimmer, or even little candy stars for the treetops. M&M’s make for fantastic, colorful “ornaments.” Go wild!
Building Your Edible Evergreen Forest: A Step-by-Step Guide
Alright, team, let’s get our hands dirty (or at least a little chocolatey). Follow these steps, and you’ll have a forest of tasty trees in no time.
Step 1: Preheat & Prep
First things first, get that oven heating to 350°F (175°C). While it’s warming up, prepare your brownie batter exactly as the package directs. Give it a good whisk until it’s just combined and no dry streaks remain. Overmixing can make your brownies tough, so easy does it! Place your silicone Christmas tree mold on a sturdy baking sheet. This makes it much easier to move in and out of the oven without the flexible mold flopping over. Give that mold a generous coating of non-stick spray into every single cavity. Get into all those little tree points and corners!
Step 2: Fill & Bake
Now, using a spoon or a small cookie scoop, fill each tree cavity about ¾ of the way full with brownie batter. Chef’s Hack: Do not overfill! The brownies will rise as they bake, and if you fill them to the top, you’ll lose that beautiful tree shape and end up with a messy, muffin-top situation. We want defined trees, not brownie blobs! Pop the whole baking sheet with the mold on it into the oven and bake for 12-15 minutes. You’ll know they’re done when the tops look set and a toothpick inserted into the center of a tree comes out with a few moist crumbs (not wet batter).
Step 3: The All-Important Cool Down
Patience is a virtue, especially in baking! Let the brownies cool in the mold for a full 15 minutes. They need this time to set and firm up. If you try to remove them too early, they might break. After 15 minutes, gently pop them out onto a wire rack and let them cool completely. I mean it—completely. If the brownies are even slightly warm when you add the candy coating, the heat will cause the coating to melt and slide right off. Not cool. Literally.
Step 4: The Magic Coat
Here’s the transformative step! Wash and thoroughly dry your silicone mold. You want to get rid of any grease or crumbs. Now, melt your Candy Melts according to the package directions. The best way is in short 30-second bursts in the microwave, stirring well between each burst. Pro Tip: If your melted candy seems too thick for coating, you can add a tiny, tiny amount of coconut oil or paramount crystals (about ½ tsp per cup of melts) to thin it to a perfect, dippable consistency. Pour a thin, even layer of the melted green candy into the bottom of each tree cavity. Now, take your completely cooled brownie and press it firmly back into the candy-filled cavity. This is how you get that gorgeous, smooth, professional-looking chocolate coating on the outside. It’s like the brownie is putting on its perfect Christmas sweater!
Step 5: Chill & Decorate
Place the entire mold back onto the baking sheet and slide it into the refrigerator for about 20-30 minutes, or until the candy coating is completely firm and set. Once they’re rock solid, they should pop out of the mold with effortless ease. Now, for the best part: decorating! Use a little extra melted candy melt as “glue” to attach sprinkles, place a candy star on the top, or create ornament patterns with M&Ms. You can also drizzle contrasting colors (like white or red candy melts) over the trees for a fancy finish.
How to Serve Your Festive Masterpieces
Presentation is half the fun with these guys! You’ve put in the work, now let’s show them off.
For a real show-stopping effect, create a “winter wonderland” scene on your serving platter. Dust the plate with a light shower of powdered sugar “snow.” You can even place a few of the trees around a small bowl filled with extra sprinkles or a dollop of whipped cream to look like a snowbank. They look incredible arranged on a tiered dessert stand amidst other holiday cookies.
These trees are rich, so one per person is usually plenty. Serve them alongside a glass of cold milk for the kids, a hot cup of coffee for the adults, or even a glass of peppermint hot chocolate for the ultimate cozy Christmas moment. They are the perfect sweet ending to a big holiday meal or a fabulous centerpiece for your dessert table.
Branch Out! Fun Variations to Try
Feel like mixing it up? This recipe is a fantastic canvas for creativity. Here are a few of my favorite twists:
- The Peppermint Patty: Add ½ teaspoon of peppermint extract to your brownie batter before baking. Decorate the finished trees with crushed candy canes and a drizzle of white candy melt. It’s like a Christmas party in your mouth!
- Cookie Butter Bliss: Swirl a few tablespoons of speculoos or biscoff cookie butter into your brownie batter. Use light brown or white candy melts for the coating, and decorate with crushed speculoos cookies. So warm and spiced!
- Nutty Forest: Fold ½ cup of finely chopped toasted pecans or walnuts into your brownie batter for a wonderful crunch. This adds a lovely grown-up, sophisticated flavor profile.
- Gluten-Free & Dairy-Free Friendly: This is so easy to adapt! Simply use your favorite gluten-free brownie mix. For the coating, make sure to find dairy-free candy melts or chocolate chips (Enjoy Life is a great brand).
- Snow-Capped Peaks: Instead of fully coating the trees in green, only dip the bottom two-thirds of the tree cavity in green candy. Fill the top third with white candy melts before pressing the brownie in. It creates a beautiful snowy effect without any extra decorating!
Beau’s Chef Notes: Tales from the Kitchen
This recipe has become a staple in my holiday lineup, but it wasn’t always smooth sailing. The first time I tested it, I was so excited I skipped the “cool completely” step. Let’s just say I ended up with ghostly, green-streaked brownie blobs that looked more like something from a swamp than a winter forest. It was a delicious, but very ugly, mistake.
I’ve also learned that the quality of your silicone mold matters. I once bought a super cheap one from a random online store, and the tree shapes were so shallow and poorly defined that my “trees” looked like green lumps. Invest in a good, deep, food-grade silicone mold—it makes all the difference in getting those beautiful, sharp details on your candy coating. Now, I can make a whole forest in under an hour, and I always double the batch because they disappear faster than Christmas morning!
FAQs & Troubleshooting: Your Questions, Answered
Q: My candy melts are too thick and gloppy! What did I do wrong?
A: This usually means they got a little too hot. Candy melts can be finicky. If they’re too thick, try adding a tiny bit of coconut oil or vegetable shortening (about ½ teaspoon at a time) and stirring until it smooths out. Remember, low and slow when melting!
Q: My brownie stuck to the mold! How do I prevent this?
A: First, never skip the non-stick spray! Second, make sure you let the brownies cool in the mold for the full 15 minutes to set before trying to remove them. If they’re still sticking, your mold might need a more heavy-duty spray, or you might have overbaked them slightly, making them stickier.
Q: Can I make these ahead of time?
A: Absolutely! These are a great make-ahead treat. Once decorated, store them in a single layer in an airtight container in the refrigerator for up to 5 days. You can also freeze them for up to a month! Just thaw in the fridge overnight before serving.
Q: Can I use homemade brownie batter instead of a mix?
A> You sure can! Use your favorite homemade fudgy brownie recipe. Just be mindful that baking times might vary slightly depending on the recipe, so keep an eye on them after the 10-minute mark.
Brownie Candy Melt Christmas Trees
Description
Fudgy brownies meet smooth candy melts in adorable, festive tree shapes. Perfect for baking with kids, cookie exchanges, or a show-stopping holiday dessert table.
Ingredients
-
1 box brownie mix (plus required ingredients on the package; choose “fudgy” for best results)
-
Non-stick baking spray
-
2 cups green candy melts (or color of choice)
-
Holiday sprinkles, candy stars, or mini M&M’s for decorating
Optional Variations:
-
Peppermint: ½ tsp peppermint extract in batter; crushed candy canes on top
-
Cookie Butter Bliss: Swirl 2–3 tbsp speculoos/biscoff cookie butter in batter; decorate with crushed cookies
-
Nutty Forest: Fold ½ cup finely chopped toasted pecans or walnuts into batter
-
Snow-Capped Peaks: Dip only bottom 2/3 of tree in green, fill top 1/3 with white candy melts
-
Gluten-Free/Dairy-Free: Use GF brownie mix and dairy-free candy melts
Instructions
1. Preheat & Prep
-
Preheat oven to 350°F (175°C).
-
Prepare brownie batter as directed on the package.
-
Place silicone Christmas tree mold on a baking sheet; spray generously with non-stick spray.
2. Fill & Bake
-
Fill each cavity ~¾ full. Do not overfill.
-
Bake 12–15 minutes until tops are set and a toothpick comes out with a few moist crumbs.
3. Cool Completely
-
Let brownies cool in the mold for 15 minutes.
-
Gently remove and cool completely on a wire rack.
4. Coat with Candy Melts
-
Melt candy melts per package instructions (microwave in 30-second bursts, stir well).
-
Thin if necessary with ½ tsp coconut oil per cup.
-
Pour a thin layer into each mold cavity, press cooled brownie in to coat evenly.
5. Chill & Decorate
-
Refrigerate 20–30 minutes until candy coating is firm.
-
Pop out trees and decorate with melted candy “glue,” sprinkles, stars, or M&M ornaments.
Notes
-
Candy melts too thick: Add a tiny amount of coconut oil or vegetable shortening.
-
Brownies sticking: Always spray mold and let brownies cool completely.
-
Make-ahead: Store decorated trees in a single layer in an airtight container in the fridge up to 5 days; freeze up to a month.
Nutrition
- Calories: 320 kcal 1 tree, 6 trees total
- Fat: 14g
- Carbohydrates: 46g
- Protein: 3g
Nutritional Information (Approximate)
Okay, let’s be real—these are a holiday treat, through and through. They’re meant to be enjoyed in the spirit of the season! This nutritional info is a rough estimate based on the ingredients listed and will vary depending on the specific brands you use. This is per serving (assuming one tree per serving and the recipe makes 6 trees).
- Calories: ~320
- Protein: 3g
- Fat: 14g
- Carbohydrates: 46g
- Fiber: 2g
- Sugar: 35g
Remember, it’s all about balance! Enjoy one of these delightful trees with your loved ones and savor every single bite.
Final Thoughts: Share the Joy!
And there you have it, my friends! Your guide to creating the most whimsical, delicious, and conversation-starting holiday dessert on the block. These Brownie Candy Melt Christmas Trees are more than just a recipe; they’re an experience. They’re about the laughter that happens while decorating them, the pride of creating something beautiful with your own hands, and the joy of sharing something made with love.
I hope this recipe brings a little extra magic and a whole lot of chocolate to your holiday season. If you make them (and I really hope you do!), I’d love to see your creations. Tag me @feastical on Instagram or Facebook so I can admire your edible forests! From my kitchen to yours, Merry Christmas and Happy Holidays. Now, let’s go eat!
With love and a full plate,