Hey There, Sweet-Tooth Friends!
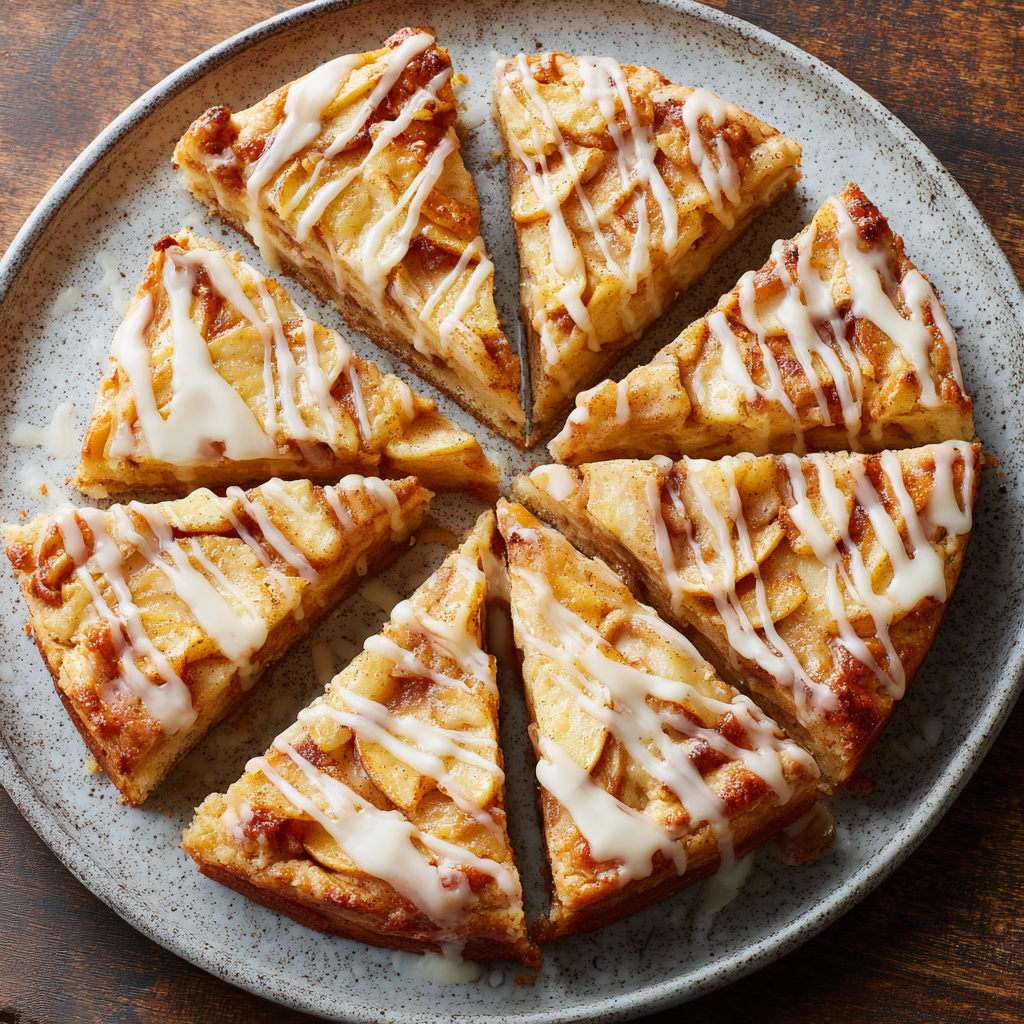
Is there anything more comforting than the smell of baked apples and buttery pastry wafting through your kitchen? Today, I’m beyond excited to share my all-time favorite crowd-pleaser: Midwest-Style Apple Slices with Vanilla Glaze. Imagine flaky, tender crust hugging a thick layer of spiced apples, all drenched in sweet vanilla sunshine. This isn’t just dessert—it’s a buttery hug on a plate. Perfect for potlucks, Sunday brunches, or those “I deserve something awesome” moments. And guess what? We’re making a double batch because sharing is caring (and leftovers are life). Trust me, once you taste these, that grocery-store pie will seem like a distant, sad memory. Ready to bake some joy? Let’s roll up our sleeves!
Why do I adore this recipe? It’s unfussy magic. No fancy tools, no temperamental techniques—just honest, feel-good baking. The glaze? Pure vanilla euphoria. The crust? So tender it practically sighs when you bite in. And that double batch means you’ll have enough to freeze for emergencies (read: Tuesday nights). Whether you’re a pastry pro or a newbie with a rolling pin, this recipe’s your golden ticket to hero status at any gathering. So preheat that oven, friend—adventure awaits!
Grandma’s Countertop & The Apple-Scented Time Machine
Every time I make these apple slices, I’m instantly 8 years old again, perched on a flour-dusted stool in my Grandma Lou’s kitchen. She’d pull out her massive speckled enamel pan—the one that weighed more than I did—and declare, “Beau, fetch the apples!” We’d peel until our fingers cramped, laughing as the skins coiled into silly green ribbons. She’d sneak me slices dusted with cinnamon sugar, whispering, “Chef’s tax, sugarplum.”
The best part? Watching her roll that crust like a boss. No measuring cups—just her hands, intuition, and decades of love baked into every fold. When those golden rectangles emerged, glazed and gleaming, the whole neighborhood would magically appear. We’d eat them warm, balancing plates on our knees on the porch, sticky-fingered and happy. That’s the secret ingredient, you know? Not the apples or the butter… but the togetherness. That’s why I always make a double batch—to share that same joy. Now, let’s make new memories!
Gathering Your Flavor Arsenal (Double Batch Deliberately!)
Crust:
- 4 cups all-purpose flour – The foundation! Spoon & level it—don’t pack it down. For tenderness, swap 1 cup with pastry flour if you’re fancy.
- 1 tsp baking powder – Our stealthy lift agent. Not baking soda! They’re not twins.
- 1 tsp salt (kosher preferred) – Balances sweetness. Kosher dissolves better, but table salt works (use ¾ tsp).
- 1 ½ cups non-hydrogenated lard – *Chef’s secret weapon!* Makes crusts flakier than butter. Chill it! Sub with cold butter if needed (same amount), but expect less flake.
- 1 cup ice water – Key word: ICE. Cold = flaky layers. Dip fingers in it if dough feels warm.
- 4 egg yolks – Richness kings! Save whites for meringues. Room temp blends smoother.
- 2 tsp lemon juice – Brightens the crust & prevents gluten toughness. No fresh lemons? White vinegar works (1 tsp).
Filling:
- 64 oz apple dessert filling/topping – The MVP! Canned is fine (I love Comstock®), but for bragging rights: simmer 10 peeled/cubed apples with 1 cup sugar, 2 tsp cinnamon, and ¼ cup water until jammy.
Glaze:
- 2 cups powdered sugar – Sift it! No one wants lumpy glaze.
- 4 tbsp softened butter – Unsalted = control. Melted works, but softened gives creamier texture.
- 1 tsp vanilla extract – Splurge on real stuff. Bourbon vanilla? *Chef’s kiss*.
- 4 tbsp whole milk – Adds creaminess. Sub heavy cream for luxury, or almond milk for dairy-free. Need it thinner? Add more ½ tsp at a time.
Pro Tip: Lard skeptics? It’s not the 70s! Non-hydrogenated lard is minimally processed. Your crust will thank you.
Let’s Build Some Deliciousness!
Step 1: Dough Whispering (15 mins)
In a big bowl, whisk flour, baking powder, and salt. Grab a pastry cutter (or two forks) and cut in COLD lard until it looks like chunky peas. Don’t overmix—flaky layers live here! In another bowl, whisk egg yolks, lemon juice, and ice water. Drizzle this into the flour mix while stirring with a fork. When it shaggy-dough-dances together, stop! Divide into two equal balls. Flatten into discs, wrap in plastic, and chill 30 mins. *Chef Hack: Chill your bowl first! Heat is the enemy.*
Step 2: Roll Out the Happiness (15 mins)
Lightly flour your surface. Roll one dough disc into a rectangle slightly larger than your 13×18″ baking sheet (grease that sheet!). Drape it in gently—no stretching! Patch tears with dough scraps. Spread apple filling evenly, leaving a ½-inch border. Roll the second dough disc same size. Carefully place it over the apples. Crimp edges with a fork (or fold & pinch) to seal tight. *Pro Move: Cut slits on top for steam to escape—no soggy bottoms!*
Step 3: Bake to Golden Glory (40 mins)
Pop it into a preheated 375°F (190°C) oven. Bake 35-40 mins until the crust is deeply golden and filling bubbles like a happy volcano. Rotate the pan halfway! *Chef Truth: Ovens lie. Use an oven thermometer!* If edges brown too fast, tent with foil.
Step 4: Glaze the Universe (5 mins)
While slices cool slightly, whisk glaze: powdered sugar, butter, vanilla, and milk. Aim for honey-thick but drizzly. Too thin? Add sugar. Too thick? Drops of milk. Drizzle lavishly over the warm slab. *Emotion Tip: Sing “You Are My Sunshine.” It improves flavor.*
Step 5: The Grand Finale (Patience, Grasshopper!)
LET IT COOL 1 HOUR before slicing. I know, torture! But cutting hot = apple lava everywhere. Use a sharp knife dipped in hot water for clean bars. Wipe between cuts!
Sharing is the Best Part
Serve these babies slightly warm or room temp. Dust with powdered sugar for snow-kissed charm or add a scoop of vanilla ice cream that melts into the glaze (heaven!). For brunch? Pair with strong coffee. Taking them to a picnic? Layer in a parchment-lined tin—no sticking! Pro tip: Stack slices with wax paper between layers. They’re sturdy, portable, and guaranteed to make you the most popular person at the potluck. Bonus: They taste even better the next day… if they last that long.
Mix It Up, Buttercup!
1. Berry Bonanza: Swap half the apples with frozen cherries or blueberries + 1 tbsp cornstarch.
2. Salty-Sweet Seduction: Sprinkle crust with flaky sea salt before baking. Add caramel drizzle on top!
3. Spice Explorer: Add ¼ tsp cardamom or ginger to the filling. Feeling wild? A pinch of black pepper!
4. Nutty Crunch: Press chopped pecans or almonds onto the glaze before it sets.
5. Vegan Vibes: Use plant-based butter + coconut oil (equal parts) for crust, and almond milk for glaze. Skip egg yolks—add 1 tbsp extra water.
Confessions from My Floury Trenches
This recipe’s survived three generations and my own kitchen disasters! Once, I subbed paprika for cinnamon (don’t ask)—we called them “Spicy Surprise Slices.” Not recommended. Over years, I tweaked Grandma Lou’s version: adding lemon juice for tenderness and using lard after a butter vs. lard experiment left my butter crust in flakey shame. The double batch? Born when my book club descended like locusts. Now I freeze unbaked slabs: just glaze after baking! Funny story: My dog, Biscuit, once stole an entire slice off the counter. He gave it 5/5 tail wags… worth the scolding.
Your Questions, My Answers (Panic Not!)
Q: My crust is tough! What went wrong?
A: Overworking or warm ingredients are likely culprits. Handle dough minimally, keep everything cold, and don’t skip the lemon juice (it inhibits gluten).
Q: Can I use fresh apples instead of canned filling?
A: Absolutely! Use 10-12 firm baking apples (like Granny Smith or Honeycrisp). Peel, slice ¼-inch thick, and toss with ¾ cup sugar, 2 tsp cinnamon, 3 tbsp flour/cornstarch, and 1 tbsp lemon juice.
Q: Why did my glaze soak into the crust?
A: You poured it on too hot! Let slices cool 20 mins first. Glaze should be thick but pourable—if too thin, it vanishes.
Q: Help! My filling leaked everywhere.
A: Next time: 1) Leave that ½-inch border! 2) Seal edges extra tight. 3) Don’t overfill—canned filling expands. Place a baking sheet under your pan to catch drips (trust me).
Apple Slices with Vanilla Glaze
- Total Time: 1 hour 30 mins
Description
Tender, flaky crust hugs a thick layer of cinnamon-spiced apples, all drowned in sweet vanilla glaze. Perfect for potlucks, cozy nights, or bribing friends.
Ingredients
Crust:
-
4 cups all-purpose flour (spooned & leveled)
-
1 tsp baking powder
-
1 tsp kosher salt
-
1 ½ cups cold lard or butter (for ultra-flaky crust!)
-
1 cup ice water
-
4 egg yolks
-
2 tsp lemon juice
Filling:
-
2 cans (32 oz each) apple pie filling OR 10–12 fresh apples (peeled, sliced) + ¾ cup sugar + 2 tsp cinnamon
Glaze:
-
2 cups powdered sugar (sifted)
-
4 tbsp softened butter
-
1 tsp vanilla extract
-
4 tbsp whole milk
Instructions
-
Make the Dough
-
Whisk flour, baking powder, and salt. Cut in cold lard/butter until pea-sized.
-
Mix egg yolks, lemon juice, and ice water. Stir into flour until just combined.
-
Divide into 2 discs, wrap, and chill 30 mins.
-
-
Roll & Fill
-
Roll one disc to fit a 13×18″ baking sheet. Spread apple filling, leaving a ½-inch border.
-
Roll second disc, place on top, and crimp edges. Cut steam vents.
-
-
Bake
-
Bake at 375°F (190°C) for 35–40 mins until golden and bubbly.
-
-
Glaze & Slice
-
Whisk glaze ingredients until smooth. Drizzle over slightly cooled slices.
-
Let cool 1 hour before cutting (patience = no lava spills!).
-
Notes
✅ Flakiest Crust: Keep ingredients cold and don’t overwork the dough.
✅ No Lard? Use butter, but expect less flake.
✅ Fresh Apples? Toss with sugar, cinnamon, and 3 tbsp flour/cornstarch to thicken.
- Prep Time: 30 mins
- Cook Time: 40 mins
Nutrition
- Calories: 280 Cal Per Slice
- Sugar: 22g
- Fat: 14g
- Carbohydrates: 34g
Nutritional Nibbles (Per Slice)
Calories: ~280 | Sugar: 22g | Fat: 14g | Carbs: 34g | Protein: 3g
*Note: Using butter instead of lard adds saturated fat. Fresh apples reduce sugar slightly. This is dessert—savor it joyfully!*
Final Thoughts: Why This Recipe is a Forever Favorite
This Midwest-Style Apple Slice isn’t just dessert—it’s nostalgia, comfort, and joy baked into one pan. The flaky crust (thanks to lard science), spiced apple filling (homemade or upgraded canned), and vanilla glaze (endlessly customizable) make it a versatile showstopper.
Why It Works for Everyone:
-
Beginners love its forgiving nature (no lattice-weaving stress).
-
Crowd-feeders adore its portability (no fork needed!).
-
Meal-preppers stash extras in the freezer (bake now, glaze later).
So whether you’re channeling Grandma Lou’s wisdom or creating new traditions, this recipe is a keeper. Now go bake, share, and watch people’s eyes light up—that’s the real magic.