
Nest Granola Cups: Your New Favorite Springtime Ritual
Hey friends, Beau here! Can you feel it? That gentle shift in the air, the first brave blooms peeking through the soil, and the morning chorus of birds tuning up for their daily symphony? Spring isn’t just a season on the calendar; it’s a feeling. It’s the promise of sunshine, fresh starts, and food that’s as fun to look at as it is to eat. And that’s exactly where our kitchen adventure leads us today.
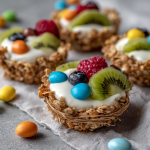
I want to introduce you to something that’s been putting a permanent smile on my face every morning this week: “Nest” Granola Cups. Imagine this: a perfectly crunchy, subtly sweet little cup, shaped just like a cozy bird’s nest, cradling a cloud of creamy yogurt and topped with a confetti of fresh, jewel-toned berries or a few playful mini eggs. It’s breakfast, it’s a snack, it’s a centerpiece for your spring brunch table—all wrapped up in one delightfully edible package.
This isn’t about fussy, complicated pastry. This is about joyful, wholesome eating that sparks a little bit of magic. Whether you’re serving these to wide-eyed kiddos, impressing your brunch crew, or simply treating yourself to a morning moment of joy, these granola nests deliver. They’re the culinary equivalent of finding the first robin’s egg of the season. So, tie on your apron (or don’t, I’m not the boss of you!), and let’s create some edible sunshine together.
A Kitchen Full of Nests & Nostalgia
This recipe takes me straight back to my grandma’s sun-drenched kitchen in April. She was a master of making the ordinary magical. I’d be at the table, a pile of crayons and construction paper before me, diligently cutting out paper birds for a school project. The smell of toasting oats and honey would start to drift from the oven, and I’d peek over my shoulder to see what she was up to.
With hands that could tell a thousand stories, she’d press the warm, fragrant granola mixture into her old muffin tin, using the back of a small spoon to carefully shape the sides. “We’re helping the birds get ready for spring, Beau,” she’d whisper with a wink. Of course, I knew our edible nests weren’t for the sparrows outside her window, but that sense of playful creation, of making something special with simple ingredients, stuck with me. When I pull these golden cups out of the oven now, that smell is a time machine. It’s the smell of creativity, of love, and of understanding that food is so much more than fuel—it’s a feeling. And that’s the feeling I want to share with you.
Gathering Your Nest-Building Supplies
Here’s the beautiful part: you likely have most of this in your pantry right now. This is simple, real-food magic. Let’s break it down.
- 2 cups rolled oats (old-fashioned): The backbone of our nest! Rolled oats give us the perfect chewy-yet-crunchy texture. Chef’s Insight: Don’t use quick oats here—they can get a bit mushy. The sturdy rolled oat holds its shape beautifully.
- ½ cup honey or pure maple syrup: Our natural sweetener and binding agent. Honey gives a classic, floral sweetness, while maple syrup offers a deeper, almost caramel-like note. Pro Tip: If your honey is super thick, warm it slightly for easier mixing.
- ⅓ cup coconut oil or unsalted butter, melted: This is what gives our nests their rich flavor and helps them crisp up. Coconut oil adds a lovely subtle tropical hint (great for dairy-free!), while butter gives that classic, comforting taste. Use what you love!
- ½ teaspoon cinnamon: The warm, cozy whisper in the background. It makes the whole kitchen smell like a hug.
- ¼ teaspoon fine sea salt: Never skip the salt in sweet recipes! It’s the secret weapon that makes all the other flavors pop and balances the sweetness perfectly.
- ½ teaspoon pure vanilla extract: The finishing touch that adds a layer of warm, aromatic depth. It’s the difference between “good” and “where have you been all my life?”
- For Filling & Topping:
- Yogurt: Greek yogurt for ultra-creamy and protein-packed, or regular yogurt for a lighter touch. Vanilla, honey, or plain all work—choose your adventure!
- Fresh Fruit or Mini Candy Eggs: Berries, kiwi slices, mango dice, banana coins… the springtime rainbow is yours! For a festive touch, especially around Easter, a few mini candy eggs nestled in the “yogurt snow” are pure joy.
Building Your Edible Masterpiece: Step-by-Step
Ready to get your hands deliciously dirty? Let’s do this. Remember, cooking is a vibe, not a stress test.
- Preheat & Prep: Fire up your oven to a cozy 350°F (175°C). Now, grab a standard 12-cup muffin tin. This is non-negotiable for me: grease that tin generously with cooking spray or butter. I’m talking every nook and cranny. These nests need to be released with love after baking. Trust me on this one—it’s the difference between perfect little cups and a frustrating crumble.
- The Big Mix: In a large mixing bowl, combine your rolled oats, honey (or maple syrup), melted coconut oil (or butter), cinnamon, salt, and vanilla. Get in there with a sturdy spoon or spatula and mix until every single oat is glistening and coated in that sweet, fragrant mixture. It should look uniform and feel slightly sticky. That’s the glue for our nests!
- Shape Those Nests! This is the fun, tactile part. Scoop up about 2-3 tablespoons of the oat mixture and plop it into a muffin cup. Now, using your fingers, a small glass, or the back of a spoon, press the mixture firmly from the bottom up the sides. You’re creating a cup shape with a nice, thick base and walls that go about ¾ of the way up the cup. Press, press, press! The more compact you make it, the better it holds together after baking. Think “bird building a sturdy home.”
- Bake to Golden Perfection: Slide your tin into the preheated oven and let the magic happen for 15-18 minutes. You’re looking for the edges to turn a beautiful, deep golden brown. They’ll smell incredible—toasty, sweet, and warm.
- The Crucial Cool Down: Here’s my #1 chef hack for success: LET THEM COOL COMPLETELY IN THE PAN. I know, the temptation is real. You’ll want to pop them out immediately. But fight it! As they cool, they firm up and set. Give them a good 20-30 minutes. Once they’re room temperature, you can gently run a butter knife around the edges to help lift them out. They should come out in perfect, intact little nests.
- Fill & Flourish: The grand finale! Right before serving, spoon your chosen yogurt into each nest. Then, unleash your inner artist with the toppings. Pile on the berries, artfully place a few kiwi slices, or tuck in those festive candy eggs. The contrast of the cool, creamy yogurt with the crunchy, warm-spiced nest is everything.
How to Serve These Sunny Little Nests
Presentation is half the fun with these! You can keep it casual or make it a show-stopper.
For a family breakfast, line them up on a big platter right down the center of the table with bowls of different toppings (sliced almonds, chia seeds, fruit salad, honey drizzle) so everyone can build their own dream nest. It turns breakfast into an interactive event!
Hosting a spring brunch? Place each nest on a small, colorful plate. Add a dollop of yogurt, a meticulous pile of mixed berries, a mint leaf for a pop of green, and a delicate dusting of bee pollen or a tiny drizzle of extra honey. Instant restaurant-worthy plating that’ll have your guests whipping out their phones for a pic.
And for snacks? Just fill ‘em and go! They’re perfectly portable for a sunny afternoon park date or a post-school pick-me-up. I’ve even been known to enjoy one with a cup of tea as a not-too-sweet afternoon treat.
Mix It Up! Creative Twists on the Classic Nest
The basic recipe is your canvas. Now let’s play with some colors and flavors!
- Tropical Getaway: Add ¼ cup of shredded coconut and 2 tablespoons of chopped macadamia nuts to the oat mix. Fill with coconut yogurt and top with mango and passionfruit.
- Chocolate Berry Bliss: Stir 2 tablespoons of unsweetened cocoa powder into the dry mix and use maple syrup as your sweetener. Fill with chocolate or vanilla yogurt and top with raspberries and a few dark chocolate chips.
- Peanut Butter & Jelly: Swap half the coconut oil for creamy natural peanut butter. Fill with Greek yogurt and top with a small spoonful of your favorite berry jam or fresh strawberry slices.
- Savory Herb & Cheese (Yes, really!): Omit the cinnamon and vanilla. Use olive oil and a touch of honey. Stir in ¼ cup grated Parmesan, 1 teaspoon of dried herbs (like Italian seasoning), and black pepper. Bake, then fill with herbed goat cheese or ricotta and top with a cherry tomato and fresh basil. A stunning appetizer!
- Superfood Power-Up: Add 2 tablespoons each of chia seeds and hemp hearts to the oat mixture. Fill with sky-high-protein Greek yogurt and top with blueberries and a sprinkle of cinnamon.
Beau’s Kitchen Notes & Stories
This recipe has evolved in my kitchen more times than I can count. The first batch I ever made, in my first tiny apartment, was a hilarious failure. I didn’t press the mixture firmly enough, used quick oats by accident, and tried to remove them from the pan while they were still warm. The result? A muffin tin full of delicious, but completely crumbled, granola. I ate it with yogurt and a spoon anyway, and learned three valuable lessons that are now baked into the instructions above!
Over the years, I’ve found these are best made the day you plan to serve them, though the unfilled baked cups can live in an airtight container for 2-3 days. The yogurt will soften them if left sitting too long, so fill them just before the party (or your morning bite). Most of all, this recipe is a reminder to play with your food. Get the kids involved in pressing the nests. Let your friends choose their toppings. Food is connection, and these little nests are some of the best connectors I know.
Your Questions, Answered!
Q: My nests fell apart when I tried to take them out! What did I do wrong?
A: The two most common culprits are: 1) Not greasing the pan enough (be generous!), and 2) Not letting them cool completely in the pan. They need that cooling time to set and firm up. Also, double-check that you’re pressing the mixture very firmly into the cups.
Q: Can I make these gluten-free or vegan?
A> Absolutely! For gluten-free, ensure your oats are certified GF. For vegan, use maple syrup (not honey) and coconut oil. Fill with a thick plant-based yogurt (coconut or almond milk yogurts work great).
Q: Can I prep these ahead of time?
A> You can! Bake the cups up to 3 days ahead and store them unfilled in an airtight container at room temperature. Assemble with yogurt and toppings right before serving for the best texture.
Q: My mixture seems too dry/crumbly to press into shape.
A> If your honey was very thick or you measured the oil a bit short, this can happen. Add an extra tablespoon of melted coconut oil or maple syrup and mix again. It should be cohesive and slightly sticky.
“Nest” Granola Cups with Yogurt : A Wholesome, Fun Springtime Treat
Description
These Nest Granola Cups are crunchy, lightly sweet, and perfect for spring breakfasts or snacks. Made with simple pantry ingredients, they bake into little edible “nests” that you can fill with creamy yogurt and fresh fruit. They’re easy, fun to shape, and great for brunch tables or make-ahead morning treats.
Ingredients
Granola Nests
-
2 cups rolled oats (old-fashioned)
-
½ cup honey or maple syrup
-
⅓ cup coconut oil or melted butter
-
½ tsp cinnamon
-
¼ tsp fine salt
-
½ tsp vanilla extract
For Filling
-
1½–2 cups Greek or regular yogurt
-
Fresh berries or chopped fruit
-
Optional: nuts, seeds, or mini chocolate/candy eggs
Instructions
1️⃣ Preheat & Prep
Preheat oven to 175°C / 350°F. Grease a 12-cup muffin tin very well.
2️⃣ Mix
In a large bowl, stir oats, honey (or maple syrup), melted oil (or butter), cinnamon, salt, and vanilla until evenly coated and slightly sticky.
3️⃣ Shape the Nests
Scoop 2–3 tablespoons into each muffin cup. Press firmly into the bottom and up the sides using your fingers or the back of a spoon to form a cup shape.
4️⃣ Bake
Bake 15–18 minutes until golden brown around the edges.
5️⃣ Cool Completely
Let nests cool fully in the pan (about 25 minutes). Carefully loosen with a knife and lift out.
6️⃣ Fill & Serve
Spoon yogurt into each nest and top with fruit or other toppings just before serving.
Notes
-
Press the mixture firmly so cups hold together.
-
Use rolled oats, not quick oats, for better texture.
-
If mixture feels dry, add 1 extra tablespoon honey or oil.
-
Cool completely before removing — this prevents crumbling.
-
Store unfilled cups airtight up to 3 days.
A Note on Nourishment
While I’m all about the joy first, it feels good to know what’s fueling you. Each unfilled granola cup (based on the recipe with honey and coconut oil) is a wholesome little package. It’s a source of energizing complex carbs and fiber from the oats, with the healthy fats from the coconut oil helping to keep you satisfied. Using Greek yogurt as a filling packs in a powerful protein punch, making this a truly balanced bite. Of course, toppings change the game—fresh fruit adds vitamins and antioxidants, while candy eggs are a pure fun treat. As with all things Feastical, it’s about balance. Enjoy the nourishment, savor the flavor, and always eat with joy.
Final Thoughts
And there you have it, friends—my heartfelt guide to creating a little edible springtime joy. These “Nest” Granola Cups are more than just a recipe; they’re an invitation to slow down, to create something beautiful with your own two hands, and to share a moment of simple, delicious happiness.
I hope you’ll bake up a batch and let that warm, cinnamon-and-honey scent fill your kitchen. I hope you’ll share them with someone you love, or simply savor one all for yourself with a quiet cup of coffee as the morning sun streams in. That’s what Feastical is all about. Now, go build some nests! And be sure to tag me @feastical if you share your creations—I live for seeing your kitchen wins.
With a full heart and an empty nest (plate),
Beau
Prep Time: 10 minutes | Cook Time: 18 minutes | Total Time: 28 minutes | Servings: 12 nests