Homemade Reese’s Peanut Butter Eggs: Your New Easter Tradition (Easy 6-Ingredient Recipe!)
Hey friends, Beau here! Can we talk about the undisputed champion of the Easter candy bowl for a second? I’m not talking about those chalky marshmallow chicks (no offense, Peeps). I’m talking about that glorious, perfect marriage of sweet and salty, creamy and crunchy: the Reese’s Peanut Butter Egg. There’s just something about that egg shape that makes the peanut butter-to-chocolate ratio feel… sacred. Magical, even.
But what if I told you that you can create that magic right on your own kitchen counter? That with just six simple ingredients and zero oven time, you can whip up a batch of homemade Reese’s Eggs that might just outshine the classic? I’m here to tell you it’s not only possible, it’s an absolute joy. This isn’t about replicating a factory-made candy bar perfectly—it’s about capturing that soul-satisfying flavor with a touch of homemade love. The kind of treat that makes you close your eyes and hum after the first bite. So, grab your favorite mixing bowl and your trusty spatula. We’re about to make some memories, and more importantly, some incredibly delicious candy. Let’s get to it!
The Peanut Butter-Stained Apron: An Easter Memory
My love for these things goes way back. Picture a sunny spring kitchen, the smell of ham in the oven, and my grandma’s counter perpetually dusted with a fine layer of powdered sugar. One year, she decided our store-bought Easter candy needed a homemade companion. She pulled out her big stoneware bowl, a jar of Jif, and a bag of chocolate chips. I was appointed “Official Egg Shaper,” a title I wore with immense, flour-dusted pride.
We didn’t have fancy molds. It was just us, a lump of sweet peanut butter dough, and our hands. Mine were small and clumsy, making lopsided ovals that looked more like potatoes than eggs. Grandma’s, however, were swift and sure, turning out perfect, smooth eggs every time. She’d smile, her eyes crinkling, and say, “Taste is what matters, Beau. The shape is just the fun of it.” And oh, the taste. That first bite of a still-slightly-warm egg, the chocolate shell giving way to the rich, creamy center… it wasn’t just candy. It was connection. It was the thrill of making something wonderful from simple things. Every time I make this recipe now, I’m back at that counter, and that’s the feeling I hope this recipe brings to your kitchen.
Your Candy-Making Toolkit: The 6 Simple Ingredients
Here’s the beautiful part: you probably have most of this in your pantry already. This is minimalist magic at its finest. Let’s break down each player and why it’s here.
- 1 ½ cups creamy peanut butter: This is the STAR. Use a standard, no-stir creamy peanut butter like Jif or Skippy. The oils and consistency are predictable, which gives us that perfect, moldable filling. Natural peanut butter (the kind that separates) can make the filling too oily and soft. Chef’s insight: This is your one chance to be a brand loyalist—use your favorite!
- ¼ cup unsalted butter, melted: Our binding agent and flavor booster. Melt it and let it cool just slightly so it doesn’t melt the peanut butter. Unsalted lets us control the sweetness. Substitution tip: For a dairy-free version, a solid, unrefined coconut oil works beautifully and adds a subtle hint of coconut flavor.
- 1 tsp pure vanilla extract: The secret whisper in the background. It deepens all the other flavors and rounds out the sweetness. Don’t skip it! Chef’s insight: If you’re feeling fancy, a tiny splash (⅛ tsp) of almond extract is a game-changer.
- 2 cups powdered sugar (confectioners’ sugar): This is what transforms our gooey mixture into a shape-holding dough. It adds sweetness and structure. Pro tip: Sift it if it’s lumpy for a super smooth filling.
- 2 cups milk chocolate chips: The iconic shell. Chocolate chips are formulated to hold their shape, making them perfect for dipping. For a darker, richer shell, use semi-sweet chips.
- 1 tbsp coconut oil or shortening: Our chocolate’s best friend! Adding a bit of fat thins the melted chocolate just enough for a smooth, glossy, crack-free coating that sets beautifully. Coconut oil will harden faster and give a slight sheen.
Let’s Make Some Magic: Step-by-Step Instructions
Ready? This is where the fun happens. Clear some counter space, put on some good tunes, and let’s craft some candy.
- Create the Peanut Butter Dough: In a medium-sized bowl, combine the creamy peanut butter, slightly cooled melted butter, and vanilla extract. Stir with a sturdy spoon or spatula until it’s completely smooth and homogenous. It’ll look like a velvety peanut butter dream.
- Incorporate the Powdered Sugar: Here’s the trick: add the powdered sugar one cup at a time. Stir vigorously after the first cup. It will get thick and crumbly—that’s normal! Add the second cup and keep mixing. At first, it’ll seem impossible, but keep faith. It will eventually come together into a soft, pliable dough that looks like Play-Doh and smells like heaven. Chef Hack: If the dough feels too sticky to handle, add an extra tablespoon or two of powdered sugar. If it’s too dry and crumbly, add a tiny drizzle of melted butter or a teaspoon of peanut butter.
- Shape Your Eggs: Line a baking sheet or tray with parchment paper. Pinch off portions of dough (about 1½ – 2 tablespoons each) and roll them into a ball in your hands. Then, gently shape them into ovals, flattening them slightly to look like classic peanut butter eggs. Place them on the parchment-lined tray. Don’t stress about perfection! Part of the charm is their homemade shape. Pro Tip: If your hands are warm, a light dusting of powdered sugar on your palms can prevent sticking.
- The Key to Success: The Freeze! Pop the entire tray into the freezer for 20-30 minutes. This step is NON-NEGOTIABLE. Freezing firms up the peanut butter centers, which makes dipping them in warm chocolate a clean, easy process. It prevents the filling from melting or falling apart.
- Prep the Chocolate Coating: While the eggs chill, melt your chocolate. Use a double boiler (a heatproof bowl set over a pot of simmering water, ensuring the bowl doesn’t touch the water) or melt carefully in the microwave in 30-second bursts, stirring well between each burst. Once the chocolate is mostly melted, stir in the tablespoon of coconut oil or shortening until the mixture is completely smooth and fluid.
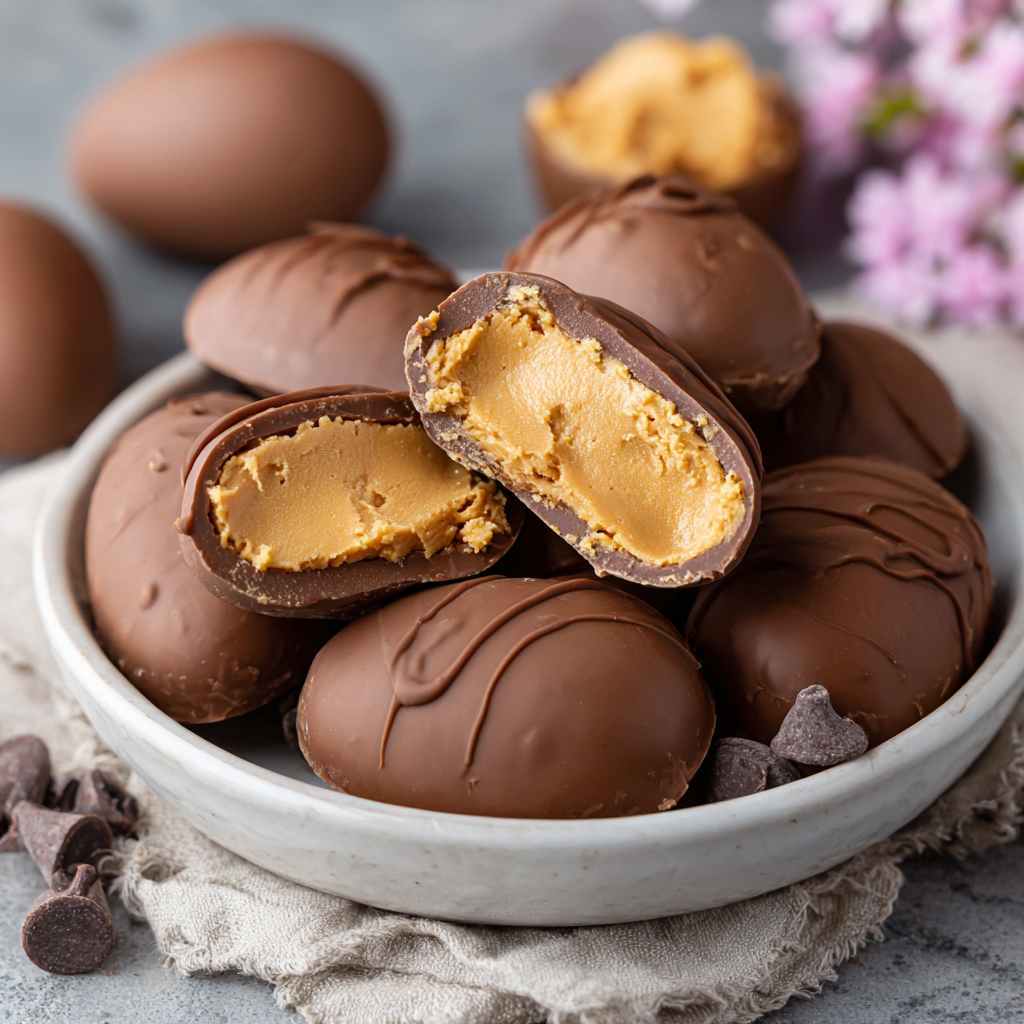
- The Dip: Remove your peanut butter eggs from the freezer. Using a fork or a dipping tool, gently lower an egg into the melted chocolate. Spoon chocolate over the top to ensure it’s fully coated. Lift it out, let the excess chocolate drip off for a second, then gently scrape the bottom of the fork on the edge of the bowl. Place it back on the parchment paper. Repeat with all eggs. Chef Hack: For that classic Reese’s crosshatch pattern, drag the tines of your fork across the top of the chocolate-coated egg before it sets!
- Set and Serve: Let the chocolate set at room temperature, or for faster results, pop the tray back in the fridge for 15-20 minutes. The chocolate will become firm and glossy. That’s it! You did it!
How to Serve Your Homemade Masterpiece
Presentation is part of the fun! Once set, these eggs are ready for their debut. You can arrange them on a festive platter lined with pastel paper or Easter grass for a classic candy bowl moment. For a more personal touch, place each one in a small candy cup (the frilly paper liners) and pack them into little gift boxes or clear cellophane bags tied with a ribbon. They make the most thoughtful, delicious homemade gift for neighbors, teachers, or friends. They’re rich, so I recommend serving them alongside some fresh fruit or berries to cut the sweetness. And a cold glass of milk? An absolute mandatory pairing, in my humble opinion.
Get Creative: Recipe Variations & Twists
Once you’ve mastered the classic, the playground is open! Here are a few of my favorite ways to mix it up:
- The Dark Side: Use dark chocolate chips for the coating. The deeper, less sweet chocolate creates an incredible contrast with the sweet filling.
- Crunch Time: Mix ½ cup of crushed pretzel pieces or rice krispies into the peanut butter dough before shaping. You get an amazing salty crunch in every bite.
- Nutty Swap: For a different flavor profile, use almond butter or cashew butter instead of peanut butter. It’s a delicious and elegant twist.
- “Healthier” Hack: Use natural peanut butter (just be prepared for a slightly softer texture), swap the butter for coconut oil, and use a reduced-sugar powdered sugar alternative. The shape might be a little less perfect, but the flavor will still be fantastic.
- Year-Round Fun: Who says these are just for Easter? Shape them into hearts for Valentine’s Day, circles for Christmas ornaments, or even just simple balls for a classic peanut butter cup experience any day of the year.
Beau’s Chef Notes & Kitchen Confessions
This recipe has been my Easter staple for over a decade, and it’s evolved from those lopsided eggs with my grandma. I’ve learned that a splash of flaky sea salt on top of the wet chocolate is a revelation. I’ve also learned the hard way that skipping the freezer step leads to a delicious but disastrous chocolate-peanut butter puddle—so learn from my mistakes! One year, I was out of vanilla and used a bit of bourbon instead. Let’s just say that “adults-only” batch was a hit at the family gathering. The beauty of a recipe like this is that it’s a foundation. Make it yours. Add a little love, a little laughter, and maybe a few finger-swipes of peanut butter dough along the way. That’s the real secret ingredient.
FAQs & Troubleshooting: Your Questions, Answered
Q: My peanut butter filling is too soft/sticky to shape. What did I do wrong?
A: Don’t panic! This is usually a measuring issue or due to the type of peanut butter. First, make sure you packed the peanut butter into the measuring cup. Add more powdered sugar, a few tablespoons at a time, until it’s moldable. If you used natural peanut butter, it will be softer; popping the mixed dough in the fridge for 20 minutes before shaping can help firm it up.
Q: My chocolate cracked when it set! Why?
A: This is likely a temperature shock. Your peanut butter centers were too cold when dipped, and the warm chocolate contracted too much as it cooled. Next time, let the frozen eggs sit out for 2-3 minutes before dipping to take the deep chill off. Also, adding that coconut oil/shortening to the chocolate helps make it more flexible.
Q: Can I use almond bark or candy melts instead of chocolate chips?
A> Absolutely! Candy melts and almond bark are designed for coating and set up very easily. Follow the package directions for melting. You won’t need to add the coconut oil, as they are already formulated to be fluid.
Q: How do I store these, and how long do they last?
A: Store them in an airtight container in the refrigerator for up to 2 weeks. They can also be frozen for up to 3 months! Just layer them between parchment paper in a freezer-safe container. Thaw in the fridge before serving.

Homemade Reese’s Peanut Butter Eggs (Easy 6-Ingredient Recipe)
Description
Creamy peanut butter filling wrapped in a smooth milk chocolate shell—these homemade Reese’s-style peanut butter eggs are rich, nostalgic, and dangerously easy to make. No oven, no fancy tools, just pure Easter magic made right on your kitchen counter.
Ingredients
-
1½ cups creamy peanut butter (no-stir, like Jif or Skippy)
-
¼ cup unsalted butter, melted and slightly cooled
-
1 teaspoon vanilla extract
-
2 cups powdered sugar (confectioners’ sugar)
-
2 cups milk chocolate chips (or semi-sweet)
-
1 tablespoon coconut oil or shortening
Instructions
-
Make the Peanut Butter Filling
In a medium bowl, mix peanut butter, melted butter, and vanilla until smooth. -
Add the Sugar
Stir in powdered sugar one cup at a time. The mixture will be thick at first, then come together into a soft, moldable dough. -
Shape the Eggs
Scoop about 1½–2 tablespoons of dough per egg. Roll into a ball, then gently shape into an oval.
Place on a parchment-lined baking sheet. -
Freeze (Very Important!)
Freeze shaped eggs for 20–30 minutes until firm. -
Melt the Chocolate
Melt chocolate chips with coconut oil using a double boiler or microwave (30-second intervals, stirring between). Stir until smooth and glossy. -
Dip the Eggs
Using a fork, dip each egg into melted chocolate. Let excess drip off, then place back on parchment.
Optional: Drag fork tines across the top for the classic look. -
Set & Enjoy
Let chocolate set at room temperature or refrigerate for 15–20 minutes until firm.
Notes
-
Use room-temperature peanut butter for smoother mixing
-
If dough is sticky, add powdered sugar 1 tablespoon at a time
-
Let frozen eggs sit out 2–3 minutes before dipping to prevent chocolate cracking
-
Sprinkle flaky sea salt on top before the chocolate sets for a gourmet touch
-
A fork works perfectly—no fancy candy tools required
A Quick Nutritional Glance
Let’s be real: this is a celebratory treat, meant to be savored and enjoyed. Each homemade egg (assuming you make about 14 from this batch) packs roughly 210-230 calories, with most coming from fats (the good kind from peanuts!) and carbohydrates. They contain about 5g of protein per serving, thanks to the peanut butter. While not an everyday health food, making them at home means you control the ingredients—no preservatives, no unpronounceable additives, just real, simple stuff. Enjoy them mindfully as part of your holiday fun!
Final Thoughts from My Kitchen to Yours
And there you have it, friends—the path to homemade Easter candy bliss. This recipe proves that the most beloved flavors are often the simplest to create. It’s not about intricate technique; it’s about the joy of making something with your own hands that brings a smile to someone’s face. Whether you’re making these for a crowd, as a gift, or just as a special treat for yourself (no judgment here!), I hope this recipe finds a spot in your tradition. So from my counter to yours, happy mixing, happy dipping, and most importantly, happy eating. Don’t forget to tag @Feastical if you share your creations—I love seeing your kitchen wins!
Until next time, keep it simple, soulful, and satisfying.
– Beau