Adorable Bunny Oreo Balls: Your New Go-To Easter Treat That’s Almost Too Cute to Eat
Hey there, friend! Beau here, from Feastical. Can we talk about the best part of holiday cooking? For me, it’s never the fussy, five-hour marathons. It’s the recipes that spark pure joy—the ones that make your kids gasp, your guests grin, and leave your kitchen feeling more like a playground than a lab. That’s exactly the magic we’re whipping up today with these Adorable Bunny Oreo Balls.
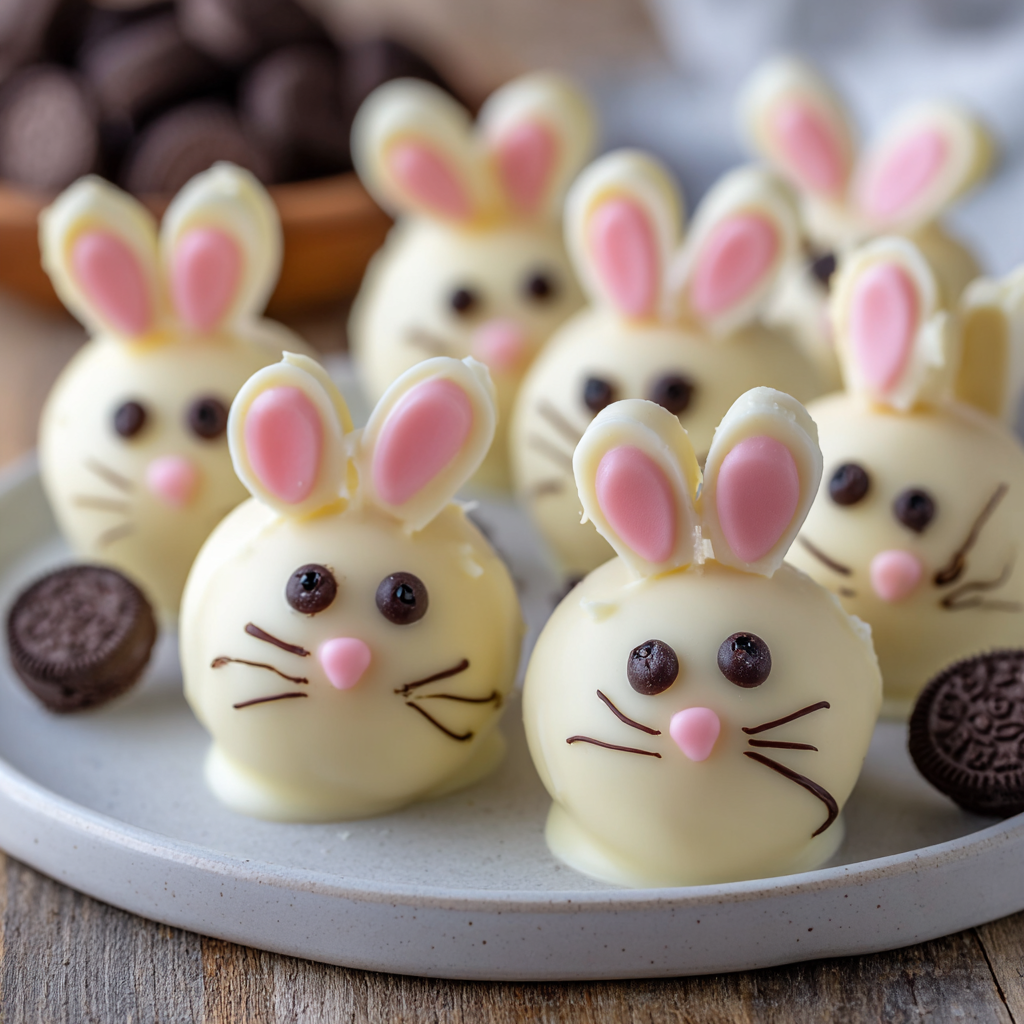
Imagine this: rich, chocolatey Oreo truffles, coated in smooth white chocolate, and transformed with just a few clever details into the sweetest little bunny faces. They’re creamy, they’re decadent, and they sit on your Easter dessert table looking like they hopped straight out of a storybook. The best part? Zero baking required. We’re talking about a treat that comes together in under an hour, with ingredients you can grab on a quick grocery run.
Whether you’re hosting a big Easter brunch, need a show-stopping treat for the school bake sale, or just want to create a fun kitchen memory with your favorite little helpers, this recipe is your ticket. It’s forgiving, endlessly customizable, and proof that the most memorable food often comes from the simplest methods. So, tie on your apron, clear a little counter space, and let’s make some edible magic that’s equal parts delicious and delightful.
The Year the Easter Bunny Needed a Helper (Spoiler: It Was Me)
This recipe takes me back to my niece Lily’s fourth Easter. I, the “cool uncle who cooks,” had boldly promised to handle the dessert table. My sister’s words, “Just keep it simple, Beau,” echoed in my head as I surveyed a kitchen littered with failed pie crusts and a cupcake disaster that looked more like abstract art. It was 9 PM the night before, and I was in full-blown “kitchen panic.”
Then I remembered the Oreo truffles my mom used to make. I had Oreos, cream cheese, and some leftover white chocolate from a previous project. In a last-ditch effort, I whipped up a batch of balls. But plain balls wouldn’t cut it for Easter. With a squeeze of pink icing and a couple of chocolate chips, a few funny faces appeared. They were lopsided, a little derpy, but unmistakably bunny-like. The next day, Lily didn’t go for the fancy ham first. She beelined for the “bunny bites,” her eyes wide. “Uncle Beau,” she whispered, “The real Easter Bunny must have helped you.” That’s when I knew. Perfection is overrated; joy is the real goal. These bunnies have been a happy, messy, beloved tradition ever since.
Gathering Your Bunny-Making Squad: Ingredients & Insights
Here’s the beautiful part: the ingredient list is short and sweet. Quality matters, but so does knowing you can swap things around. Let’s break it down.
- 36 Oreo Cookies: The classic, original flavor is our gold standard here. That perfect cookie-to-cream filling ratio gives us the ideal texture and flavor. Chef’s Insight: Don’t bother scraping out the cream—it all gets blended in! For a fun twist, try mint Oreos for a “grass-eating” bunny vibe.
- 8 oz (one block) Cream Cheese, softened: This is our glue and our magic maker, transforming crumbly cookies into a pliable, rollable dough. Pro Tip: Take it out of the fridge at least an hour before. Room-temp cream cheese mixes seamlessly, preventing lumpy bunnies.
- 2 cups White Chocolate Chips or Candy Melts: This is the bunny’s fluffy white coat! Key Choice: High-quality baking chocolate tastes amazing but can be temperamental. Candy melts (like Wilton brand) are formulated to melt smoothly, set firmly, and are more forgiving for beginners. I often use a mix of both!
- Pink Candy Melts or Pink Food Coloring + White Chocolate: For those iconic inner ears and cute little noses. A small bag of pink candy melts is easiest. If you’re in a pinch, a drop of oil-based pink food coloring mixed into melted white chocolate works.
- Mini Chocolate Chips OR Edible Candy Eyes: The eyes are the soul of the bunny! Mini chocolate chips give a sweet, classic look. Pre-made edible candy eyes (found at craft or baking stores) are foolproof and super cute.
- Black Decorating Gel OR Melted Dark Chocolate: For the whiskers and mouth. A tube of black decorating gel is no-mess and sets nicely. A tiny bit of melted dark chocolate in a zip-top bag with the corner snipped off gives you more control.
Let’s Build Some Bunnies: Your Step-by-Step Roadmap to Cuteness
Ready? Let’s do this. We’ll move in three easy acts: making the base, creating the shape, and bringing our bunnies to life with decorations.
Act 1: Creating the Oreo “Dough”
Step 1: The Great Cookie Crush. Toss your Oreos (yes, the whole cookie, cream filling and all) into a food processor. Pulse until you have fine, uniform dark crumbs. No food processor? No sweat! Place cookies in a heavy-duty zip-top bag, seal it tightly, and unleash your inner superhero (or a rolling pin) until you’ve got crumbs. Chef’s Hack: A few larger chunks are okay—they add a nice texture—but aim for mostly fine for smooth rolling.
Step 2: The Creamy Merge. In a large mixing bowl, combine your fine Oreo crumbs with the softened block of cream cheese. Use a hand mixer (or serious elbow grease with a spatula) to mix until it’s completely combined and looks like a unified, dark, fudgy dough. You shouldn’t see any streaks of white. This is the moment it all comes together!
Act 2: Shaping & Chilling – The Foundation of a Good Bunny
Step 3: Roll Call. Scoop out about 1 tablespoon of the mixture. Roll it firmly between your palms to form a smooth, 1-inch ball. Place it on a baking sheet lined with parchment or wax paper. Repeat with all the mixture. Pro Tip: If the dough is super sticky, lightly dampen your hands with water. This prevents sticking and gives you a smoother finish.
Step 4: The Big Chill. This step is NON-NEGOTIABLE. Pop the tray of uncoated balls into the freezer for 15-20 minutes, or the fridge for 30-45 minutes. They need to be very firm. A firm ball won’t fall apart when we dip it, making the whole process ten times easier. Trust me on this.
Act 3: The Chocolate Coat & Personality Transplant
Step 5: Mastering the Melt & Dip. Melt your white chocolate or candy melts according to package directions. I prefer the double-boiler method (a heatproof bowl set over a pot of simmering water, not touching the water) for gentle, even heat. If using a microwave, do it in 30-second bursts, stirring vigorously in between. Key Hack: For a thinner, smoother coating that’s easier to work with, add a teaspoon of coconut oil or vegetable shortening to the melting chocolate.
Step 6: The Dip. Using a fork or dipping tools, submerge one chilled ball at a time. Tap the fork gently on the side of the bowl to let the excess chocolate drip off. Carefully slide the coated ball back onto your parchment-lined tray. Don’t worry about perfection—a little “puddle” at the base is just the bunny sitting down!
Step 7: Bring on the Cute. WORK QUICKLY before the chocolate sets! Immediately after dipping:
- Press on two mini chocolate chips (pointy side down) or candy eyes for eyes.
- Using melted pink candy (in a small bag with the corner snipped), draw a small “V” for a nose and two longer, curved shapes on top for the inner ears.
- Once the pink sets a bit (a minute or two), use your black gel or melted chocolate to add three little dots on each side for whiskers and a tiny smiling mouth.
Step 8: The Final Set. Allow the bunnies to set completely at room temperature (if your kitchen is cool) or in the fridge for about 15 minutes. Once the chocolate shell is hard, they’re ready to party!
Hopping onto the Table: How to Serve Your Bunny Crew
Presentation is half the fun! These bunnies are social creatures, so don’t leave them lonely on a plate. Create a “Spring Garden” platter by covering a tray or cake stand with green-tinted coconut (pulse coconut shreds with a drop of green food coloring in a bag) or a bed of green Easter grass. Nestle your bunnies in, and maybe add a few jelly bean “eggs” or flower decorations around them.
For individual treats, place each bunny in a pastel-colored mini cupcake liner. They make incredible homemade Easter gifts. Pack a few into a clear cellophane bag tied with a ribbon, or arrange them in a pretty box for teachers, neighbors, or friends. They’re also the star of any dessert table—pair them with some lemon bars, fresh fruit, and a pitcher of iced tea for the perfect spring spread.
Mix It Up! 5 Fun Twists on the Classic Bunny
Once you’ve mastered the basic bunny, the pasture is wide open for creativity! Here are a few of my favorite spins:
- Carrot-Crazy Bunnies: Use Golden Oreos instead of chocolate. Mix in a teaspoon of orange zest to the filling. Coat in orange-tinted white chocolate. Decorate with green piping gel or a sliver of a green fruit roll-up for the carrot top!
- “Some-Bunny” Special Dietary Needs: Use gluten-free Oreos and dairy-free cream cheese. Opt for dairy-free white chocolate chips. Voilà—allergy-friendly bunnies that everyone can enjoy.
- Mocha Bunnies: Add 1-2 teaspoons of instant espresso powder to the Oreo-cream cheese mixture for a sophisticated coffee-chocolate kick. Perfect for the adults’ table.
- Party Animal Bunnies: Before dipping, roll the Oreo balls in colorful sprinkles for a fun-fur effect, or use different colored candy melts to make a whole rainbow bunny family.
- Peanut Butter Bunny Holes: Substitute 1/4 cup of the cream cheese with creamy peanut butter in the filling. Use milk chocolate for coating. A nutty, delicious twist.
Beau’s Kitchen Confidential: Lessons from the Bunny Frontlines
Over the years, I’ve learned a thing or two. First, embrace the imperfections. Some bunnies will be cross-eyed. Some ears will be lopsided. That’s where the charm is! Kids especially love the ones with “personality.” Second, this recipe is a fantastic kitchen therapy session. Get the family involved: let someone crush cookies, someone else roll balls, and the artists in the group handle the decorating. It’s about the messy, fun, laughing process as much as the delicious result. Finally, these guys are best enjoyed within 3-4 days, stored in a sealed container in the fridge. The flavor actually gets better on day two! Just let them come to room temp for about 10 minutes before serving for the softest, most decadent bite.
Your Bunny Questions, Answered
Q: My mixture is too sticky to roll! Help!
A: This usually means the cream cheese was too warm or you need to chill the mixture. Pop the whole bowl in the fridge for 20 minutes. Also, lightly wetting your hands with cold water before rolling each ball is a game-changer.
Q: My chocolate coating is thick and clumpy. What did I do wrong?
A: Chocolate can “seize” if even a tiny drop of water gets in, or if it’s overheated. If it’s just thick, stir in a bit of coconut oil or shortening to thin it. If it’s truly seized (grainy), sadly it’s best to start fresh. Always melt gently and keep everything completely dry!
Q: Can I make these ahead of time?
A: Absolutely! You can make the uncoated Oreo balls and freeze them for up to a month in an airtight container. Thaw in the fridge before dipping and decorating. Fully decorated bunnies keep beautifully in the fridge for 3-4 days.
Q: I don’t have a piping bag for the details. Any hacks?
A: My favorite hack! Spoon melted candy or chocolate into a small zip-top bag. Seal it, then snip the TINIEST corner off. Instant, disposable piping bag. For whiskers, a toothpick dipped in black gel works great too.

Adorable Bunny Oreo Balls : Easy No-Bake Easter Treat
Description
If you’re looking for a fun, no-bake dessert that brings instant smiles, these Bunny Oreo Balls are perfect. They’re creamy, chocolatey, and easy to decorate into cute bunny faces using simple candies. This is a great recipe to make with family or friends, and it doesn’t require any oven time — just mix, roll, dip, and decorate.
Ingredients
Base
-
36 Oreo cookies (regular flavor)
-
8 oz (225 g) cream cheese, softened
Coating & Decorations
-
2 cups white chocolate chips or white candy melts
-
½ cup pink candy melts (or white chocolate tinted pink with oil-based food coloring)
-
Mini chocolate chips or candy eyes
-
Black decorating gel or melted dark chocolate (for whiskers and mouth)
-
Optional: sprinkles, coconut flakes, or colored sugar
Instructions
1️⃣ Make the Oreo Mixture
-
Place the Oreo cookies (with filling) in a food processor.
-
Pulse until they become fine crumbs.
No processor? Put them in a sealed bag and crush with a rolling pin. -
Add softened cream cheese.
-
Mix until fully combined into a smooth, dough-like mixture.
2️⃣ Shape
-
Scoop about 1 tablespoon of mixture and roll into balls.
-
Place on a parchment-lined tray.
-
Chill in the freezer for 15–20 minutes (or fridge 30–40 minutes) until firm.
3️⃣ Melt the Coating
-
Melt white chocolate or candy melts slowly (microwave in short bursts, stirring each time).
-
If thick, stir in 1 teaspoon of coconut oil or vegetable shortening to thin it.
4️⃣ Dip
-
Dip each chilled ball into melted chocolate using a fork.
-
Let excess drip off.
-
Place back on parchment paper.
5️⃣ Decorate the Bunnies
-
While coating is still soft:
-
Add candy eyes or mini chocolate chips.
-
Pipe a small pink nose and inner ears with pink candy melts.
-
Draw whiskers and a mouth with black gel or melted chocolate.
6️⃣ Set
-
Let set at room temperature or refrigerate 15 minutes until firm.
Notes
-
✅ Chill well before dipping — this prevents cracking and falling apart.
-
✅ Keep hands slightly damp when rolling to prevent sticking.
-
✅ Candy melts are easier than real chocolate if you’re a beginner.
-
✅ Use a zip-top bag with a tiny corner cut off as a quick piping bag.
-
✅ Store in the fridge in an airtight container up to 4 days.
Nutritional Snapshot (Because We’re All Curious!)
Let’s be real: these are a celebratory treat, meant to be enjoyed mindfully and with delight! The following is an estimated nutritional breakdown per bunny ball (based on a yield of 24, using standard ingredients). If you’re managing specific dietary needs, always double-check your specific product labels.
- Calories: ~160
- Total Fat: 9g
- Saturated Fat: 5g
- Carbohydrates: 18g
- Sugar: 14g
- Protein: 2g
To lighten things up slightly, you can use reduced-fat cream cheese and/or dip only half the ball in chocolate (creating a “bunny butt” look, which is also adorable!). Remember, sharing these with friends and family spreads the joy—and the calories!
The Final Scoop (Or Should I Say, Hop?)
And there you have it—your complete guide to creating pure, unadulterated Easter joy, one bunny face at a time. This recipe is more than just a list of steps; it’s an invitation to play in the kitchen, to not take yourself too seriously, and to create something that sparks a smile.