
Easter Rocky Road Cheesecake Bars – Your New No-Bake Tradition
Hey friends, Beau here from Feastical! Pull up a stool and let’s talk about the best part of any spring gathering: the dessert table. Now, I love a project, but when the sun is shining and you’d rather be hunting for eggs (or hiding from your relatives), the last thing you need is a fussy, oven-bound recipe. That’s where these Easter Rocky Road Cheesecake Bars swoop in to save the day.
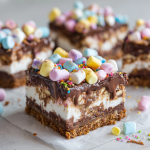
Imagine this: a buttery chocolate biscuit base, a cloud of vanilla-specked no-bake cheesecake, and a glorious, chunky rocky road topping dripping with melted chocolate, pastel marshmallows, and crunchy nuts. It’s a texture dreamland—creamy, crunchy, chewy, and chocolatey all in one bite. These bars are the edible equivalent of your favorite cozy sweater: familiar, comforting, and always a good idea. They scream celebration without you having to scream in the kitchen. Whether you’re hosting a big Easter brunch, need a show-stopping contribution, or just want to treat yourself to something special, this no-bake wonder is your ticket to dessert glory. So, let’s ditch the complicated baking and make something magically simple together.
Why This Recipe Feels Like Spring
This recipe takes me right back to my grandma’s linoleum-floored kitchen. Easter was always chaos—cousins everywhere, the smell of ham in the air, and a giant, slightly lopsided bunny cake as the centerpiece. But my favorite memory? The “kiddie table” dessert spread. It was an unspoken rule: the fancier the adult desserts, the more fun ours had to be. Think bowls of chocolate eggs, rainbow sprinkles, and those irresistible pastel marshmallows.
My aunt would always bring her famous rocky road fudge, a concoction so rich and chunky we’d be bouncing off the walls. This cheesecake bar is my grown-up (but not too grown-up) homage to that feeling. It captures that same playful, nostalgic joy but in a sleek, sliceable form. It’s the perfect bridge between the elegance of a cheesecake and the pure, unadulterated fun of a candy-packed treat. Every time I make it, I get a little hit of that childhood excitement. Food memories are the best kind, aren’t they?
Gathering Your Rocky Road Cheesecake Crew
Here’s the beautiful part: no fancy ingredients required. This is all about pantry heroes and a few festive touches. Let’s break it down:
For the Chocolate Biscuit Base:
- 250 g Chocolate Digestive Biscuits: The classic UK choice for a reason—they have a perfect hint of wheaty sweetness that pairs with chocolate like a dream. Chef’s Insight: No digestives? Graham crackers or Oreos (sans filling) work brilliantly. Just crush them until they resemble fine sand.
- 120 g Unsalted Butter, melted: This is the glue. Using unsalted lets you control the salt level. Substitution Tip: For a dairy-free base, coconut oil works in a pinch, though the flavor will be subtly different.
For the Luxurious No-Bake Cheesecake Layer:
- 300 g Full-Fat Cream Cheese, softened: Full-fat is non-negotiable here, friends. It sets firmer and delivers that iconic rich, tangy flavor. Leave it on the counter for a good hour before you start.
- 200 ml Heavy Whipping Cream: This is what gives the layer its light, mousse-like texture. Make sure it’s cold for the best whip.
- 100 g Powdered Sugar: Also called icing sugar. It dissolves instantly, preventing any graininess. Sift it if it’s lumpy!
- 1 tsp Pure Vanilla Extract: The soul of the cheesecake. The real stuff makes a world of difference.
For the Festive Rocky Road Topping:
- 200 g Milk or Dark Chocolate, melted: Your choice! Milk chocolate is sweeter and more kid-friendly, while dark (around 70%) adds a sophisticated depth. Chef’s Hack: Melt it slowly in a bowl over simmering water or in short bursts in the microwave for the smoothest result.
- 150 g Mini Marshmallows: Go for pastel colors to make it Easter-perfect! The mini size distributes the gooeyness perfectly.
- 80 g Chopped Nuts (Almonds or Peanuts): For that essential crunch. Toast them lightly first for an incredible flavor boost.
- 50 g Mini Chocolate Eggs or Candy Pieces: The festive confetti! This is where you can get creative with seasonal sprinkles, chopped-up creme eggs, or even little bunny-shaped chocolates.
Let’s Build Some Dessert Magic: Step-by-Step
Ready? Throw on some tunes, clear some counter space, and let’s get to it. This is the fun part.
- Crush & Conquer the Base: Pop your biscuits into a sturdy zip-top bag. Now, channel any lingering stress and go at them with a rolling pin until you have fine crumbs. No bag? A food processor works in seconds. Pour the crumbs into a bowl, drizzle in the melted butter, and mix until it looks like wet sand. Tip it into your lined 8×8 or 9×9 inch pan and press it down firmly and evenly with the bottom of a glass or a measuring cup. This compact layer is your foundation—make it strong! Slide it into the fridge to set up while you make the filling.
- Whip Up the Cheesecake Cloud: In a large bowl, beat the softened cream cheese with an electric mixer until it’s completely smooth and lump-free. Scrape down the sides! Add the powdered sugar and vanilla and beat again until silky. Now, in a separate, clean bowl, whip the cold heavy cream to soft peaks. Pro-Tip: Don’t overwhip it here; it should be billowy and just hold its shape. Gently fold the whipped cream into the cream cheese mixture using a spatula. Use big, sweeping folds from the bottom up until no white streaks remain. You’ve just created no-bake cheesecake gold.
- Layer & Smooth: Pull your chilled base from the fridge. Dollop the cheesecake mixture on top and spread it out into one gorgeous, even layer. A small offset spatula is your best friend for this, but the back of a spoon works too. Give the pan a gentle tap on the counter to settle everything and remove air bubbles.
- Create the Rocky Road Topper: In a medium bowl, gently mix your melted (but slightly cooled) chocolate with the mini marshmallows, chopped nuts, and most of your chocolate eggs/candy (save a few for garnish!). The goal is to coat everything in a glossy chocolate cloak. Spoon this irresistible mixture over the cheesecake layer and spread it gently. Don’t press down hard—you want a textured, rocky landscape! Scatter the reserved candies on top for a bakery-worthy finish.
- The Patient Chill: This is the hardest part. Cover the pan and refrigerate for at least 4 hours, but ideally overnight. This patience pays off BIG TIME, allowing all the layers to firm up perfectly so you get those clean, beautiful slices.
- Slice & Serve with Style: When it’s set, use the parchment paper to lift the whole slab out of the pan. Warm a sharp knife under hot water, dry it quickly, and slice into bars or squares. Wipe the knife clean and re-warm between cuts for super clean edges. Admire your masterpiece, then dig in!
How to Serve These Show-Stopping Bars
Presentation is part of the fun! Place these bars on a beautiful platter or a cake stand. For an extra touch of spring, scatter a few extra pastel marshmallows or edible flowers around the base. They’re rich, so small squares are perfect. I love serving them with a pot of strong coffee for the adults or a glass of cold milk for the kids. They’re a complete dessert on their own, but if you’re feeling extra, a tiny dollop of whipped cream or a drizzle of salted caramel sauce never hurt anybody. Remember, the vibe is festive, fun, and utterly shareable.
Make It Your Own: Fun Variations to Try
The beauty of this recipe is its adaptability. Here are a few ways to twist it up:
- Salted Caramel Pretzel Twist: Swap the nuts for crushed salted pretzels and drizzle the top with store-bought or homemade salted caramel sauce after slicing. Sweet, salty, crunchy perfection.
- Cookies & Cream Dream: Use Oreos (whole, filling and all) for the base. In the topping, use white chocolate and add in some extra crushed Oreo pieces along with the marshmallows.
- Fruity Spring Flare: Add 50g of dried cranberries or chopped dried apricots to the rocky road topping for a chewy, tangy contrast to all that chocolate.
- Nut-Free & Fabulous: Simply omit the nuts! Replace them with extra mini eggs, or add in some toasted coconut flakes or rice cereal for that essential crunch.
- Decadent Dark Chocolate Orange: Use dark chocolate for the topping and add the zest of one orange to the cheesecake layer. Garnish with candied orange peel for a sophisticated, grown-up flavor.
Beau’s Kitchen Notes & Stories
I’ve made this recipe more times than I can count, and it’s evolved from a messy, thrown-together trifle into these elegant bars. The biggest lesson? Patience is a ingredient. That long chill is not a suggestion—it’s the law for perfect slices. One time, in a hurry for a picnic, I only chilled it for two hours. Let’s just say we ate delicious, spoonable “rocky road cheesecake *puddle*” out of bowls with graham crackers. Still tasty, but not the showpiece I wanted! Now, I always make it the day before. It’s one less thing to worry about, and the flavor actually improves. Also, a warm knife is the secret weapon for pro-level slices. Trust me on this one.
Your Questions, Answered
- Q: Can I freeze these cheesecake bars?
A: Absolutely! Once set, slice them, then place on a tray and flash-freeze for an hour before transferring to a container with parchment between layers. They’ll keep for up to 2 months. Thaw in the fridge overnight. - Q: My cheesecake layer is too soft. What happened?
A: This usually means it didn’t chill long enough, or the cream was under-whipped. Make sure your cream is very cold before whipping, and give it that full 4+ hour chill. The cream cheese must also be full-fat for proper structure. - Q: Can I use a different pan size?
A: Yes, but it will change the bar thickness. A 9×9 pan will give you thinner, more numerous bars (chill time may be less). An 8×8 gives classic, thicker bars. A springform pan works for a circular “cake” style—just be sure to line it. - Q: The chocolate in my topping seized when I mixed it. Help!
A: Ah, the dreaded seize! Make sure your melted chocolate has cooled slightly (it should be warm, not hot) before adding the other ingredients. Also, ensure your marshmallows and nuts are dry (not damp). If it happens, try stirring in a tiny teaspoon of neutral oil (like vegetable) to smooth it back out.
Easter Rocky Road Cheesecake Bars : No-Bake Chocolate Marshmallow Dessert
Description
If you want a festive dessert without turning on the oven, these Easter Rocky Road Cheesecake Bars are the perfect solution. They combine a chocolate cookie base, a creamy no-bake cheesecake layer, and a chunky rocky road topping loaded with chocolate and marshmallows. They’re colorful, fun, and ideal for spring gatherings, potlucks, or holiday dessert tables — with minimal effort and maximum payoff.
Ingredients
Chocolate Base
-
2½ cups (250 g) chocolate biscuits or graham crackers, crushed
-
½ cup (120 g) unsalted butter, melted
No-Bake Cheesecake Layer
-
10 oz (300 g) full-fat cream cheese, softened
-
¾ cup (100 g) powdered sugar
-
1 cup (200 ml) cold heavy whipping cream
-
1 tsp vanilla extract
Rocky Road Topping
-
7 oz (200 g) milk or dark chocolate, melted and slightly cooled
-
1½ cups (150 g) mini marshmallows
-
½ cup (80 g) chopped almonds or peanuts (optional)
-
⅓ cup (50 g) mini chocolate eggs or Easter candy pieces
Instructions
-
Make the base
Mix crushed biscuits with melted butter until combined. Press firmly into a lined 8×8 inch (20×20 cm) pan. Chill 20 minutes. -
Prepare cheesecake layer
Beat cream cheese until smooth. Add powdered sugar and vanilla and mix well. -
Whip cream
In a separate bowl, whip cold cream to soft peaks. Gently fold into the cream cheese mixture until smooth and fluffy. -
Layer
Spread cheesecake mixture evenly over the chilled base. Return to fridge while you prepare the topping. -
Rocky road topping
Stir marshmallows, nuts, and candy into the melted chocolate until coated. Spoon gently over the cheesecake layer and spread lightly. -
Chill
Refrigerate at least 4 hours (overnight is best) until fully set. -
Slice
Lift out using parchment, cut into bars with a warm knife, and serve.
Notes
-
Use full-fat cream cheese for proper setting.
-
Cool the melted chocolate slightly before mixing in marshmallows to prevent melting them.
-
Press the base very firmly so bars hold together when sliced.
-
Warm your knife under hot water and wipe dry between cuts for clean edges.
-
Make one day ahead — flavor and texture improve overnight.
Nutritional Information*
*Please note: This is an approximate estimate generated from the ingredients used. For precise dietary needs, calculate with your specific brands.
Per Serving (1 bar, based on 12 servings): Calories: ~380 kcal | Protein: 6g | Carbohydrates: 34g | Sugars: 25g | Fat: 25g | Saturated Fat: 14g | Fiber: 2g | Sodium: 180mg
This is a celebratory treat, meant to be enjoyed mindfully and shared. The richness means a little goes a long way in satisfaction!
Final Thoughts from My Kitchen to Yours
And there you have it—my ultimate feel-good, no-fuss Easter dessert. These Rocky Road Cheesecake Bars are more than just a recipe; they’re a reminder that the best food brings joy, connects us to memories, and doesn’t have to be complicated to be incredible. I hope this becomes a bright spot in your spring celebrations, a recipe you come back to when you need something guaranteed to make people smile.
If you make them (and I really hope you do!), tag me over on @Feastical or leave a comment on the blog. I love seeing your creations and hearing your kitchen stories. Now, go forth, crush those biscuits, and make something deliciously spectacular. Happy Easter, and happy cooking!
With love and a full spoon,
Beau