Dubai Chocolate Balls: Your Passport to a Luxurious, Crunchy, Chocolatey Bite
Hey friends, Beau here! Welcome back to the Feastical kitchen. Today, we’re packing our culinary bags and taking a flavor trip somewhere truly magical. Close your eyes and imagine: the glittering skyline of Dubai, the scent of exotic spices in the air, and the dazzling window displays of gourmet sweet shops filled with treasures you just have to try. Among those treasures? The kind of dessert that makes you stop in your tracks: impossibly elegant chocolate balls, crackling with golden pastry, whispering secrets of rich pistachios, and cloaked in a robe of glossy dark chocolate.
I’m telling you, these aren’t your average truffles. They’re a textural symphony. A celebration of crunch and creaminess that feels as luxurious as a gold-leaf latte but is, believe it or not, totally achievable in your home kitchen. I know the thought of “kataifi pastry” or “tempering chocolate” might sound like chef-level challenges, but stick with me. We’re going to break it all down into simple, fun, and absolutely foolproof steps. No fancy diploma required—just a love for incredible food and a willingness to get a little chocolate on your fingers (the best part, honestly). So, are you ready to impress your friends, treat your family, or just have a secret stash of something spectacular? Let’s turn your kitchen into a corner of a Dubai sweet shop and make some magic happen.
The Sweet Bite That Started It All
My love affair with these bites began not in a fancy restaurant, but in a bustling, fragrant market alley. I was visiting a friend who’d moved to Dubai, and she dragged me, jet-lagged and wide-eyed, to a tiny, unassuming shop that was famous with locals. The air was thick with the smell of butter, honey, and roasting nuts. Behind the counter, a man moved with calm precision, his hands a blur as he shaped these gorgeous orbs. He offered me one with a smile that said, “You’re about to experience something.”
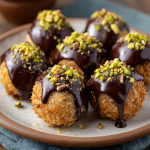
I took a bite, and friends, it was a revelation. The initial snap of the dark chocolate gave way to this incredible, crispy, almost hay-like interior that immediately melted into the most luscious, nutty, not-too-sweet heart. It was complex yet comforting, foreign yet instantly familiar. I bought a whole box, and we ate them slowly with tiny cups of strong Arabic coffee, watching the world go by. That moment—the connection, the surprise, the pure joy of a perfect bite—is what I want to bring to your table today. It’s more than a recipe; it’s a little edible souvenir.
Gathering Your Luxurious Line-Up
Here’s everything you need to build these flavor towers. Don’t let the specialty items scare you—I’ve got all the swaps and secrets right here.
- 7 oz (200 g) Kataifi Pastry: This is the star of our crunch! Kataifi (also called shredded phyllo) looks like a nest of angel-hair pasta. Find it in the freezer section of Middle Eastern or international markets. Chef’s Insight: Keep it frozen until the moment you’re ready to use it to prevent drying out.
- ⅓ cup (75 g) Unsalted Butter, melted: Our golden glue. It’s going to coat every strand of that kataifi and turn it into a crispy, buttery wonderland as it bakes.
- 5.3 oz (150 g) White Chocolate, chopped: The base of our filling. It adds sweetness and a smooth structure. Use a good quality baking bar for best results. Easy Sub: Vanilla candy melts will work in a pinch!
- 5.3 oz (150 g) Natural Pistachio Butter: The soul of the dish. That iconic, vibrant green flavor. Look for it near other nut butters. Can’t find it? Blend 150g of shelled, roasted, unsalted pistachios in a food processor with 1-2 tbsp of a neutral oil until super smooth.
- 1 pinch Sea Salt: Our flavor enhancer. It’s going to make the chocolate taste more chocolatey and the pistachios pop. Trust me on this.
- 1½ tsp Neutral Vegetable Oil (optional): A little insurance policy. If your pistachio butter is very thick, this helps create a rollable, creamy filling.
- 14.1 oz (400 g) Dark Chocolate (55–65% cocoa), chopped: For the luxurious outer shell. We’ll use a simple “cheat’s tempering” method for that perfect snap and shine. Using a chocolate bar you love eating is key here.
- 3 tbsp Chopped Pistachios, for garnish: The finishing touch! They add a beautiful pop of color, texture, and tell the world exactly what’s inside.
Let’s Build Some Magic: Step-by-Step
Follow these steps, read my little hacks in between, and you’ll have a tray of beauties before you know it.
- Bake the Kataifi to Golden Perfection: Preheat that oven to 350°F (175°C). Grab your frozen kataifi and gently pull it apart into loose strands—no need to be perfect! Toss it all in that glorious melted butter until every strand is lightly coated. Spread it thinly on a baking sheet. Now, bake for 12-15 minutes. You’re looking for a beautiful, even golden brown color. Pro Tip: Give it a stir halfway through for even browning. Let it cool completely on the sheet. This crunch is our foundation!
- Whip Up the Dreamy Pistachio Filling: While the kataifi cools, let’s make the heart of our ball. Chop your white chocolate and melt it gently. I do 30-second bursts in the microwave, stirring well in between, until it’s just smooth. In a medium bowl, combine the melted white chocolate, pistachio butter, and that pinch of salt. Stir, stir, stir until it’s one homogenous, creamy, pale green wonder. Taste it (a cook’s privilege!) and marvel. If it seems very stiff, stir in that optional oil.
- Combine, Crunch, and Roll: Time to bring it together! Take your cooled, baked kataifi and give it a rough chop on the cutting board. You want small, crunchy bits, not powder. Fold this crunchy goodness into the pistachio mixture. It might seem like a lot of crunch, but it’s what makes these special. Now, with lightly oiled hands (this prevents sticking!), scoop out portions about the size of a whole walnut. Roll them into smooth balls and place them on a parchment-lined tray. Pop the whole tray into the fridge for a firm 30-minute chill. This step is non-negotiable—it makes coating them in chocolate a breeze.
- The Glossy Chocolate Coat & Garnish: This is the fun, slightly messy, totally rewarding part! Melt about 2/3 of your chopped dark chocolate. Once melted and smooth, remove from heat and stir in the remaining 1/3 of the chopped chocolate until it’s all melted. This “seeding” method helps give us a stable, snappy coating. Using a fork or dipping tools, dip each chilled ball, let the excess chocolate drip off, and place it back on the parchment. Immediately, while the chocolate is still wet, sprinkle the tops with your chopped pistachios. Work quickly and with confidence!
- The Final Set: Let your gorgeous creations set at room temperature for about 15 minutes, then you can move them to the fridge to fully harden. That’s it! You’ve just created edible luxury.
Serving Your Dubai-Inspired Masterpiece
Presentation is part of the joy! Arrange these chocolate balls on a beautiful platter or in petite paper liners. They are the star of any dessert table. For the full experience, serve them with tiny cups of strong black coffee, fragrant cardamom tea, or even a glass of cold milk. They make an unbelievable gift, too—place them in a elegant gift box lined with tissue paper. I promise, receiving a box of these feels like getting a box of jewels.
Make It Your Own: Delicious Twists
Once you’ve mastered the classic, the world is your oyster (or should I say, your pistachio?).
- Hazelnut Dream: Swap the pistachio butter for roasted hazelnut butter and garnish with crushed, toasted hazelnuts. A Nutella-lover’s paradise.
- Rose & Cardamom: Add ¼ tsp of ground cardamom and ½ tsp of rose water to the pistachio filling. Garnish with a tiny, edible dried rose petal for a stunning, aromatic twist.
- Cashew & White Chocolate: Use smooth cashew butter and coat the balls in melted white chocolate instead of dark. It’s a beautiful, creamy, and elegant variation.
- Dairy-Free Delight: Use vegan white chocolate, coconut oil instead of butter on the kataifi, and ensure your dark chocolate is dairy-free. Easy and inclusive!
- The “Baklava” Ball: Add a tablespoon of honey and a sprinkle of cinnamon to the filling. After coating in chocolate, drizzle with a little more honey. Instant baklava vibes!
Beau’s Kitchen Notes & Stories
This recipe has become my go-to “wow” dish for dinner parties. I once made a double batch for a holiday party and hid them in the back of the fridge… or so I thought. My friend’s teenager, with a radar for chocolate only a teen can possess, found them and proclaimed them “the best thing I’ve ever baked.” High praise! Over time, I’ve learned that the quality of your pistachio butter makes the biggest difference—splurge on the good stuff if you can. And don’t stress if your first few chocolate coats aren’t magazine-perfect. The flavor is 100% there, and a little rustic charm just shows they’re homemade with love.
Your Questions, Answered
Q: My kataifi is browning unevenly. Help!
A: No worries! Just make sure to break up any large clumps before baking and give it a good stir/toss on the baking sheet about halfway through the bake time. An even, thin layer is the goal.
Q: Can I make these ahead of time?
A: Absolutely! They are perfect for making ahead. Store them in an airtight container in the fridge for up to a week, or freeze them for up to 2 months. Let them come to room temperature for about 10 minutes before serving for the best texture.
Q: My filling is too soft to roll. What do I do?
A: This usually means the kataifi wasn’t fully cooled before mixing, or the mixture just needs more firming up. Pop the whole bowl of filling into the fridge for 20 minutes, then try rolling again with oiled hands.
Q: My chocolate coating isn’t shiny or it got streaky.
A: This is likely due to the chocolate getting too warm or not being tempered. The “seeding” method I described is a great cheat. If it streaks, it’s purely cosmetic—the taste is still fantastic!
Dubai Chocolate Balls Recipe : A Luxurious Middle Eastern Treat
Description
These Dubai Chocolate Balls are rich, crunchy, and filled with pistachio flavor inside a crisp chocolate shell. They look impressive but are surprisingly simple to make at home. Perfect for parties, gifts, or when you want a small, fancy treat without complicated baking.
Ingredients
-
7 oz (200 g) kataifi pastry (shredded phyllo), thawed
-
⅓ cup (75 g) unsalted butter, melted
-
5 oz (150 g) white chocolate, chopped
-
5 oz (150 g) pistachio butter (or very finely blended pistachios)
-
Pinch of salt
-
1–2 tsp neutral oil (only if pistachio butter is very thick)
-
14 oz (400 g) dark chocolate (55–65%), chopped
-
3 tbsp chopped pistachios (for garnish)
Instructions
-
Bake the kataifi
-
Preheat oven to 350°F (175°C).
-
Loosen pastry strands and toss with melted butter.
-
Spread on a baking sheet and bake 12–15 minutes until evenly golden, stirring once halfway.
-
Cool completely, then roughly chop.
-
-
Make the filling
-
Melt white chocolate gently (microwave in short bursts, stirring).
-
Stir in pistachio butter and salt until smooth.
-
Add a little oil if mixture is too thick.
-
-
Add crunch
-
Fold chopped baked kataifi into the pistachio mixture.
-
-
Shape
-
Scoop and roll into walnut-size balls with lightly oiled hands.
-
Place on a lined tray and chill 30 minutes.
-
-
Coat in chocolate
-
Melt ⅔ of the dark chocolate.
-
Remove from heat and stir in remaining ⅓ until smooth (helps texture and shine).
-
Dip each chilled ball, let excess drip off, and return to tray.
-
-
Garnish & set
-
Sprinkle chopped pistachios on top while coating is wet.
-
Let set at room temp, then refrigerate to firm.
-
Notes
-
Keep kataifi frozen until ready so it doesn’t dry out.
-
Bake kataifi in a thin layer for even crispness.
-
Cool the crunch fully before mixing — warm pastry makes the filling too soft.
-
Chill balls before dipping so coating is neat and easy.
-
Use chocolate you enjoy eating — flavor really shows here.
A Note on Nutrition (Because We’re All Friends Here)
Let’s be real: this is a celebratory treat, meant to be savored and enjoyed mindfully. Each ball is a rich, satisfying bite. They contain healthy fats from the nuts and dark chocolate, and making them at home means you control the quality of ingredients. While they’re not a health food, they are a perfect example of how a little bit of something truly exquisite can be far more satisfying than a lot of something mediocre. Enjoy them guilt-free as the special occasion treat they are!
Final Thoughts from My Kitchen to Yours
And there you have it, friends—your ticket to creating a little bit of Dubai’s sweet magic right on your countertop. I hope this recipe fills your kitchen with the incredible smells of toasting pastry and melting chocolate, and fills your home with the kind of joy that comes from sharing something made with your own hands. Remember, cooking is an adventure, not a test. So if your balls aren’t perfectly round, or you get more chocolate on you than on them, you’re doing it right. The real goal is to have fun and create something delicious. Now, go grab a fork (or just your fingers), make a pot of coffee, and dig into your own luxurious creation. You’ve earned it. Until next time, keep making it feastical!
Beau 😊